How to sign a java applet
- From the sandbox
- Tutorial
Hello, dear reader.
Today you will learn how to sign a JAVA applet. To begin with, I will say that JAVA applets have limited functionality until they are signed. For example, unsigned applets cannot:
There are several solutions to the problem:
1. Allow clients to execute on each local machine. To do this, you can edit the java.policy file, which is located in the folder with the JRE installed (by default in C: \ Program Files \ Java \ jre6 \ lib \ security). And add the necessary permissions. For example, to allow everything that is possible, you need to insert the line:
And if you need to allow only work with the clipboard for the site hackmeplease.com :
This method will be convenient only if the number of end users of your site is limited and you do not need to edit this file on the scrap on each computer. In addition, the security of this solution is not very high.
2. Sign your Java applet. So, what we have at the entrance:
- installed JDK and JRE;
- the jar file of your applet (there are some features of writing the source code, see below);
- the desire to work with the clipboard. For this, the line should work correctly:
Toolkit toolkit = Toolkit.getDefaultToolkit ();
Clipboard clipboard = toolkit.getSystemClipboard ();
In the case of calling these lines, from the unsigned applet we get the following exception:
java.security.AccessControlException: access denied (java.awt.AWTPermission accessClipboard)
So, let's proceed:
0. Go to the BIN folder of our JDK (for example, C: \ Program Files \ Java \ jdk1.6.0_23 \ bin).
I. Create a local store of our certificate (keystore):
keytool -genkey -keystore .keystore -alias "Terrasoft" -validity 99999
where Terrasoft is the name of the alias of our certificate;
99999 - period in months of certificate validity;
.keystore - file name of the created storage.
In case of successful launch of the team, the system will ask us the password of our store, as well as some information about the certificate (your name, company name, city, country and blood type)
As a result, we will have a .keystore file. This is our repository with which we will sign different applets.
II. Copy our JAR file to the BIN folder of our JDK. We sign it with the following command:
jarsigner.exe -keystore .keystore ClipboardLibrary.jar "Terrasoft"
where Terrasoft is the name of the alias of our certificate;
.keystore - storage file name;
ClipboardLibrary.jar - the name of the JAR file.
The system will ask us for the password - enter the one that you entered in step I.
It seems like it’s ready ... Yes, right now, naive ...
So, when you start the page with our applet on board, the user will receive friendly messages like:
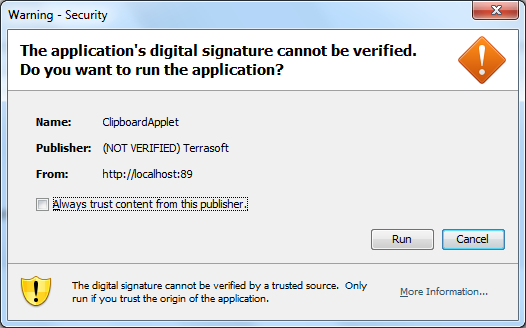
What does it mean, “User, click Yes and say goodbye with our system, for we can do what we want with it. ”
By the way, pay attention to NOT VERIFIED. Means that we do not have a trust certificate. To get a trust, you need to contact special services on the internet and even pay money.
But back to our sheep. When accessing the clipboard, we again get an exception like:
java.security.AccessControlException: access denied (java.awt.AWTPermission accessClipboard)
It's a pity. Well, it didn’t work out now - it will work out another time. Bye.
Just kidding. In fact, at this point all the applet signing guides I have met dwell. Like, a signed applet is not afraid of anything. May they all be ashamed.
In short, the following feint for our call to the clipboard to work:
III. Change the source code.
Instead of calling the view:
need to write a call of the form:
After that, you need to recompile your JAR and repeat step II (for those who read my post from the end - respect).
That’s basically all. Should work. I hope that this will be useful to someone, and he will not spend as much of his life on this nonsense as I have spent. Don't worry, you villains don’t shy your life in wait (C). Until next time on the air.
Today you will learn how to sign a JAVA applet. To begin with, I will say that JAVA applets have limited functionality until they are signed. For example, unsigned applets cannot:
- interact with the local file system of the client;
- establish network connections with other servers;
- interact with the client clipboard;
- some others.
There are several solutions to the problem:
1. Allow clients to execute on each local machine. To do this, you can edit the java.policy file, which is located in the folder with the JRE installed (by default in C: \ Program Files \ Java \ jre6 \ lib \ security). And add the necessary permissions. For example, to allow everything that is possible, you need to insert the line:
grant {
	...
	permission java.security.AllPermission;
}
And if you need to allow only work with the clipboard for the site hackmeplease.com :
grant codeBase "http://hackmeplease.com/*" {
	permission java.awt.AWTPermission "accessClipboard";
};
This method will be convenient only if the number of end users of your site is limited and you do not need to edit this file on the scrap on each computer. In addition, the security of this solution is not very high.
2. Sign your Java applet. So, what we have at the entrance:
- installed JDK and JRE;
- the jar file of your applet (there are some features of writing the source code, see below);
- the desire to work with the clipboard. For this, the line should work correctly:
Toolkit toolkit = Toolkit.getDefaultToolkit ();
Clipboard clipboard = toolkit.getSystemClipboard ();
In the case of calling these lines, from the unsigned applet we get the following exception:
java.security.AccessControlException: access denied (java.awt.AWTPermission accessClipboard)
So, let's proceed:
0. Go to the BIN folder of our JDK (for example, C: \ Program Files \ Java \ jdk1.6.0_23 \ bin).
I. Create a local store of our certificate (keystore):
keytool -genkey -keystore .keystore -alias "Terrasoft" -validity 99999
where Terrasoft is the name of the alias of our certificate;
99999 - period in months of certificate validity;
.keystore - file name of the created storage.
In case of successful launch of the team, the system will ask us the password of our store, as well as some information about the certificate (your name, company name, city, country and blood type)
As a result, we will have a .keystore file. This is our repository with which we will sign different applets.
II. Copy our JAR file to the BIN folder of our JDK. We sign it with the following command:
jarsigner.exe -keystore .keystore ClipboardLibrary.jar "Terrasoft"
where Terrasoft is the name of the alias of our certificate;
.keystore - storage file name;
ClipboardLibrary.jar - the name of the JAR file.
The system will ask us for the password - enter the one that you entered in step I.
It seems like it’s ready ... Yes, right now, naive ...
So, when you start the page with our applet on board, the user will receive friendly messages like:
What does it mean, “User, click Yes and say goodbye with our system, for we can do what we want with it. ”
By the way, pay attention to NOT VERIFIED. Means that we do not have a trust certificate. To get a trust, you need to contact special services on the internet and even pay money.
But back to our sheep. When accessing the clipboard, we again get an exception like:
java.security.AccessControlException: access denied (java.awt.AWTPermission accessClipboard)
It's a pity. Well, it didn’t work out now - it will work out another time. Bye.
Just kidding. In fact, at this point all the applet signing guides I have met dwell. Like, a signed applet is not afraid of anything. May they all be ashamed.
In short, the following feint for our call to the clipboard to work:
III. Change the source code.
Instead of calling the view:
clipboard = toolkit.getSystemClipboard()
need to write a call of the form:
clipboard = (Clipboard) AccessController.doPrivileged(new PrivilegedAction() {
	public Object run() {
		return toolkit.getSystemClipboard();
	}
});
After that, you need to recompile your JAR and repeat step II (for those who read my post from the end - respect).
That’s basically all. Should work. I hope that this will be useful to someone, and he will not spend as much of his life on this nonsense as I have spent. Don't worry, you villains don’t shy your life in wait (C). Until next time on the air.