Corel, Escher, Photoshop ...
- Tutorial
Graphic motion: do-it-yourself tessellations.
Sometimes, when I draw, it seems to me that I am a medium, dominated by beings born of my own imagination. Fish become birds. Day at night. Life is born out of chaos, it freezes in dead cities, transforms into a chess game and crumbles into dust. The mosaic comes to life and turns into lizards, they move, live and again go into the ornament.
Maurits Cornelis Escher
The author of the epigraph is a Dutch graphic artist known for conceptual lithographs, wood and metal engravings, in which he masterfully explores the plastic aspects of the concepts of infinity and symmetry.
Absurdly enough, several hand-drawn lines may look like a three-dimensional figure. Such is the peculiarity of a person’s psychological perception of complex three-dimensional objects. Escher achieved a striking effect by simple means. And if he had at his disposal all the means of modern computer graphics? As he himself said: "If you only knew what visions visit me in the darkness of the night ... Sometimes my inability to make them visible literally drives me crazy."
Having the latest versions of Corel, Paint, or Photoshop, you can go the other way. And other metamorphoses will appear before us ...
CorelDRAW perfectly implements one of Escher's drawing techniques - tessellationknown as tiling a plane. These are collections of figures that cover the entire mathematical plane, combining without overlays and spaces.

A reproduction of Escher's Day and Night.
Asher drafts contain many such variations. He used them in many works: the famous “Metamorphoses”, “Mosaics”, the painting “Day and Night”, the series of paintings “The Limit of the Circle” and others.

The famous “mosaics” of

“Circle Limit with Butterflies” The
correct tessellations consist of figures in the form of the correct ones polygons, when combined, all angles are the same. There are only three polygons suitable for use in tessellations - a square, a regular triangle, and a hexagon.
Now, a novice designer, along with a computer, can become an Escher, however, he will not achieve fame. Although who knows what talents can open up among computer graphics masters ...

Escher himself.
To create tessellations, you only need to know a few simple tricks. We take a regular triangle, a square and, of course, a regular hexagon. Correct - because they themselves are the embodiment of symmetry.

Those very correct figures used in tessellations.
With the help of vector editors you can get amazing mosaics. Let's create an algorithm for creating tessellations based on arbitrary curves. All our new objects can easily be fit into the same regular polygons.
Draw an arbitrary curve in CorelDRAW. We open docker of transformations. We move the center of rotation of the curve to its beginning and rotate with duplication of the object by an angle of 90º. The more accurately the center of rotation of the object is set, the more correctly the mosaic will look.
Therefore, it is more convenient to enable the "Snap to Objects" mode in CorelDRAW .
Again, we move the center of rotation of the original curve to its end point and again rotate it by 90º with duplication. Combine the curves and fit into a square. We transform the curves into an object by performing the “Combine” operation , and sequentially connect the pairs of nodes at the vertices of the “square”. You can use the menu command "Arrange" • "Connect curves"and in the appropriate docker, reduce the clearance tolerance value. The basis of the future mosaic is a closed curve, so you can specify a fill and outline for it.

Algorithm for creating a mosaic element
Again we move the center of rotation to one of the vertices of the object, set the rotation angle to -90º, the number of copies is 3 and with one click on the “Apply” button in the transform docker we get a mosaic of 4 elements.

And so we achieve the rotation of the mosaic elements. We
continue to build the mosaic: we repeat the rotation operation for a group of the first 4 objects. Similarly, duplicate a group of objects with a rotation of -90º relative to the center of rotation at the top of the “square”. There are protruding elements on two sides of the object, and the other two contain similar elements in the form of cutouts.

We continue to create mosaics and get “puzzles” so beloved by children and adults.
Variants of mosaics built on various basic curves.
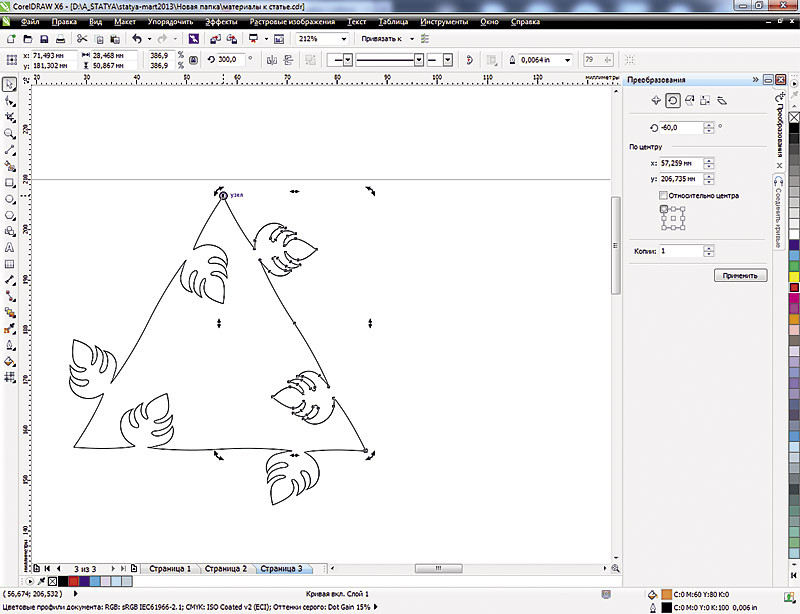
We complicate the task, but not for ourselves, and not even for CorelDRAW, but only for geometry. We make a mosaic based on triangles and hexagons. And we come across one feature. Arbitrary curves cannot be used in a mosaic of many objects. The base curve here must necessarily consist of two symmetrical parts. One section of the curve may contain protruding elements, and the other - cutout elements. Only then fragments of the mosaic will fit together without gaps and overlays. For triangles, the base curve must be duplicated with a rotation of -60º.

Rotation of a symmetrical segment of a curve to obtain a regular triangle

Now we have a block of mosaics from triangles.

Examples of mosaics based on triangles.
Mosaics based on hexagons are similarly constructed, only the rotation angle of each base curve is 120º. All subsequent elements are rotated at the same angle. For an accurate connection of mosaic details, the base curve should contain protrusions and depressions, which are connected in the process of drawing up the pattern.

Hexagon mosaic examples
The mosaic is made up, we revive it. You can use all the effects from CorelDRAW, applicable to vector objects and their groups: shell, distortion, stretching, decoration, bevel, relief, lens ... Various fills and outlines will do. And you can take an arbitrary photo image or a vector image, put it in PowerClip and simulate the effect of a crumbling mosaic.

“Scattered puzzles”
Apply the “Lens” • “Fisheye” effect to the finished mosaic and get an imitation of the volume effect.

“Lens” effect with positive and negative values of the “frequency” parameter
As a basis for tessellations, not only basic curves are suitable, but also groups of objects with various fills and pre-applied effects. And you can supplement the fragment of the mosaic with additional drawings.
Fragments of the mosaic are complemented by decorative elements
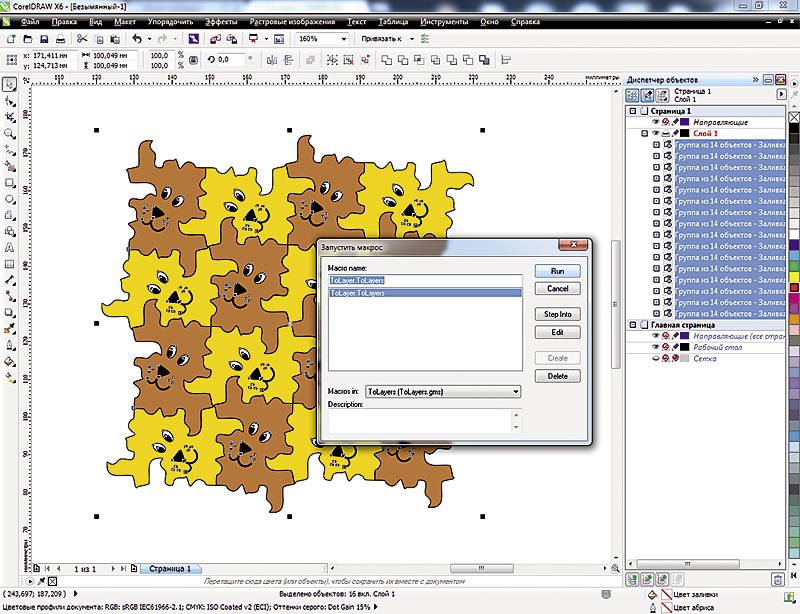
. Now let's open the graphic movement. Turn the mosaic into animation. Mosaic elements created in CorelDRAW were placed on one layer, while programs for creating animations require the arrangement of its elements in separate layers. Of course, you can manually redistribute mosaic pieces into separate layers in CorelDRAW, but this is a long and tedious job. Simplify your life by downloading from the website www.cdrpro.ru special macro ToLayersto redistribute objects across layers. Download it to CoreDRAW using the macro manager. It remains to select all the objects that need to be distributed across the layers, and run the macro.

Run the ToLayers macro and observe the result.
After the macro automatically redistributes objects or groups of objects into layers, you can export the mosaic for further animation. We will export in two modes - to a * .psd file for Adobe Photoshop and to * .cpt for Corel PHOTO-PAINT.
In the settings of the export parameters, check the box “Save layers” to prevent all layers from merging into one, otherwise all our work will be wasted. Change the color model to RGB and reduce the image size.

When exporting, select the format of the tool that is more convenient to work on.
Open the exported file in Photoshop. All mosaic layers are saved, it remains to open the animation panel and select the “Make Frames from Layers” function , set the animation parameters and save the optimized image in * .gif format.

We will assemble an animated banner from pieces of mosaic. You can invert the direction of the animation - then the mosaic will "crumble".
And so you can create an animated banner in Photoshop
Go back to Corel PHOTO-PAINT and open the previously exported mosaic file. All fragments are distributed in layers. You can apply any effect to one of them, for example, from a group of three-dimensional effects or textures, and repeat the effect for all visible objects. The appearance of the mosaic will change.

Mosaic Elements with “Plastic” Effects Mosaic Elements with “Plastic”

Effect Settings
Now we will create an animated banner in Corel PHOTO-PAINT, for which we will open the “Film” • “Create from Document” tab . Consistently combining each fragment of the mosaic with the background and placing them on the corresponding frame of the film, we create an animation.
You can get rid of the routine operations by writing down the sequence of actions for creating an animation as a custom macro in CorelPHOTO-PAINT or by creating a custom Action in Photoshop and using it for subsequent mosaics.
Creating animations by sequentially combining the active layer with the background

Import a layered image in Adobe Flash

Mosaic layers in Adobe Flash
In any editor that works with vector objects, you can quickly transform objects. The tessellation algorithm is easy to use in Adobe Illustrator and Adobe Flash Professional. For beginning Flash users, it is enough to import a multi-layer mosaic in the * .psd format and place it in Adobe Flash, distributing the elements by key frames or by layers.
Modern graphic editors make it easy and simple to create animated banners, flash toys, advertising clips that deeply penetrate the minds of buyers.
The great artist recalled how a lady called him one day and said:
“Mr. Asher, I admire your work. In your work, Reptiles, I see reincarnation. ” And he replied:
"Madame, if you see this, then this is so."
Now the works of computer graphics, like the paintings of great artists and films of great directors, will be filled with life, movement, meaning. The main thing is to do everything with the soul, then each designer can become an animated Fellini.
About the authors: Elena Svistunova (elensvs@yandex.ru), teacher of computer graphics; Alexander Svistunov (alexsvs@yandex.ru; http: //alexrash.livejournal.com/), writer, director of the Internet company InterNext.
Based on COREL Magazine