Integration of LMS Moodle and Microsoft Active Directory. Part 1
- From the sandbox
- Tutorial
Well, this is my first post in the Habr community. In the future, this article should become one of the articles in the series of stories about building the information infrastructure of an educational institution based on Moodle , BigBlueButton , Microsoft Active Directory and Kaspersky Security Center .
For those who don’t know, Moodle is a distance learning system , such as CMS with a focus on education, a lot has already been written about it on the hub . In this article I will tell you how to fully associate it with the user database created in Microsoft Active Directory.
Well, we will assume that the following has already been done:
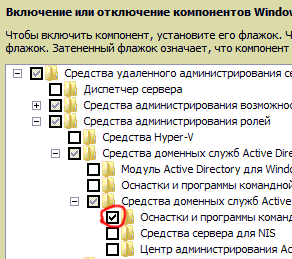
First, on any machine included in the domain, you need to run the Active Directory Users and Computers MMC snap-in. Of course, you can go to the server via RDP and run it there, as many administrators like. But if you plan to simplify your work in the future by transferring responsibilities for maintaining the user base to others, I recommend that you learn how to install this equipment on client machines now. This is done differently in different versions of Windows. To get started, download: for XP , for 7 SP1 and for 8 . In XP, the snap-in will appear immediately under Control Panel> Administrative Tools . In 7 and 8, after installing the downloaded update, you will need to go to Control Panel> Programs> Turn Windows components on or off. There, select Remote Server Administration Tools> Role Administration Tools> Active Directory Domain Services Tools and ...> Active Directory Domain Services Tools> Snap-in Tools and Command-Line Tools ... and note the latter for installation.

Using the mentioned snap-in, we will create a separate unit for users. In it we will store the accounts of all users, setting up the structure in a way convenient for us. Trite, but I will call this unit "Users".

In order for the Moodle system to be able to request information about users from Active Directory, we will create a special user for communication. Let it be called moodle_liceum_ru. We will create it not in the “Users” container that we created, but in the initially existing “Users” container so that there is no confusion between the accounts of real users and the service account created for communication between systems.
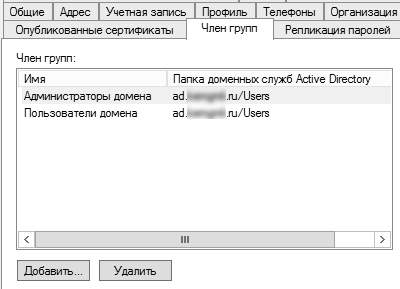
We will add the created account to the Domain Admins group.
Of course, adding a service account to the group of administrators is not a good idea, because having stolen the Moodle administrator password or gaining access to the Moodle database, you can also get access to the domain, because in Moodle the user password for communication is stored in clear text. In fact, it is enough to give this account only the right to edit users in the "Users" subdivision. How to do this, I will describe later. But as they say, there is one caveat. In this case, it will not be possible to change the password from Moodle for the user if he is a member of the Domain Admin group. Regardless of the editing rights to the unit in which the user is located, only another domain administrator can change the password to the domain administrator. Such is the mysterious soul of Windows.
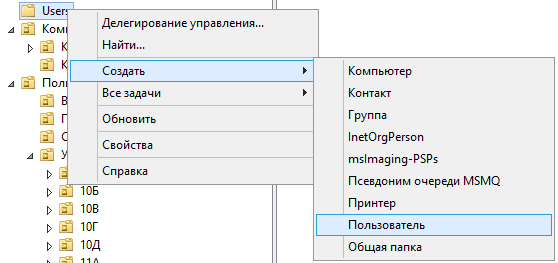
Now create a real user in Active Directory.

Middle name, if you want it to be displayed, it is better to immediately enter in the same field as the name. The fact is that neither Active Directory nor Moodle by default provide middle name fields in the interface. Immediately it is worth changing the order of the name and surname in the "Full name" field. This will allow you to see users in the list sorted in the usual way by name.
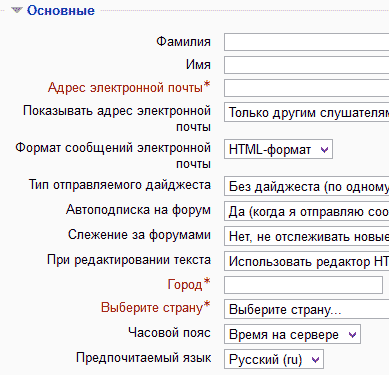
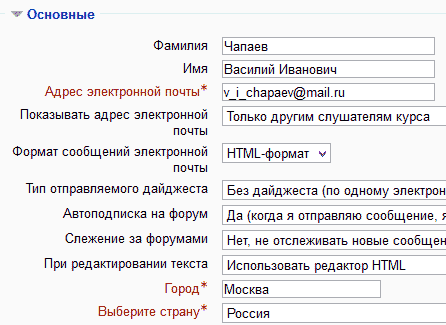
After creating the user and setting his password, we call the properties. Fill in the fields with e-mail, country and city. What is it for? The fact is that the meticulous Moodle system believes that the fields email, country and city are required to be filled by all users without exception. And, if they cannot be obtained from Active Directory, the user will not be able to continue working until he enters this data. Well, it’s clear with the city and the country, but what if the user does not have e-mail, or the administrator does not know it? In this case, you can come up with a fictitious email. If desired, the user will be able to change it, while a confirmation letter will be sent to a new address, which means that the user does not have access to the mail we invented will not be a limitation.
Go to Moodle in Administration> Plugins> Authentication> Authentication Settings , enable the "LDAP Server" plugin.

Why LDAP? Well, LDAP is such a protocol for working with a hierarchical database. So, you can and should connect to Active Directory using this protocol.
Well, let's start setting up the authentication plugin. We will indicate the name of our server in the “Server URL” field by adding the ldap: // prefix to it. Remember, the web server must be able to correctly resolve the LDAP server name to IP address. To do this, you can specify the domain controller as the DNS server, you can configure DNS more cleverly, you can simply enter the correct IP in the hosts file on the machine with the web server. Well, you can, of course, specify IP instead of a name in the Moodle settings. By the way, who does not know, you can check what name is resolved using the ping and nslookup commands.

Of course, if you are thinking about the future, you have a backup domain controller. In this case, it is also worth mentioning here. Other parameters in this section should be left by default.
Now you need to specify the data to connect to the server. However, this is not just a username and password, instead of a login some kind of Distinguished Name is required, it is also a DistinguishedName or a constant DN. What is it? The fact is that in a hierarchical database, as in a file system, there can be many objects with the same name. So, what is called a file name in the file system is commonly called common name or CN in LDAP, and what is called the full file name, that is, the file name plus its path, is called distinguished name or DN. Well, now a small digression on how to find out this very DN.
Let's return to the Active Directory Users and Computers snap-in. In the View menu, enable the Additional components option .

Now, when we call the properties of different objects, the attribute editor will be among the tabs.
In the attribute editor, you can see all the properties of an object. The distinguishedName we need will also be there.

By the way, it's time to look at the names of the fields that store all sorts of user data. By comparing what we entered in the user’s card and what we see in the attribute editor, we’ll make a tablet.
Observers will notice that the country is stored twice - the full name in the co attribute and the code in the c attribute . For Moodle, you need exactly the two-letter code.
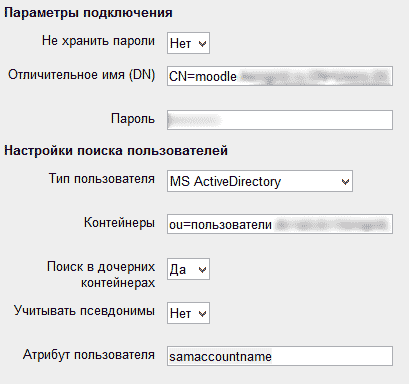
In Moodle, enter the distinguished username and password displayed in Active Directory. In my example, the distinguished name would be CN = moodle_liceum_ru, CN = Users, DC = ad, DC = liceum, DC = ru . In the "User Type" field, specify "MS ActiveDirectory."
By default, Moodle stores password hashes in its database. It stores well - in recent versions the bcrypt algorithm is used, so such passwords cannot be decrypted by searching the md5 database. True, this is of little use, because if the connection with Active Directory suddenly disappears, users will not be able to log into the system, despite the password information available in it. The only way to use the saved password is if the administrator manually switches the authentication type for the user account to Manual registration. But you can turn it off by activating the Do not store passwords mode .
In the Containers field, specify the distinguished name of the department in which users are stored. It can be recognized in the manner described above. In our case, it will be OU = Users, DC = ad, DC = liceum, DC = ru . Since the users are stored in our subsidiaries, we enable the Search in child containers option .
In the User attribute field , specify sAMAccountName. You can, of course, experiment with this option. If you specify mail here, then when entering the system you will need to specify the email address as the login; if you specify telephoneNumber, then the phone number. However, with all the alternatives, we will then be unable to configure automatic login with an account from the domain.
Other parameters will be left by default.
Well, it's time to try logging in to Moodle with an account from Active Directory.
If everything was done correctly before, then you will be able to enter Moodle. However, the system will offer us to fill out an empty form - there will be no user data in Moodle.
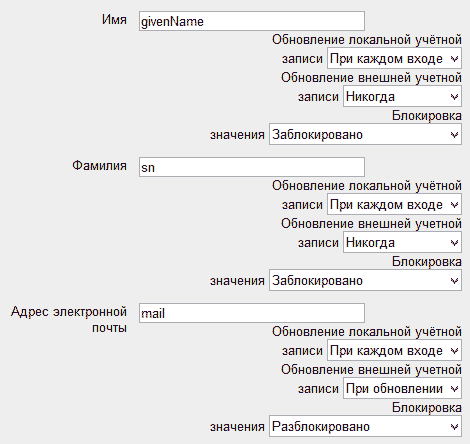
The reason is simple - we have not yet told Moodle where exactly the data should be taken from. The “Data Mapping” parameter group is responsible for this. Fill in the fields using the previously obtained plate.
Well, try to log in again. This time, if everything is done correctly, no requests will be made to fill in the missing fields. The user data will be indicated in the upper right corner.

If you invoke the user profile, you can verify that the data matches the information from LDAP.
And how to use the Update local account , Update external account, and Lock values when matching data?
Such data as, for example, the name and surname would be desirable to manage exclusively from Active Directory. This is necessary, for example, so that the students do not write all sorts of nonsense instead of the name and surname. And when changing data in AD, I would like to update them as quickly as possible in Moodle. For such options, a combination of At each entry , Never , Blocked is suitable .
In my example, the email addresses of the users are unknown, so fictitious ones were invented instead. This approach allows users to start working in the system immediately, and then, if desired, replace the email address with a real one, for example, to start receiving notifications. If you want users to necessarily enter e-mail at the first login, this field should not be filled in Active Directory. For email, I use the option Every time I log in , When updating , Unlocked . This allows you to update data in AD when updating it in Moodle, and vice versa.
Well, now let's check if the data is updated. Exit Moodle, fix the user's email in Active Directory, and go back to Moodle. In the profile, the user should display new mail.
Now change the email from Moodle. A confirmation email will be sent. The address in Moodle and in Active Directory will have to change immediately after the confirmation of the new address.
Well, about how to configure password expiration in Active Directory from Moodle, how to allow users to create accounts on their own, and, of course, how to log in to Moodle without entering a password - I hope to talk about all this in the next sections. Unless, of course, someone sends an invite.
For those who don’t know, Moodle is a distance learning system , such as CMS with a focus on education, a lot has already been written about it on the hub . In this article I will tell you how to fully associate it with the user database created in Microsoft Active Directory.
What is it for?
- Well, firstly, to simplify the work of the administrator, it’s easier to keep users in one database, and not in two.
- Secondly, for the possibility of delegating functions to manage the list of users to other employees. The fact is that in Moodle all users “lie” in a single list without dividing them into a structure, and, as a result, it is impossible to give someone permission to edit part of this list. And at the Active Directory level, it’s quite possible to delegate editing rights: to employees of a particular dean’s office for students of this faculty, and to class teachers to students of their class.
- Thirdly, the use of such a bundle allows you to organize SSO - access to the site with the same username and password with which the user logged into Windows. A trifle, but nice - you do not need to enter the password again.
Where to begin?
Well, we will assume that the following has already been done:
- A computer with a server version of Microsoft Windows is configured. Any version, you can 2003, you can 2008 (in the screenshots will be 2012). The domain controller role has already been raised on this server. Several machines have already been entered into the domain. Let the domain be called ad.liceum.ru , its NetBIOS name is ad_liceum_ru , and the domain controller is pdc.ad.liceum.ru
- Configured web server with Moodle. I have it based on Ubuntu 12.04. Of course, you can install IIS and Moodle on the same machine where the domain controller is, but that's another story. Let the server be called moodle.liceum.ru . The screenshots will be Moodle 2.5, but the logic has not fundamentally changed since version 1.9. Moodle is already configured to send mail
- The domain controller, web server, and machines included in the domain have the ability to interact with each other. In the simplest case, you can simply place them on the same network, but you can use a more complex configuration with tricky routing and closing all unnecessary ports.
Managing users in Active Directory
First, on any machine included in the domain, you need to run the Active Directory Users and Computers MMC snap-in. Of course, you can go to the server via RDP and run it there, as many administrators like. But if you plan to simplify your work in the future by transferring responsibilities for maintaining the user base to others, I recommend that you learn how to install this equipment on client machines now. This is done differently in different versions of Windows. To get started, download: for XP , for 7 SP1 and for 8 . In XP, the snap-in will appear immediately under Control Panel> Administrative Tools . In 7 and 8, after installing the downloaded update, you will need to go to Control Panel> Programs> Turn Windows components on or off. There, select Remote Server Administration Tools> Role Administration Tools> Active Directory Domain Services Tools and ...> Active Directory Domain Services Tools> Snap-in Tools and Command-Line Tools ... and note the latter for installation.
Using the mentioned snap-in, we will create a separate unit for users. In it we will store the accounts of all users, setting up the structure in a way convenient for us. Trite, but I will call this unit "Users".
In order for the Moodle system to be able to request information about users from Active Directory, we will create a special user for communication. Let it be called moodle_liceum_ru. We will create it not in the “Users” container that we created, but in the initially existing “Users” container so that there is no confusion between the accounts of real users and the service account created for communication between systems.
We will add the created account to the Domain Admins group.
Of course, adding a service account to the group of administrators is not a good idea, because having stolen the Moodle administrator password or gaining access to the Moodle database, you can also get access to the domain, because in Moodle the user password for communication is stored in clear text. In fact, it is enough to give this account only the right to edit users in the "Users" subdivision. How to do this, I will describe later. But as they say, there is one caveat. In this case, it will not be possible to change the password from Moodle for the user if he is a member of the Domain Admin group. Regardless of the editing rights to the unit in which the user is located, only another domain administrator can change the password to the domain administrator. Such is the mysterious soul of Windows.
Now create a real user in Active Directory.
Middle name, if you want it to be displayed, it is better to immediately enter in the same field as the name. The fact is that neither Active Directory nor Moodle by default provide middle name fields in the interface. Immediately it is worth changing the order of the name and surname in the "Full name" field. This will allow you to see users in the list sorted in the usual way by name.
After creating the user and setting his password, we call the properties. Fill in the fields with e-mail, country and city. What is it for? The fact is that the meticulous Moodle system believes that the fields email, country and city are required to be filled by all users without exception. And, if they cannot be obtained from Active Directory, the user will not be able to continue working until he enters this data. Well, it’s clear with the city and the country, but what if the user does not have e-mail, or the administrator does not know it? In this case, you can come up with a fictitious email. If desired, the user will be able to change it, while a confirmation letter will be sent to a new address, which means that the user does not have access to the mail we invented will not be a limitation.
Customize Moodle
Go to Moodle in Administration> Plugins> Authentication> Authentication Settings , enable the "LDAP Server" plugin.
Why LDAP? Well, LDAP is such a protocol for working with a hierarchical database. So, you can and should connect to Active Directory using this protocol.
Well, let's start setting up the authentication plugin. We will indicate the name of our server in the “Server URL” field by adding the ldap: // prefix to it. Remember, the web server must be able to correctly resolve the LDAP server name to IP address. To do this, you can specify the domain controller as the DNS server, you can configure DNS more cleverly, you can simply enter the correct IP in the hosts file on the machine with the web server. Well, you can, of course, specify IP instead of a name in the Moodle settings. By the way, who does not know, you can check what name is resolved using the ping and nslookup commands.
Of course, if you are thinking about the future, you have a backup domain controller. In this case, it is also worth mentioning here. Other parameters in this section should be left by default.
Now you need to specify the data to connect to the server. However, this is not just a username and password, instead of a login some kind of Distinguished Name is required, it is also a DistinguishedName or a constant DN. What is it? The fact is that in a hierarchical database, as in a file system, there can be many objects with the same name. So, what is called a file name in the file system is commonly called common name or CN in LDAP, and what is called the full file name, that is, the file name plus its path, is called distinguished name or DN. Well, now a small digression on how to find out this very DN.
We look for the necessary information in LDAP
Let's return to the Active Directory Users and Computers snap-in. In the View menu, enable the Additional components option .
Now, when we call the properties of different objects, the attribute editor will be among the tabs.
In the attribute editor, you can see all the properties of an object. The distinguishedName we need will also be there.
By the way, it's time to look at the names of the fields that store all sorts of user data. By comparing what we entered in the user’s card and what we see in the attribute editor, we’ll make a tablet.
| Value | Attribute |
|---|---|
| Surname | sn |
| Name | givenName |
| Windows login | sAMAccountName |
| Town | l |
| The country | from |
Observers will notice that the country is stored twice - the full name in the co attribute and the code in the c attribute . For Moodle, you need exactly the two-letter code.
We continue to customize Moodle
In Moodle, enter the distinguished username and password displayed in Active Directory. In my example, the distinguished name would be CN = moodle_liceum_ru, CN = Users, DC = ad, DC = liceum, DC = ru . In the "User Type" field, specify "MS ActiveDirectory."
By default, Moodle stores password hashes in its database. It stores well - in recent versions the bcrypt algorithm is used, so such passwords cannot be decrypted by searching the md5 database. True, this is of little use, because if the connection with Active Directory suddenly disappears, users will not be able to log into the system, despite the password information available in it. The only way to use the saved password is if the administrator manually switches the authentication type for the user account to Manual registration. But you can turn it off by activating the Do not store passwords mode .
In the Containers field, specify the distinguished name of the department in which users are stored. It can be recognized in the manner described above. In our case, it will be OU = Users, DC = ad, DC = liceum, DC = ru . Since the users are stored in our subsidiaries, we enable the Search in child containers option .
In the User attribute field , specify sAMAccountName. You can, of course, experiment with this option. If you specify mail here, then when entering the system you will need to specify the email address as the login; if you specify telephoneNumber, then the phone number. However, with all the alternatives, we will then be unable to configure automatic login with an account from the domain.
Other parameters will be left by default.
Login
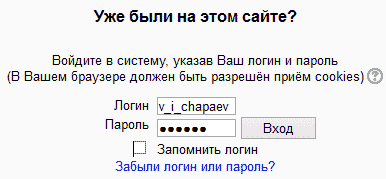
Well, it's time to try logging in to Moodle with an account from Active Directory.
If everything was done correctly before, then you will be able to enter Moodle. However, the system will offer us to fill out an empty form - there will be no user data in Moodle.
The reason is simple - we have not yet told Moodle where exactly the data should be taken from. The “Data Mapping” parameter group is responsible for this. Fill in the fields using the previously obtained plate.
Well, try to log in again. This time, if everything is done correctly, no requests will be made to fill in the missing fields. The user data will be indicated in the upper right corner.
If you invoke the user profile, you can verify that the data matches the information from LDAP.
Check for data updates
And how to use the Update local account , Update external account, and Lock values when matching data?
Such data as, for example, the name and surname would be desirable to manage exclusively from Active Directory. This is necessary, for example, so that the students do not write all sorts of nonsense instead of the name and surname. And when changing data in AD, I would like to update them as quickly as possible in Moodle. For such options, a combination of At each entry , Never , Blocked is suitable .
In my example, the email addresses of the users are unknown, so fictitious ones were invented instead. This approach allows users to start working in the system immediately, and then, if desired, replace the email address with a real one, for example, to start receiving notifications. If you want users to necessarily enter e-mail at the first login, this field should not be filled in Active Directory. For email, I use the option Every time I log in , When updating , Unlocked . This allows you to update data in AD when updating it in Moodle, and vice versa.
Well, now let's check if the data is updated. Exit Moodle, fix the user's email in Active Directory, and go back to Moodle. In the profile, the user should display new mail.
Now change the email from Moodle. A confirmation email will be sent. The address in Moodle and in Active Directory will have to change immediately after the confirmation of the new address.
Well, about how to configure password expiration in Active Directory from Moodle, how to allow users to create accounts on their own, and, of course, how to log in to Moodle without entering a password - I hope to talk about all this in the next sections. Unless, of course, someone sends an invite.