Development of cross-platform mobile applications in Delphi # 2
Part # 1
In the previous part of the series, we reviewed the main features of the new RAD Studio XE5. Today, let's move on to practice. First of all, let's decide on the task.
Formulation of the problem
Despite some academic tasks, as an example we chose a cookbook. And to give originality to the developed application, we will try to expand the functionality usual for such programs with a few additional functions:
Recalculation of quantity of required products.
Typically, recipes indicate the exact amount of products used. But if you want to change the number of servings, then, accordingly, it is necessary to recount the number of products. In the process of preparing a dish, this is not always convenient.Timer.
If you are new to cooking, then you should use recipes that clearly indicate the time of a particular operation. And the timer on the tablet, phone or netbook may well become a convenient replacement for the kitchen timer.
It often happens that several operations are performed in parallel. Each operation can have its own "timer".
At the same time, we are interested in both “desktop” and mobile application implementation. The mobile application will be used as a tool to visualize the recipe and accompany the preparation process. The desktop version can be used in a more advanced functionality for, for example, the formation of new recipes.
It should be noted here that, in principle, cookbooks, like programming books, can be designed for different levels of readers' preparedness. In our case, we are talking about "recipes for dummies", that is, those that indicate the exact number of products and the exact time of a particular action.
We are implementing this application for Windows and for Android . Then, based on a single source code base, we can port the application to MacOS and iOS .
Choice of development tools
Before proceeding directly to the development, let's decide on the tools. Of course, the data that will be used in the application is most expediently stored in a database.
For the purity of the experiment, we use SQLite as a DBMS . This DBMS has a number of advantages, including speed, ease of use, cost-effectiveness in relation to resources. It is ideally suited for simple tasks, and in addition, Android has built-in SQLite support .
In the future, we will look at how you can transfer the application to using InterBase DBMS and show all the advantages of the “native” solution from Embarcadero.
Together with the application, we will distribute a ready-made DBMS created separately. This approach is due to the specifics of the task.
Of course, we need Delphi XE5 . To create a Windows application, in principle, we could restrict ourselves to Professional editions. But for the so-called For mobile development, we need at least an Enterprise edition of the product. Alternatively, you can use the Mobile Add-On Pack for Delphi XE5 Professional .
To work with SQLite on Windows, we need to download the sqlite-dll-win32-x86-3080100.zip library from the official website. The easiest way to put this library in one of the system folders (for example, Windows / SYSTEM32).
There are currently quite a large number of free SQLite database administration tools. You may well use one of them.
We will access the database from the application using the FireDAC library .
FireDAC is a universal data access library designed to develop applications that connect to various databases. Using FireDAC, you can develop both VCL and FireMonkey applications. The library supports the following DBMSs: InterBase , SQLite , MySQL , SQL Serve r,Oracle , PostgreSQL , DB2 , SQL Anywhere , Advantage DB , Firebird , Access , Informix . However, at this stage, in mobile applications “directly” (without using DataSnap technology) using FireDAC, you can connect only to SQLite and InterBase .
Database creation
We begin the development process by creating a database structure. Its logical model is shown in the diagram.
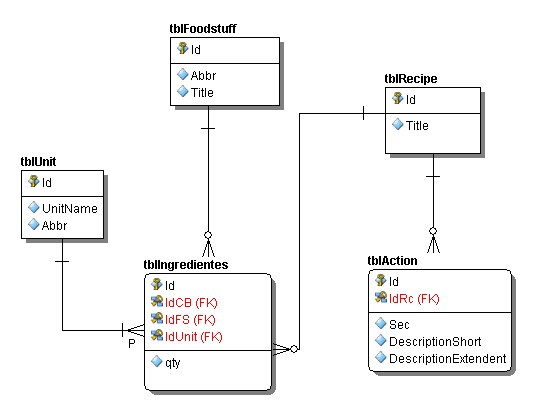
This diagram was obtained using another tool from Embarcadero Technologies - ER / Studio . Developer Edition of this product is available to users of RAD Studio Architect . In the framework of this publication, we will not dwell on the description of ER / Studio . This powerful tool deserves to devote separate material to it.
When creating the database structure, each entity of the logical model will have a physical table. Briefly consider the purpose of the resulting tables.
In the tblFoodstuff table we will keep a list of all possible products. In the tblUnit table , a list of units of measure (gram, spoon, glass, etc.). The tblRecipe table contains a list of recipes. The tables tblIngredientes and tblAction contain a list of ingredients (indicating the quantity in the qty field) and actions (indicating the time and descriptions), respectively.
To create an SQLite database, you can simply use the script below.
CREATE TABLE [tblAction] (
[Id] INTEGER  NOT NULL PRIMARY KEY AUTOINCREMENT,
[IdRc] INTEGER  NOT NULL,
[Sec] INTEGER  NULL,
[DescriptionShort] VARCHAR(128)  NOT NULL,
[DescriptionExtendent] TEXT  NOT NULL
);
CREATE TABLE [tblFoodstuff] (
[Id] INTEGER  PRIMARY KEY AUTOINCREMENT NULL,
[Abbr] VARCHAR(10)  NULL,
[Title] VARCHAR(50)  NULL
);
CREATE TABLE [tblIngredientes] (
[Id] INTEGER  NOT NULL PRIMARY KEY AUTOINCREMENT,
[IdCB] INTEGER  NOT NULL,
[IdFS] INTEGER  NOT NULL,
[IdUnit] INTEGER  NOT NULL,
[qty] INTEGER  NULL
);
CREATE TABLE [tblRecipe] (
[Id] INTEGER  NOT NULL PRIMARY KEY AUTOINCREMENT,
[Title] VARCHAR(150)  NOT NULL
);
CREATE TABLE [tblUnit] (
[Id] INTEGER  NOT NULL PRIMARY KEY AUTOINCREMENT,
[UnitName] VARCHAR(25)  NOT NULL,
[Abbr] VARCHAR(7)  NOT NULL
);
CREATE INDEX [IDX_TBLACTION_Recipe] ON [tblAction](
[IdRc]  ASC
);
CREATE INDEX [IDX_TBLINGREDIENTES_] ON [tblIngredientes](
[IdCB]  ASC
);
CREATE INDEX [idxFoodStuff] ON [tblIngredientes](
[IdFS]  ASC
);
CREATE INDEX [idxRecipe] ON [tblIngredientes](
[IdCB]  ASC
);
CREATE INDEX [idxUnit] ON [tblIngredientes](
[IdUnit]  ASC
);
Creating a Windows Application
We will organize the application development process as follows. Let's start by creating a basic version of the application for Windows, then port it to the Android platform. Next, we will expand the functionality of both applications in parallel. MacOS and iOS versions of the application will be the final stage. We will start their creation after we have a ready-made Windows and Android version.
The Delphi IDE provides several new application templates. In this case, we are interested in the FireMonkey Desktop Application .
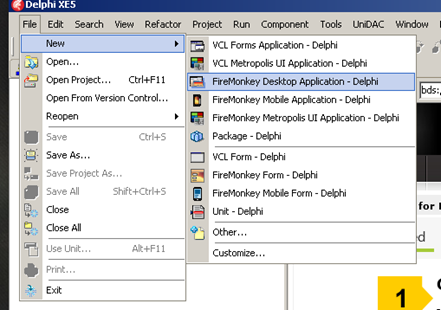
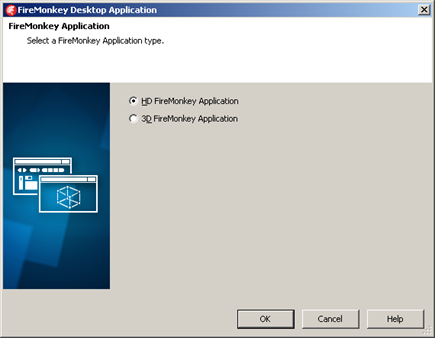
After selecting the appropriate menu item, an additional dialog will be displayed on the screen, in which you will be asked to select the type of the new FireMonkey application - HD (High Definition) or 3D.
Rename the main form of the application (in the object inspector we change the Name property) and save the newly created project. Add a new Data Module to the project (File | Other menu of the Delphi Files branch), rename and save it.

Thus, we created a new project and prepared directly for development.
Configure FireDAC Connection
habrahabr.ru/topic/edit/200490/#
The first thing we need to do is set up a database connection. In FireMonkey, this procedure is not significantly different from VCL.
Place the components TFDConnection , TFDGUIxWaitCursor and TFDPhysSQLiteDriverLink in the DataModule . In the Object Inspector change the value of the component LoginPrompt TFDConnection :
LoginPrompt = False The
Double-clicking on a component on the form will cause the connection settings dialogue.
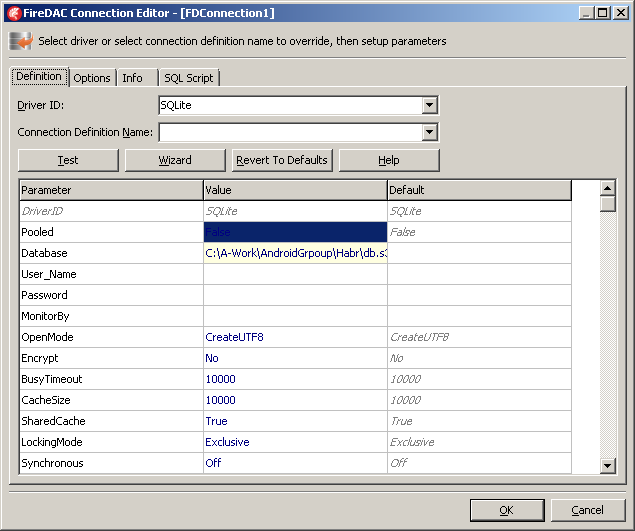
In our case, specify SQLite as the Driver ID, and also specify the path to the database file as the value of the Database parameter. You can check the settings using the Test button.
Immediately create a function responsible for connecting to the database in Run Time.
function TDM.ConnectToDB: Boolean;
begin
try
  FDConnection1.Connected := True;
except
end;
 Result:= FDConnection1.Connected;
end;
In order for this function to be called from the main module, we will place its title in the public section.
Main application form
On the main form of the application, sequentially place the components TGroupBox , TTabControl and TSplitter . Set the Align property for each of them (alLeft, alLeft and alClient, respectively). We place two components on the left panel - TListBox and TBindNavigator. We place them as shown in the figure. Double-click to call the point designer of the TTabControl component, and create two points.
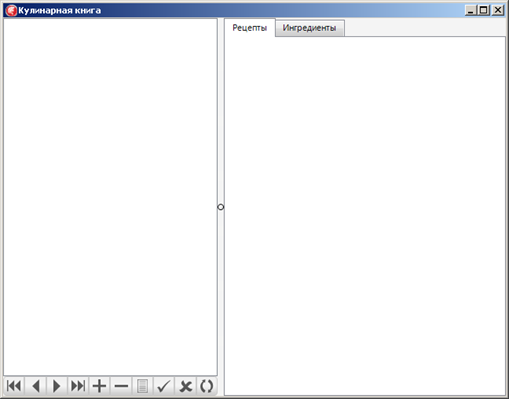
A list of recipes will be displayed on the left side of our application. On the tabs on the right side is a list of the ingredients of the dish (indicating the quantity) and, directly, the recipe itself, consisting of a specific list of actions.
Data connection
As we have already said, there are no special data display components in FireMonkey. Instead, the LiveBinding binding mechanism is used . Let's see how it works. Connect the list of recipes to the TListBox component on the main form. First of all, you need to create a data set for working with the list of recipes. In the data module, we use the TFDTable component . Set its properties as follows:

In the code of our ConnectToDB function, add a call to the method of opening a data set.
FDTRecipe.Open;
In order to establish a connection to the database in Run Time mode, you must add a call to the ConnectToDB function. You can bind it to the OnCreate event of the data module.
procedure TDM.DataModuleCreate(Sender: TObject);
begin
DM.ConnectToDB;
end;
At the initial stage of application development, we will not handle exceptions that may occur during connection, although in the future this will need to be done.
We organize the output of data from the TRecipe table to a list on the main form. To do this, first of all, add the data module to the Uses section of the module of the main form of the program.
interface
uses
  uDM,
  System.SysUtils, System.Types, System.UITypes, System.Classes, System.Variants,
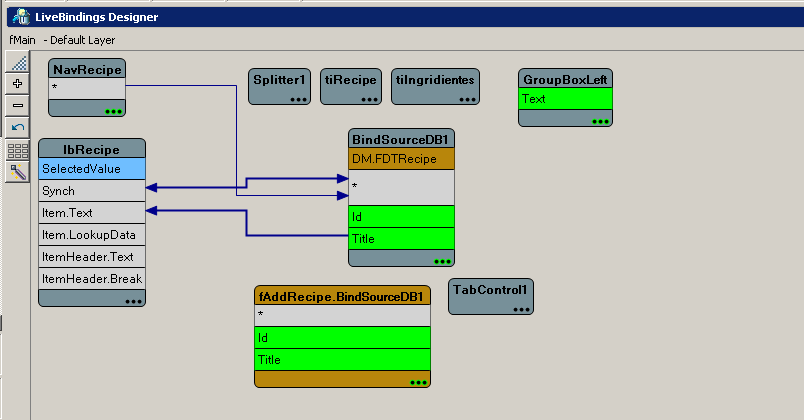
In the form editor, call the context menu and select the Bind Visually item. The LiveBinding Designer opens at the bottom of the screen . In it, in the form of diagram elements, objects and their main properties are presented. By simply dragging and dropping, we connect the properties of the three objects as shown in the figure.
Actually, this is all that is needed to display data from the recipe table (i.e. a list of recipe names). If we run the program now, it will show a list, but it will be empty, and we should take care of how to add recipes.
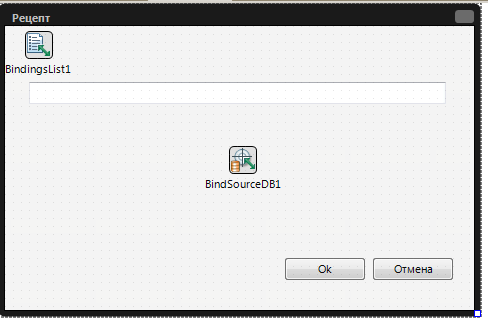
Create a new FireMonkey HD form. Set its properties as follows: Connect the data module and place the TEdit component and two buttons on the form. In the LiveBinding Designer, we associate the Text property of the TEdit component with the Title field of the dataset.
Name = fAddRecipe

BorderStyle = bsToolWindow

Position = poMainFormCenter
Save the new forum and remove it from the list of automatically created forms (Project | Options tab Forms menu).
For the main form of the application, create a method:
procedure TfMain.RecipeAfterInsert(DataSet: TDataSet);
var
  fAddRecipe: TfAddRecipe;
begin
    try
    fAddRecipe:= TfAddRecipe.Create(Application);
    fAddRecipe.ShowModal;
    if fAddRecipe.ModalResult = mrOk then
    begin
     if DataSet.State in [dsInsert, dsEdit] then
      DataSet.Post;
    end
    else
    begin
     if DataSet.State in [dsInsert, dsEdit] then
      DataSet.Cancel;
    end;
  finally
    FreeAndNil(fAddRecipe);
  end;
end;
When the program starts, we define the AfterInsert event for the recipe data set.
procedure TfMain.FormShow(Sender: TObject);
begin
DM.FDTRecipe.AfterInsert:= RecipeAfterInsert;
end;
Now, by launching the application, we get a list of recipes that can be modified using the navigator. When adding a new recipe, a form with an input field appears on the screen.
In this part of the series, we created the simplest FireMonkey application for Windows . We learned how to establish a connection to the database using the FireDAC package and looked at the simplest example of using LiveBinding .
In the next, perhaps most interesting, part of the cycle, we will create the first Android application .
Stay with us ...
Part # 3