Yii linked data walkthrough
- From the sandbox
- Tutorial
Intro
Recently, I began to study the wonderful Yii framework. During development, I was faced with the task of saving data from one form to several tables. Googling, I did not find a sane guide that explains the full meaning of this preservation. On the official Russian-language site, I found a short article from Alexander Makarov, but again, in general terms, it demonstrates the “salt” of this method.
I decided to write this article, in the style of tutorial, to give beginners the opportunity to visually see the full CRUD cycle when working with several models, and for those who are more experienced, criticize this decision and explain “how not to do it”.
Formulation of the problem
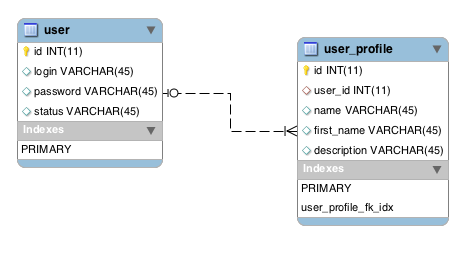
It is necessary to create two tables to store user data. One is called user - designed to store the username and password of the user, his status and his global identifier, which will be used throughout the system. The second user_profile which is intended for storing public data about the user, his name and surname, etc. The profile table is linked to the user table using a foreign key.
It is necessary to save and edit data about the user, from one single form, which includes the fields of both the user table and user_profile
Creating database tables
Let's create two tables of this type
user - the parent table, where the user id is created
user_profile - the child table, has the foreign key user_id on the parent table
Model creation
Using the gii code generator, we create models of these tables and call them User and UserProfile, respectively.
Using gii, we’ll create a CRUD for the User model (note that for the UserProfile model, I intentionally do not create CRUD, since we don’t need it)
Refinement of the parent model
In the parent model, we need to add fields from the child model:
 'ID',
			'login' => 'Login',
			'password' => 'Password',
 			'status' => 'Status',
////добавление начато
                        'name'=>'Имя',
                        'first_name'=>'Фамилия',
                        'description'=>'Описание'
////добавление окончено
		);
	}
And also define the AfterSave method by adding code:
////добавление начато
 protected function afterSave() {
            parent::afterSave();
            if($this->isNewRecord){
    	  // если мы создаем нового пользователя, тогда нам необходимо создать
          // для него запись в таблице профиля с ссылкой на родительскую таблицу
             $user_profile = new UserProfile;
             $user_profile->user_id =     $this->id;
             $user_profile->name =        $this->name;
             $user_profile->first_name =  $this->first_name;
             $user_profile->description = $this->description;
             $user_profile->save();
            } else {
 	// иначе неободимо обновить данные в таблице профиля
             UserProfile::model()->updateAll(array( 'user_id' =>$this->id,
                                                'name' => $this->name,
                                                'first_name'=>$this->first_name,
                                                'description'=>$this->description
                    ), 'user_id=:user_id', array(':user_id'=> $this->id));
            }
        }
////добавление окончено
Now, step by step , what happened here:
1) added three public variables that correspond to the fields of the UserProfile model ,
now these are new fields in the User model
       public $name;
       public $first_name;
       public $description;
2) in the attributeLabels () method , create descriptions for the new fields
          'name'=>'Имя',
          'first_name'=>'Фамилия',
          'description'=>'Описание'
3) Now we create the afterSave method , which works after saving the data in the User model ,
and we will immediately save the data in UserProfile .
Thus, we check what is happening now: creating a new record or editing an existing one.
if($this->isNewRecord){
If a new user is created, then:
- I create an instance of the UserProfile model
- We get the ID of the created user, and assign this value to the field
$ user_profile-> user_id = $ this-> id; - I assign the UserProfile model fields the values that came from the form (how we get this data from the form, see the actionCreate action in the UserController )
- We execute the save () method on the UserProfile model
If it was an editing operation, then:
- you must execute the updateAll method for the UserProfile model
UserProfile::model()->updateAll(array( 'user_id' =>$this->id,
                                                'name' => $this->name,
                                                'first_name'=>$this->first_name,
                                                'description'=>$this->description
                    ), 'user_id=:user_id', array(':user_id'=> $this->id));
Here, the values are populated from the action actionUpdate controller UserController
Controller revision
Now open the freshly-generated UserController .
In it, we have to fix two actions actionCreate and actionUpdate ,
and one function loadModel
actionCreate
We assign values to the public variables that we added to the models.
This is where the data is used in the afterSave method
public function actionCreate()
	{
 	$model=new User;
   	   if(isset($_POST['User']))
		{
			$model->attributes=$_POST['User'];
////добавление начато
                        $model->name = $_POST['User']['name'];
                        $model->first_name = $_POST['User']['first_name'];
                        $model->description = $_POST['User']['description'];
////добавление оконченно
			if($model->save())
				$this->redirect(array('view','id'=>$model->id));
		}
		$this->render('create',array(
			'model'=>$model,
		));
	}
actionUpdate
Here, a similar process occurs as when creating a user
	public function actionUpdate($id)
	{
		$model=$this->loadModel($id);
    	      if(isset($_POST['User']))
		{
			$model->attributes=$_POST['User'];
////добавление начато
                        $model->name = $_POST['User']['name'];
                        $model->first_name = $_POST['User']['first_name'];
                        $model->description = $_POST['User']['description'];
////добавление оконченно			if($model->save())
				$this->redirect(array('view','id'=>$model->id));
		}
		$this->render('update',array(
			'model'=>$model,
		));
	}
loadModel
Here we add such lines.
We need to load the data from the user profile table found by its user_id.
	public function loadModel($id)
	{
		$model=User::model()->findByPk($id);
////добавление начато
                $modelprofile=UserProfile::model()->find('user_id=:user_id', array(':user_id'=> $id));
                $model->name =  $modelprofile->name;
                $model->first_name = $modelprofile->first_name;
                $model->description = $modelprofile->description;
////добавление оконченно
		if($model===null)
			throw new CHttpException(404,'The requested page does not exist.');
		return $model;
	}
This is necessary so that the data is uploaded to the form when we click on the Update User link ,
and in order to display the information in the view
Finalization of the parent form
In the form, which is located at protected / views / user / _form.php,
we need to add elements to enter the user's name, surname and description
beginWidget('CActiveForm', array(
'id'=>'user-form',
'enableAjaxValidation'=>false,
)); ?>
Fields with * are required.
errorSummary($model); ?>
labelEx($model,'login'); ?>
textField($model,'login',array('size'=>45,'maxlength'=>45)); ?>
error($model,'login'); ?>
.....
////добавление начато
labelEx($model,'name'); ?>
textField($model,'name',array('size'=>45,'maxlength'=>45)); ?>
error($model,'name'); ?>
labelEx($model,'first_name'); ?>
textField($model,'first_name',array('size'=>45,'maxlength'=>45)); ?>
error($model,'first_name'); ?>
labelEx($model,'description'); ?>
textField($model,'description',array('size'=>45,'maxlength'=>45)); ?>
error($model,'description'); ?>
////добавление оконченно
endWidget(); ?>
Finalization of the presentation
The view file, which is located at protected / views / user / view.php , we also add our new fields to the detailed display widget
widget('zii.widgets.CDetailView', array(
	'data'=>$model,
	'attributes'=>array(
		'id',
		'login',
		'password',
		'status',
////добавление начато
                'name',
                'first_name',
                'description'
////добавление оконченно
	),
)); ?>
and in the auxiliary file protected / views / user / _view.php add the following:
getAttributeLabel('id')); ?>:
	id), array('view', 'id'=>$data->id)); ?>


...
////добавление начато
 getAttributeLabel('name')); ?>:
	name); ?>

getAttributeLabel('first_name')); ?>:
	first_name); ?>

getAttributeLabel('descrption')); ?>:
	descrption); ?>


////добавление оконченно
Check result
Now, if everything is done as described above, go to the address
localhost / YourProjectName / index.php? R = user / create
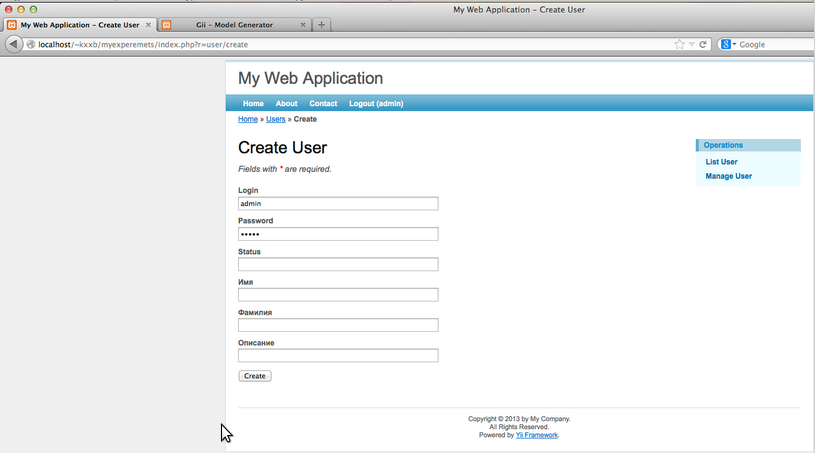
Fill in all the fields and click Create .
After which, we should see the following result:
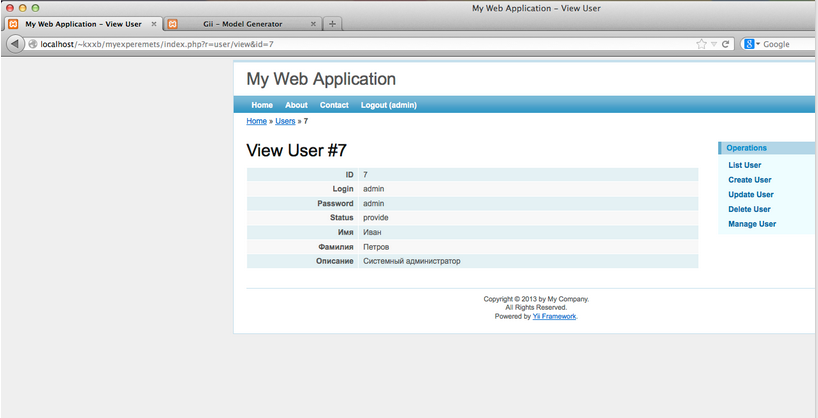
If we want to edit this entry, click on the Update User link ,
our form will be filled with data

Outro
I hope that the article will be useful to beginner developers, and save time in finding a similar solution.
Any constructive criticism, experienced developers, flavored with personal examples.
Thanks for attention!
Used Books
An article from the Recipes section, “ Preserving Related Data ”.