Offline OS X installation, without OS X
 The post is not as relevant as it could be a couple of days ago, but still better late than never. And so, under the cut, the story of how I decided to upgrade to OS X Mavericks, and in the end it took me 18 hours.
 The post is not intended for the OS X guru, but for ordinary users who have encountered problems installing the axis and cannot continue to install it.
Well let's go:
Thursday October 22nd (release date of OS X Mavericks release). I download it for free from the AppStore and without making any backups I plan to update my downloaded one year ago from torrents for free OS X Mountain Lion, which was installed on top of OS X Lion without any questions.
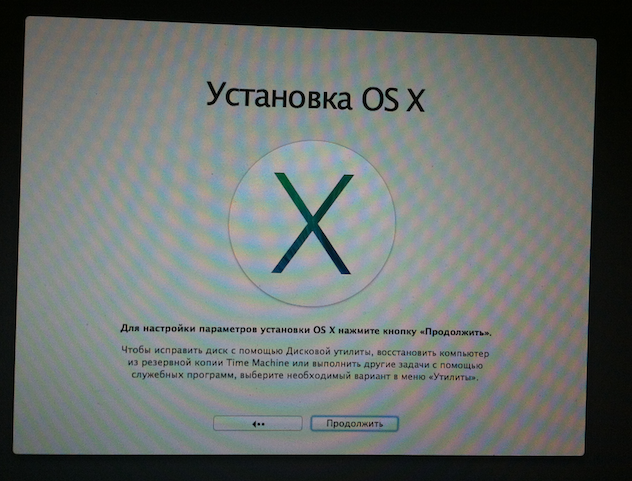
In general, the OS is downloaded, proceed to installation. I clicked on its icon, answered a couple of questions, and the computer restarts. Then the axis logo appears, and writes that there are 40 minutes left, and the progressbar begins to move quietly. I'm already starting to think about what to do while reinstalling, as a message pops up saying that my disk is damaged and impossible to fix, you need to backup the data and restart the installation.
Then I recall that when installing OS X Mountain Lion I had something similar, I go into the disk utility, select Macintosh HD and I want to poke the "Fix Disk" button, but it is inactive, then click "Check Disk" -> go the verification process, after which it says what my errors are: “Something with links of some sort, either named wrong, or the date of creation is not the same” in general, google the error, did not find anything. Then I somehow made sure that the “Fix disk” button becomes active, I click, but it says to me that it cannot restore the disk, and you need to format it first after making a backup (highlighted for those who don’t see that I wrote it, and for some reason minus post with karma) .
Well, I think we need to backup important information, and think what to do next. I run the Windows installed as the second OS, and make a backup to the BOOTCAMP disk, trying to find the most important among 500 GB of information on Macintosh HD to put on the remaining 30 gigabytes on the BOOTCAMP disk. Along the way, I come across the OS X install Data folder located at the root of the disk, I go in and see the following structure:
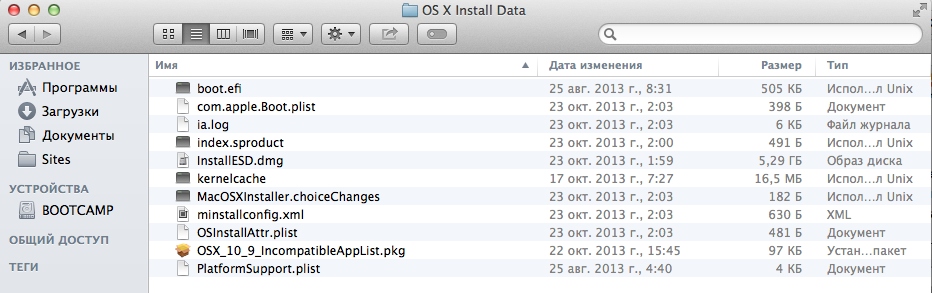
(The screenshot was taken now, because then I did not think about writing the article)
Well, I think we need to backup this folder as well, after formatting the disk, the installer OS will also be deleted. (Incidentally, a key moment in the story)
In general, a backup is made. I decide to make my last attempt to install the axis in the usual way, but again the same error. I go into the disk utility and try to format the disk. But it doesn’t work out. Because it is used. I reboot the laptop, hold down cmd + r and enter recovery mode, and here I can already format it through the disk utility.
I reboot into Windows, try to copy the previously saved OS X install Data folder to the root of the formatted disk, but it fails, because Apparently Windows does not know how to write to a Mac disk.
I recall that you can restore the old OS X Mountain Lion, and from there I plan to start installing Mavericks again.
But here, too, failure awaits me, as I mentioned Mountain Lion was downloaded from torrents, and upon restoration it asked me to enter my Apple ID, after which it said that I could not do this because this axis is not listed on me. Regretting that he regretted $ 20 (or how much there) a year ago, I think about the option of creating a bootable flash drive.
Googling realized that it was not so easy to make it, and for all the manuals the folder structure was not at all like mine (because I had already launched the installation and something had changed there).
But I decided to try to restore the image of InastallESD.dmg to a USB flash drive. But somehow it did not work out.
Well, then you need to download it again, and do everything according to the manuals. I'm starting to look, but because she just came out today, I don’t find more than one good result, because Rutracker blocked torrents, because it can be downloaded for free anyway. The choice remains: download Mountain Lion or dev version of Mavericks. I decide to download the same image that Mountain Lion put a year ago. Having downloaded, I’m trying to make a USB flash drive, and again failure (either I didn’t want to record, or I recorded but the computer didn’t see what can be installed from there), apparently because some operations with files inside the image must be performed to create a USB flash drive. I decide to download a couple more versions of the OS: just Lion and the dev version of Mavericks. Along the way, google as possible using Windows to edit DMG.
It turned out that UltraISO and TransMac can help me with this. Download. And indeed TransMac allows you to record and read flash drives in MAC format. And UltraISO allows you to view dmg files. I begin to compare the structure of the downloaded Mountain Lion with the saved OS X install Data folder and the structure described in the manual for creating bootable flash drives.
Brief instructions from the manual:
- Unpack the Mavericks installer in the "Programs" folder. Right-click on “Show Package Contents”.
- In this window, open the “Contents” folder, then “Shared Support”, where we find the InstallESD.dmg file. We mount his image
and open it.- Here we find the BaseSystem.dmg file, mount it.
- It's time to move on to writing data to the drive. In the "Disk Utility" select the image BaseSystem.dmg and go
to the "Restore" tab.- Leave the BaseSystem.dmg file as the source, and drag the external drive into the "Destination" field. Then
click "Restore."- The last step remained. We find the recovered drive in Finder, then go to the “System” folder, the
“Installation” section , from where we delete the Packages file.- Open the OS X Install ESD image in Finder, where again in the “Installation” section we find the Packages folder
(Installation Packages). Drag it to the directory from which we deleted the file in the previous step.- All is ready. We remove the disk, then restart the computer with the Option (Alt) key pressed.
And then I understand that the only file I need is that is, InastallESD.dmg, you just need to open it and do some fraud. Using UltraISO I open InastallESD.dmg, I find there BaseSystem.dmg I get it, and I record it using TransMac on a USB flash drive. (I didn’t replace the Packages folder, because there would be some more crap, but I just needed to see if I could see my Macbook bootable from a USB flash drive), but I didn’t see it, I decided to try to burn the image using the disk utility in recovery mode , so surely, but along the way I find this article on the hubHaving read it, I realized that I only need the Packages folder located in InstallESD.dmg that I can get using UltraISO, and I also learn that in addition to the disk utility and the browser, I can also use a terminal that I thought was unavailable all the time.
In general, I do everything that is described there and at the very last step
installer -pkg /Volumes/usb-osx/Packages/OSInstall.mpkg -target /Volumes/macHD
Which starts the os x installation from the console gives me an error, the meaning of which is that the installation from the console is not available for my version.
Well, I think figs with him, Google is it possible to deploy a dmg image from the console and it turns out that it is possible. Then I finally solve the problem by doing what is said in the manual but from the console.
Mount the installESD.dmg image.
hdiutil mount "/Volumes/BOOTCAMP/OS X Install Data/installESD.dmg"

Then mount BaseSystem.dmg which is inside the just mounted installESD.dmg:
hdiutil mount "/Volumes/OS X Install ESD/BaseSystem.dmg"

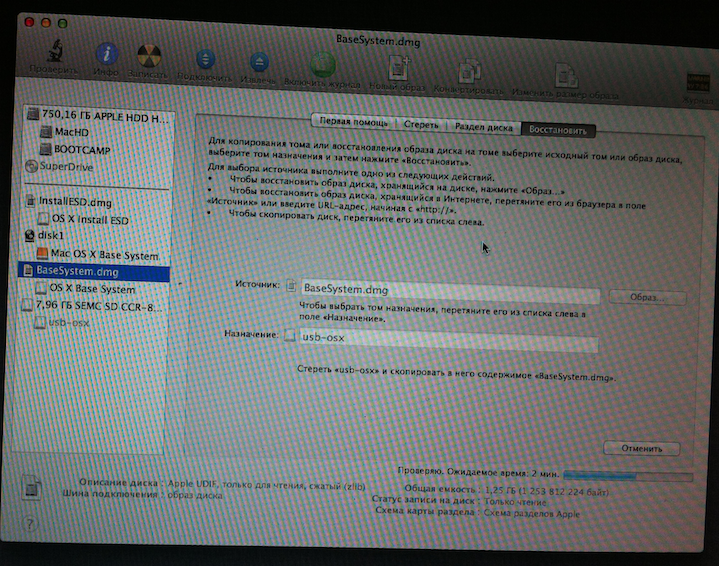
Now I switched to the disk utility (for reliability, although I think it could be done through the command line as well)
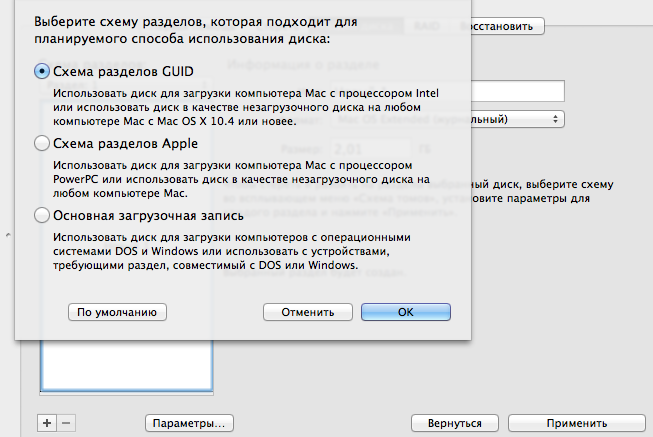
and restored BaseSystem.dmg to the USB flash drive. Pre-formatted here with such settings in Disk utility-> disk partition
After that, I decided to check whether it is possible to boot from a USB flash drive, and my joy knew no bounds: I

left and went back to the terminal, where the USB flash drive is already available at "/ Volumes / OS X Base System 1 "and deal with the Packeges folder We
write:
rm "/Volumes/OS X Base System 1/System/Installation/Packages"
Thus removing the link to Packages
Next:
cp -R "/Volumes/OS X Install ESD/Packages/" "/Volumes/OS X Base System 1/System/Installation/Packages/"
This inserts the Packages folder instead of the link that was deleted.
Then we reboot by pressing Option (alt)
and we see a joyful splash screen
After which the installation runs like clockwork.