Configure and use Geany with Python
Hello, today I will tell you about setting up and working with a text editor called Geany. So, let's begin.
We go here , here you can find information about the installation in many distributions. Install. Everything works.
Download setup.exe from here , install. After installation, you will have to do the following:
Go to Edit -> Settings -> Editor -> Indents. We indent spaces, because it is necessary ; tab lovers can not touch.
One of geany’s most awesome features is its integrated terminal. But it does not always work, in order for it to work, you need libvte.so; in Ubuntu, you can do apt-get install libvte-dev. I don’t know for the other distros, but you can ask Google. The terminal is available in the bottom panel. Also, delve a little in the settings, there you can enable the completion of brackets, quotes, etc. configure hotkeys and more.
We go here , choose the installation method for our distribution.
Download the setup from here , install.
Go to geany, Tools -> Module Manager. I strongly recommend that you enable the modules:
Well, everything is simple: to create a project, click Project -> New. We set the name, in the file name field write <directory path> / <project name> .geany
From below, we simply write the directory path. When you open a project, the project folder will automatically open in the side panel, in the file tree module.
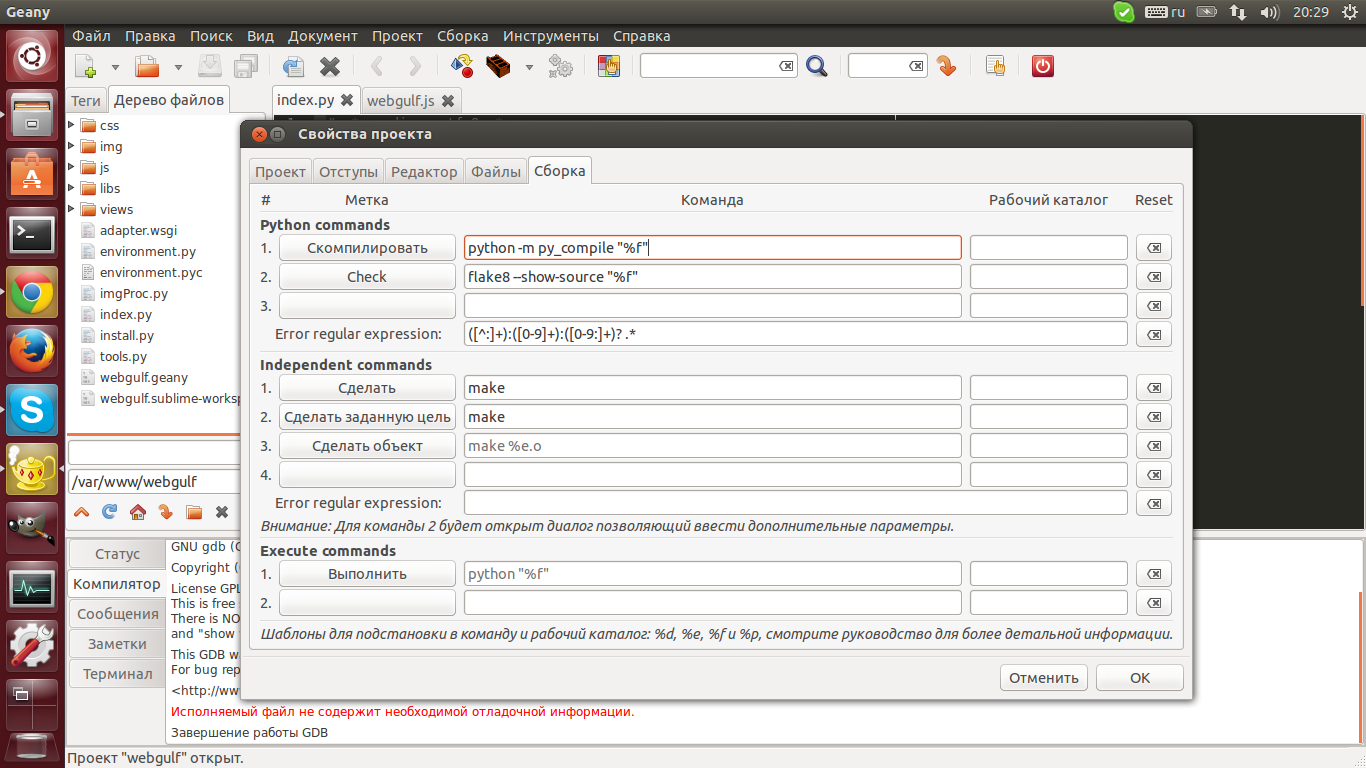
I don’t know about you, but sometimes I need to check the code style. In geany, there is no standard support for this. I decided to use flake8 for this, since it is very easy to install. We do pip install flake8 pep8-naming. Open some Python file, click Build -> Install
Build Commands. Under the heading python commands we look for item 2, rename it to check, or something else, on the right we write flake8 --show-source "% f" In the column regular error expression write ([^:] +): ([0-9 ] +): ([0-9:] +)? . *; It should turn out like this:
Bindim on the hot key (by default I had F9). PROFIT
ATTENTION !!!In order for the code check to work for any Python files, you need to open not a single file from some project, but any single file, and just assign these lines to it. Otherwise, code verification will only work for the project in which we
activated it.
The next thing - many people who are engaged in web development experience the problem that in order for everything to update, you need to restart the
server, which is not always convenient. Of course, you can use the built-in terminal, and it is quite convenient, I did it myself. But here I wanted
that, when I clicked on some button, the server itself rebooted. We open oddly enough Assembly -> Install
build teams. We are looking for the header indemendent comands. In the graph to the right of "Make" we write the restart command of our server (I have sudo
apachectl restart). Attention! In order for this trick to work, it is necessary to register in sudoers so that this command does not ask for a password, otherwise it will
not work. Next, bind “Make” to a convenient button, rejoice.
The standard color scheme is not so bad, but I want, of course, more beautiful. We go here , download the archive. In the case of Linux, copy the entire contents of the archive to ~ / .config / geany. In the case of windows, copy everything to
C: \ Users \ YourUserName \ AppData \ Roaming \ geany \. Next, go to View -> Editor -> Color Schemes. We select the one we like, restart
geany, everything works. My choice is monokai, the most pleasant scheme in my opinion. Yes, and if anyone does not like these topics, you can do it yourself here .
I hope in this article I uncovered the main advantages of such an editor as geany and helped you fine-tune it, thanks for your attention.
Installation
Linux
We go here , here you can find information about the installation in many distributions. Install. Everything works.
Windows
Download setup.exe from here , install. After installation, you will have to do the following:
Spoiler
Out of the box, everything seems to work, except for the execute button: it will be written, they say we do not know what python is. Click Build -> Install Build Commands -> at the bottom, to the right of the Run sign, write the full path to the python interpreter.

Everything, now everything works.
Everything, now everything works.
Initial setup
Go to Edit -> Settings -> Editor -> Indents. We indent spaces
One of geany’s most awesome features is its integrated terminal. But it does not always work, in order for it to work, you need libvte.so; in Ubuntu, you can do apt-get install libvte-dev. I don’t know for the other distros, but you can ask Google. The terminal is available in the bottom panel. Also, delve a little in the settings, there you can enable the completion of brackets, quotes, etc. configure hotkeys and more.
Plugins
Linux
We go here , choose the installation method for our distribution.
Windows
Download the setup from here , install.
Go to geany, Tools -> Module Manager. I strongly recommend that you enable the modules:
- XML Snippets: Enables automatic tag completion
- File tree: shows us the file tree in the sidebar
- Documentation: you can set a hot key, by clicking on which documentation will be opened about something that we hover over
- Extras: small amenities, such as a taskbar, framing the selected text in the specified text and other goodies
- Split window: allows you to open two files in one window, wildly convenient
Projects
Well, everything is simple: to create a project, click Project -> New. We set the name, in the file name field write <directory path> / <project name> .geany
From below, we simply write the directory path. When you open a project, the project folder will automatically open in the side panel, in the file tree module.
Various amenities
I don’t know about you, but sometimes I need to check the code style. In geany, there is no standard support for this. I decided to use flake8 for this, since it is very easy to install. We do pip install flake8 pep8-naming. Open some Python file, click Build -> Install
Build Commands. Under the heading python commands we look for item 2, rename it to check, or something else, on the right we write flake8 --show-source "% f" In the column regular error expression write ([^:] +): ([0-9 ] +): ([0-9:] +)? . *; It should turn out like this:
Bindim on the hot key (by default I had F9). PROFIT
ATTENTION !!!In order for the code check to work for any Python files, you need to open not a single file from some project, but any single file, and just assign these lines to it. Otherwise, code verification will only work for the project in which we
activated it.
The next thing - many people who are engaged in web development experience the problem that in order for everything to update, you need to restart the
server, which is not always convenient. Of course, you can use the built-in terminal, and it is quite convenient, I did it myself. But here I wanted
that, when I clicked on some button, the server itself rebooted. We open oddly enough Assembly -> Install
build teams. We are looking for the header indemendent comands. In the graph to the right of "Make" we write the restart command of our server (I have sudo
apachectl restart). Attention! In order for this trick to work, it is necessary to register in sudoers so that this command does not ask for a password, otherwise it will
not work. Next, bind “Make” to a convenient button, rejoice.
Color scheme
The standard color scheme is not so bad, but I want, of course, more beautiful. We go here , download the archive. In the case of Linux, copy the entire contents of the archive to ~ / .config / geany. In the case of windows, copy everything to
C: \ Users \ YourUserName \ AppData \ Roaming \ geany \. Next, go to View -> Editor -> Color Schemes. We select the one we like, restart
geany, everything works. My choice is monokai, the most pleasant scheme in my opinion. Yes, and if anyone does not like these topics, you can do it yourself here .
Conclusion
I hope in this article I uncovered the main advantages of such an editor as geany and helped you fine-tune it, thanks for your attention.