Step 7. Continuing system setup
In this chapter I will discuss the most common points in the initial setup of the system.
I have Ubuntu located on my home computer, so I'm not afraid that someone from my family will steal important data. My password is complicated enough so that my younger brother does not pick it up and break the system. Therefore, I decided to disable the login and password input window at boot.
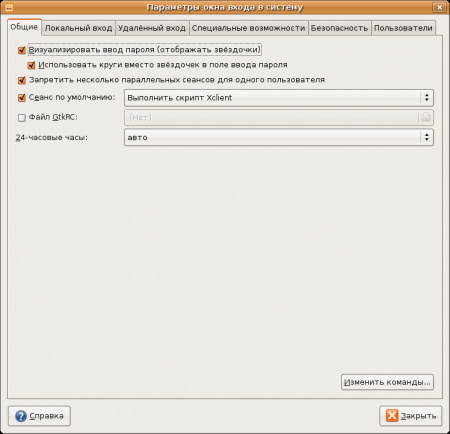
Open System-> Administration-> Login window .

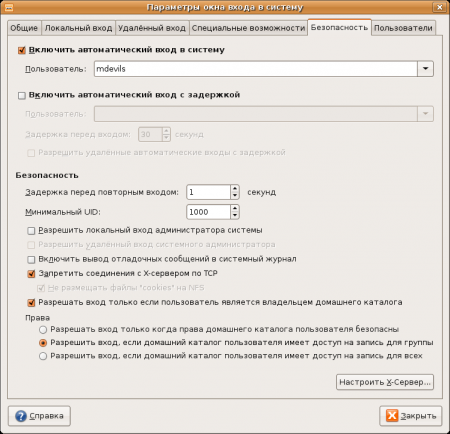
The most interesting tab for me is the Security tab :

Enter the login of the desired user and save ourselves from constantly entering the password when turning it on.
Some applications in Ubuntu have the ability to maintain their state when you turn off the computer / session. Turning this feature on is easy. Open System → Settings → Sessions and go directly to the “Session Settings” tab and check the box:

A lot of people use the Internet through proxies, or use proxies for anonymity. Ubuntu has a single proxy settings interface for many applications at once.
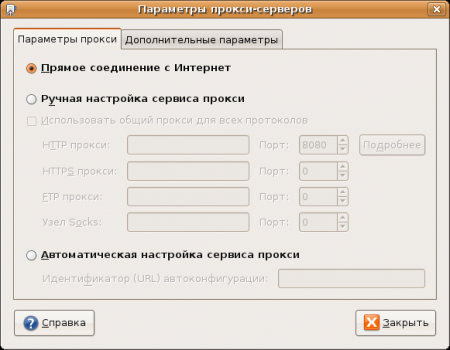
Open System → Settings → Service Proxy and enter the necessary parameters:

Having a liquid crystal monitor, I can choose only one resolution that will not blur the picture. Open System → Settings → Screen Resolution and select the desired resolution and frequency.

If the desired permission is not listed, you can add it.
Open the file /etc/X11/xorg.conf with administrator privileges ( sudo gedit /etc/X11/xorg.conf ). Find a similar block of text:
Section "Screen"
Identifier "Default Screen"
Device "Generic Video Card"
Monitor "Acer AL1751"
Defaultdepth 24
SubSection "Display"
Modes "1280x1024" "1024x768" "832x624" "800x600" "720x400" "640x480"
And we add the necessary permission to the Modes parameter in accordance with the format.
To keep abreast of my articles, you can subscribe to the RSS feed.
Everyone can help develop this series of articles, share their experiences. Welcome: http://www.linuxman.ru . Over time, I will transfer all changes to Wiki to Habr.
Guide: Step Backward , Step Forward , Table of Contents
Login and password entry window
I have Ubuntu located on my home computer, so I'm not afraid that someone from my family will steal important data. My password is complicated enough so that my younger brother does not pick it up and break the system. Therefore, I decided to disable the login and password input window at boot.
Open System-> Administration-> Login window .

The most interesting tab for me is the Security tab :

Enter the login of the desired user and save ourselves from constantly entering the password when turning it on.
Saving and loading state
Some applications in Ubuntu have the ability to maintain their state when you turn off the computer / session. Turning this feature on is easy. Open System → Settings → Sessions and go directly to the “Session Settings” tab and check the box:

Proxy service
A lot of people use the Internet through proxies, or use proxies for anonymity. Ubuntu has a single proxy settings interface for many applications at once.
Open System → Settings → Service Proxy and enter the necessary parameters:

Screen resolution
Having a liquid crystal monitor, I can choose only one resolution that will not blur the picture. Open System → Settings → Screen Resolution and select the desired resolution and frequency.

If the desired permission is not listed, you can add it.
Open the file /etc/X11/xorg.conf with administrator privileges ( sudo gedit /etc/X11/xorg.conf ). Find a similar block of text:
Section "Screen"
Identifier "Default Screen"
Device "Generic Video Card"
Monitor "Acer AL1751"
Defaultdepth 24
SubSection "Display"
Modes "1280x1024" "1024x768" "832x624" "800x600" "720x400" "640x480"
And we add the necessary permission to the Modes parameter in accordance with the format.
To keep abreast of my articles, you can subscribe to the RSS feed.
Everyone can help develop this series of articles, share their experiences. Welcome: http://www.linuxman.ru . Over time, I will transfer all changes to Wiki to Habr.
Guide: Step Backward , Step Forward , Table of Contents
