Alternative development environment for Arduino

In the world of Arduino, there is its own, written in java, IDE, quite a Spartan look, without text highlighting and auto-completion! Its main functions are program assembly and loading. Compilation is carried out through avr-gcc, and loading in MK through avrdude. After several months of use, I decided to look for an alternative, since I periodically managed to load the processor 100% on the Arduino IDE or just crash! After checking the search engine results, I was a little disappointed, there are no alternatives for linux, except for the console ino . Well, maybe we’ll have enough of the console client, let's get started ...
Take the development environment: Geany- An easy and convenient cross-platform editor, with the ability to fasten your scripts, which has a built-in console and is easily extensible through plugins. Further, all actions will be performed on the debian / ubuntu x86-64 system.
1. Install ino, Geany and plugins for it:
$ sudo apt-get install geany geany-plugins pip picocom$ sudo pip install ino2. Let's proceed to configure ino. For its operation, you need a folder with the original arduino ide, preferably a stable version 1.0.5. With beta versions, it didn’t work for me, because there they changed the logic of the location of the libraries and manual fitting did not lead to success, so I stopped at version 1.0.5. You need to download and unzip it to any convenient directory. I will have the root of the user directory / home / user /. Ino mainly uses 4 commands:
- ino init - creates a folder structure for the project, you need to execute in an empty directory
- ino build -d / path_to_arduino_ide_directory - compiles the project
- ino upload - uploads a project to MK
- ino clean - cleans the results of a previous build
I advise you to create a minimal settings file for ino with a description of your arduino board and serial port for working with it:
$ cat ~/.inorc
[build]
board-model = uno
[upload]
board-model = uno
serial-port = / dev / ttyACM0
[serial]
serial-port = / dev / ttyACM0
3. Let's proceed with the easy configuration of Geany and combining it with arduino.
Everyone can connect the necessary plug-ins at their discretion. This is done in two clicks of the mouse through the tools → module manager.
Change the default theme to dark + code highlighting templates:
$ wget http://geany-dark-scheme.googlecode.com/files/geany_dark_filedefs_20100304_190847.zip /tmp/
$ mkdir ~/.config/geany/geany_dark_filedefs && unzip /tmp/geany_dark_filedefs_20100304_190847.zip -d ~/.config/geany/geany_dark_filedefs/
$ rm -r ~/.config/geany/filedefs && ln -s ~/.config/geany/geany_dark_filedefs/ ~/.config/geany/filedefs
Next, you can start Geany, it will be with a new dark theme. Go to Tools → settings files → filetype_extensions.conf and add * .ino to the end of the line with C ++ so that arduino project files open with code highlighting in C ++ style. If you wish, then the code highlighting can be customized for yourself ~ / .config / geany / geany_dark_filedefs / filetypes.cpp. Unfortunately, I did not find the finished snippets (auto-completion) file under arduino. Specific functions, again, those who wish can make and publish.
Example of adding snippets
Tools → settings files → snippets.conf add the following line to the C ++ section
Serial=Serial.print(%cursor%);4. Configure the assembly of the Arduino project in Geany:
Assembly → Install assembly commands
- Compile -
cd .. && ino build -d /home/user/arduino-1.0.5 && find . -name 'firmware.hex' ! -path './.build/uno/*' -print -exec cp -f {} .build/uno \; - Load at MK -
cd .. && ino upload - Complete assembly -
cd .. && ino clean && ino build -d /home/user/arduino-1.0.5 && mkdir .build/uno && find . -name 'firmware.hex' ! -path './.build/uno/*' -print -exec cp -f {} .build/uno \; - Run -
ino serial
Settings picture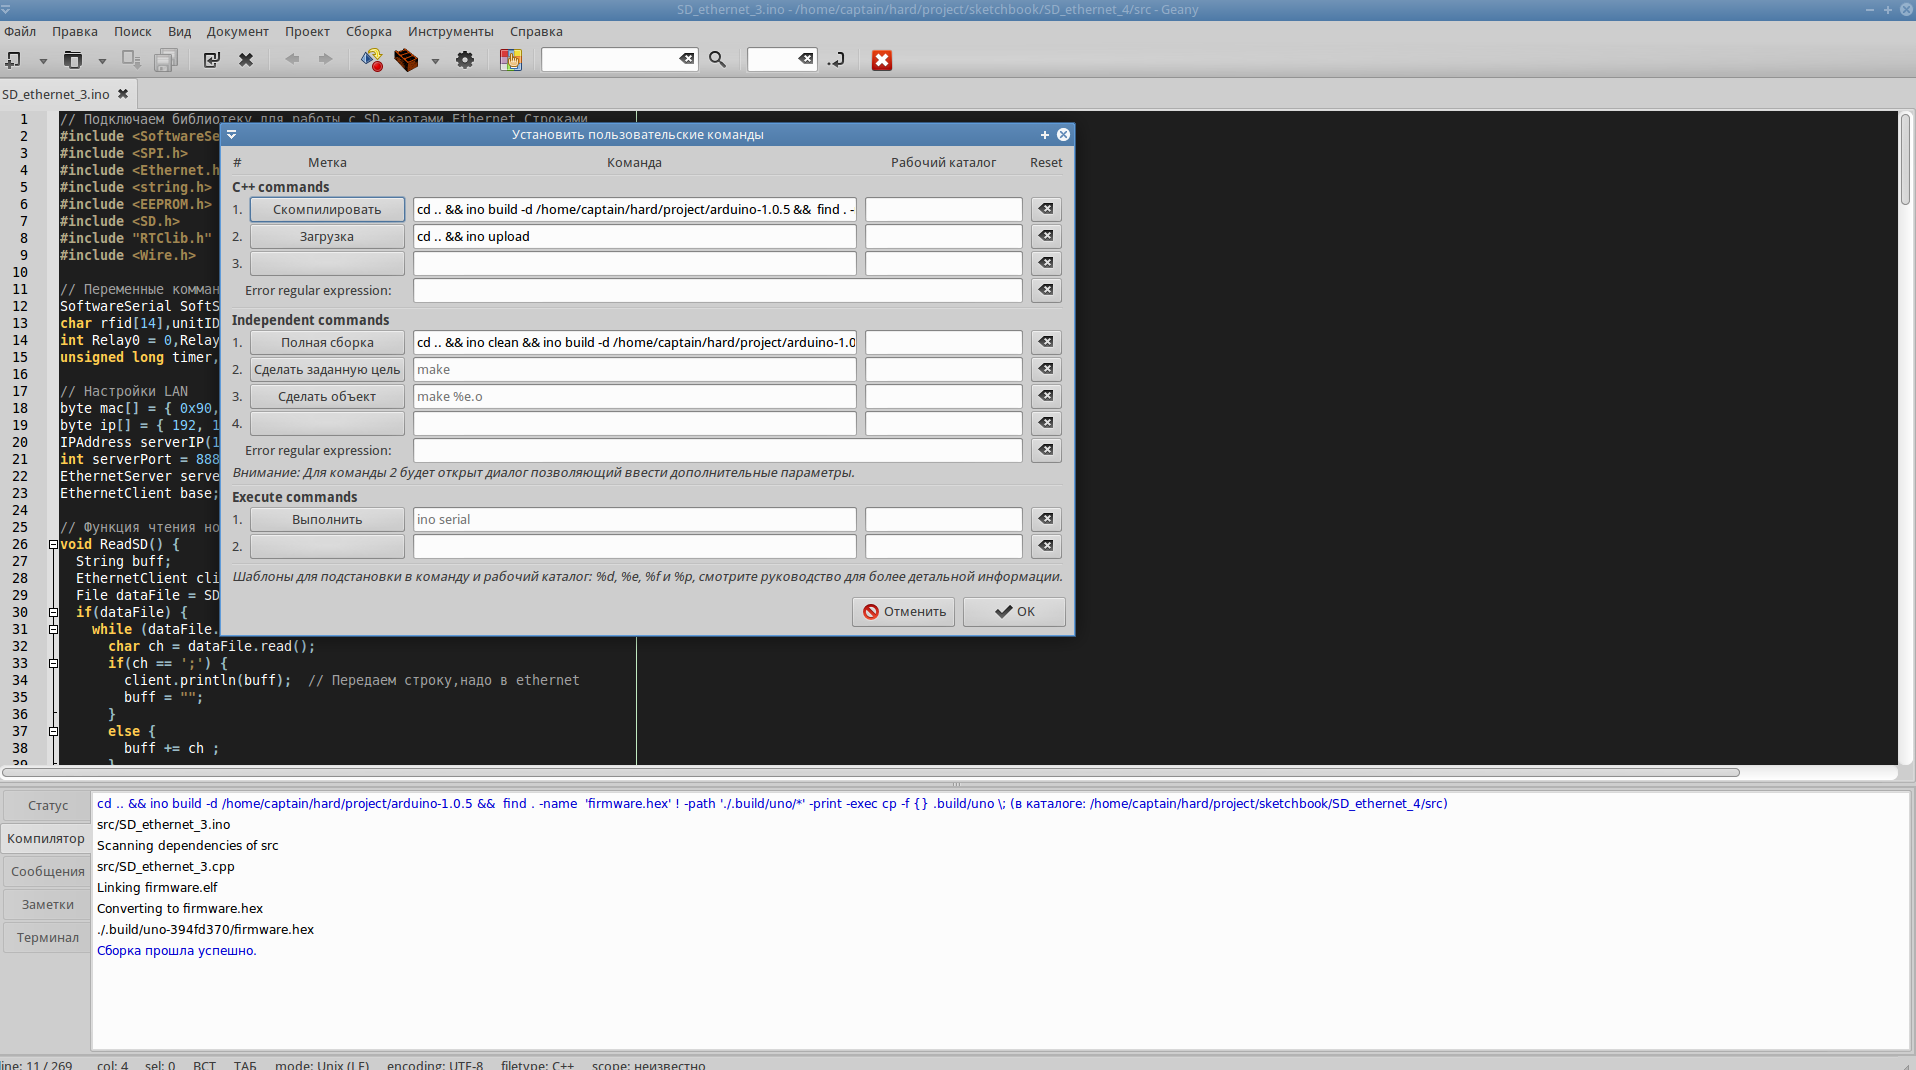
Video work example
These commands have a bit of magic associated with the ino feature. Namely, that after the assembly, ino creates the folder ./build/name_MK_randomnoy_number, and when loaded into MK, it looks for it in the folder ./build/name_MK_name. Perhaps these moments can be fixed with flags for ino or settings in the config, I didn’t really look for it, I did it through bash.
To create a new project, you must first create a folder through the console, go into it and execute ino init. Then, through geany, you can create a project file (or open the sketch.ino created by default). At the first assembly, you need to run the command "Full Assembly", then you can already use "Compile". In principle, that’s all. Everything works perfectly, while if you want geany you can fully customize for yourself. I recorded a small video of the work for clarity.
Note: ino has a bug with parsing the wifi library, which is included in the standard arduino ide package. Before running ino -d / path, you must remove it from the / libraries directory.
Materials used for the article: