August 21, 2013 at 11:20
Overview of IP phones Escene ES320, ES320P and GS320
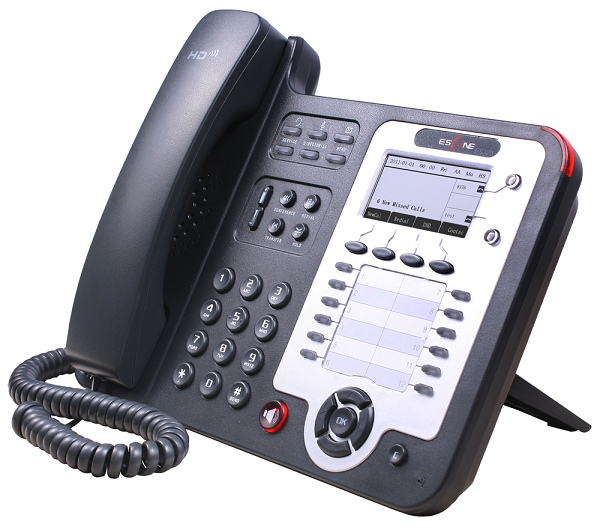
In the continuation of the review cycle of Escene IP-phones , we are smoothly moving from budget to more expensive models. Today we look at the Escene ES / GS 320 phones . Compared with the base model Escene ES220 , the presented devices have an improved screen with a higher resolution, a more rigorous office design, a built-in 12-button programmable panel, an adjustable stand and advanced features for connecting a headset.
Escene ES320-PN with PoE support (Power over Ethernet) and Escene ES220-N without PoE support (equipped with Escene AD200 power supply ) have 100 Mbps Fast Ethernet network interfaces, Escene GS320-N got Gigabit Ethernet network interfaces operating at speeds up to 1 Gb / s and PoE support. For the PoE model, the power supply is not included, but if necessary, it can be purchased separately. The differences between the models end there.
The retail cost of the ES320-N and ES320-PN models is almost the same and amounts to 3850 rubles. Due to the presence of a gigabit bridge and PoE in the GS320-N, the cost of the device is slightly higher and amounts to 5630 rubles.
Positive features
Functionality
VoIP
Data transfer
Physical parameters
Additional types of service (additional functions)
Control
Nutrition
Packaging
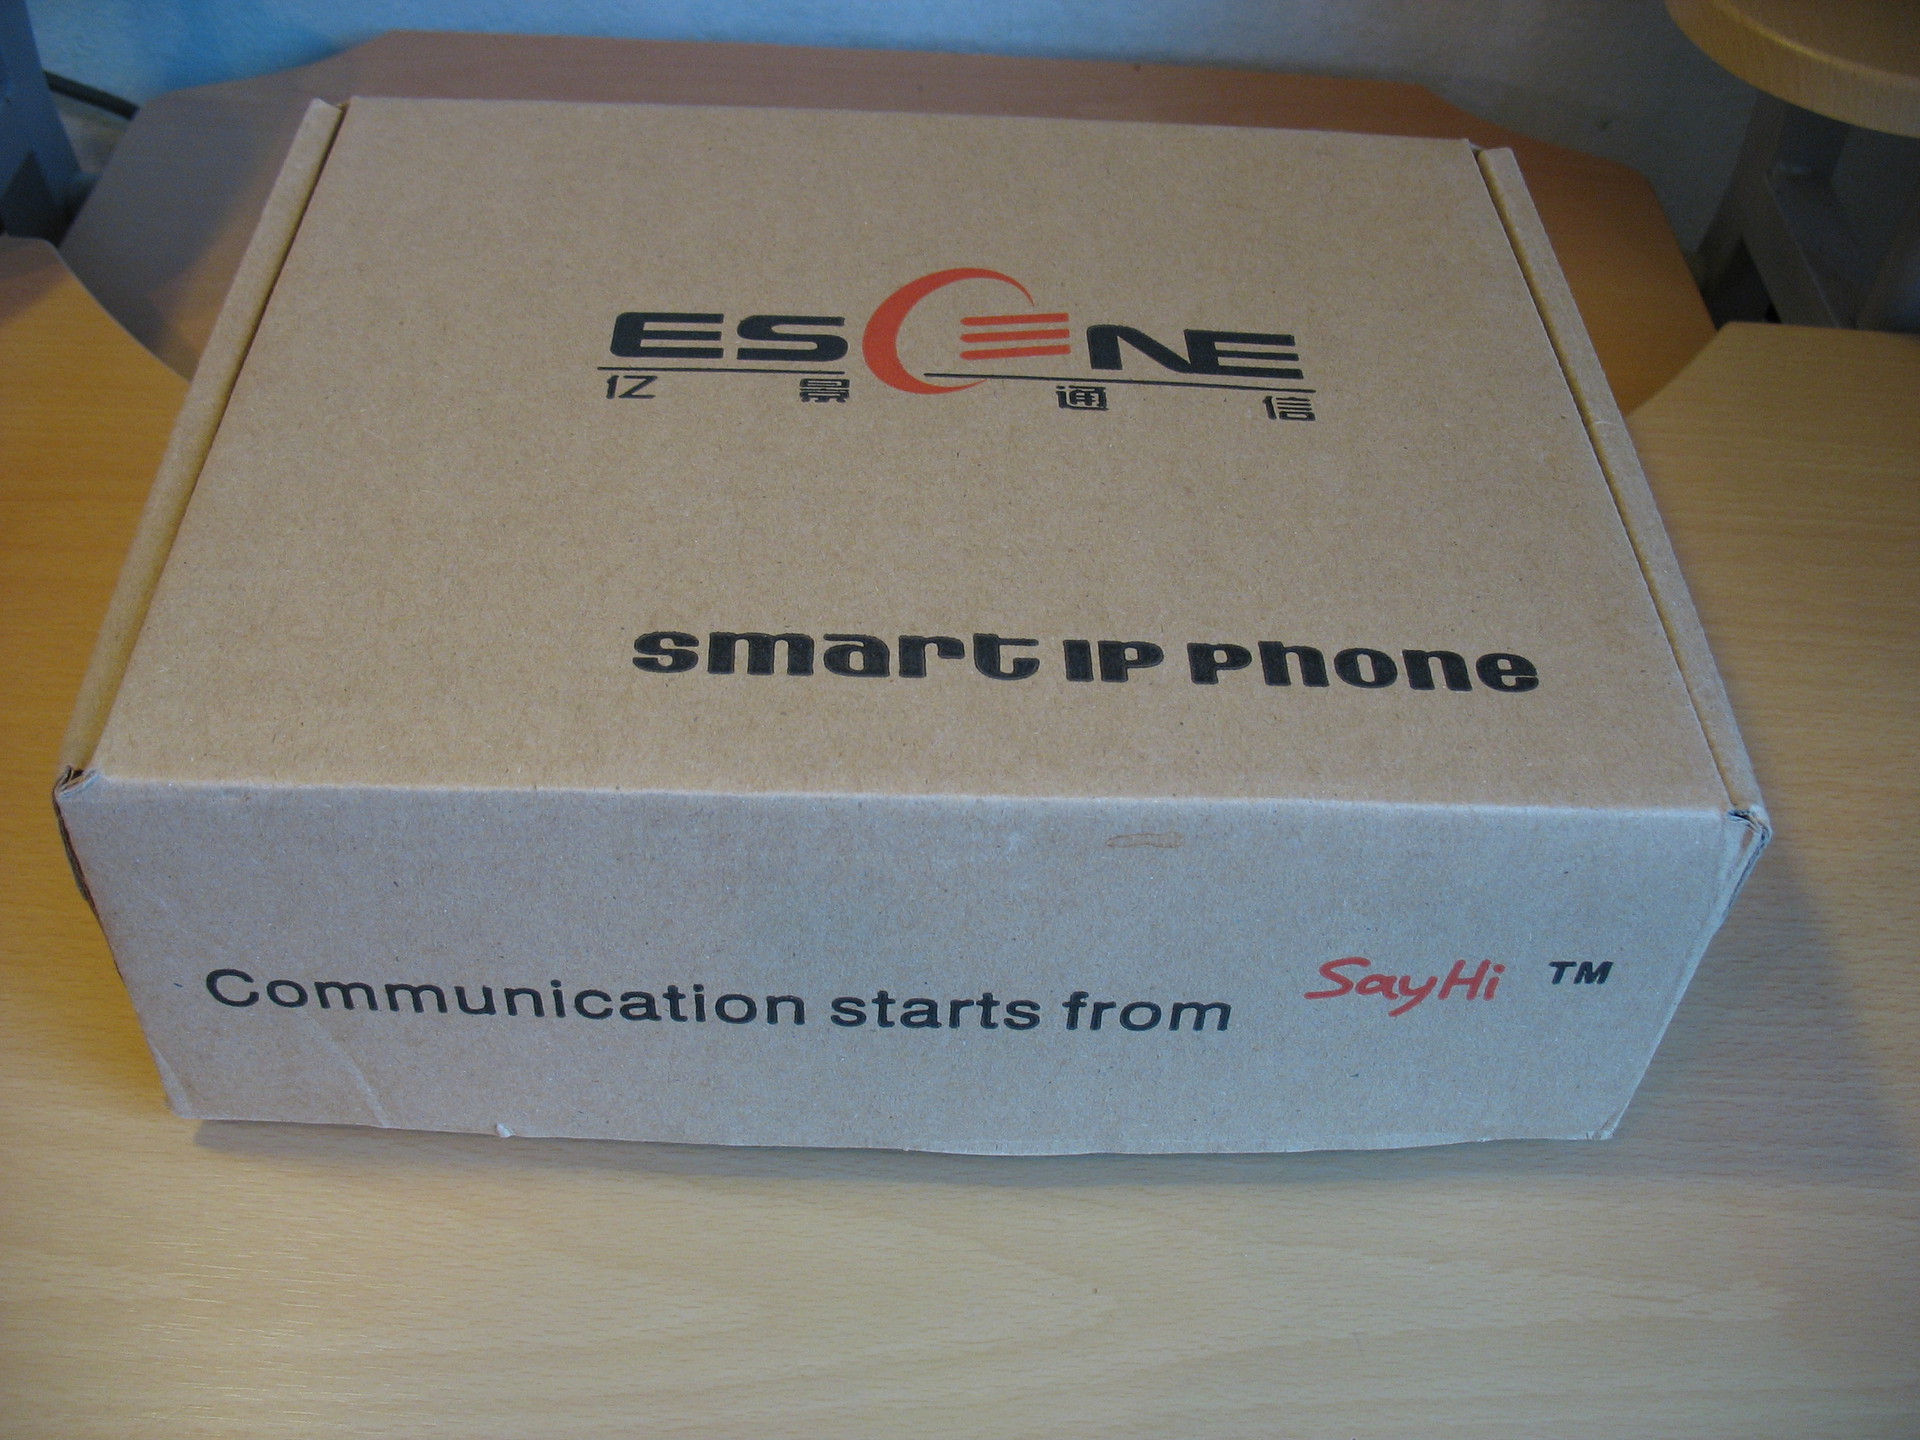
The device is delivered in a cardboard box with the company logo, on the side of the package there is a sticker with the model number and the device barcode.

Phone delivery set
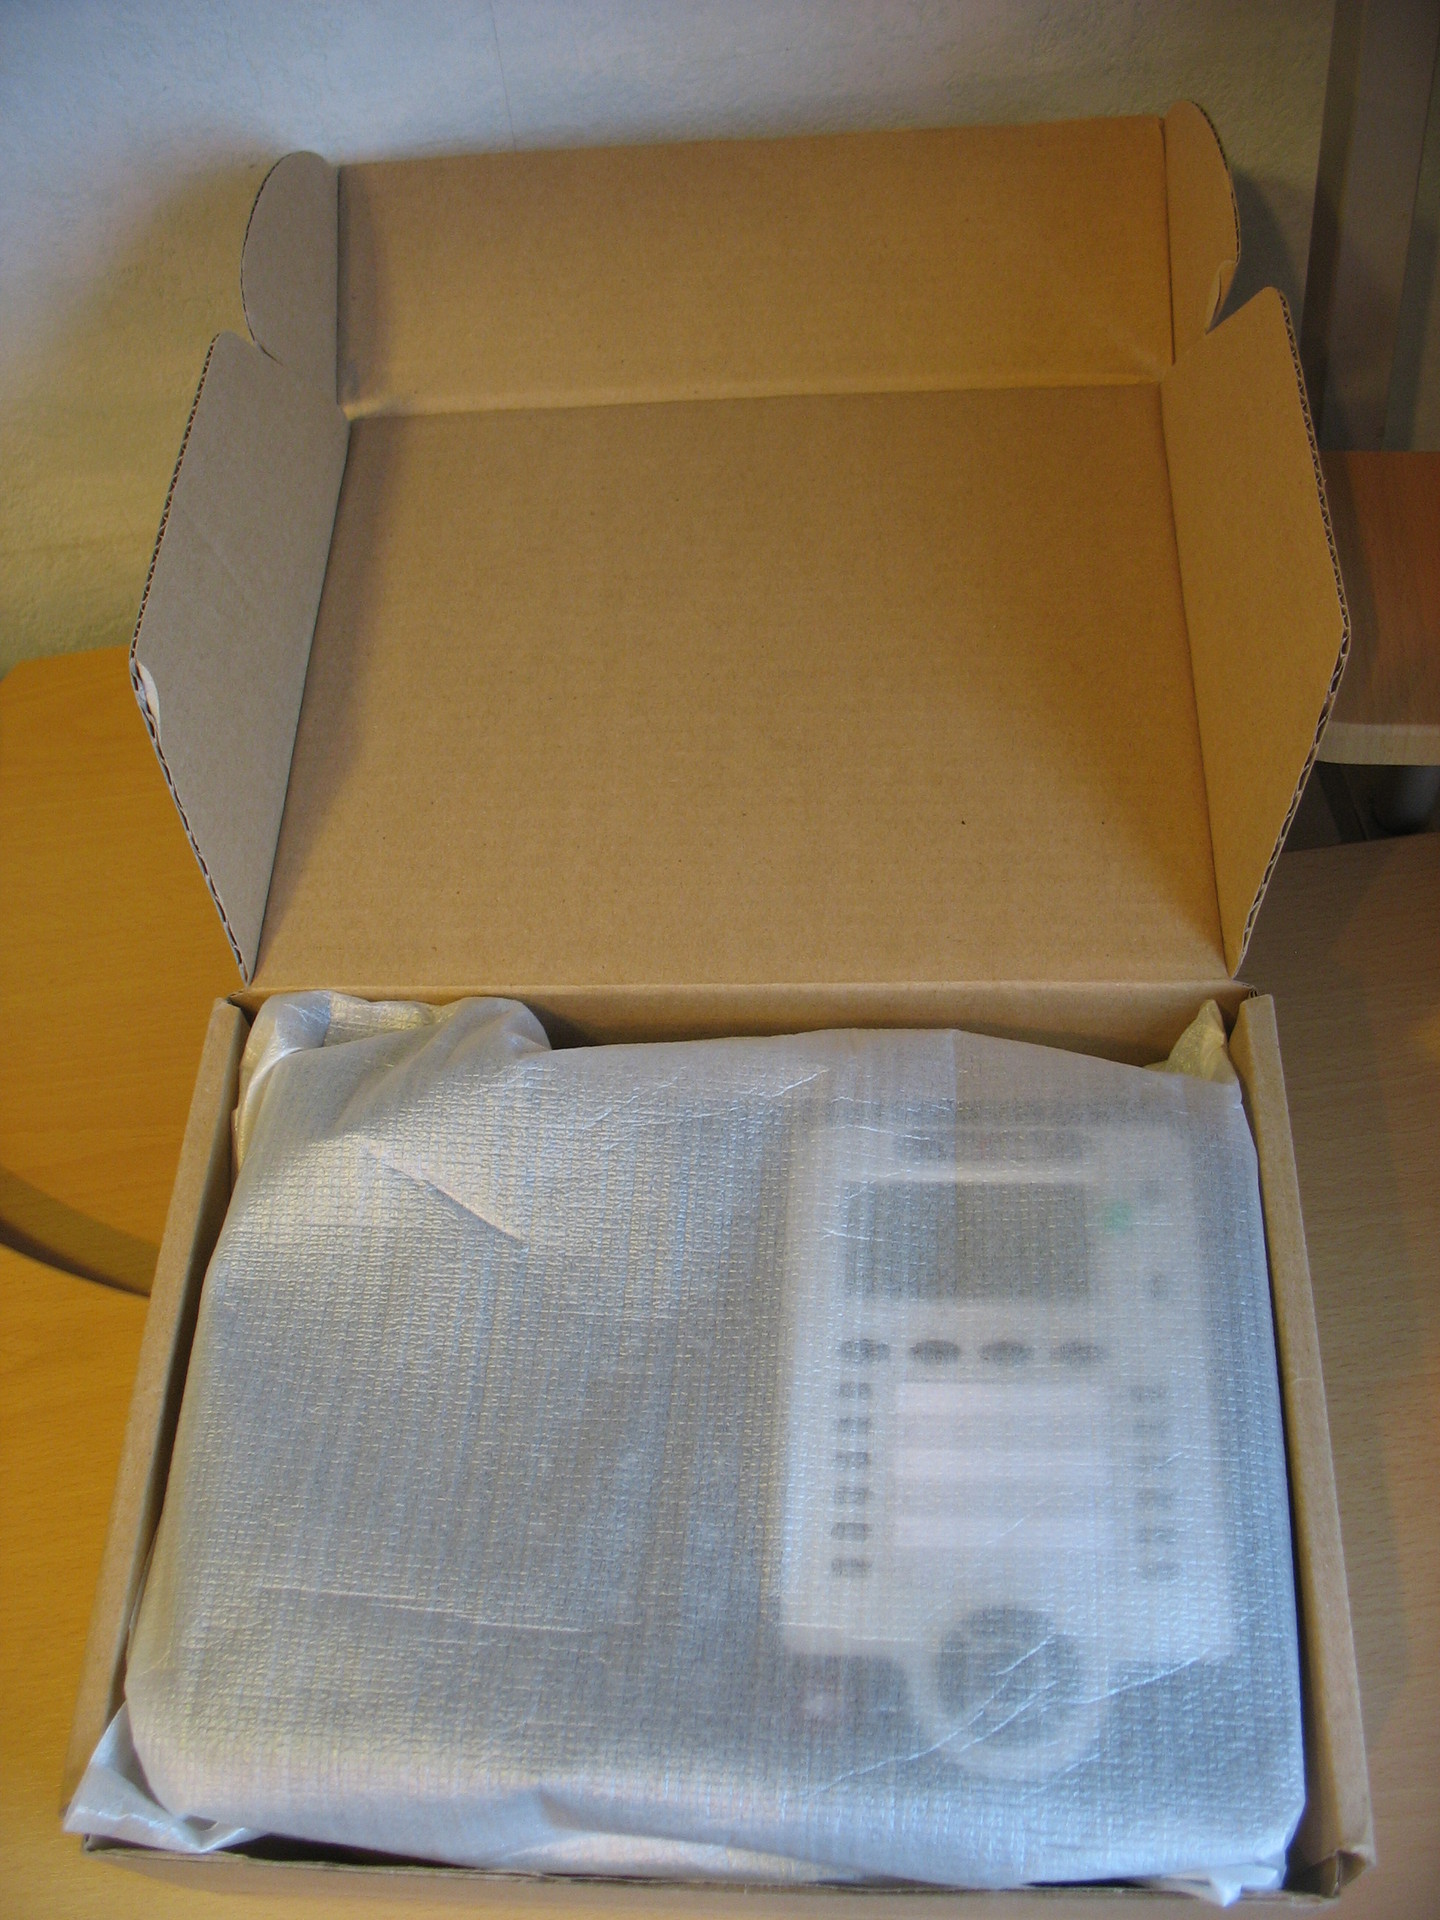
Having opened the box, we will see that the phone is neatly packed, nothing more.
Inside, standard equipment, which includes:
The bundled model Escene ES320-PN there is no power supply Escene AD200 (at 5 volts), it must be ordered separately.
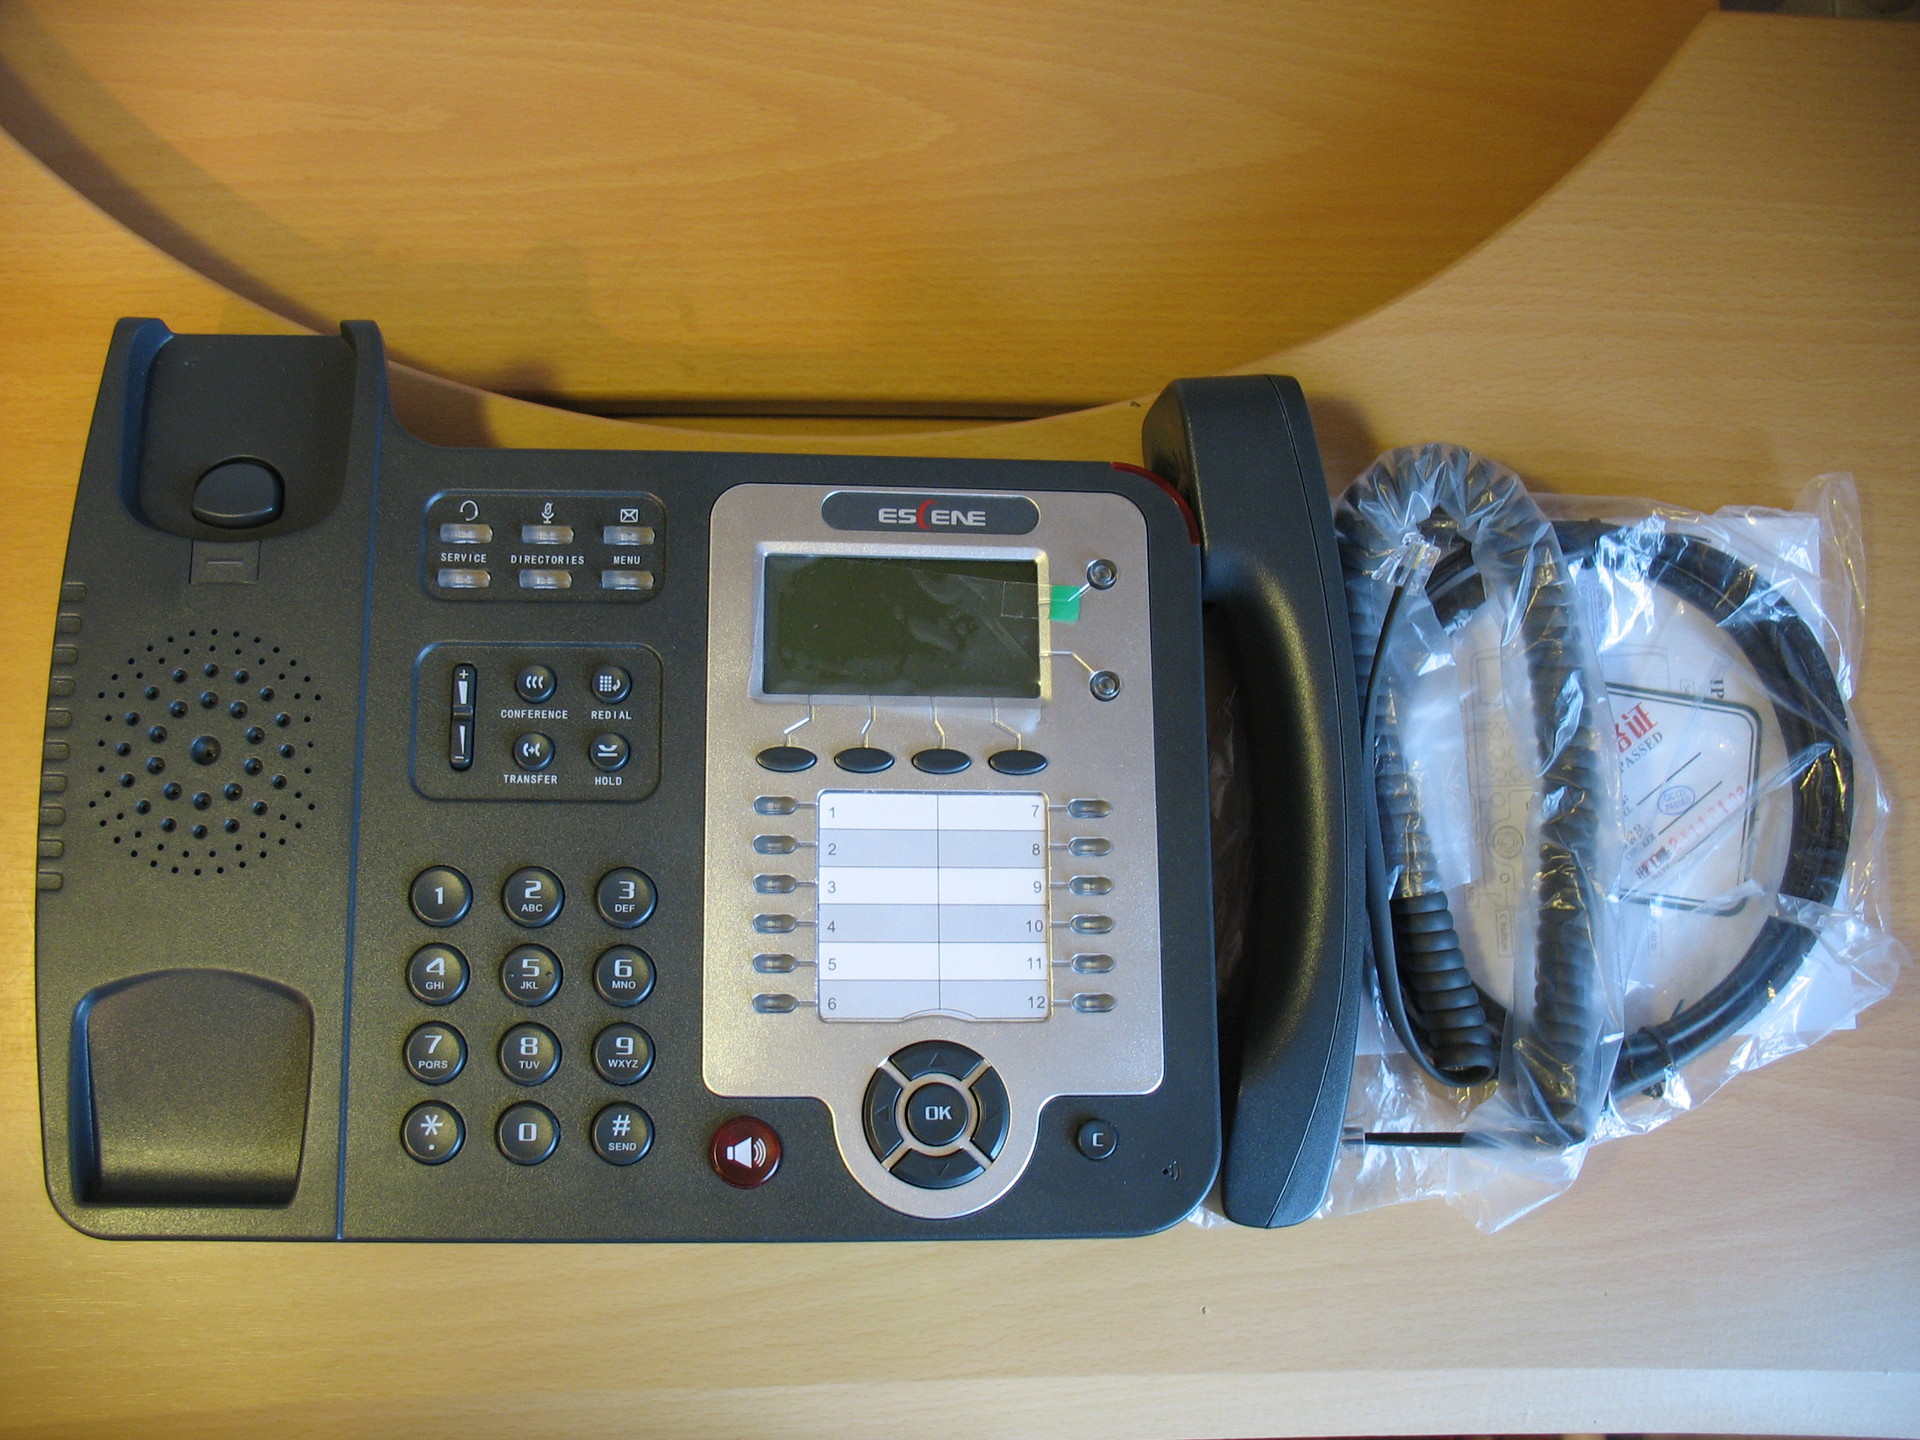
Conventionally, the buttons on the phone can be divided into 5 blocks.
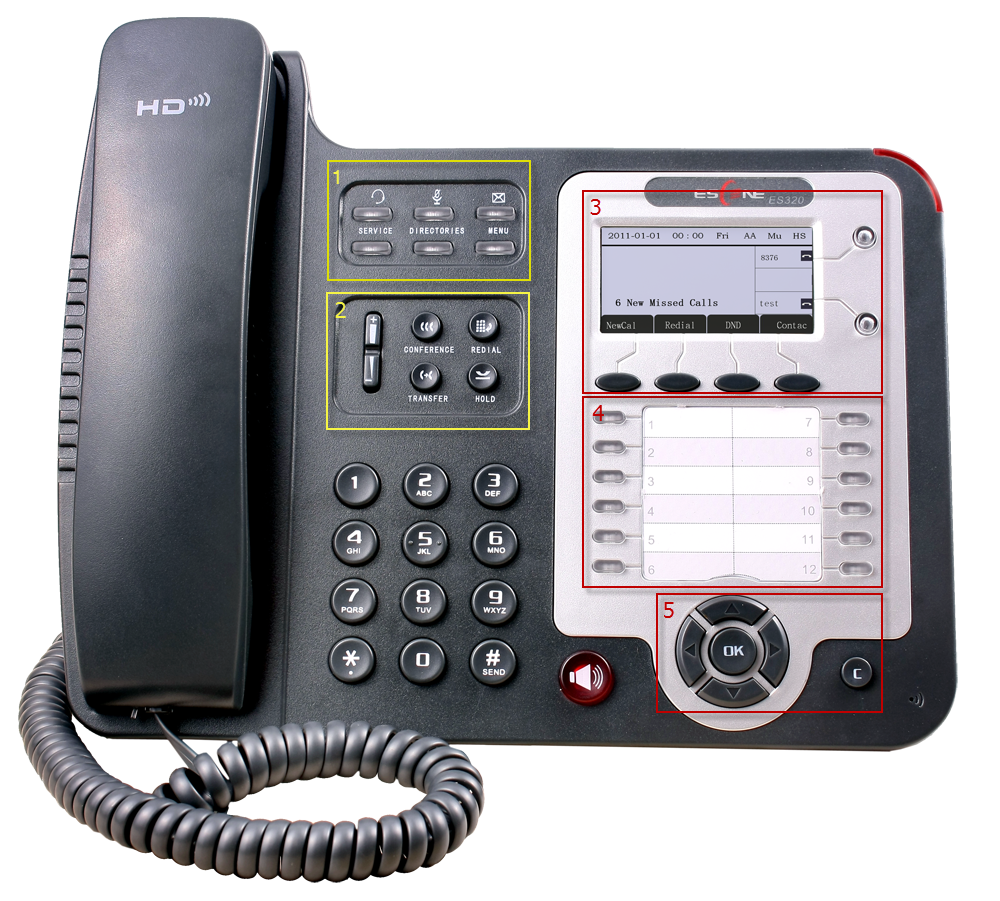
The first block is the management of the service functions of the phone.
There is a separate button for calling voicemail with an image of an envelope; if there are unread messages in the voicemail box, the button lights up in red. A very useful button (the headset icon is shown above it) for switching to the headset and vice versa, the button also has a light indicator, which allows the operator to control whether the headset is turned on or off. Also on the panel is a separate microphone mute button; if the microphone is muted, the button lights up in red.
The second block is the management of additional functions.
There are all the necessary buttons, just the ones that are used most often:
There are also two buttons for adjusting the volume of the phone / ringtone.
The third block is line management and multi-function screen buttons.
The phone has two independent SIP accounts (two SIP lines). By default, outgoing calls are established from line 1, unless of course it is configured, if necessary make a call from line 2, you need to press the line button, then dial the number - the phone will send the call through a second SIP account.
The phone can accept two simultaneous calls. The Line 1 and Line 2 buttons have a light indication, when a call arrives, the diode of the line to which the call arrives flashes. If the line is busy, the line button lights up in red; if it is blinking, an incoming call has arrived. If the line lights up green - an active call is on the line; if it blinks - the call is held on the line.
Each of the multi-function buttons displays the function that is currently active, for example: New call, end a call, Do Not Disturb, transfer a call, and others.
The fourth block - 12 programmable buttons.
The buttons can operate in BLF mode, speed dial (number, prefix or SIP URI) or transmit DTMF tones. If we are talking about dialing a prefix, then this function differs from dialing in that the saved combination is automatically dialed, but the block of digits is not sent from the telephone to the IP PBX - the telephone is waiting for the remaining digits to be dialed.
The BLF (Busy Lamp Field) function allows you to monitor the current state of the lines of other subscribers in real time, as well as intercept calls intended for other subscribers. When the button is in BLF mode, if the button is lit in red, the line is busy, if it is green, the line is free.
The fifth block is multifunctional navigation keys.
The block is used, first of all, for convenient navigation through the menu; the button “C” is used to delete a character. Use the Up and Down buttons to adjust the ringtone volume or the phone volume during a call.
The panel has a separate large red button - “Handsfree”, which allows you to enable or disable the speakerphone (speakerphone), in the phone it is full duplex. During hands-free operation, the red indicator on the button lights up.
There is a standard sticker on the back of the phone with the model number, serial number and MAC address.
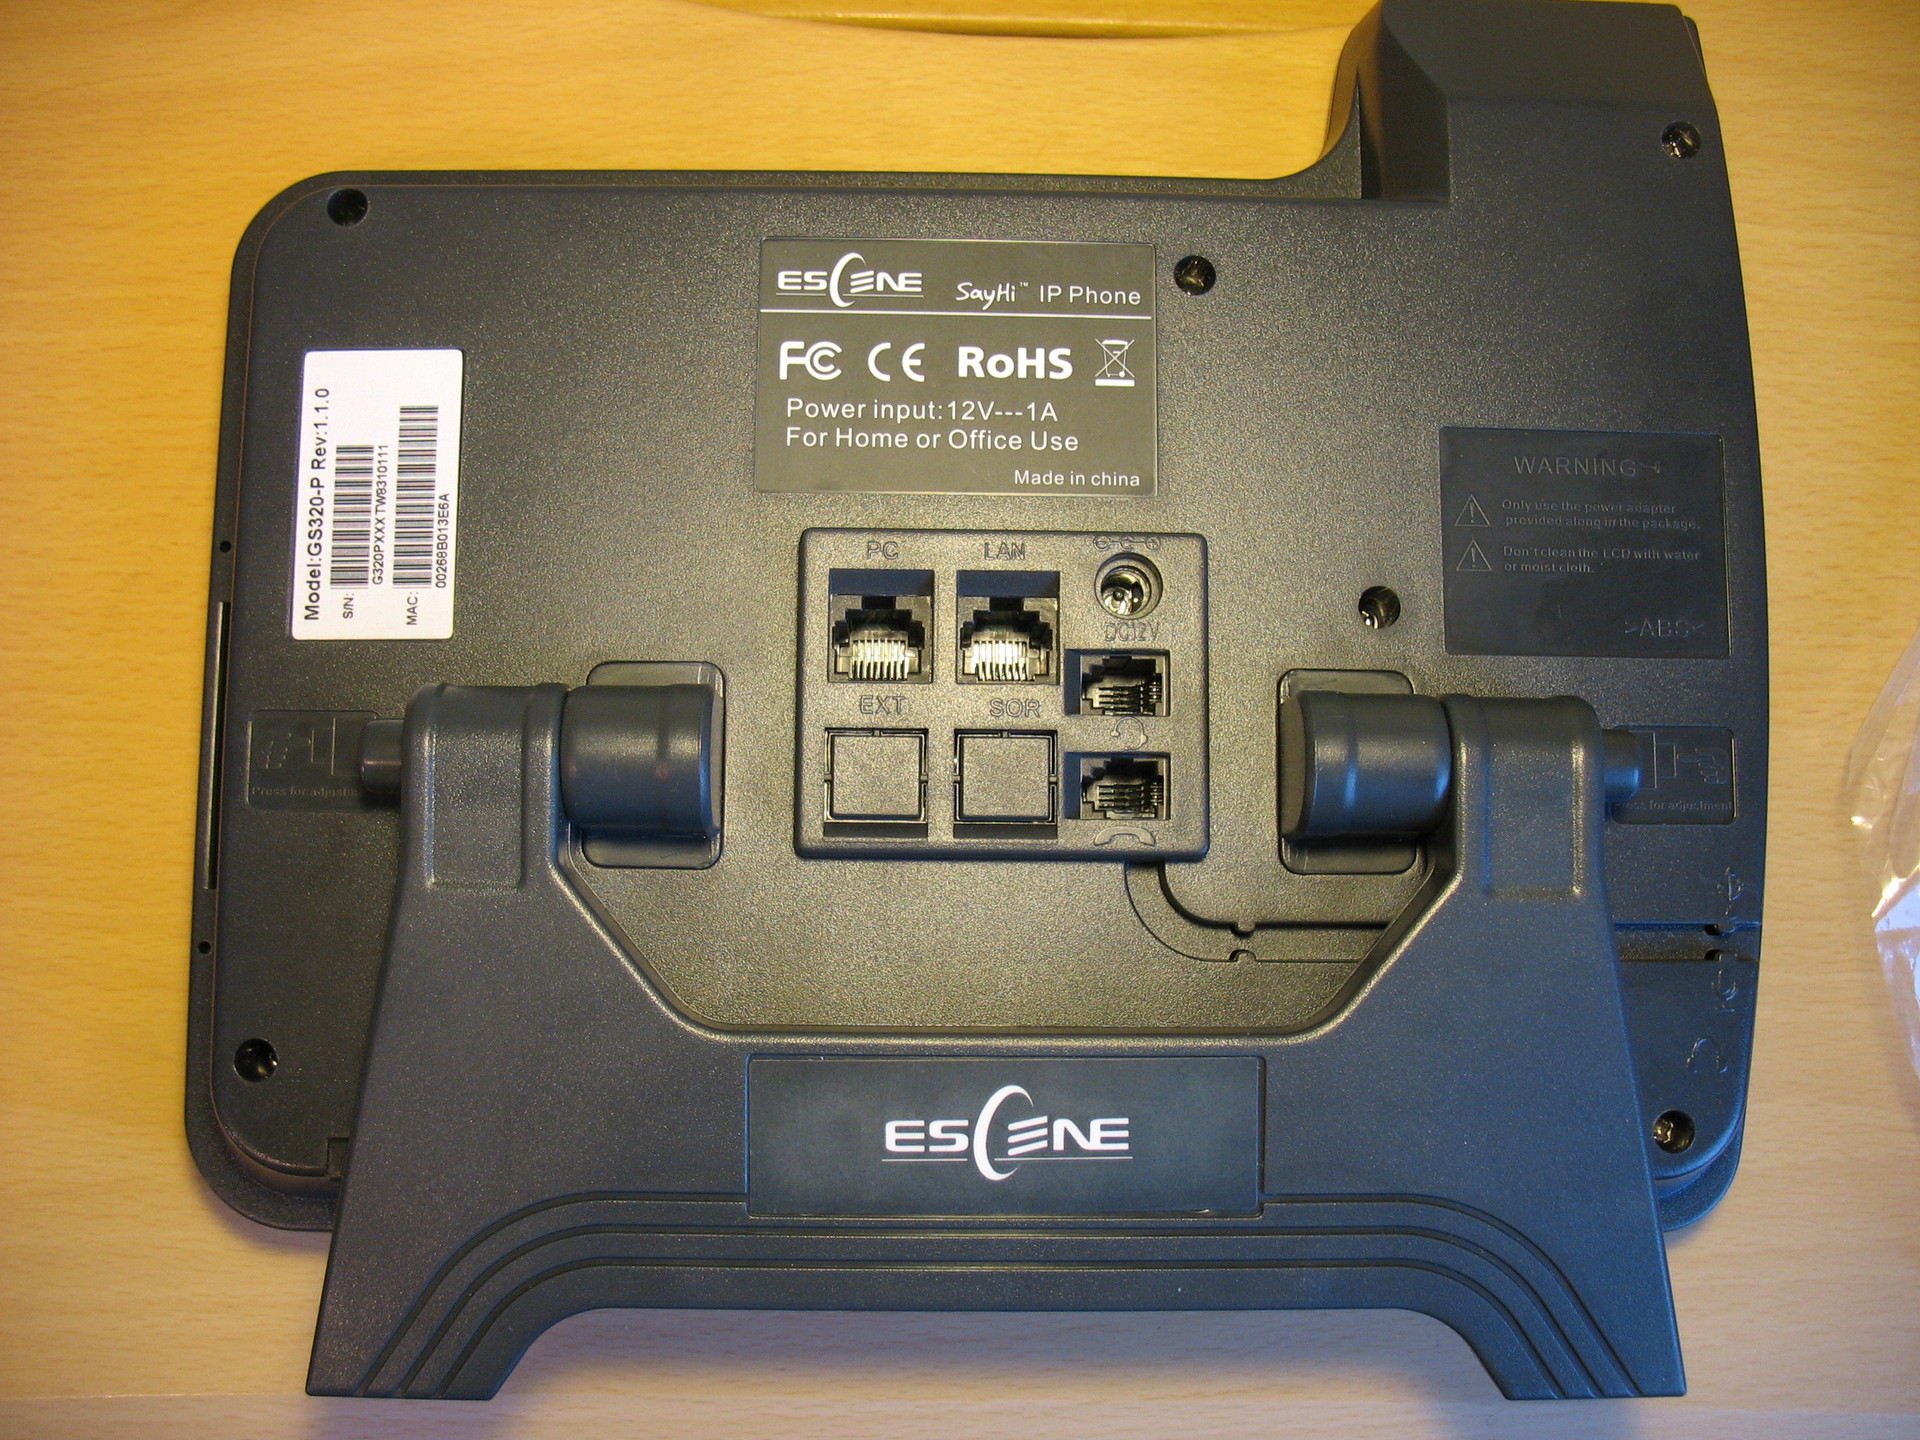
The model is equipped with a swivel stand, with which you can choose a convenient angle for the phone, just press the buttons on the sides of the stand and set the desired angle. The phone is not designed for wall mounting.
Interfaces and telephone connectors
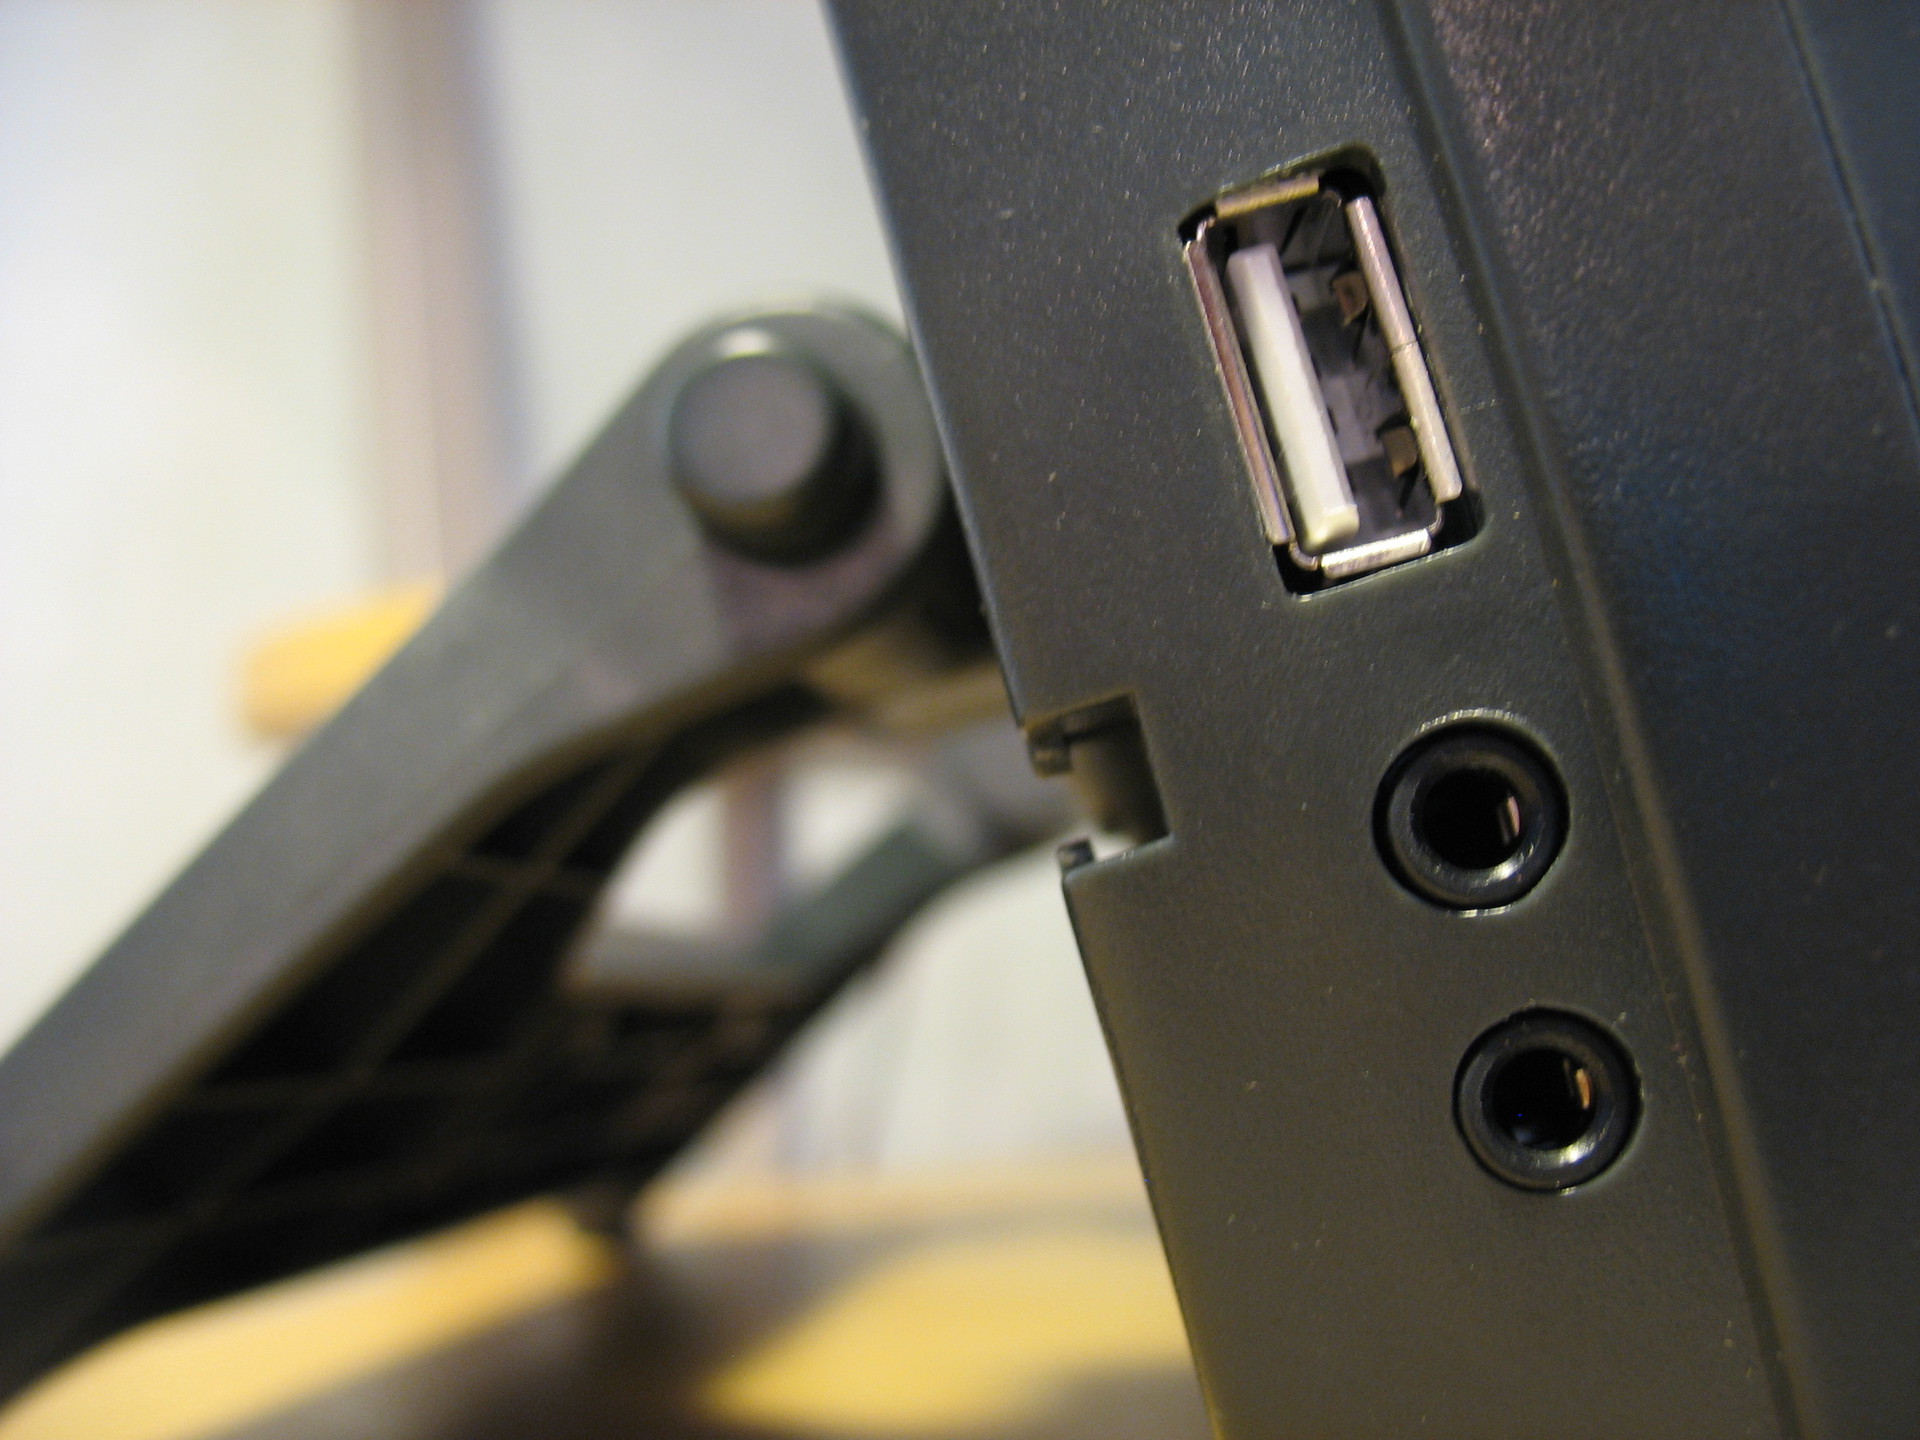
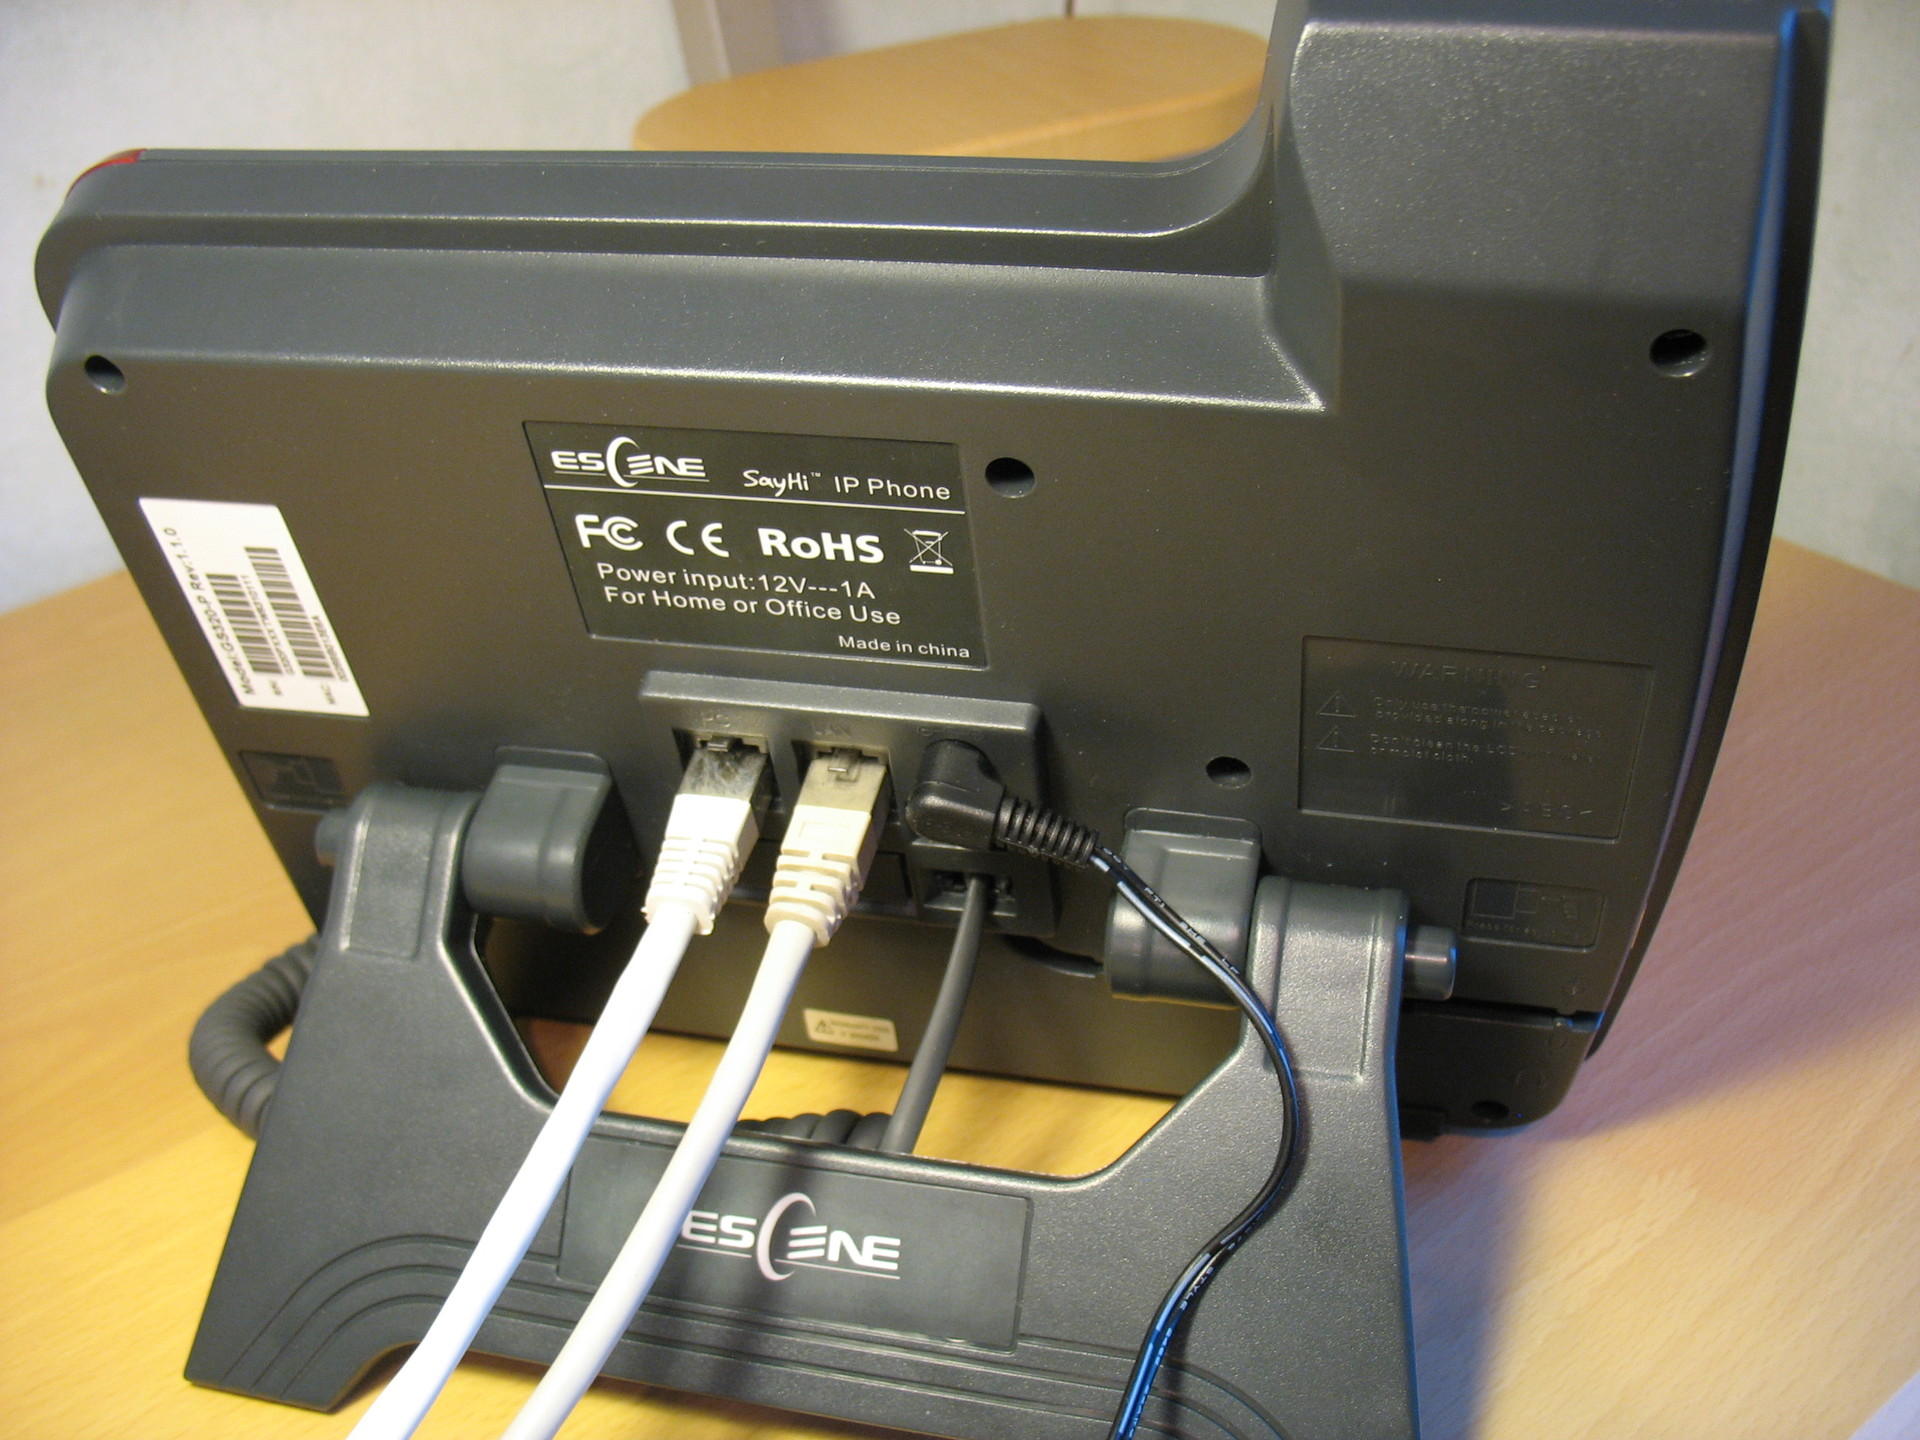
The first photo shows the interface block. To power from AC power using the power adapter, the panel has a 5 Volt jack, two headset jacks and a handset with an RJ11 jack. Two Ethernet interfaces - PC for connecting the phone to a computer and LAN for connecting to a local area network and PoE power supply (for Escene ES320-PN or GS320-N).
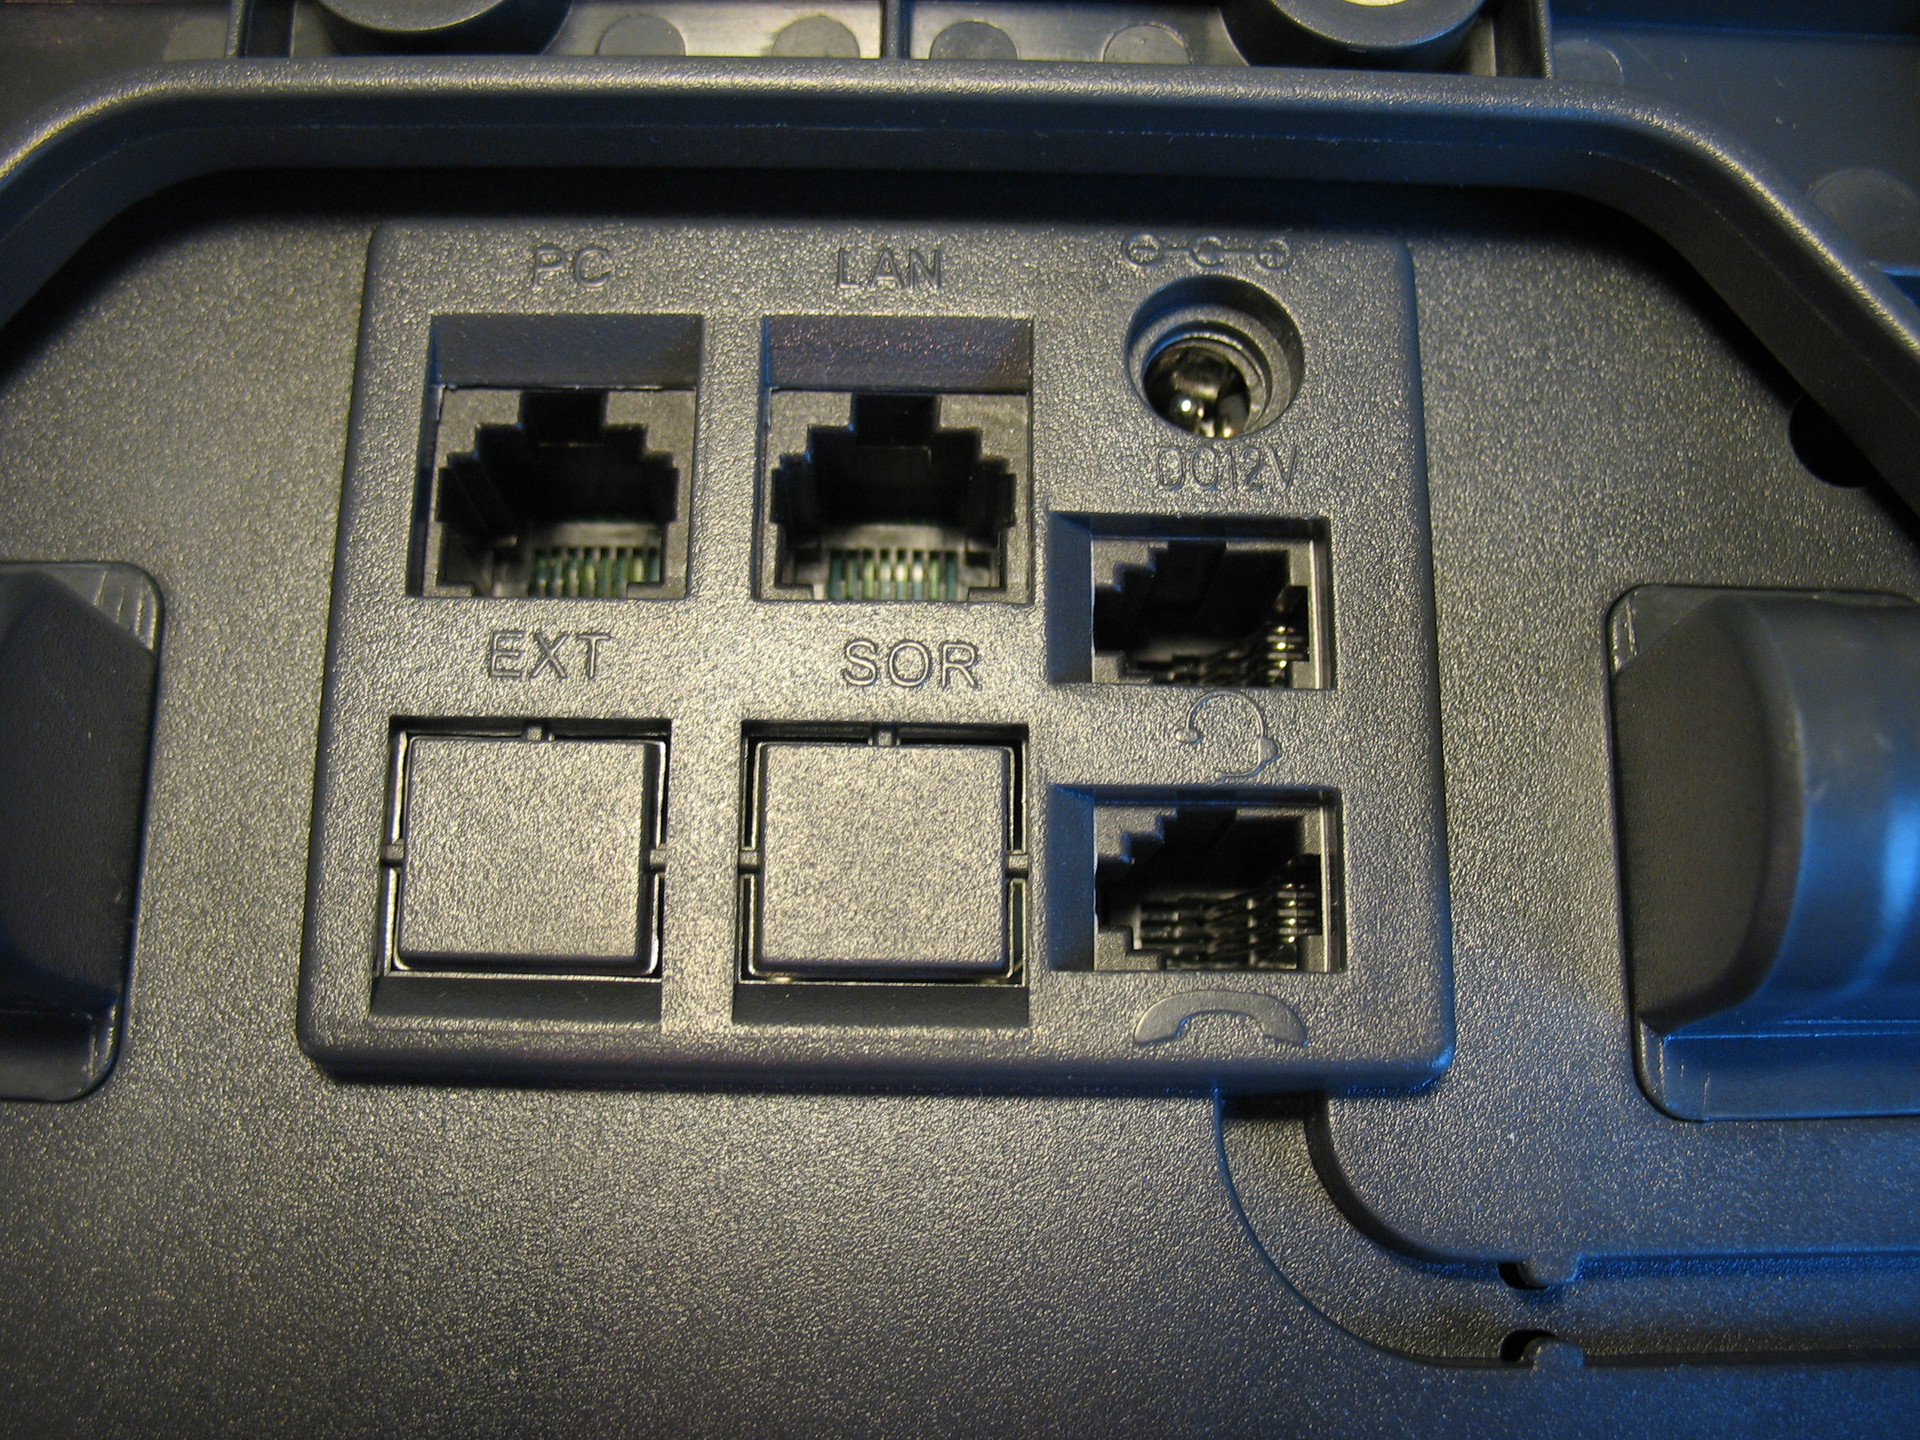
Two Jack 3.5 mm are used to connect a headset. This is extremely convenient, since many headsets have such a connector.
The USB connector can be used in two ways:
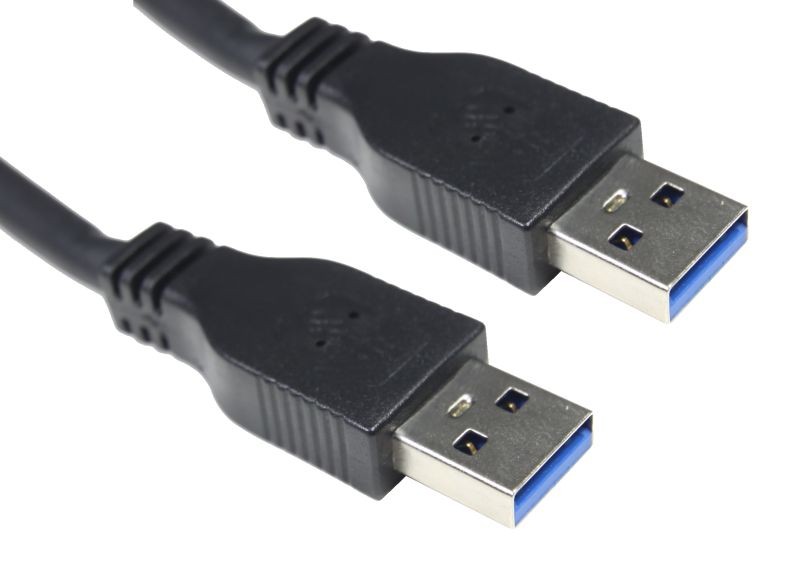
This is what the panel looks like with the wires connected.
The view of the phone on the table
This is how the phone looks assembled, high-quality plastic, the screen backlight is not very bright, but bright enough to read messages on the screen without difficulty.

It should be noted separately a nice screen with good resolution. The phone has a monochrome LCD screen with a backlight size of 128 * 64, not large, but its size is sufficient to easily read information from the screen.
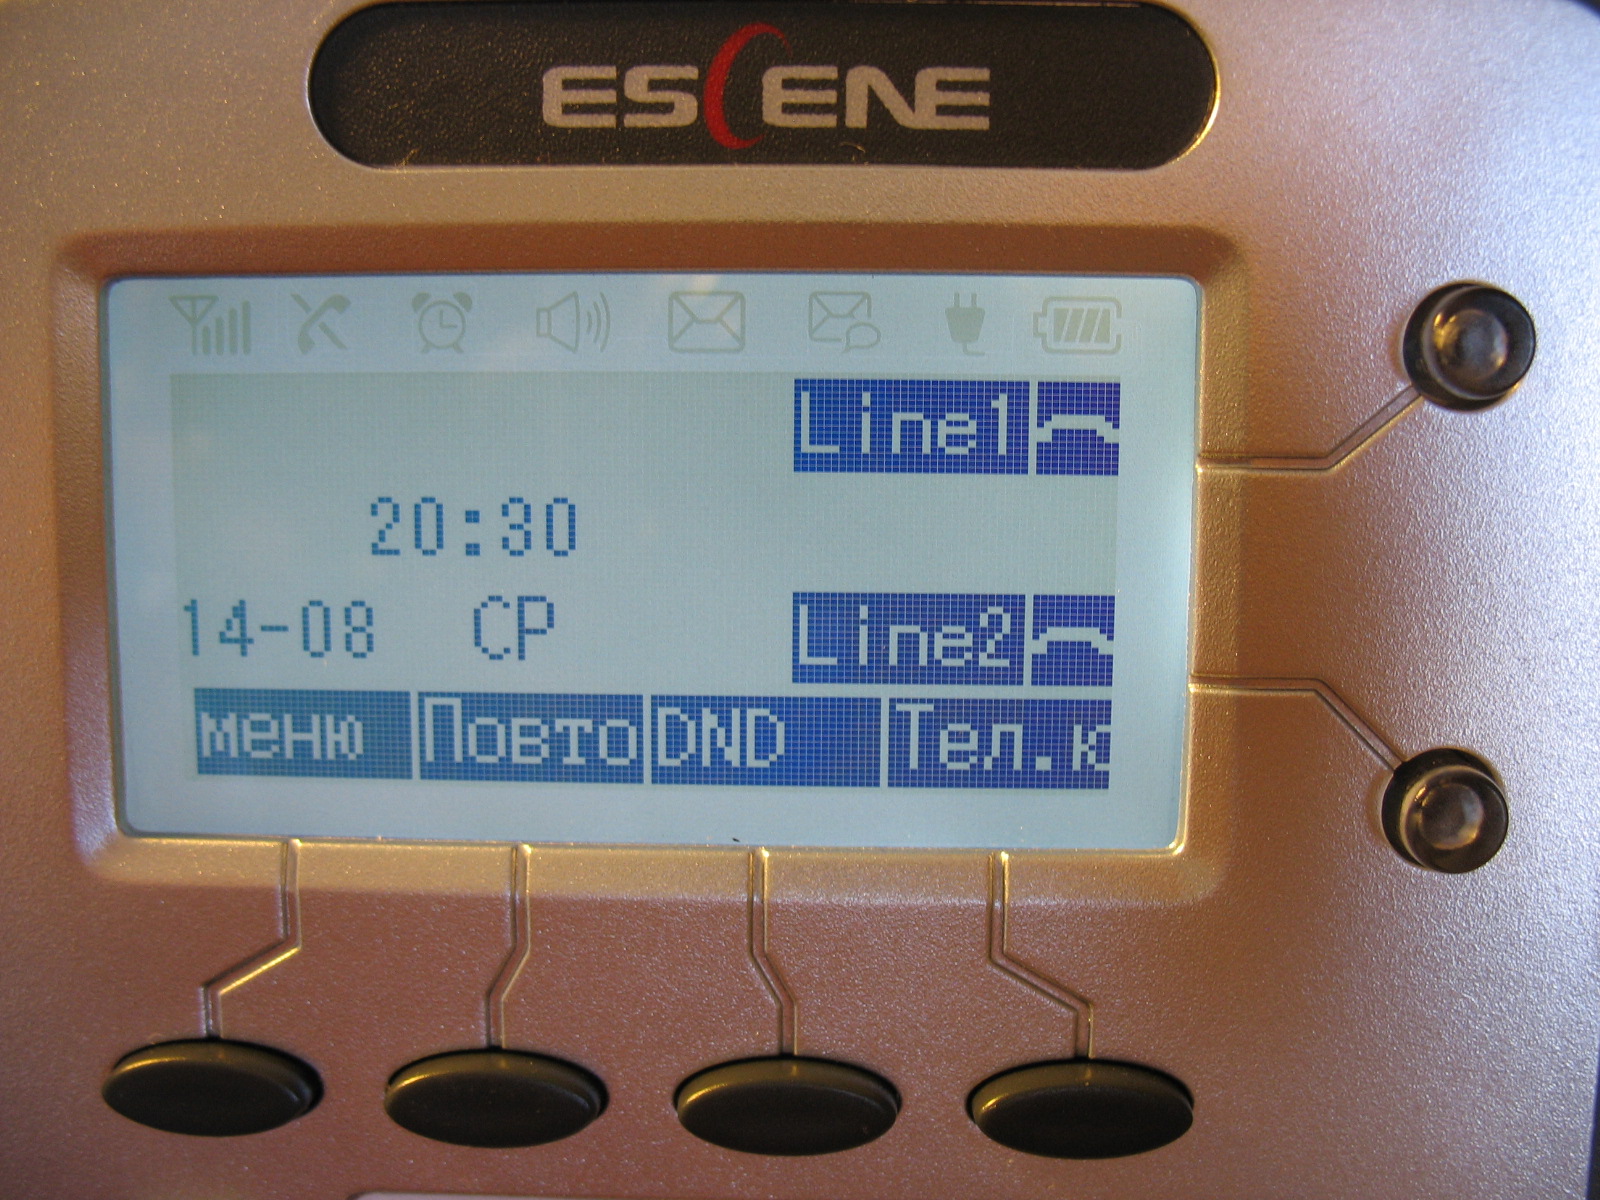
This is how the phone screen with the registered line in Russian looks like. “Line1” and “Line 2” - an arbitrary label, which is configured in the menu “SIP Accounts” and is called “Label”.
Dialing a number. When dialing a number, the line button through which the number is dialed lights up in red.
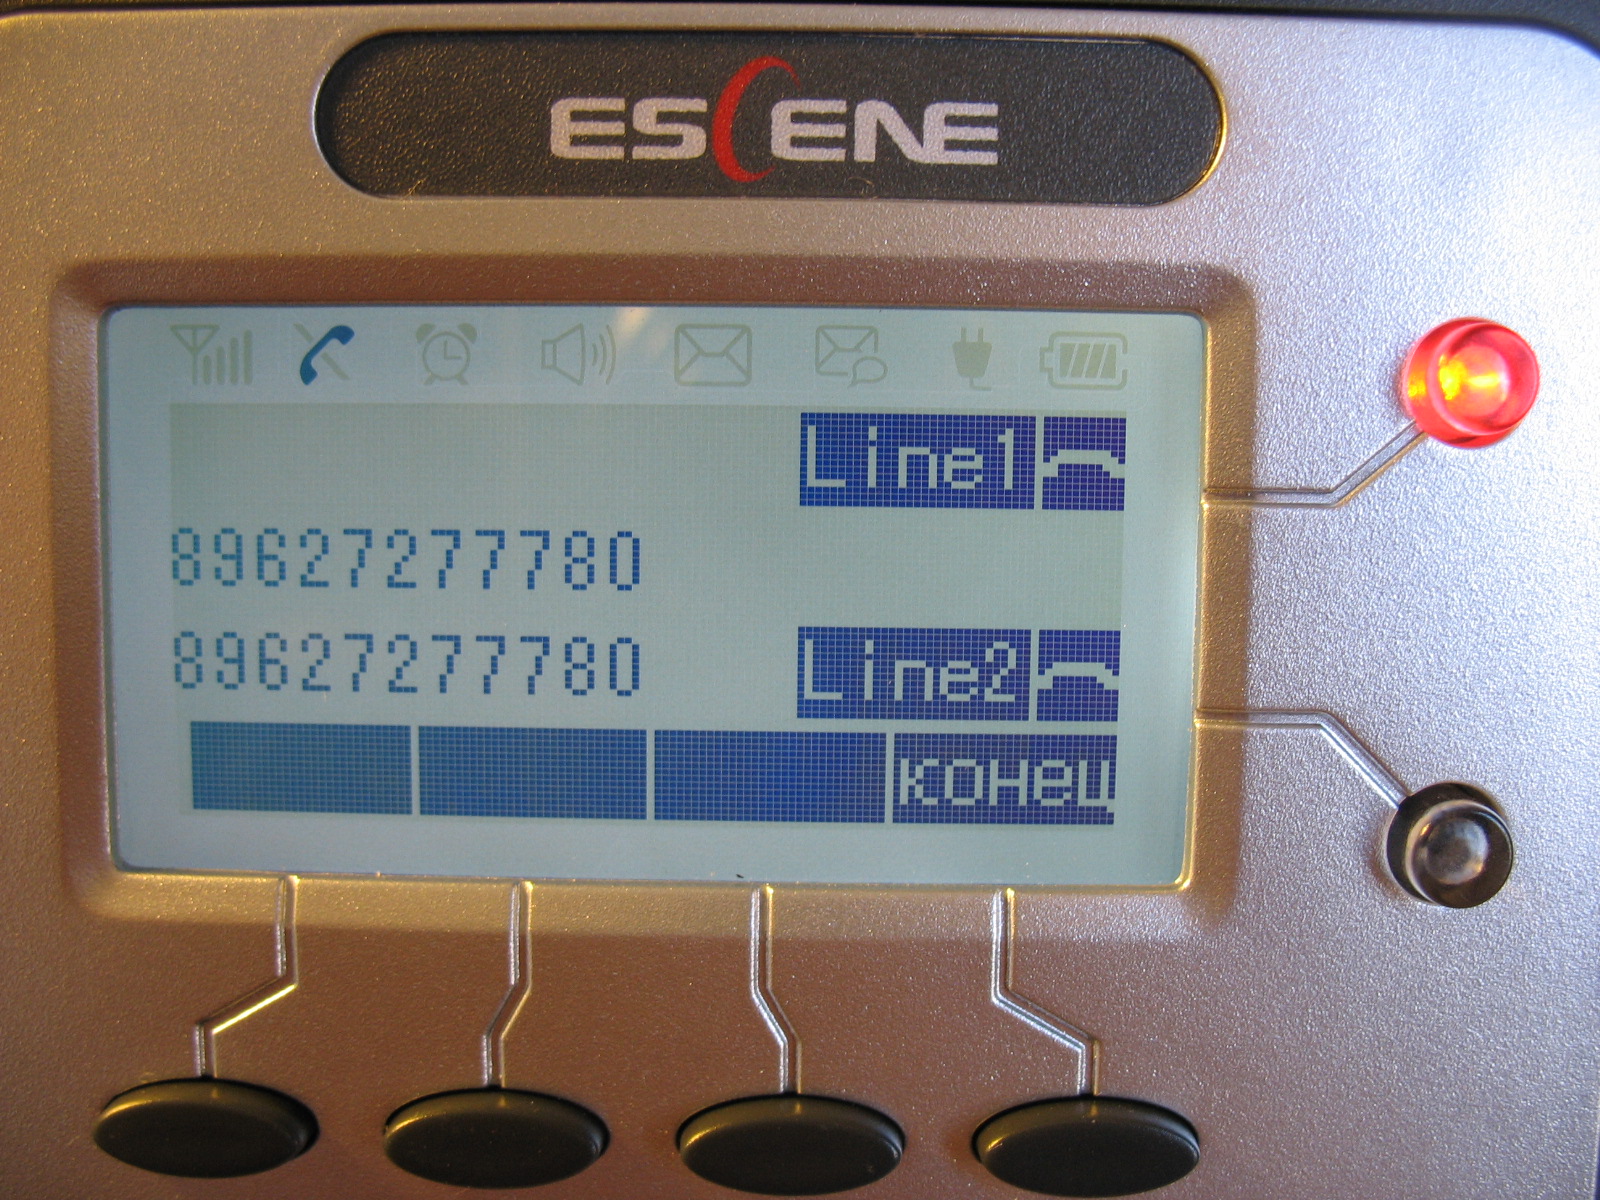
Incoming call. The line button that the call came to flashes in red.

The state of the conversation. During a call, the line button lights up in green.

Call logs.

View of the menu on the phone screen.

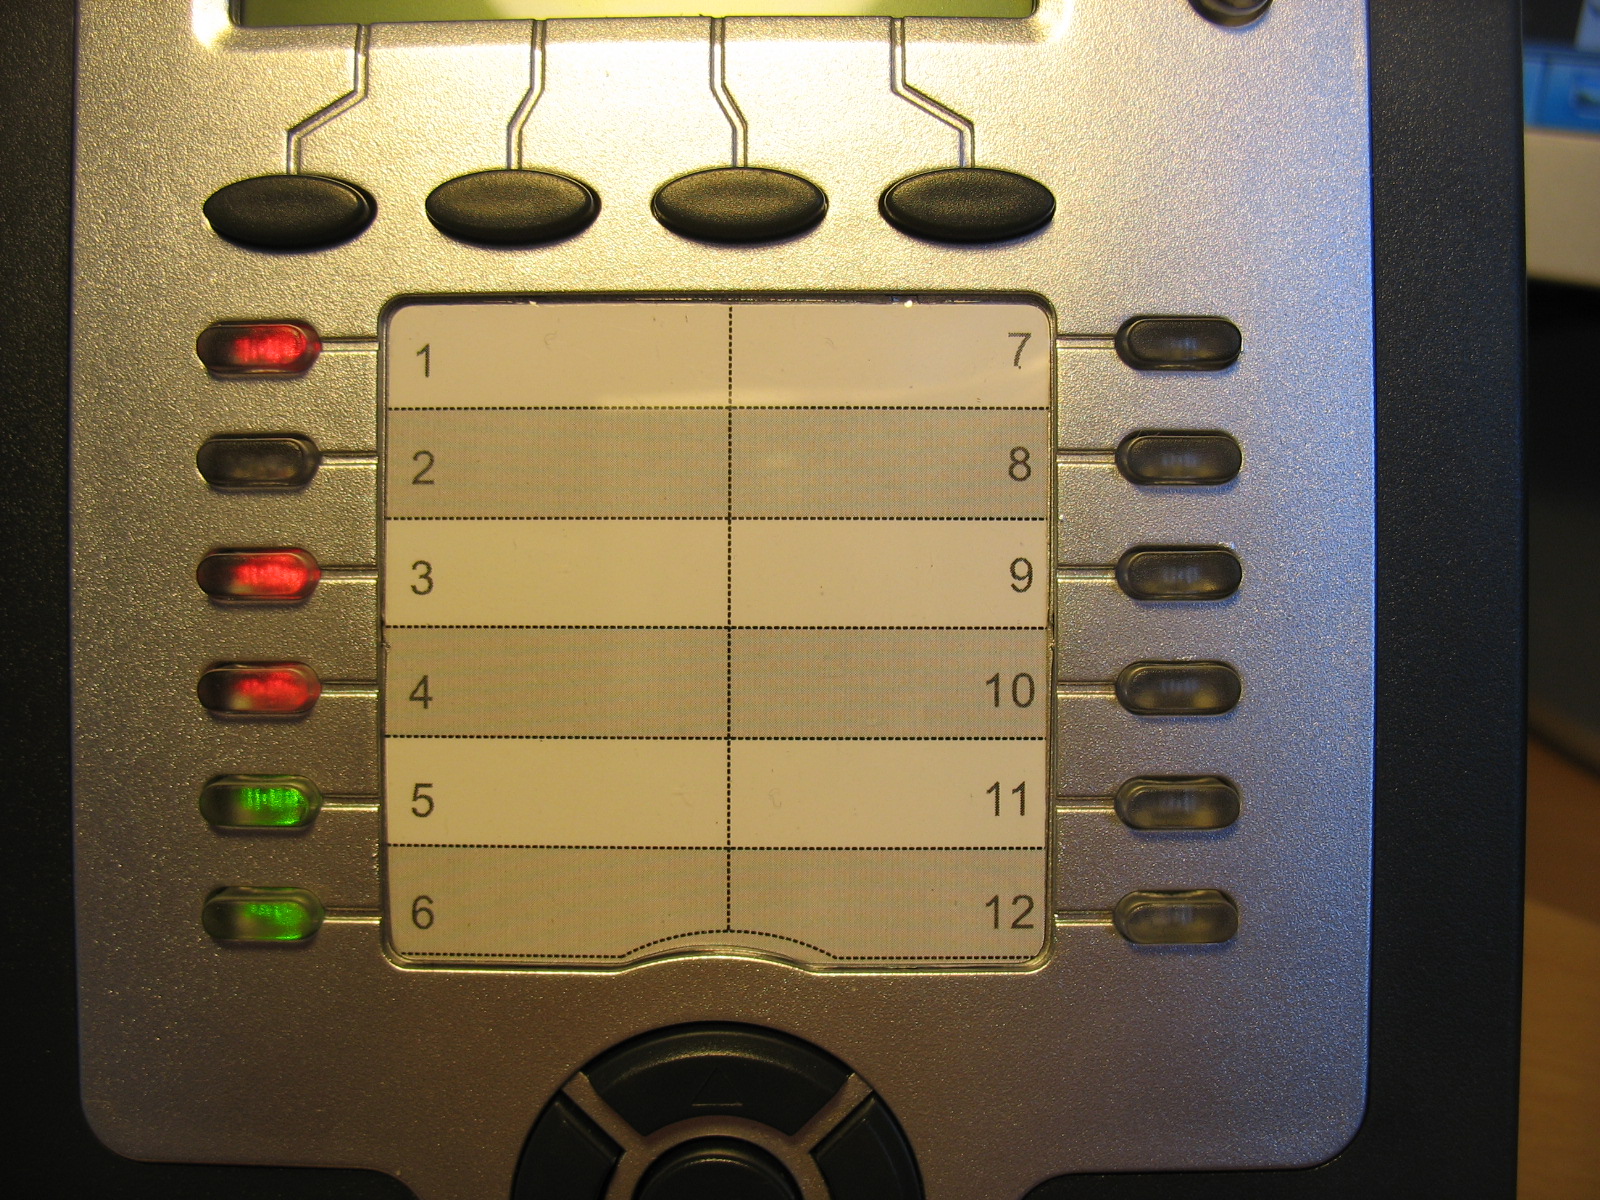
Extension panel in BLF mode. In the photo below, in the BLF mode, 6 lines work, 1, 3 and 4 lines are busy - the diodes are lit in red. On line 2, an incoming call - the diode flashes red. Lines 5 and 6 are free - the diodes are green. The remaining lines are registered as speed dialing, DTMF, dialing prefix and SIP URI - in this mode, the line diodes are canceled.
There are two options for setting up the device, either using the phone menu, or using the web interface. Unlike most phones from other manufacturers, which contain a minimum of settings in the phone’s menu, and the bulk of them can be done only through the web interface, Escene developers decided to make the settings related to SIP accounts available from the phone’s menu in addition to the standard settings.
This step is justified, in some cases, you can set up your phone faster. In addition, sometimes there may be problems with accessing the phone via the web interface or it may be necessary to remotely explain to the employee how to reconfigure his phone. It will be easier for an untrained person to use the phone menu than the web-based interface.
So, we turned on the phone, connected the LAN port to the local network, which has access to the IP PBX. The employee’s computer was connected via cable to the PC port.
Now we need to include the Russian language in the menu:
Press the "Menu" button or the "OK" button, it is located in the middle of the navigation buttons block, a menu will open. To move through the menu, use the Up or Down navigation buttons, to return to the previous item, use the C button. Next, press the number 1 (or the “OK” button), which corresponds to the choice of the “Language” menu, using the navigation buttons “Up” or “Down” select “Russian” and press “OK”. Then press the “C” button until you exit the menu.
Now you need to configure the network settings:
Press “Menu”, then select the “Settings” menu (or press the number 6), number 2 - “Advanced Settings”, the password is empty by default, just press “Menu”. If you need to configure VLAN (menu item 2) go to the corresponding menu and set its ID and priority. Next, select “Network”, then “LAN port”, by default, after the phone boots up, a DHCP client is turned on, which tries to obtain an IP address, therefore there must be a DHCP server in the network where the IP phone is located. If all the settings are made correctly, the phone will receive an IP address and will be ready for further configuration.
If you need to use a static IP address, press the number 1 - “Type”, select “Static” and press “Menu”. By default, IP 192.168.0.200 is configured on the phone, to change the IP address, mask, gateway and DNS settings, use the menu buttons and navigation keys, after saving the settings, the phone will reboot. I draw your attention to the fact that in this menu “LAN Port” you can configure the port for access to the web interface, by default it is 80, as well as the port for access to the phone via telnet.
The PC Port setting deserves special attention (Menu -> Settings -> Advanced Settings -> Network -> PC Port). Here you can configure the network mode between the PC and LAN ports. In bridge mode, it is a two-port switch with support for a separate tagged or untagged VLAN for a LAN or PC port. If you set the Router mode, then the IP port and mask are assigned to the PC port, NAT address translation is enabled between the LAN and PC, you can also enable the DHCP server. Thus, the phone also becomes a NAT-enabled router.
Now you need to check the correctness of the network settings and see the IP address that was assigned by DHCP, for this press “Menu”, press number 7 - “Status”, then number 1 - “Network”, in my case the IP address assigned by DHCP: 192.168.1.152
Все эти настройки выполняются в «Меню» –> «Функции»(цифра 2)
The phone supports two independent SIP accounts, that is, registration on two different IP PBXs. When registering both lines at the same time, by default, the first line will be used. To switch to the second line (it must be configured) and return to the first, use the “Line 1” and “Line 2” buttons.
Please note that the phone supports two simultaneous calls, therefore, to use simultaneous SIP registration on both lines in the settings of SIP accounts for each line, you need to set the "Number of lines used by the account" parameter to 1 (the default value is 2). That is, the device supports only two lines, you can distribute them at your discretion: either assign both lines to the first SIP account, or distribute one line to each SIP account and register both at the same time.
As for the Far East Region, they all work correctly:
Для доступа к журналам вызовов:
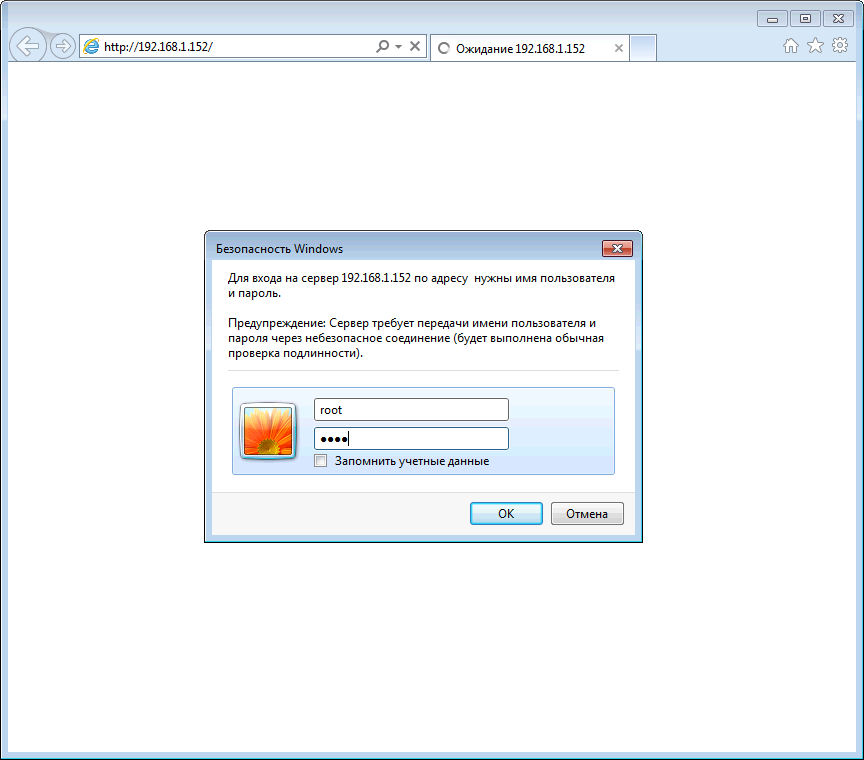
To access the web interface from a computer that has access to the network where the phone is located, enter the IP address of the phone in the address bar of the web browser, in my case it is 192.168.1.152.
The default username and password are:
root
root
There are two access levels on the phone: the administrator level, which can change any settings, and the user, which can perform a limited number of settings.
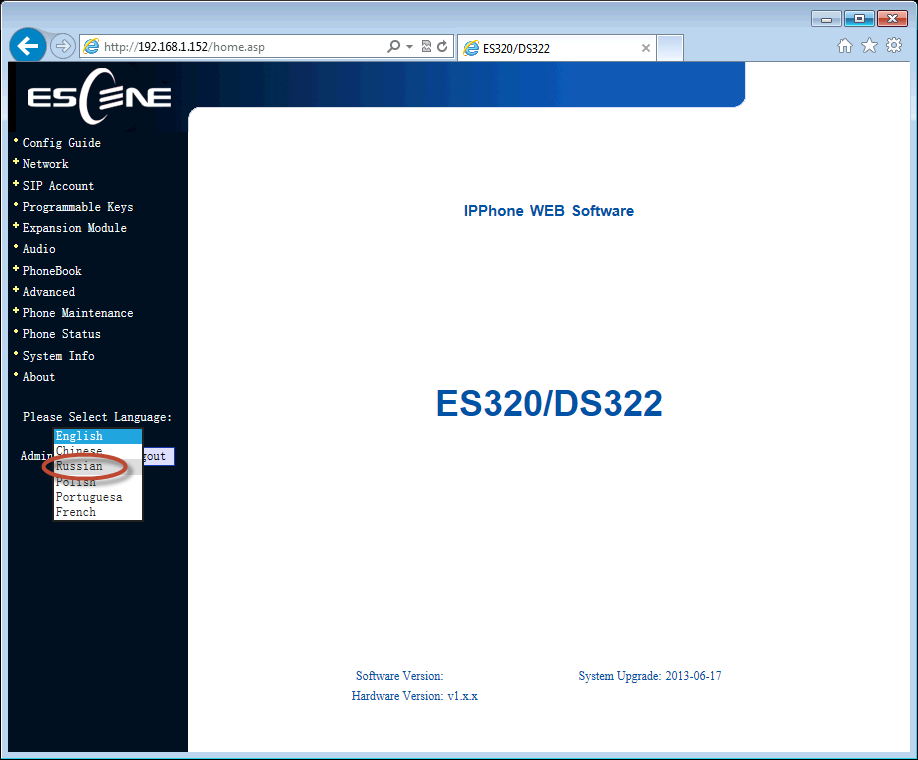
We get to the main menu of the web-configurator of the phone. For convenience, we immediately select the Russian language in the lower left menu: The
menu is divided into several groups:

Consider the most important phone menu items. The “Setup Wizard” menu serves for quick basic phone setup, allows you to sequentially configure two tabs: the “Network” menu -> “LAN port” and the basic setup of the SIP account located in the “SIP Accounts” -> “Account1” menu. These tabs will be discussed in more detail below.
Menu "Network" -> "LAN port"
You can set one of three connection methods: via DHCP, static IP or PPPoE. Important settings are HTTP and Telnet ports. They should be made non-standard if the phone is in an untrusted network (for example, with an external IP address on the Internet).

Menu "Network" -> "PC port"
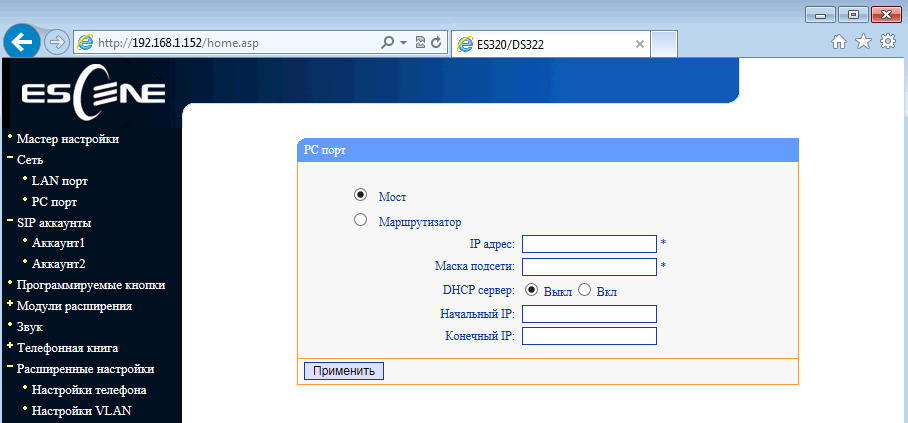
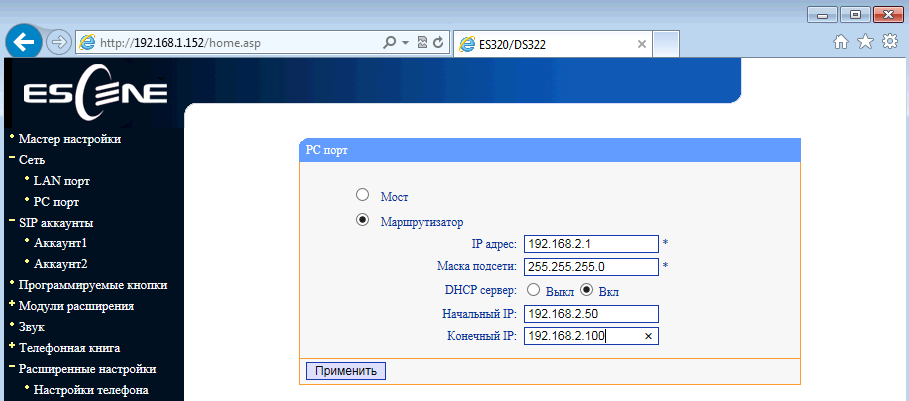
Between the LAN and PC ports of the phone, L2 switching is switched on by default - "Bridge" mode. The phone can switch to L3 routing mode - the NAT address translation will turn on on the LAN port, the IP address will need to be configured on the PC port, and if necessary, enable the DHCP server in which to register the pool of IP addresses for clients.
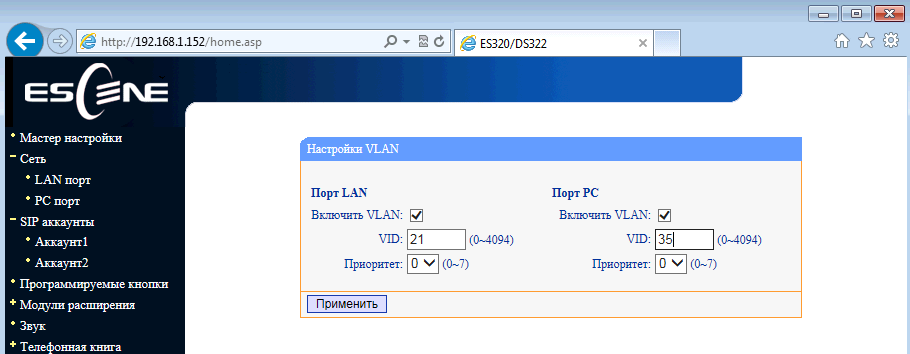
Network Menu -> VLAN Settings
In a corporate network, it is recommended to isolate computer network traffic from voice network traffic, this is most often done using two VLANs. The phone supports VLAN on both ports.
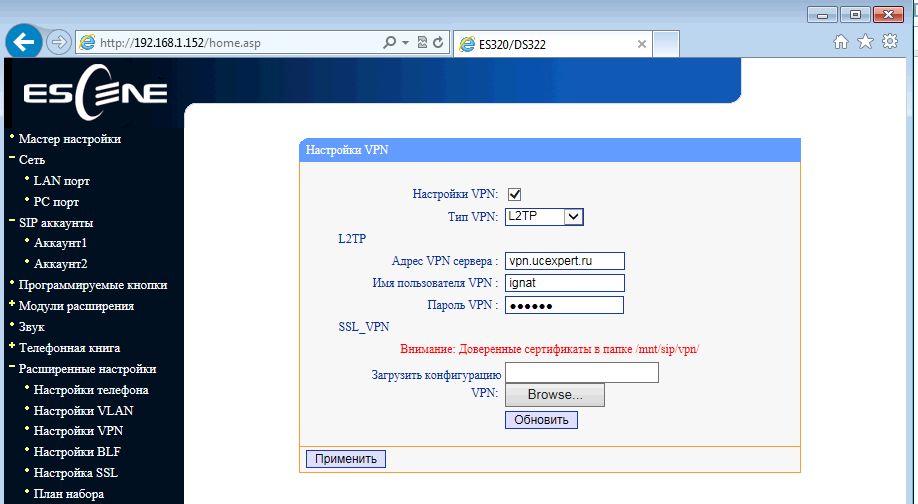
Menu "Network" -> "VPN Settings"
If you need to connect the phone through a secure VPN channel, you can do this directly from the phone, without buying additional equipment (for example, a VPN router), the phone supports L2TP and SSL VPN. This is a very useful feature for several reasons.
Firstly, if you have several phones that need to be delivered to a remote office, there is no need to buy a VPN concentrator at each remote point, just configure the VPN client built into the phone. Next, through the tunnel register his phone on the IP PBX at the central office.
Secondly, a VPN increases security, more and more administrators are thinking about how to protect terminals that are on the Internet, two problems are becoming more acute: the danger of breaking into a terminal and the difficulty of accessing telecommunications operator engineers to configure it, because often the terminal is behind NAT. Using a VPN client solves both of these problems, so such a useful feature will become more and more popular.
VoIP Settings Your
phone allows you to manage a large number of SIP signaling settings and settings for RTP media traffic.
Menu “SIP Accounts” -> “Account 1”
In addition to the standard settings for the SIP account - Username (UserID), Name (AuthID) and password, there is a “Label” field, it allows you to insert any line description that will be displayed on the phone screen.
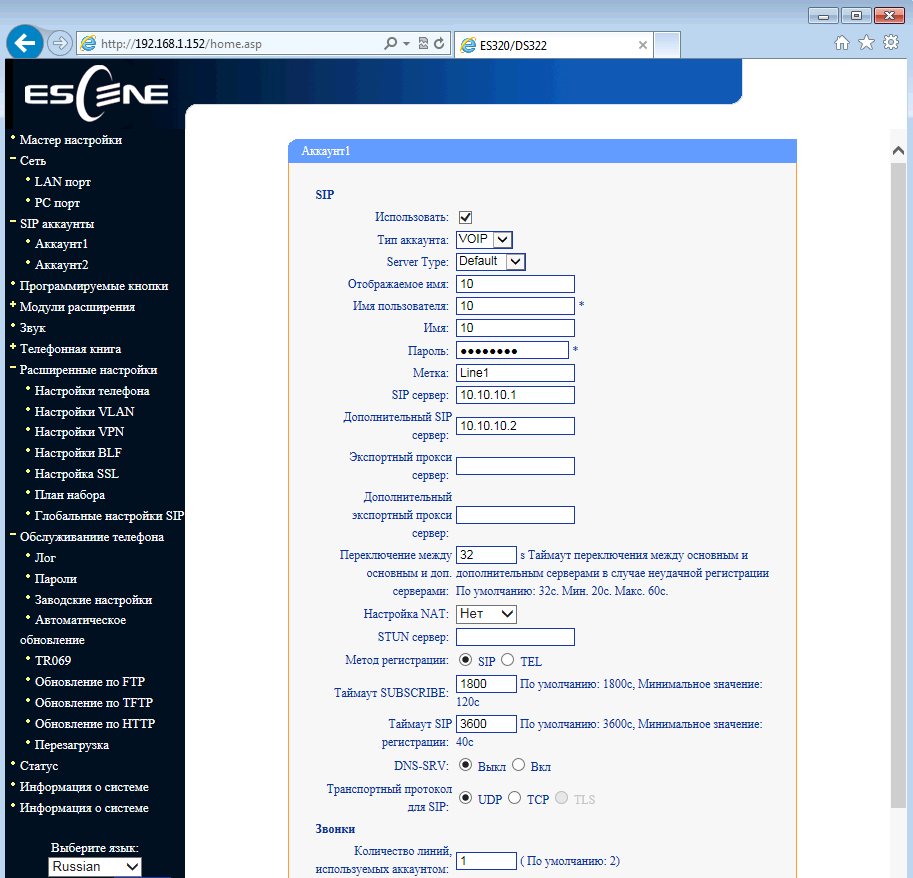
In addition to the main IP address of the SIP server, you can add an additional IP SIP server. In case of registration failure during the timeout, which by default is 32 seconds, the address of the additional SIP server will be used for registration. The setting "Number of lines used by the account" must be equal to 1 if you want to use both lines, because the second line must be assigned to the second account. If you leave the value equal to 2, then when applying the settings of the second line, the phone will display a message that there are not enough lines.
The phone supports RTP and SIP signaling traffic over TLS.

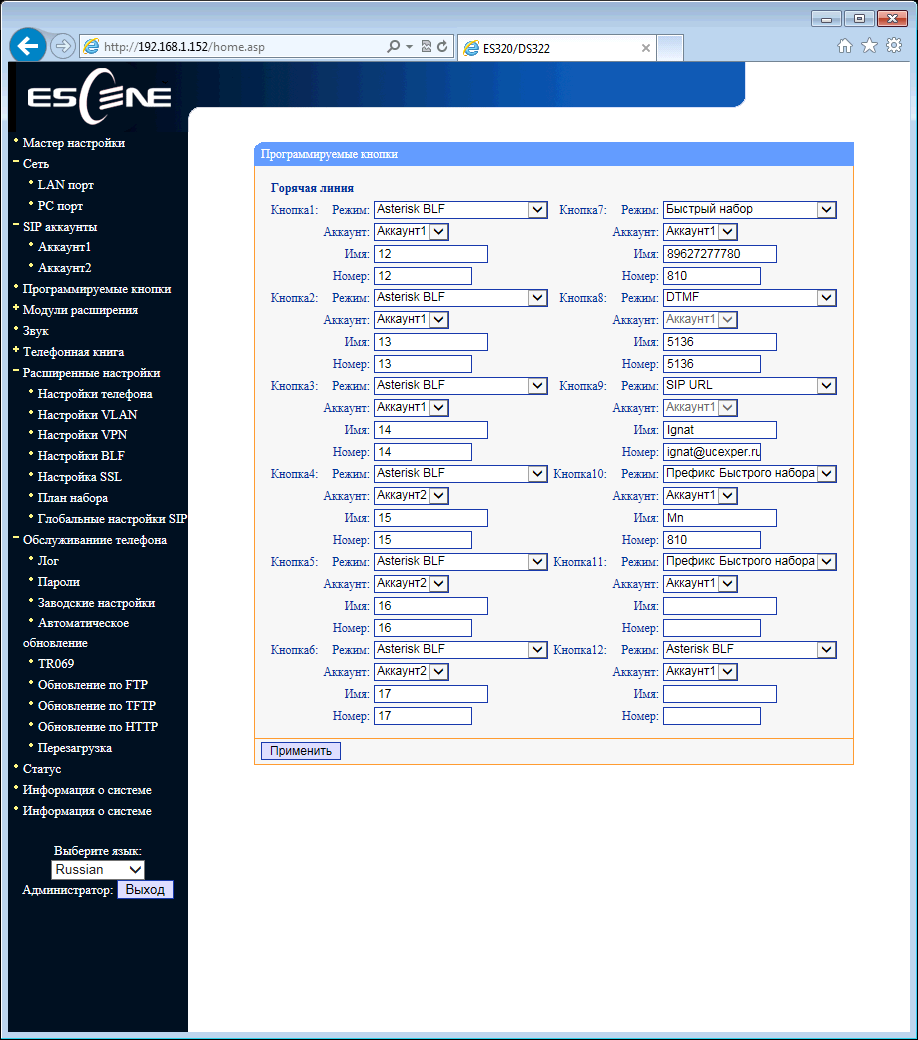
Programmable Buttons Menu
In this menu, you can configure the operation mode of each of the 12 programmable buttons on the expansion panel. The following modes are available:
Sound menu
By default, during a call, the phone declares all possible codecs. If necessary, unused codecs can be disabled.
Various volume parameters are configured in the menu: handset, ringer, microphone, speakerphone. You can enable echo cancellation and VAD. Moreover, you can download your ringtone.

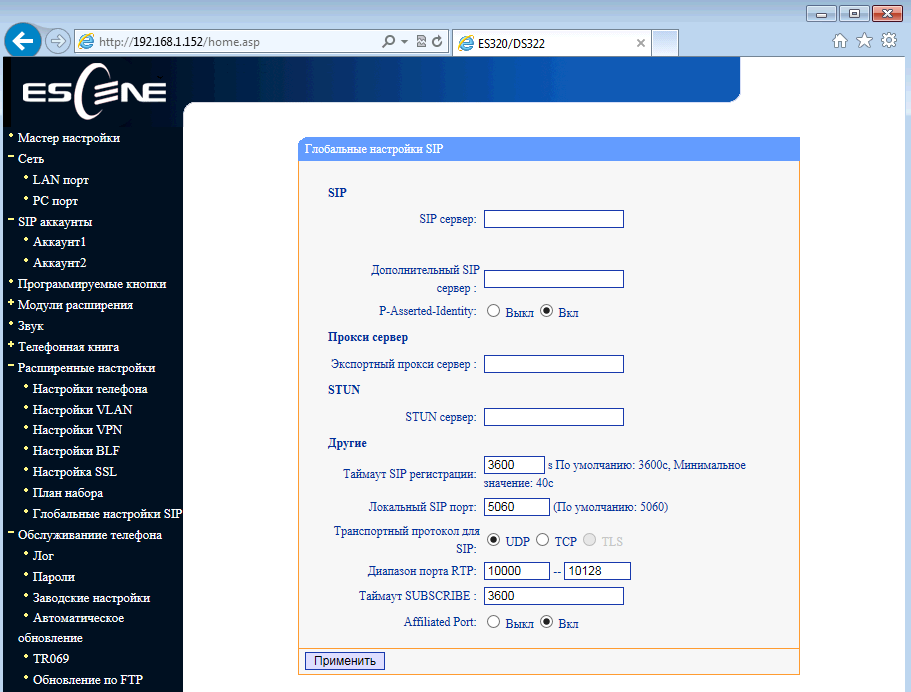
Menu “Advanced Settings” -> “Global SIP Settings”
If you set the SIP settings here, they will be applied for both lines automatically, except for the settings “Local SIP Port” and “RTP Port Range”, which can be useful for proper network settings screen.
Menu "Advanced Settings" -> "Phone Settings"
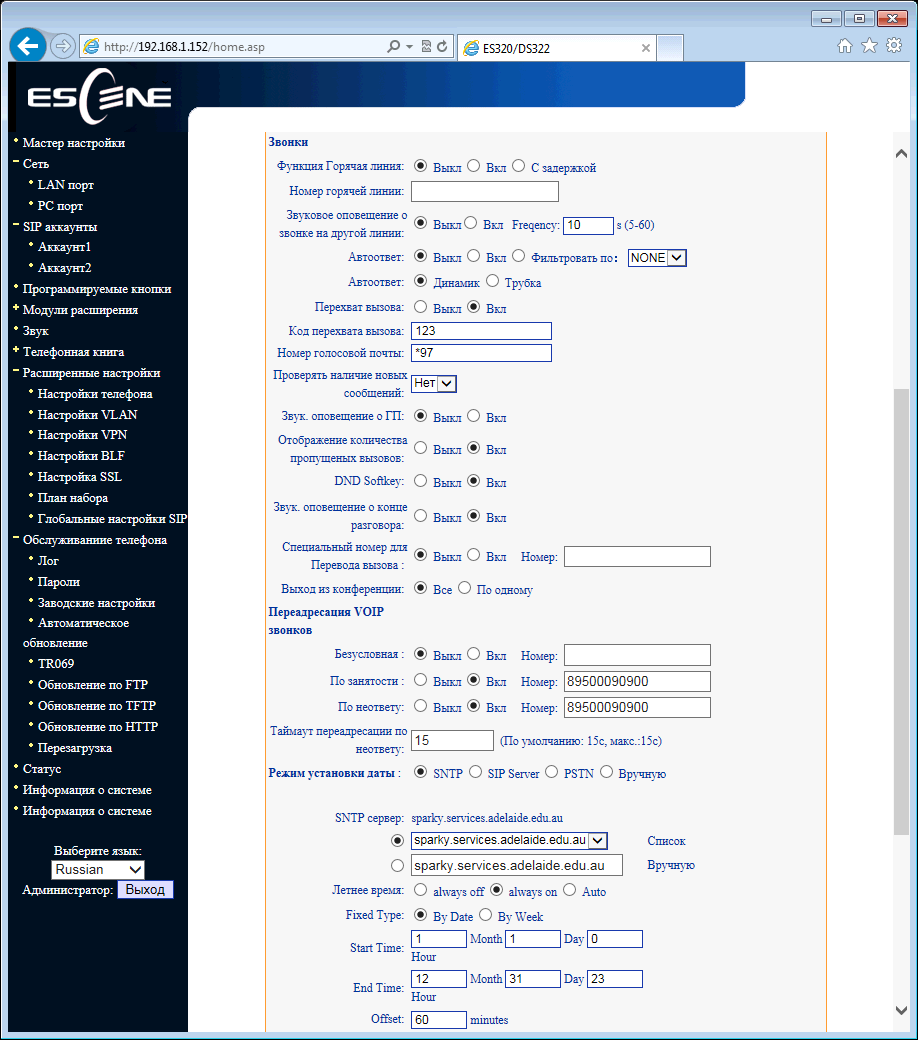
Additional functions are configured in this menu. Such as “Hot line”, when you pick up the handset, the specified number is automatically dialed, you can enable auto-search using the address book during dialing and auto answer a call.
If you want to transfer a call using a special combination of buttons (old code), instead of the standard SIP message 302, this can be specified in the “Special code for transferring calls” setting. A useful setting that allows you to keep the connection in the conference if the initiator leaves it. You can set call forwarding by condition (busy and “no answer”) and unconditional.
In this menu, codes are configured that will be transmitted when the “Pickup” buttons (value in the “Call Pickup Code” field) and “Voicemail” (value in the “Voicemail Number” field) are pressed.
There are three ways to intercept a call:
Menu "Phonebook"

The phone has a built-in phonebook, and quite advanced. It allows you to store up to 300 records of contacts, in each of which you can save up to 3 phone numbers. Entries can be made through the on-screen menu of the phone, using the web interface. To download or save a ready-made phonebook in XML format, use the menu “Phone Service” -> “Update via HTTP” -> “XML Phonebook”, here you can save or download a phonebook in XML format.
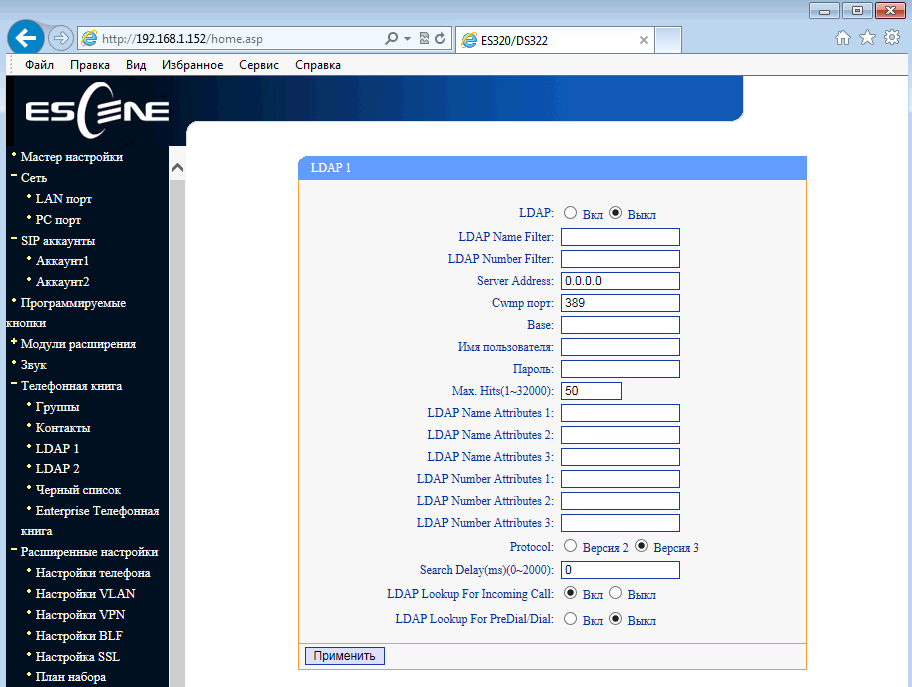
If the company uses an LDAP server, you can connect a phone to it and synchronize corporate contacts. 2 and 3 versions of the protocol are supported. Also, using the settings “LDAP Lookup For Incoming Call” and “LDAP Lookup For PreDial / Dial”, you can apply for a contact name for incoming and outgoing calls. If the contact is in the LDAP directory, then its name will be automatically added to the number.
The phone also supports blacklists or ban lists: an unwanted phone number is added to this list and will no longer be able to reach you.
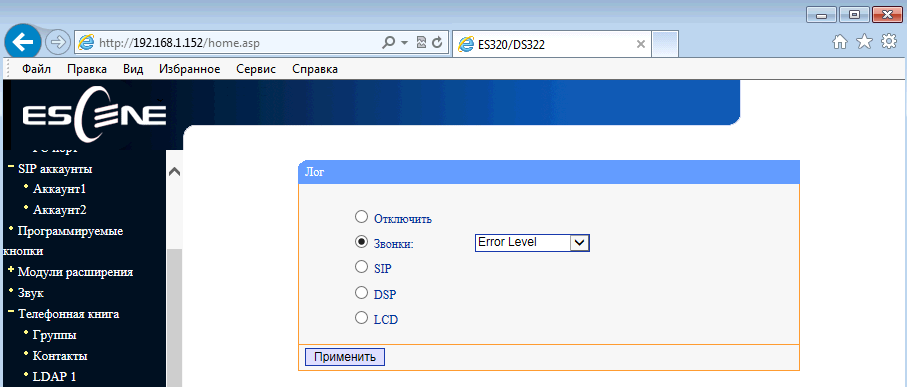
The Debug menu.
To debug the phone, you can enable logging by specifying the necessary logs (Menu “Phone service” -> Log). You can view them in two ways:
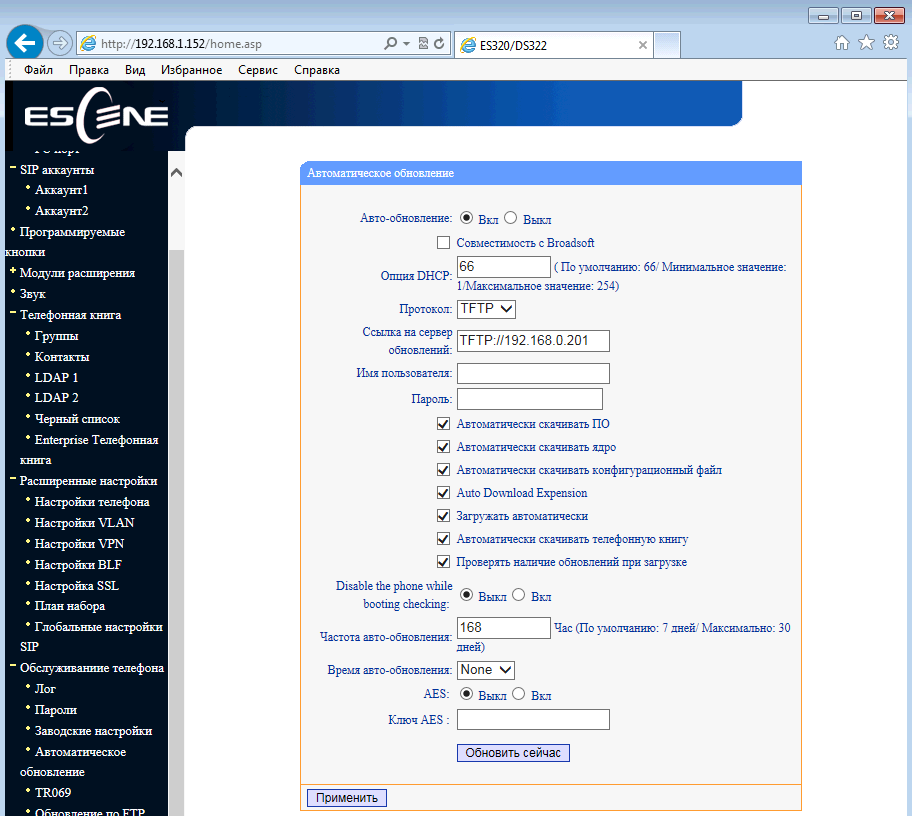
Menu “Phone Service” -> “Auto Provision” (Auto update).
Using this menu, you can configure the phone to automatically download configuration, firmware and notebook. You can download using one of several protocols: http / https / ftp / tftp.
If the version of the phone’s downloadable firmware is lower than the installed one, a window will appear with the inscription “Filename is illegal”.
Backing up and updating software You can
copy configuration files using three different protocols. FTP, TFTP and HTTP - the choice of a protocol is a matter of taste and convenience. Software update is extremely simple, you need to select the firmware file, then click update.

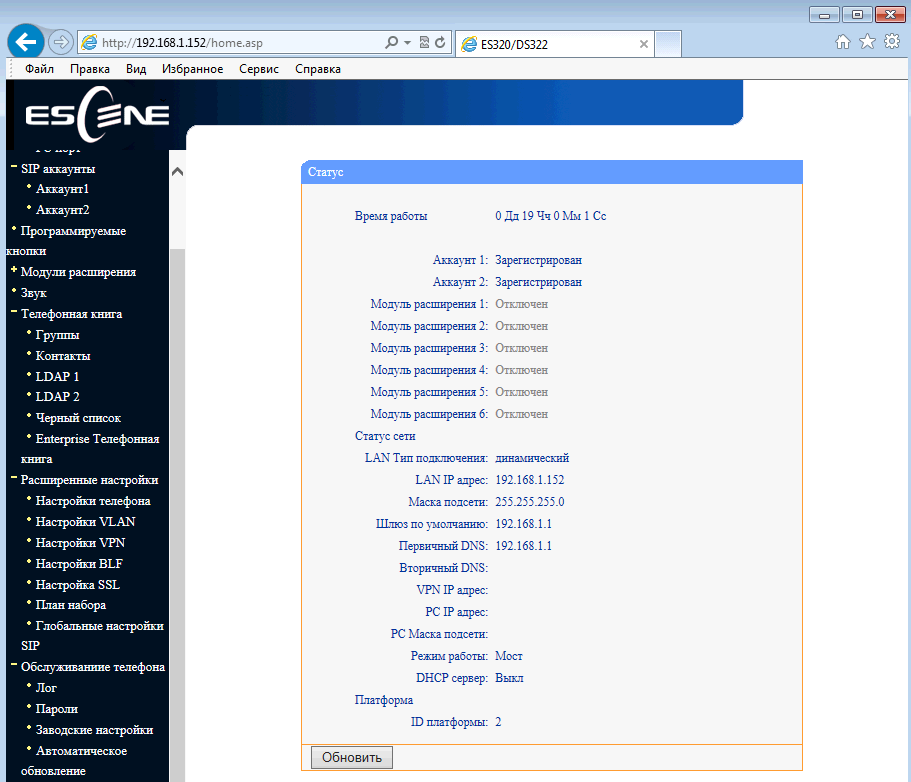
Phone status and system software can be viewed in the menu items “Status” and “System Information”
Configuring Asterisk IP PBX Connection Using the Web Interface
Suppose we need to configure two extension numbers (two SIP accounts). For example, the first record on the Asterisk IP PBX (with FreePBX) + configure the BLF buttons, the second on the virtual IP PBX:
server IP address with Asterisk = 10.10.10.1
UserID = 10
password = Tc6SAzsD
SIP server (Asterisk) = 10.10.10.1
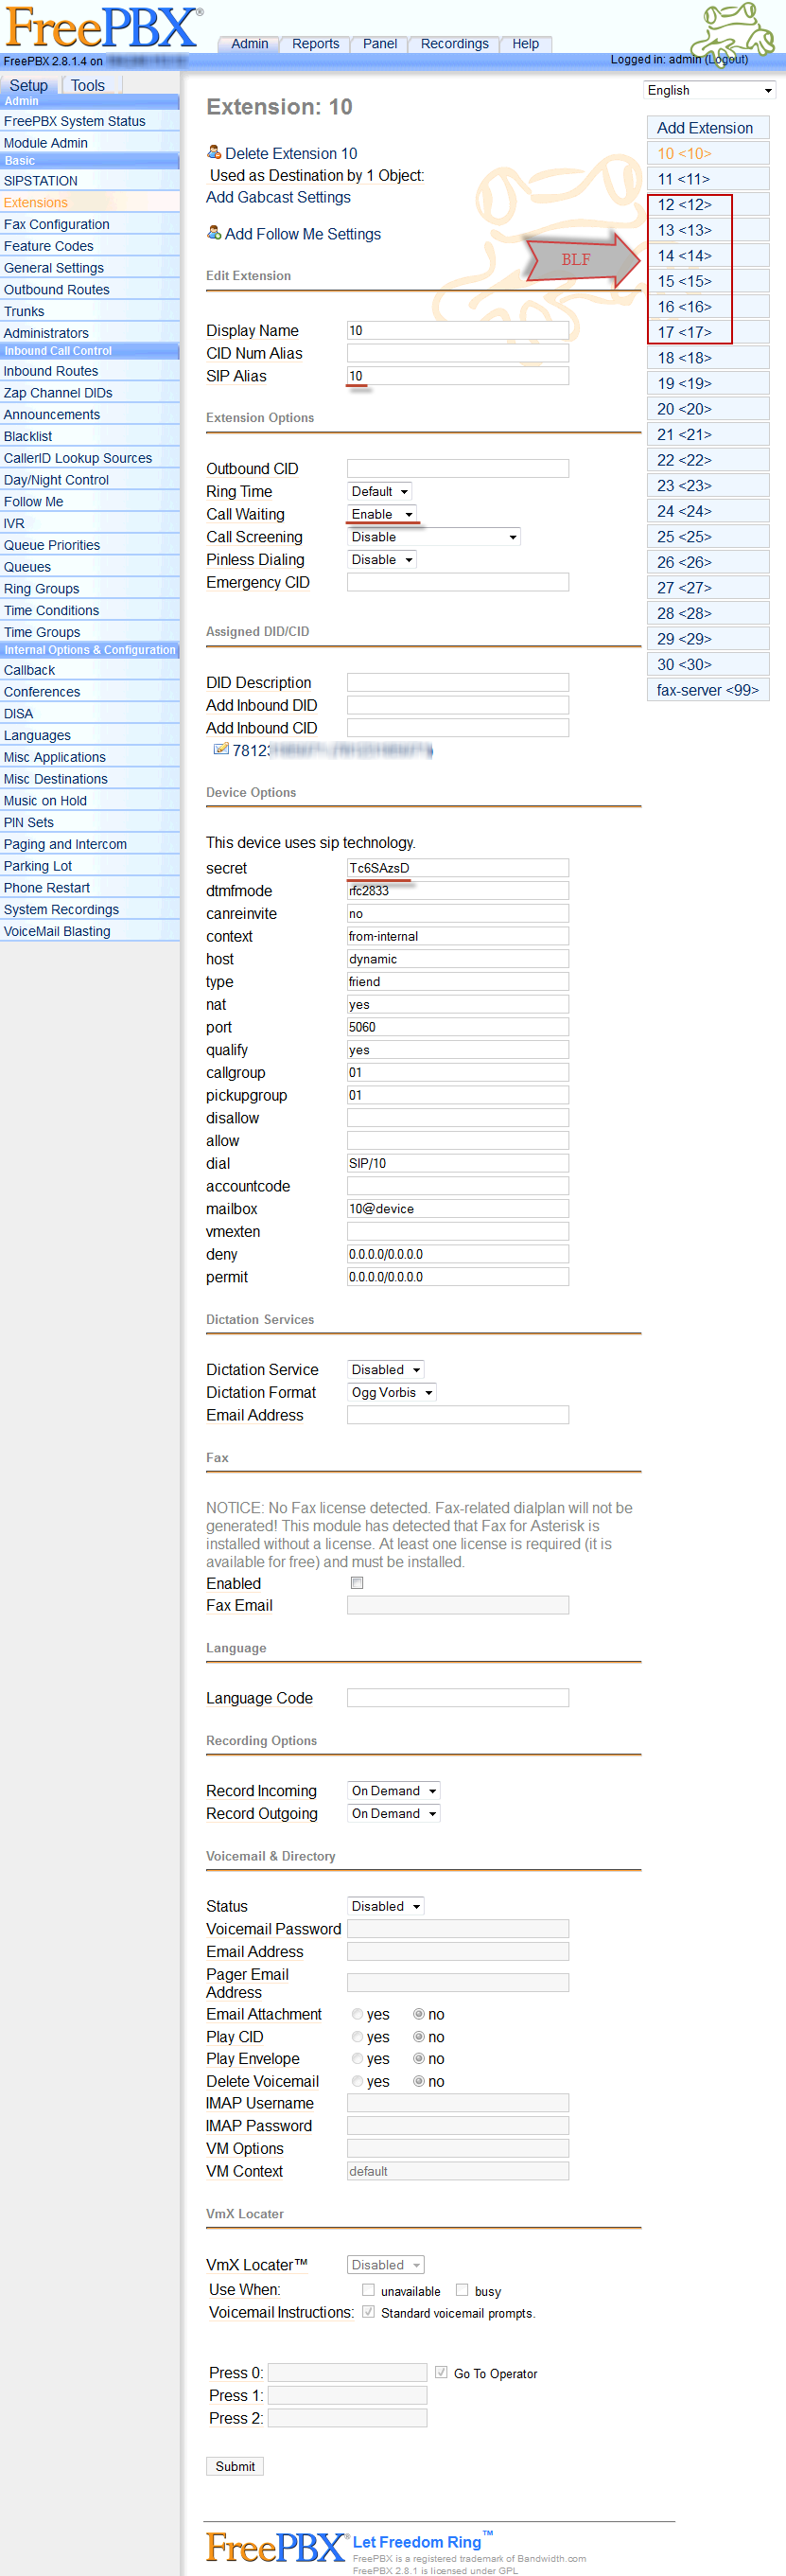
In the sip configuration .conf Asterisk this will be equivalent:
[10]
deny = 0.0.0.0 / 0.0.0.0
secret = Tc6SAzsD
dtmfmode = rfc2833
canreinvite = no
context = from-internal
host = dynamic
type = friend
nat = yes
port = 5060
qualify = yes
callgroup = 01
pickupgroup = 01
allow = ulaw
dial = SIP / 10
mailbox = 10 @ device
permit = 0.0.0.0 / 0.0.0.0
callerid = device <10>
callcounter = yes
faxdetect = no
Equivalent when configured in the Free-PBX web interface, an example of the first line (line 10), numbers 12 to 17 will be used for BLF:

To work with Asterisk, just set Username = 10, password (Password) = Tc6SAzsD and SIP Server (SIP Server) = 10.10.10.1. You can add a label (Label) that will be displayed on the phone screen, in this case, "Line 1".
You can reduce the time of re-registration from the standard 3600 seconds to 600 seconds, this is especially true if the IP PBX is located outside the office, for example, Virtual PBX. If the phone is located on the local network and the IP PBX is on the Internet, no special settings are usually required to overcome NAT. Next, click the “Submit” button.
Exactly the same thing must be done with the second line, for example, city number 78126470011 on the West Call SIP server. We will register it on a virtual PBX with a non-standard SIP port 9966:
userid = 78126470011
authid = 6470011
password = eIoMzKsf
sip proxy = uc.westcall.net
port = 9966

To specify a non-standard SIP port (other than 5060), you need to explicitly specify it in the SIP server line: uc.westcall.net:9966. Then click the “Apply” button.
In case of successful registration, the corresponding indication will appear on the phone screen, so information about the line registration status is available on the “Status” menu page:
Account 1: Registered
Account 2: Registered
In order to use the DVO buttons (transfer, hold, conference) of additional settings not required.
Configuring the operation of BLF
For the operation of BLF, you must enable this feature on Asterisk in the Free-PBX configuration files:
In the /etc/asterisk/sip_general_custom.conf file, you need to add lines that allow subscribers to monitor the status of lines:
notifyringing = yes
notifyhold = yes
For more information on setting up BLF for Escene phones , click here .
Setting up BLF on the phone is very simple, you just need to specify the numbers for which you want to activate the BLF function, in our case these are lines 12 to 17:

If everything is correct, then the first six buttons on the phone panel will become active - their status will be displayed, in my case green, it means that the lines are free.
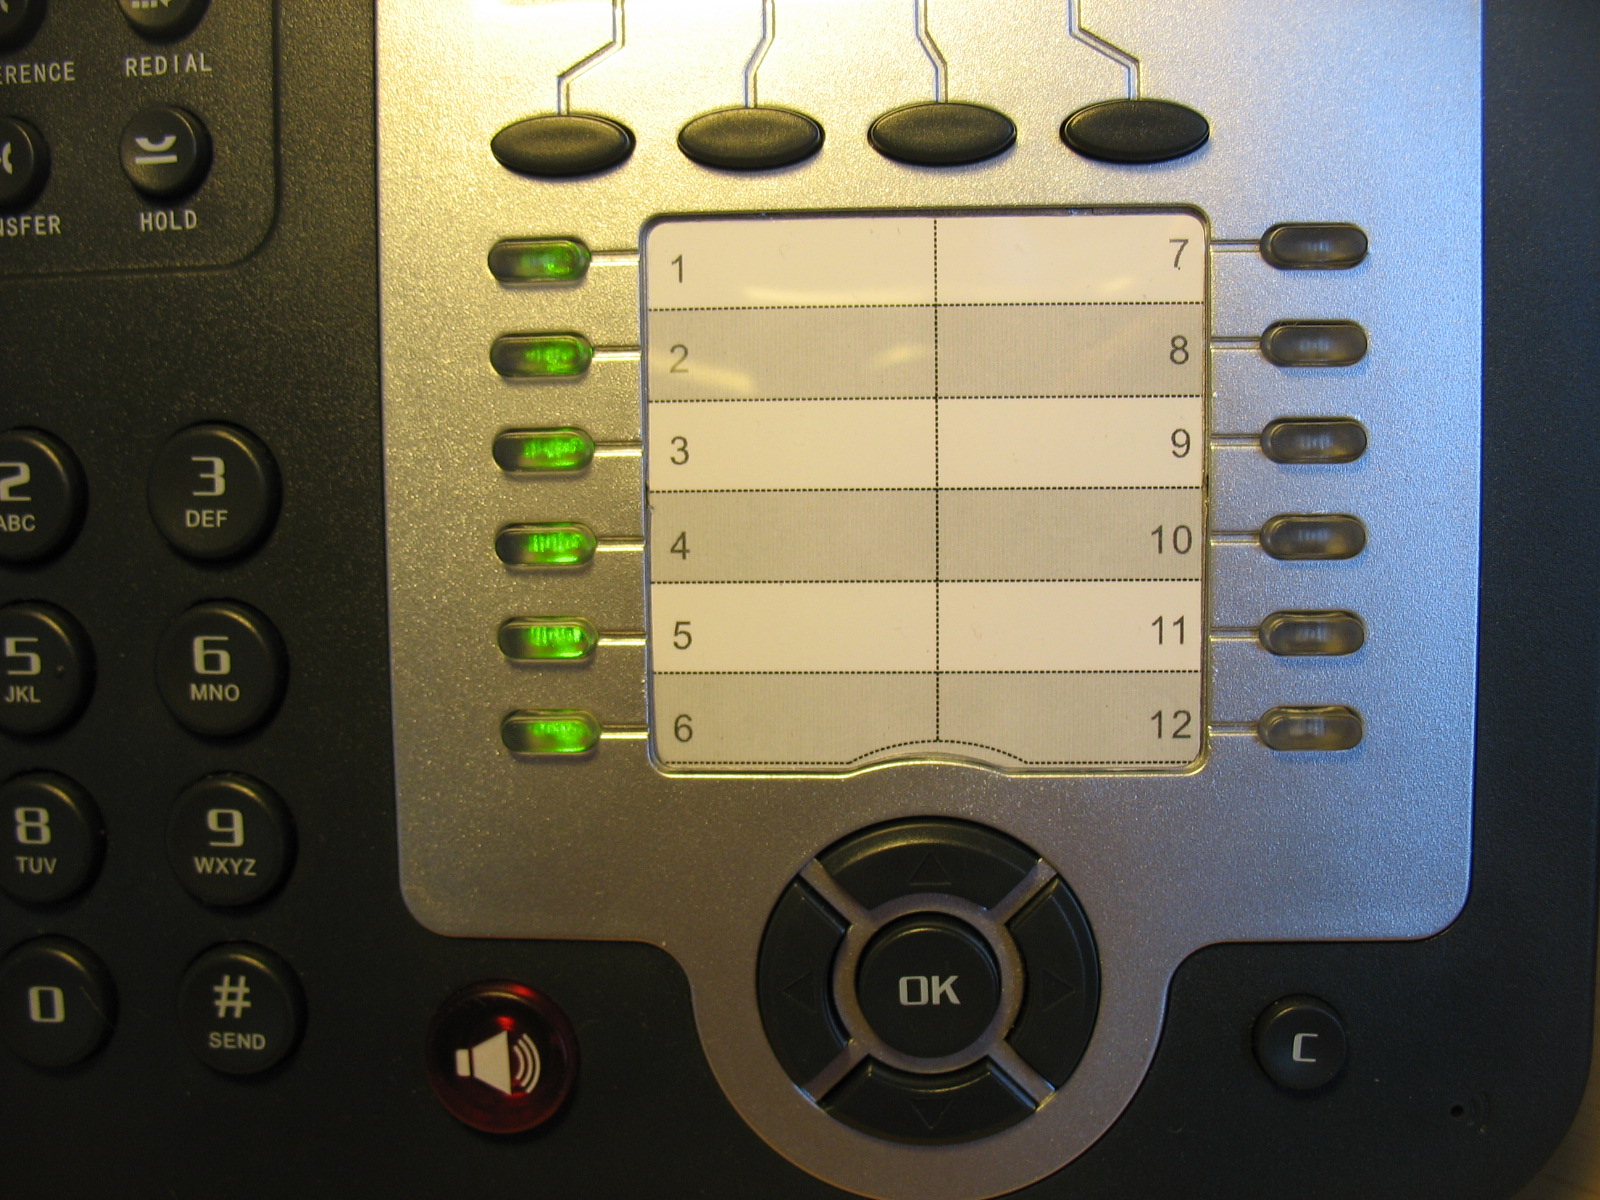
When you press the line button, the phone will automatically make a call to the line corresponding to this button.
The key features of the phone include:
Due to additional functions (translation, holding, forwarding, BLF, etc.), advanced functionality of hardware buttons, intuitive settings, USB power supply, as well as three headset connection options, these models allow you to quickly and conveniently perform reception and distribution tasks calls.
Escene ES320-PN with PoE support (Power over Ethernet) and Escene ES220-N without PoE support (equipped with Escene AD200 power supply ) have 100 Mbps Fast Ethernet network interfaces, Escene GS320-N got Gigabit Ethernet network interfaces operating at speeds up to 1 Gb / s and PoE support. For the PoE model, the power supply is not included, but if necessary, it can be purchased separately. The differences between the models end there.
The retail cost of the ES320-N and ES320-PN models is almost the same and amounts to 3850 rubles. Due to the presence of a gigabit bridge and PoE in the GS320-N, the cost of the device is slightly higher and amounts to 5630 rubles.
Positive features
- Part of a single lineup at the corporate level.
- High quality body materials.
- Large and clear graphic screen.
- High ergonomics.
- Adjustable stand.
- Suitable for equipping the workplace of the secretary.
- Suitable for work in the contact center.
- Easy setup through a clear interface.
- Russified web-interface and on-screen menu.
- The ability to fully customize the phone using the screen and buttons, including SIP accounts.
- The ability to adapt the phone to work with SIP-compatible equipment.
- Functionality is greater than most IP-PBXs and telecom operators currently support.
Functionality
- Direct SIP connection to Virtual IP PBXs (for example, Broadworks, MFI RTU) and to office IP PBXs (for example Asterisk, 3CX IP PBX, Avaya IP Office).
- Two Ethernet (PC / LAN) ports with VLAN support and the ability to work in switching or routing mode.
- Easy installation and operation, the possibility of advanced settings (including SIP and DVO functions) through the on-screen menu or via the web interface.
- Support for two simultaneous calls on two independent SIP accounts.
- Adaptation for the operator to work in the contact center (ergonomics, an additional RJ11 connector for the headset of the contact center operator).
- Full duplex speakerphone, caller ID, call hold, call transfer and call forwarding, as well as other additional functions.
- Support for high definition audio Voice HD (G.722 codec).
- Built-in VPN client.
- Encryption of signal SIPS and SRTP media traffic.
- Support for corporate notebook using LDAP or XML or personal notebook.
- Russified OSD and web-based phone.
Specifications
VoIP
- RFC 3261 standard SIP server, Asterisk, Avaya, Cisco, Broadsoft, RTU MFI, 3CX IP PBX, Panasonic SIP-PBX and others.
- Encryption of SIPS signaling traffic and SRTP media traffic.
- Audio codecs: G.711 u / a, G.722 (HD Voice), G.729a, G.723.
- QoS: TOS, Jiffer Buffer, VAD, CNG, G.168 (32ms).
- Support for DNS SRV.
- Two SIP accounts with the ability to register on two independent SIP servers and the ability to automatically switch in case of loss of registration.
- Two simultaneous phone calls from either of two SIP accounts.
Data transfer
- 2 * RJ45 10 / 100M Ethernet interfaces (LAN / PC) for Escene models ES320-PN and ES320-N).
- 2 * RJ45 10/100 / 1000M Ethernet interfaces (LAN / PC) for model GS320-P
- Support VLAN / QoS.
- IP Addressing: DHCP client or static IP assignment.
- Built-in VPN client L2TP or SSL VPN.
- Network protocols HTTP, BOOTP, FTP, TFTP, IEEE 802.1Q, IEEE 802.1X.
Physical parameters
- Monochrome LCD screen with backlight and a size of 128 * 64 characters with white backlight.
- 3 additional jacks for a headset - connection is supported in one of three ways: with a USB connector, using Jack 3.5 mm jacks or RJ11 connector.
- Line status indicator (two-color LED).
- Full duplex speaker and speakerphone.
- Two buttons for selecting line 1 and line 2 with light indication of line status.
- Buttons for adjusting the volume of the telephone / ringtone.
- 4 multi-function buttons under the screen.
- 12 programmable buttons that can work in BLF, speed dial (number, prefix or SIP URI) or transmit DTMF tones.
- 6 navigation multifunction buttons (4 navigation buttons, OK button and button for deleting the C symbol).
- Buttons of additional services: conference, transfer, hold and redial.
- Handsfree button with light indication.
- Button “Mute microphone” with light indication.
- The Voicemail button with light indication.
- Button for switching to a headset with light indication.
- Button "Menu".
- Button "Service".
- Directories button to access the notebook.
- Connector for connecting the RJ11 handset.
Additional types of service (additional functions)
- Waiting for a second call, queue (if it supports IP PBX), transferring a call, transferring a call, holding a call, intercepting a call, call back, redialing, answering.
- Speed dialing, a button to start recording a conversation using the old code (if it supports IP PBX).
- BLF (Busy Lamp Field).
- Multilateral conference (if supports IP PBX), 3-way conference on the phone.
- Do Not Disturb (DND).
- Voicemail (if the function is supported by IP PBX).
- Personal notebook, corporate notebook (LDAP or XML).
Control
- Protocol update: HTTP / TFTP / (PnP auto-provisioning) PnP auto-provision.
- Configuration: via the phone’s on-screen menu / web-interface / auto-provision.
- Debugging: telnet / phone screen / web-interface.
Nutrition
- Adapter model AD200 (AV 220/110 Volts, output DC 5 Volts / 1.2A).
- Power Over Ethernet (IEEE 802.af) LAN port - for modification of the Escene ES220-PN and GS320-P.
- USB power via USB-AMAM cable (“male” to “male”)
Scope of delivery, appearance and packaging
Packaging
The device is delivered in a cardboard box with the company logo, on the side of the package there is a sticker with the model number and the device barcode.
Phone delivery set
Having opened the box, we will see that the phone is neatly packed, nothing more.
Inside, standard equipment, which includes:
- Telephone set.
- Handset.
- Handset cord.
- RJ45 patch cord for connecting to a network.
- Instruction and warranty card.
- Escene AD200 power supply only for Escene ES320-N without PoE.
The bundled model Escene ES320-PN there is no power supply Escene AD200 (at 5 volts), it must be ordered separately.
Front panel and hardware buttons
Conventionally, the buttons on the phone can be divided into 5 blocks.
The first block is the management of the service functions of the phone.
- Menu button to access the on-screen menu.
- The “Service” button opens and closes the service menu.
- The Directories button allows you to access your phone’s address book or one-touch call logs.
There is a separate button for calling voicemail with an image of an envelope; if there are unread messages in the voicemail box, the button lights up in red. A very useful button (the headset icon is shown above it) for switching to the headset and vice versa, the button also has a light indicator, which allows the operator to control whether the headset is turned on or off. Also on the panel is a separate microphone mute button; if the microphone is muted, the button lights up in red.
The second block is the management of additional functions.
There are all the necessary buttons, just the ones that are used most often:
- Conference - creation of a 3-way conference (initiator, and two participants). To create a conference with a large number of participants, support for such a function on the IP PBX is required.
- Transfer - transfer a call during a call.
- Hold (Pickup) - during a call, when you press the button, the call will be put on hold.
- Redial - to redial the last number.
There are also two buttons for adjusting the volume of the phone / ringtone.
The third block is line management and multi-function screen buttons.
The phone has two independent SIP accounts (two SIP lines). By default, outgoing calls are established from line 1, unless of course it is configured, if necessary make a call from line 2, you need to press the line button, then dial the number - the phone will send the call through a second SIP account.
The phone can accept two simultaneous calls. The Line 1 and Line 2 buttons have a light indication, when a call arrives, the diode of the line to which the call arrives flashes. If the line is busy, the line button lights up in red; if it is blinking, an incoming call has arrived. If the line lights up green - an active call is on the line; if it blinks - the call is held on the line.
Each of the multi-function buttons displays the function that is currently active, for example: New call, end a call, Do Not Disturb, transfer a call, and others.
The fourth block - 12 programmable buttons.
The buttons can operate in BLF mode, speed dial (number, prefix or SIP URI) or transmit DTMF tones. If we are talking about dialing a prefix, then this function differs from dialing in that the saved combination is automatically dialed, but the block of digits is not sent from the telephone to the IP PBX - the telephone is waiting for the remaining digits to be dialed.
The BLF (Busy Lamp Field) function allows you to monitor the current state of the lines of other subscribers in real time, as well as intercept calls intended for other subscribers. When the button is in BLF mode, if the button is lit in red, the line is busy, if it is green, the line is free.
The fifth block is multifunctional navigation keys.
The block is used, first of all, for convenient navigation through the menu; the button “C” is used to delete a character. Use the Up and Down buttons to adjust the ringtone volume or the phone volume during a call.
The panel has a separate large red button - “Handsfree”, which allows you to enable or disable the speakerphone (speakerphone), in the phone it is full duplex. During hands-free operation, the red indicator on the button lights up.
Phone back cover
There is a standard sticker on the back of the phone with the model number, serial number and MAC address.
The model is equipped with a swivel stand, with which you can choose a convenient angle for the phone, just press the buttons on the sides of the stand and set the desired angle. The phone is not designed for wall mounting.
Interfaces and telephone connectors
The first photo shows the interface block. To power from AC power using the power adapter, the panel has a 5 Volt jack, two headset jacks and a handset with an RJ11 jack. Two Ethernet interfaces - PC for connecting the phone to a computer and LAN for connecting to a local area network and PoE power supply (for Escene ES320-PN or GS320-N).
Two Jack 3.5 mm are used to connect a headset. This is extremely convenient, since many headsets have such a connector.
The USB connector can be used in two ways:
- Connect a USB headset. The manufacturer does not guarantee the operation of any USB headset, a list of supported headsets will be prepared in the future.
- To power the phone via a USB cable, instead of PoE or power supply. To do this, you will need a USB cable such as AMAM, that is, "father-father".
- His image is shown in the figure below.
This is what the panel looks like with the wires connected.
The view of the phone on the table
This is how the phone looks assembled, high-quality plastic, the screen backlight is not very bright, but bright enough to read messages on the screen without difficulty.
Phone screen
It should be noted separately a nice screen with good resolution. The phone has a monochrome LCD screen with a backlight size of 128 * 64, not large, but its size is sufficient to easily read information from the screen.
This is how the phone screen with the registered line in Russian looks like. “Line1” and “Line 2” - an arbitrary label, which is configured in the menu “SIP Accounts” and is called “Label”.
Dialing a number. When dialing a number, the line button through which the number is dialed lights up in red.
Incoming call. The line button that the call came to flashes in red.
The state of the conversation. During a call, the line button lights up in green.
Call logs.
View of the menu on the phone screen.
Extension panel in BLF mode. In the photo below, in the BLF mode, 6 lines work, 1, 3 and 4 lines are busy - the diodes are lit in red. On line 2, an incoming call - the diode flashes red. Lines 5 and 6 are free - the diodes are green. The remaining lines are registered as speed dialing, DTMF, dialing prefix and SIP URI - in this mode, the line diodes are canceled.
Phone setup
There are two options for setting up the device, either using the phone menu, or using the web interface. Unlike most phones from other manufacturers, which contain a minimum of settings in the phone’s menu, and the bulk of them can be done only through the web interface, Escene developers decided to make the settings related to SIP accounts available from the phone’s menu in addition to the standard settings.
This step is justified, in some cases, you can set up your phone faster. In addition, sometimes there may be problems with accessing the phone via the web interface or it may be necessary to remotely explain to the employee how to reconfigure his phone. It will be easier for an untrained person to use the phone menu than the web-based interface.
Initial setup using phone buttons
So, we turned on the phone, connected the LAN port to the local network, which has access to the IP PBX. The employee’s computer was connected via cable to the PC port.
Now we need to include the Russian language in the menu:
Press the "Menu" button or the "OK" button, it is located in the middle of the navigation buttons block, a menu will open. To move through the menu, use the Up or Down navigation buttons, to return to the previous item, use the C button. Next, press the number 1 (or the “OK” button), which corresponds to the choice of the “Language” menu, using the navigation buttons “Up” or “Down” select “Russian” and press “OK”. Then press the “C” button until you exit the menu.
Now you need to configure the network settings:
Press “Menu”, then select the “Settings” menu (or press the number 6), number 2 - “Advanced Settings”, the password is empty by default, just press “Menu”. If you need to configure VLAN (menu item 2) go to the corresponding menu and set its ID and priority. Next, select “Network”, then “LAN port”, by default, after the phone boots up, a DHCP client is turned on, which tries to obtain an IP address, therefore there must be a DHCP server in the network where the IP phone is located. If all the settings are made correctly, the phone will receive an IP address and will be ready for further configuration.
If you need to use a static IP address, press the number 1 - “Type”, select “Static” and press “Menu”. By default, IP 192.168.0.200 is configured on the phone, to change the IP address, mask, gateway and DNS settings, use the menu buttons and navigation keys, after saving the settings, the phone will reboot. I draw your attention to the fact that in this menu “LAN Port” you can configure the port for access to the web interface, by default it is 80, as well as the port for access to the phone via telnet.
The PC Port setting deserves special attention (Menu -> Settings -> Advanced Settings -> Network -> PC Port). Here you can configure the network mode between the PC and LAN ports. In bridge mode, it is a two-port switch with support for a separate tagged or untagged VLAN for a LAN or PC port. If you set the Router mode, then the IP port and mask are assigned to the PC port, NAT address translation is enabled between the LAN and PC, you can also enable the DHCP server. Thus, the phone also becomes a NAT-enabled router.
Now you need to check the correctness of the network settings and see the IP address that was assigned by DHCP, for this press “Menu”, press number 7 - “Status”, then number 1 - “Network”, in my case the IP address assigned by DHCP: 192.168.1.152
Configure advanced phone features
Все эти настройки выполняются в «Меню» –> «Функции»(цифра 2)
- Автоответ позволяет настраивать автоматический ответ на вызов без поднятия трубки.
- DND позволяет отклонять все вызовы в случае занятости абонента.
- Номер VM — установить номер для доступа к голосовой почте (по умолчанию это номер *97 — стандартный номер для доступа голосовой почты дистрибутива Asterisk с FreePBX).
- Горячая линия позволяет установить автоматический набор заданного номера немедленно или с установленным таймаутом.
- Переадресация позволяет установить условную и безусловную переадресацию на указанные номера.
- Кнопка — запрограммировать кнопки панели расширения.
Поддержка дополнительных видов обслуживания (ДВО) и программируемые кнопки
The phone supports two independent SIP accounts, that is, registration on two different IP PBXs. When registering both lines at the same time, by default, the first line will be used. To switch to the second line (it must be configured) and return to the first, use the “Line 1” and “Line 2” buttons.
Please note that the phone supports two simultaneous calls, therefore, to use simultaneous SIP registration on both lines in the settings of SIP accounts for each line, you need to set the "Number of lines used by the account" parameter to 1 (the default value is 2). That is, the device supports only two lines, you can distribute them at your discretion: either assign both lines to the first SIP account, or distribute one line to each SIP account and register both at the same time.
As for the Far East Region, they all work correctly:
- The Conference button allows you to transfer a call; call transfer is implemented using the SIP 302 Moved Temporarily message. This message is today almost all IP PBXs on the market.
- Кнопка Transfer — перевод вызова с консультацией и вслепую, так же использует SIP 302 Moved Temporarily.
- Кнопка Hold (так же Pickup) позволяет или поставить вызов на удержание во время разговора или перехватить вызов. По умолчанию при нажатии на эту кнопку срабатывает стандартная комбинация 123, её можно переназначить через web-интерфейс в меню «Расширенные настройки» -> «Настройки телефона» параметр «Код перехвата вызова».
- Кнопка «Redial» позволяет повторить набор последнего номера.
- Кнопка «Громкая связь» позволяет включить или выключить громкую связь, ответить на вызов с включением громкой связи или завершить вызов, если разговор состоялся через громкую связь.
Для доступа к журналам вызовов:
- Способ 1: нажмите кнопку «Directories» на панели телефона, затем цифру 2. Журнал вызовов содержит записи о последних исходящих, входящих и пропущенных вызовах.
- Способ 2: нажмите кнопку «Menu» или кнопку «OK», затем цифру 3 (соответствует пункту меню «История вызовов»).
Обзор web-интерфейса
To access the web interface from a computer that has access to the network where the phone is located, enter the IP address of the phone in the address bar of the web browser, in my case it is 192.168.1.152.
The default username and password are:
root
root
There are two access levels on the phone: the administrator level, which can change any settings, and the user, which can perform a limited number of settings.
We get to the main menu of the web-configurator of the phone. For convenience, we immediately select the Russian language in the lower left menu: The
menu is divided into several groups:
- Network settings (interfaces, VLAN, VPN, etc.).
- VoIP settings (SIP entries and additional functions for signaling and media traffic).
- Settings for additional phone functions (settings for the phone book, programmable buttons, dial plan, sound, etc.).
- Service settings (logging, reset and reboot, configuration management and software updates, etc.)
Consider the most important phone menu items. The “Setup Wizard” menu serves for quick basic phone setup, allows you to sequentially configure two tabs: the “Network” menu -> “LAN port” and the basic setup of the SIP account located in the “SIP Accounts” -> “Account1” menu. These tabs will be discussed in more detail below.
Network settings
Menu "Network" -> "LAN port"
You can set one of three connection methods: via DHCP, static IP or PPPoE. Important settings are HTTP and Telnet ports. They should be made non-standard if the phone is in an untrusted network (for example, with an external IP address on the Internet).
Menu "Network" -> "PC port"
Between the LAN and PC ports of the phone, L2 switching is switched on by default - "Bridge" mode. The phone can switch to L3 routing mode - the NAT address translation will turn on on the LAN port, the IP address will need to be configured on the PC port, and if necessary, enable the DHCP server in which to register the pool of IP addresses for clients.
Network Menu -> VLAN Settings
In a corporate network, it is recommended to isolate computer network traffic from voice network traffic, this is most often done using two VLANs. The phone supports VLAN on both ports.
Menu "Network" -> "VPN Settings"
If you need to connect the phone through a secure VPN channel, you can do this directly from the phone, without buying additional equipment (for example, a VPN router), the phone supports L2TP and SSL VPN. This is a very useful feature for several reasons.
Firstly, if you have several phones that need to be delivered to a remote office, there is no need to buy a VPN concentrator at each remote point, just configure the VPN client built into the phone. Next, through the tunnel register his phone on the IP PBX at the central office.
Secondly, a VPN increases security, more and more administrators are thinking about how to protect terminals that are on the Internet, two problems are becoming more acute: the danger of breaking into a terminal and the difficulty of accessing telecommunications operator engineers to configure it, because often the terminal is behind NAT. Using a VPN client solves both of these problems, so such a useful feature will become more and more popular.
VoIP Settings Your
phone allows you to manage a large number of SIP signaling settings and settings for RTP media traffic.
Menu “SIP Accounts” -> “Account 1”
In addition to the standard settings for the SIP account - Username (UserID), Name (AuthID) and password, there is a “Label” field, it allows you to insert any line description that will be displayed on the phone screen.
In addition to the main IP address of the SIP server, you can add an additional IP SIP server. In case of registration failure during the timeout, which by default is 32 seconds, the address of the additional SIP server will be used for registration. The setting "Number of lines used by the account" must be equal to 1 if you want to use both lines, because the second line must be assigned to the second account. If you leave the value equal to 2, then when applying the settings of the second line, the phone will display a message that there are not enough lines.
The phone supports RTP and SIP signaling traffic over TLS.
Programmable Buttons Menu
In this menu, you can configure the operation mode of each of the 12 programmable buttons on the expansion panel. The following modes are available:
- Asterisk BLF - Busy Lamp Field allows you to monitor the current status of the lines of other subscribers in real time.
- Broadsoft BLF is the same as the first item but with features for working with the Broadsoft platform.
- Speed dialing - Allows you to dial a saved number with one touch.
- Speed dial prefix - Allows you to dial a combination of numbers and then wait for the end of dialing from the subscriber.
- DTMF - allows you to send a saved DTMF combination.
- SIP URI - allows you to dial a previously saved address, for example sip: [email protected]
Sound menu
By default, during a call, the phone declares all possible codecs. If necessary, unused codecs can be disabled.
Various volume parameters are configured in the menu: handset, ringer, microphone, speakerphone. You can enable echo cancellation and VAD. Moreover, you can download your ringtone.
Menu “Advanced Settings” -> “Global SIP Settings”
If you set the SIP settings here, they will be applied for both lines automatically, except for the settings “Local SIP Port” and “RTP Port Range”, which can be useful for proper network settings screen.
Menu "Advanced Settings" -> "Phone Settings"
Additional functions are configured in this menu. Such as “Hot line”, when you pick up the handset, the specified number is automatically dialed, you can enable auto-search using the address book during dialing and auto answer a call.
If you want to transfer a call using a special combination of buttons (old code), instead of the standard SIP message 302, this can be specified in the “Special code for transferring calls” setting. A useful setting that allows you to keep the connection in the conference if the initiator leaves it. You can set call forwarding by condition (busy and “no answer”) and unconditional.
In this menu, codes are configured that will be transmitted when the “Pickup” buttons (value in the “Call Pickup Code” field) and “Voicemail” (value in the “Voicemail Number” field) are pressed.
There are three ways to intercept a call:
- By pressing the “Hold” button, the combination to intercept the call assigned in the “Interception code” field will be sent to the IP PBX.
- Assign a speed dial combination to one of the extension panel buttons to intercept a call.
- By explicitly dialing a combination on the telephone keypad.
Menu "Phonebook"
The phone has a built-in phonebook, and quite advanced. It allows you to store up to 300 records of contacts, in each of which you can save up to 3 phone numbers. Entries can be made through the on-screen menu of the phone, using the web interface. To download or save a ready-made phonebook in XML format, use the menu “Phone Service” -> “Update via HTTP” -> “XML Phonebook”, here you can save or download a phonebook in XML format.
If the company uses an LDAP server, you can connect a phone to it and synchronize corporate contacts. 2 and 3 versions of the protocol are supported. Also, using the settings “LDAP Lookup For Incoming Call” and “LDAP Lookup For PreDial / Dial”, you can apply for a contact name for incoming and outgoing calls. If the contact is in the LDAP directory, then its name will be automatically added to the number.
The phone also supports blacklists or ban lists: an unwanted phone number is added to this list and will no longer be able to reach you.
Service Settings
The Debug menu.
To debug the phone, you can enable logging by specifying the necessary logs (Menu “Phone service” -> Log). You can view them in two ways:
- In the same menu, enable sending logs to the syslog server.
- В меню «Обслуживание телефона» –> «Обновление по HTTP» скачать файл c журналам.
Menu “Phone Service” -> “Auto Provision” (Auto update).
Using this menu, you can configure the phone to automatically download configuration, firmware and notebook. You can download using one of several protocols: http / https / ftp / tftp.
If the version of the phone’s downloadable firmware is lower than the installed one, a window will appear with the inscription “Filename is illegal”.
Backing up and updating software You can
copy configuration files using three different protocols. FTP, TFTP and HTTP - the choice of a protocol is a matter of taste and convenience. Software update is extremely simple, you need to select the firmware file, then click update.
Phone status and system software can be viewed in the menu items “Status” and “System Information”
Configuring Asterisk IP PBX Connection Using the Web Interface
Suppose we need to configure two extension numbers (two SIP accounts). For example, the first record on the Asterisk IP PBX (with FreePBX) + configure the BLF buttons, the second on the virtual IP PBX:
server IP address with Asterisk = 10.10.10.1
UserID = 10
password = Tc6SAzsD
SIP server (Asterisk) = 10.10.10.1
In the sip configuration .conf Asterisk this will be equivalent:
[10]
deny = 0.0.0.0 / 0.0.0.0
secret = Tc6SAzsD
dtmfmode = rfc2833
canreinvite = no
context = from-internal
host = dynamic
type = friend
nat = yes
port = 5060
qualify = yes
callgroup = 01
pickupgroup = 01
allow = ulaw
dial = SIP / 10
mailbox = 10 @ device
permit = 0.0.0.0 / 0.0.0.0
callerid = device <10>
callcounter = yes
faxdetect = no
Equivalent when configured in the Free-PBX web interface, an example of the first line (line 10), numbers 12 to 17 will be used for BLF:
To work with Asterisk, just set Username = 10, password (Password) = Tc6SAzsD and SIP Server (SIP Server) = 10.10.10.1. You can add a label (Label) that will be displayed on the phone screen, in this case, "Line 1".
You can reduce the time of re-registration from the standard 3600 seconds to 600 seconds, this is especially true if the IP PBX is located outside the office, for example, Virtual PBX. If the phone is located on the local network and the IP PBX is on the Internet, no special settings are usually required to overcome NAT. Next, click the “Submit” button.
Exactly the same thing must be done with the second line, for example, city number 78126470011 on the West Call SIP server. We will register it on a virtual PBX with a non-standard SIP port 9966:
userid = 78126470011
authid = 6470011
password = eIoMzKsf
sip proxy = uc.westcall.net
port = 9966
To specify a non-standard SIP port (other than 5060), you need to explicitly specify it in the SIP server line: uc.westcall.net:9966. Then click the “Apply” button.
In case of successful registration, the corresponding indication will appear on the phone screen, so information about the line registration status is available on the “Status” menu page:
Account 1: Registered
Account 2: Registered
In order to use the DVO buttons (transfer, hold, conference) of additional settings not required.
Configuring the operation of BLF
For the operation of BLF, you must enable this feature on Asterisk in the Free-PBX configuration files:
In the /etc/asterisk/sip_general_custom.conf file, you need to add lines that allow subscribers to monitor the status of lines:
notifyringing = yes
notifyhold = yes
For more information on setting up BLF for Escene phones , click here .
Setting up BLF on the phone is very simple, you just need to specify the numbers for which you want to activate the BLF function, in our case these are lines 12 to 17:
If everything is correct, then the first six buttons on the phone panel will become active - their status will be displayed, in my case green, it means that the lines are free.
When you press the line button, the phone will automatically make a call to the line corresponding to this button.
conclusions
The key features of the phone include:
- Support for two independent SIP accounts on the phone.
- Наличие дополнительного порта Ethernet для подключения к компьютеру и возможность работать в режиме маршрутизации.
- Возможность подключения гарнитуры одним из трех способов: через гнездо RJ11, 2x jack 3.5 мм или USB порт.
- Большинство функций выведены на аппаратные кнопки.
- Встроенная программируемая панель на 12 кнопок.
- Поддержка гигабитных Ethernet интерфейсов (модификация GS320-N).
- Поддержка PoE (модель ES320-PN и GS320-N).
- Возможность питания через USB порт
- Четкий ЖК экран с белой подсветкой.
- Возможность настроить помимо сетевых параметров, SIP аккаунты, кнопки быстрого набора и переадресацию прямо с экрана телефона.
The Escene ES320- (P) N phone and its gigabit modification Escene GS320-N are very attractive offers for those who have the need for simultaneous processing of a large number of calls.
Due to additional functions (translation, holding, forwarding, BLF, etc.), advanced functionality of hardware buttons, intuitive settings, USB power supply, as well as three headset connection options, these models allow you to quickly and conveniently perform reception and distribution tasks calls.