Buffalo Linkstation Duo All-In-One NAS Overview
Today we are testing a NAS server from Buffalo Technology called Linkstation Duo. In addition to organizing network access to files, it boasts a number of additional features, such as: built-in web server, mysql database server, DLNA, iTunes and Squeezebox servers, access to files via the Internet using WebAccess.
Specifications
Interfaces
RJ-45 LAN port connector. Data transfer rate 10/100 / 1000Mb / s 1 x USB 2.0
Internal hard drives
Number of disks: 2 Disk interface: SATA
Total disk capacity: 1TB, 2.0TB, 4.0TB, 6.0TB
Supported levels: RAID0, 1 and JBOD (separate disks)
Protocol support
Network Protocol: TCP / IP File Sharing Protocol: SMB / CIFS, AFP, FTP / FTPS, SFTP, HTTP / HTTPS
Active Directory Integration Kerberos
Management Protocol: HTTP, HTTPS
Time Protocol: NTP
Device dimensions are 86 x 204 x 127mm , weight - 2.3kg. It works with both the Windows family and MAC OS X.
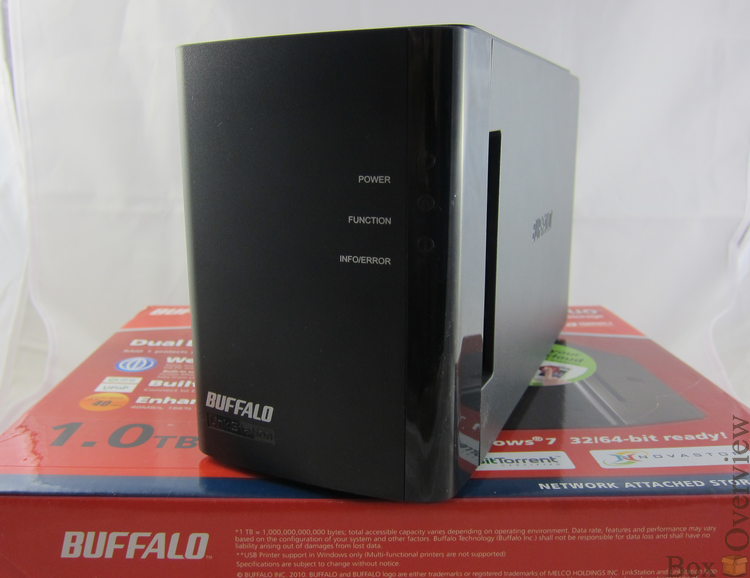
Appearance and equipment
Linkstation Duo comes in a small red box:

Of the accessories present: power supply, Ethernet cable, CD-ROM with software and a brief installation guide. The complete instruction manual is located on the enclosed CD.

Also included is an adapter that allows you to conveniently turn off the power of the network drive:

There are 3 indicators on the front panel:
- Power
- Function
- INFO / ERROR

The Power LED indicates the status of the NAS. When loading, it blinks blue, then it lights constantly if the device is turned on.
The Function indicator signals the process of copying files from a USB drive.
INFO / ERROR can light up in two colors: orange or red. Orange means an informational message, red - a critical error. The error code consists of two parts: the number of long flashes corresponds to the first digit of the error code, quantitatively short - to the second digit of the error. Code decoding can be found in the Linkstation Duo instruction manual, which is located on the supplied CD-ROM.
The case of the device is black and made of plastic. The front panel opens and there are 2 hard drives behind it. You can remove the hard drives by pulling the plastic retainer at the bottom and pulling the metal ring.

In the version that came to us for testing, 2 Western Digital drives of 500 GB each were installed.

SATA-III disk interface, spindle rotation speed - 7200 rpm.
On the rear panel there are: a small cooling fan, a USB 2.0 port, an RJ-45 network port, an external power supply connector, a Kensington lock hole, a Function button and an OFF / ON / AUTO power switch.

The difference between the ON and AUTO positions is in the NAS operating mode: in the ON position it will always be on, and in AUTO mode it will go into sleep mode if there are no active clients in the local network.
The Function button is responsible for activating Direct Copy mode, which copies all data from a USB device connected to the NAS to disk.
The “brains” of the network drive consist of 2 small boards: one is located on the side, and hard drives are connected to the second.

Since the power supply is external, the drive itself turned out to be quite compact in size.
On the main board there are: 2 Hynix h5ps5162gfr memory chips of 32 MB each, a Marvell 88F6281 ARM processor with a frequency of 600 MHz and an auxiliary Marvell 88E1118 network chip.

Turn on
The first inclusion is very simple - you need to connect the NAS to the router, connect the power and set the switch on the rear panel to ON mode.
The next step is to install NAS management software - NAS Navigator 2 utility. The utility is available for both Windows and MacOS. The installer is located on the supplied CD.

By right-clicking on the NAS icon, select "Open Web Installation."
A page with the login window opens in the browser:

Default login options: admin: password
The intuitive control menu. On the left is information about the NAS, on the right is the settings menu.
On the first tab "Shared Folders" you can add, view the shared folders that are available to users.

When creating a folder, you can set various access parameters:
Attributes of a shared folder:
- Only for reading
- Read and write
Поддержка общей папки в различных ОС, а также возможность доступна к ней по FTP, SFTP.

На второй вкладке «Пользователи и группы» можно отредактировать или добавить пользователей:

На вкладке «Сеть» можно произвести следующие настройки:
1) Настроить метод получения IP-адреса по DHCP либо присвоить статический IP, а также включить/выключить протоколы AFP и FTP:

2) Включить NAS к рабочей группе, домену NT, Active Directory.

3) Включить встроенный web-server:

4) Активировать mysql:

Для управления базами данных mysql установлен phpMyAdmin:

На вкладке «Система» можно настроить параметры синхронизации времени и язык web-интерфейса:

Настроить режимы работы RAID: раздельные диски, RAID0 либо RAID1:

When changing the setting, the section is formatted and data is not saved.
What should I do if a failure occurs when changing the RAID settings and the device no longer boots?
If an error occurs during the process of changing RAID arrays (for example, a power outage in the process of updating the configuration), not only disk layout, but also the firmware itself may be damaged.
If there is a problem downloading the firmware, the INFO / ERROR indicator will blink red 6 times.
To recover, you must boot into EM mode (Engineering mode) using TFTP.
To do this, connect the NAS directly to the LAN port of the computer, configure the static IP address 192.168.11.1 and start TFTP. Then turn on the NAS, wait for 6 red lights and hold down the Function button for 5 seconds. The following output should appear in the TFTP window:

Important: before connecting, you must disconnect all other active network connections (including Wifi connection).
Now we need to restore the disk layout, and for this we need to enable debug mode in the Linkstation Series updater application.
To do this, edit the LSUpdater.ini file and add the lines to it: Save the changes and run LSUpdater.exe. We go into debug mode and select the following items: Click Update and wait for the process to complete. The process may result in a lost connection error - no big deal. Click Find in the LSUpdater program, if the NAS is not detected, repeat the download to EM mode via TFTP. Now in Debug we configure the following parameters: Update the firmware by clicking the Update button. The process will fail with a loss of communication with the NAS.


Turn off the NAS, turn it on again and observe the INFO / ERROR indicators. It should blink 2 times long orange and 5 times short.
This is code 25 - firmware update.
We don’t touch anything and just wait until the end of the process.
Everything! We have fully restored our NAS Linkstation Duo.
If there is a problem downloading the firmware, the INFO / ERROR indicator will blink red 6 times.
To recover, you must boot into EM mode (Engineering mode) using TFTP.
To do this, connect the NAS directly to the LAN port of the computer, configure the static IP address 192.168.11.1 and start TFTP. Then turn on the NAS, wait for 6 red lights and hold down the Function button for 5 seconds. The following output should appear in the TFTP window:
Important: before connecting, you must disconnect all other active network connections (including Wifi connection).
Now we need to restore the disk layout, and for this we need to enable debug mode in the Linkstation Series updater application.
To do this, edit the LSUpdater.ini file and add the lines to it: Save the changes and run LSUpdater.exe. We go into debug mode and select the following items: Click Update and wait for the process to complete. The process may result in a lost connection error - no big deal. Click Find in the LSUpdater program, if the NAS is not detected, repeat the download to EM mode via TFTP. Now in Debug we configure the following parameters: Update the firmware by clicking the Update button. The process will fail with a loss of communication with the NAS.
[SpecialFlags]

Debug=1
Turn off the NAS, turn it on again and observe the INFO / ERROR indicators. It should blink 2 times long orange and 5 times short.
This is code 25 - firmware update.
We don’t touch anything and just wait until the end of the process.
Everything! We have fully restored our NAS Linkstation Duo.
Backup can be done only on another NAS Linkstation, or on a USB drive.

Reports on the operation of NAS can be sent by email by setting up a connection to the SMTP server and adding a list of emails for distribution.

Additional features
In addition to simply storing files, Linkstation Duo offers a number of additional services. 
WebAccess service allows you to configure remote access to files through a web browser. This function has the ability to configure remote access using the proprietary BuffaloNAS service , which replaces DDNS.
You can also connect via WebAcess from mobile devices based on Android and iOS.
Linkstation Duo has built-in DLNA, iTunes and Squeezebox servers:

DLNA indexes many video and audio formats, including avi, mkv, mp4, ts, mpeg, divx, wmv, ts, m2ts, m4v, vob, divx, mp3, m4a, aac, wma, wav.
The iTunes server has no additional settings; it works with mp3 and m4a formats.
A torrent client based on uTorrent for downloading files is also preinstalled:

There are many settings, as in the desktop version: queue setting, download speed, port numbers, speed limit, work schedule.
There are also settings for synchronizing folders with images with the Flickr service and organizing file sharing via Eye-Fi.
conclusions
Advantages and disadvantages
 User-friendly web-interface Built - in web-server with php and mySQL Many different additional services: DLNA, Bittorent, WebAccess and others. Compact size.
  Only 1 USB port, which is located at the back.
 Complete hard drives can be attributed to both pluses and minuses . On the one hand, they have already made a choice for us and it remains only to connect a network drive, and on the other hand, we were deprived of the very choice of our favorite hard drive model. It is also worth noting that the manufacturer does not recommend changing the hard drives that come with the NAS to others.
In total, a very good network drive with many additional functions was obtained. Well suited for home use or a small office. If you need more productive solutions, then you should look at the Linkstation 420 series , or TeraStation .
The price of Buffalo Linkstation Duo on Yandex.Market is ~ 9000 rubles for the 2TB version and ~ 11700 rubles for the 4TB version.
If you do not have an account on Habrahabr, you can read and comment on our articles on BoxOverview.com