Configuring Single Sign-On in Zimbra Collaboration Suite
Along with Active Directory, one of the important technologies to ensure the user experience even with the strictest password security policy is Single Sign-On technology. This technology allows employees, after the next password change, to go through the authentication procedure once and after successful completion, to gain access to all corporate resources automatically. In the event that you are using the Zimbra Collaboration Suite, you may want to configure SSO on it. Below we describe how to do this.

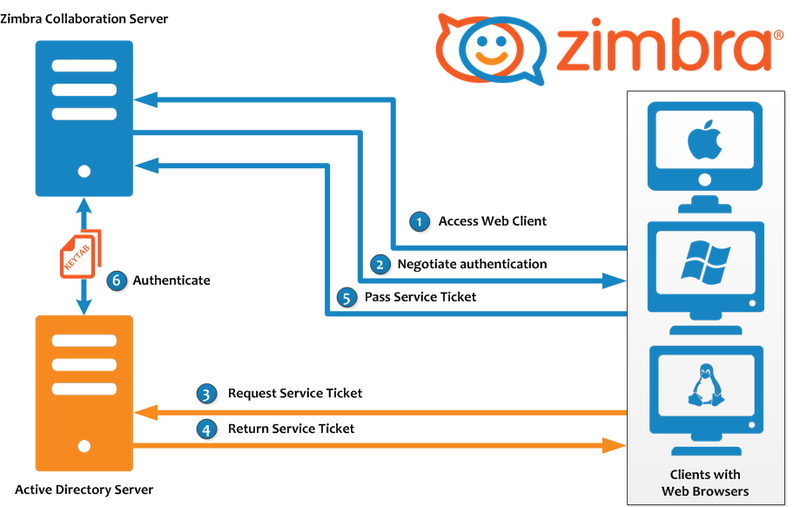
If you configured authorization in Zimbra via AD according to the instructions from the previous article, then the principle of configuring SSO will be to create a keytab file in Kerberos, as well as a special account account in AD, configure SPNEGO on the Zimbra server and issue certificates for using SSO to all users . We especially note that it is extremely important to create backup copies of the files in which these or other changes will be made, and store them in separate folders so that unforeseen problems will not turn into major troubles for you.
First of all, we need to create a ticketer account in Zimbra and prohibit it from changing the password, as well as create a Service Principal Name (SPN) in Kerberos for the account-billing account on the domain controller. You can do this with the commandsetspn –A mail.domain.com ticketer , after which it is necessary to check the result with the command setspn –L ticketer . After this, we create a key-file on the domain controller using a command like this:
After the keytab file is successfully created, you will need to move it to the Zimbra Collaboration Suite server in the / opt / zimbra / data / mailboxd / spnego / and / opt / zimbra / jetty / folders , and then you need to change the access rights to them:
Now let's proceed to setting up the SPNEGO utility built into the Zimbra Collaboration Suite, which will work with the previously created .keytab file. You can configure SPNEGO using the following commands:
The next step is to bring the settings file /opt/zimbra/jetty/etc/krb5.ini into something like the following:
After that, you need to configure the users' browsers by adding the mail.domain.com values to the network.neg in all fields with the word uris in the title. You can speed up this process by using group policies.
The final touch is to update the authorization settings via AD in the Zimbra Collaboration Suite:
Done! Now, in Zimbra, not only correctly working Single Sign-On is configured, but also automatic creation of mailboxes when the user first logs in to the server, authorized by SSO.
If you configured authorization in Zimbra via AD according to the instructions from the previous article, then the principle of configuring SSO will be to create a keytab file in Kerberos, as well as a special account account in AD, configure SPNEGO on the Zimbra server and issue certificates for using SSO to all users . We especially note that it is extremely important to create backup copies of the files in which these or other changes will be made, and store them in separate folders so that unforeseen problems will not turn into major troubles for you.
First of all, we need to create a ticketer account in Zimbra and prohibit it from changing the password, as well as create a Service Principal Name (SPN) in Kerberos for the account-billing account on the domain controller. You can do this with the commandsetspn –A mail.domain.com ticketer , after which it is necessary to check the result with the command setspn –L ticketer . After this, we create a key-file on the domain controller using a command like this:
ktpass -out c:\keys\jetty.keytab -princ HTTP/mail.domain.com@domain.local -mapUser ticketer -mapOp set -pass !@#$%& -crypto RC4-HMAC-NT -pType KRB5_NT_PRINCIPALAfter the keytab file is successfully created, you will need to move it to the Zimbra Collaboration Suite server in the / opt / zimbra / data / mailboxd / spnego / and / opt / zimbra / jetty / folders , and then you need to change the access rights to them:
chown ticketer:zimbra /opt/zimbra/data/mailboxd/spnego/jetty.keytab
chown ticketer:zimbra /opt/zimbra/jetty/jetty.keytab
Now let's proceed to setting up the SPNEGO utility built into the Zimbra Collaboration Suite, which will work with the previously created .keytab file. You can configure SPNEGO using the following commands:
su zimbrazmprov mcf zimbraSpnegoAuthEnabled TRUE
zmprov mcf zimbraSpnegoAuthRealm domain.local
zmprov ms mail.domain.com zimbraSpnegoAuthTargetName HTTP/mail.domain.com
zmprov ms mail.domain.com zimbraSpnegoAuthPrincipal HTTP/mail.domain.com
zmprov md domain.com zimbraAuthKerberos5Realm domain.local
zmprov md domain.com zimbraWebClientLoginURL '/service/spnego'
zmprov md domain.com zimbraWebClientLogoutURL '../?sso=1'
The next step is to bring the settings file /opt/zimbra/jetty/etc/krb5.ini into something like the following:
[libdefaults]
default_realm = domain.local
dns_lookup_realm = no
dns_lookup_kdc = no
kdc_timesync = 1
ticket_lifetime = 24h
default_keytab_name = FILE:/opt/zimbra/data/mailboxd/spnego/jetty.keytab
default_tgs_enctypes = arcfour-rc4-md5 rc4-hmac des-cbc-crc des-cbc-md5
default_tkt_enctypes = arcfour-rc4-md5 rc4-hmac des-cbc-crc des-cbc-md5
permitted_enctypes = arcfour-rc4-md5 rc4-hmac des-cbc-crc des-cbc-md5
[realms]
domain.local = {
kdc = dc.domain.local
admin_server = dc.domain.local
default_domain = domain.local
}
[appdefaults]
autologin = true
forwardable=true
After that, you need to configure the users' browsers by adding the mail.domain.com values to the network.neg in all fields with the word uris in the title. You can speed up this process by using group policies.
The final touch is to update the authorization settings via AD in the Zimbra Collaboration Suite:
su zimbra
zmprov md domain.ru +zimbraAutoProvAuthMech SPNEGO +zimbraAutoProvAuthMech KRB5 +zimbraAutoProvAuthMech PREAUTH +zimbraAutoProvAuthMech LDAP
zmcontrol restart
Done! Now, in Zimbra, not only correctly working Single Sign-On is configured, but also automatic creation of mailboxes when the user first logs in to the server, authorized by SSO.