Step-by-step instructions for restoring access to a Linux Amazon EC2 instance when you lose a pem file
- From the sandbox
- Tutorial
If, when creating a Linux instance in AWS, a key pair (KeyPair) was not created to access it via SSH or they are lost, then you need to perform a series of operations to gain access to the machine. It is not possible to add keys to an already running instance via the AWS console. There are three ways we can restore SSH access to the instance.
The easiest way is to configure the key using the cloud-init mechanism (thanks for the hint yusman ). But it does not work if the rights to the directory are
The second way is to create an image.(Amazon Machine Image) from an existing instance and the subsequent launch of a new instance based on it, but with the creation of a key. In this way, the existing machine will actually be cloned with the only difference being that at the last stage it is possible to create new keys. Creating an image can take a long time for an instance with large volume disks, and you will have to configure all services tied to this machine again. Therefore, this method in most cases will take more time.
The official documentation from Amazon describes another way . It allows you to restore access and minimize the cost of reconfiguring services (as compared to the second method), which are tied to the instance to which access is lost. The article gives a step by step description.
Attention! This method works only for instances that use block storage (Amazon Elastic Block Store) as the root device, and does not work for local storage of instances (Amazon EC2 Instance Store).
To find out what type of root device you are using, open the Amazon EC2 console, go to Instances , select an instance and check the Root device type parameterin the details pane.

If your machine is EBS , then this method is suitable for you.
First you need to save some information so that you do not have to be distracted and do not switch to other screens (especially it will be very inconvenient). All data can be found in the detailed information of the instance (you already know how to get there). Record the following settings:
For an instance running in a VPC , save the value of the VPC ID .
For EC2-classic : if an elastic IP address ( Elastic IP ) is created for the instance , then its value must be saved.
 The image is clickable.
To get the block storage identifier ( EBS ID ), click on the Root device name .

The next step is to create an instance with which you will restore the keys on the original instance. You can skip this step if you have another running instance that is in the same zone (Availability zone) as the one being restored, and at the same time it is created using the same AMI or the version of the operating system on it allows you to connect the disk from the original instance and copy the SSH keys to it. If there is no such instance, then do the following:
First you need to disconnect the disk from the original instance and connect it to a temporary one. Since this is the root disk, the original instance will have to be stopped before it is disconnected.
Linux users do not need to generate any additional keys. It is only necessary to give permissions to read this file:
Connect to port 22 using the key. The username depends on which AMI was used to create the instance. You recorded it at the very beginning. The following usernames are possible:
The name of the host you want to connect to is user@aws-host.amazon.com , where user is the name described above and aws-host.amazon.com is the ip-address of your instance, which can be found on the detailed information tab (from it you saved parameters at the very beginning). The parameter is called IPv4 Public IP . Please note that if you do not use Elastic IP , each time the instance starts, it will have a new ip address.
Mount the volume that you connected to the temporary instance so that you can access its file system.
Copy the SSH keys from the temporary instance to the mounted partition.
Attention! Use the username specified on the command line. This is necessary, because despite the fact that you have successfully connected with a standard username, which depends on the operating system (described in step 5), it may be different in the AMI from the AWS Marketplace after logging in. For example, for AMI WordPress Certified by Bitnami, when logging in via SSH, the standard login for Ubuntu is used
Unmount the partition:
Connect to the restored access instance using the generated key.
If the name of the new key pair is different from the previous one, make sure that you connect using the new private key.
If you created a new temporary instance to perform all operations, and did not use an existing one, stop it if you no longer need it:
Thus, you have restored access to a Linux Amazon EC2 instance.
The easiest way is to configure the key using the cloud-init mechanism (thanks for the hint yusman ). But it does not work if the rights to the directory are
/homedamaged or the distribution does not support cloud-init directives. The second way is to create an image.(Amazon Machine Image) from an existing instance and the subsequent launch of a new instance based on it, but with the creation of a key. In this way, the existing machine will actually be cloned with the only difference being that at the last stage it is possible to create new keys. Creating an image can take a long time for an instance with large volume disks, and you will have to configure all services tied to this machine again. Therefore, this method in most cases will take more time.
The official documentation from Amazon describes another way . It allows you to restore access and minimize the cost of reconfiguring services (as compared to the second method), which are tied to the instance to which access is lost. The article gives a step by step description.
Attention! This method works only for instances that use block storage (Amazon Elastic Block Store) as the root device, and does not work for local storage of instances (Amazon EC2 Instance Store).
To find out what type of root device you are using, open the Amazon EC2 console, go to Instances , select an instance and check the Root device type parameterin the details pane.

If your machine is EBS , then this method is suitable for you.
Step 1. Preparation
First you need to save some information so that you do not have to be distracted and do not switch to other screens (especially it will be very inconvenient). All data can be found in the detailed information of the instance (you already know how to get there). Record the following settings:
- Instance ID
- AMI ID
- EBS ID
- Root device
- Availability zone
For an instance running in a VPC , save the value of the VPC ID .
For EC2-classic : if an elastic IP address ( Elastic IP ) is created for the instance , then its value must be saved.

To get the block storage identifier ( EBS ID ), click on the Root device name .

Step 2. Create a temporary instance
The next step is to create an instance with which you will restore the keys on the original instance. You can skip this step if you have another running instance that is in the same zone (Availability zone) as the one being restored, and at the same time it is created using the same AMI or the version of the operating system on it allows you to connect the disk from the original instance and copy the SSH keys to it. If there is no such instance, then do the following:
- Go to the EC2 console (on the dashboard or in the Instances menu ) and click Launch Instance
- On the AMI ( Choose an Amazon Machine Image ) page, select the one that was used to create the original instance (you recorded it in the first step - AMI ID ). If for some reason this AMI is not available, you can create an image from the original instance and use it, or select the type of AMI to which you can connect the root disk of the instance to be restored.
- On the Choose an Instance Type page, select the cheapest type available.
- On the Configure Instance Details page, specify the same zone ( Availability Zone ) as in our instance. If it is running in VPC, select the paragraph Network similar VPC and select subnet ( subnet statement ) in the area.
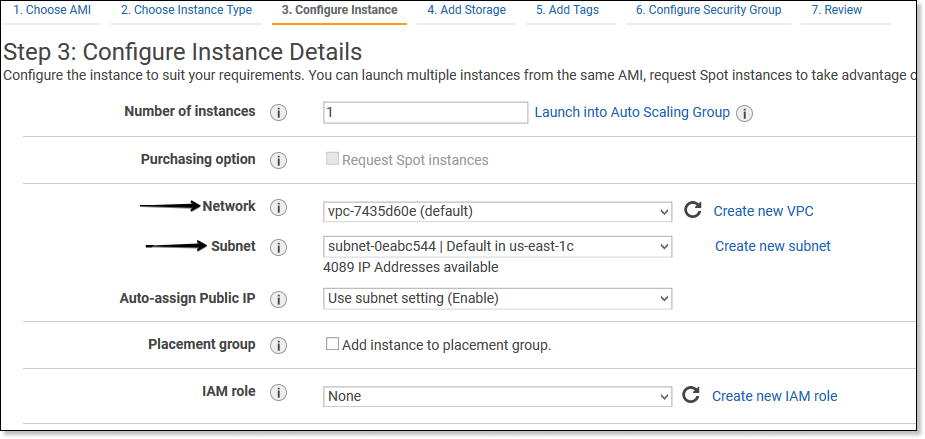
However, the Network Interfaces settings do not need to be changed. - No changes are required on the Add Storage page
- On the Tags page ( Add Tags ), add a name for the temporary instance so that it is easy to identify and then do not waste time checking Instance ID and EBS ID , as on the pages where you will need to determine which instance or volume you are working in the title this value will appear.

- Click Review and Launch , and then Launch
- The last stage is the selection of an existing key pair or the creation of a new one. Download the key file (pem) and do not forget to backup so that all operations do not have to be performed again.
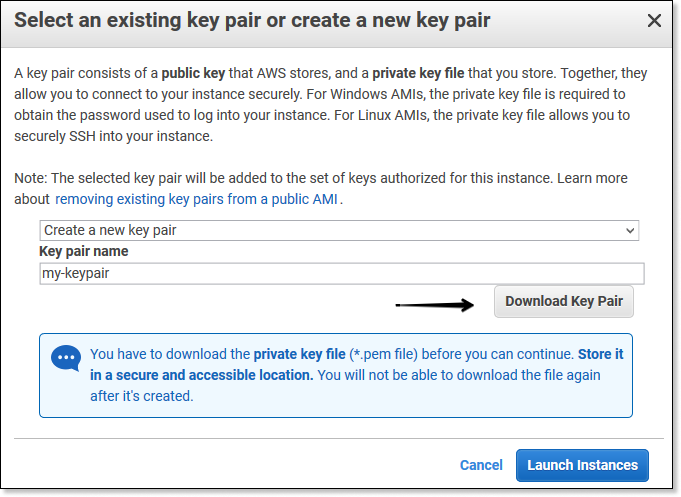
- After you save the file, launch the instance with the Launch Instances button.
Step 3. Connecting the root disk from the restored machine to the temporary instance
First you need to disconnect the disk from the original instance and connect it to a temporary one. Since this is the root disk, the original instance will have to be stopped before it is disconnected.
- Go to the EC2 section of the Instances console and select the original instance (it can be identified by the previously recorded Instance ID or by a name that differs from the one you specified when creating the temporary instance).

Next in the menu Actions - Instance State - Stop .
Attention! When the instance stops, all data in local storage (Amazon EC2 Instance Store) is erased. If you have data on such volumes, take care of their safety by transferring them to permanent storage, if necessary. - After the instance is stopped, go to the Elastic Block Store - Volumes section and select the root volume of the original instance. It can be determined by the saved Volume ID or based on information from the Attachment Information column , which contains the name of the instance.

Next in the menu Actions - Detach Volume - Connect this volume to a temporary instance. To do this, select it again, then in the Actions - Attach Volume menu and in the dialog box that appears specify your temporary instance.
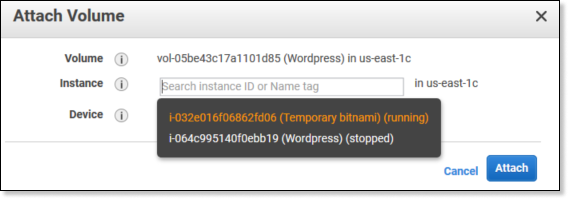
Then click Attach . If the original instance was created through the AWS Marketplace AMI and the section contains the AWS Marketplace codes, you will get an error stating that the code section cannot be connected to a working instance.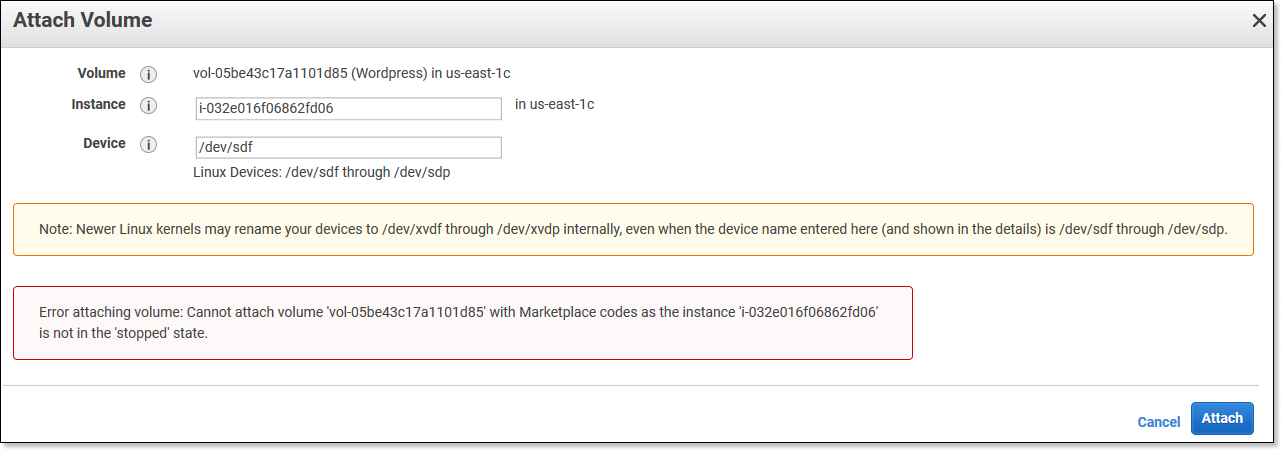
In this case, stop our temporary instance and re-perform the steps to connect the root volume of the original instance to the temporary instance. The second attempt should be successful. - You should now see that both disks are connected to a temporary instance.

- If you stopped the instance, run it:
- Go to the Instances section in the navigation bar.
- Choose a temporary instance
- Next in the menu Actions - Instance State - Start .
Step 4. Preparing keys for connecting to the instance over SSH
Linux users do not need to generate any additional keys. It is only necessary to give permissions to read this file:
chmod 400 my-keypair.pemKey preparation, if you are working under Windows
To connect to a Linux machine, we will use the PuTTY utility, so if you haven’t installed it, download it. To connect via SSH with its help, you will need a ppk-key , while with AWS the key was saved in the pem format . In order to get the key to the right format, do the following:
Ключ готов.
- Open PuTTYgen (installed with PuTTY)
- Выберите в параметрах RSA 2048 бит

- Загрузите сохраненный pem-ключ нажав Load (Load an existing private key file)
- Укажите парольную фразу (key passphrase) и подтвердите её (confirm passphrase). Это делать не обязательно, но так безопасней. Разница будет лишь в том, что при подключении с использованием этого ключа всегда будет предлагаться ввести эту фразу, чтобы подтвердить вход
- Сохраните файл с тем названием, которое вы указали при создании пары ключей (KeyPair) в процессе создания временного инстанса (название совпадает с именем pem-ключа)
Ключ готов.
Step 5. Connecting to a temporary instance over SSH
Connect to port 22 using the key. The username depends on which AMI was used to create the instance. You recorded it at the very beginning. The following usernames are possible:
- Amazon Linux 2 or Amazon Linux AMI - ec2-user
- Centos AMI - centos
- Debian AMI - admin or root
- Fedora AMI - ec2-user or fedora
- RHEL AMI - ec2-user or root
- SUSE AMI - ec2-user or root
- Ubuntu AMI - Ubuntu
- For others, if the names ec2-user and root do not work - contact your AMI provider.
The name of the host you want to connect to is user@aws-host.amazon.com , where user is the name described above and aws-host.amazon.com is the ip-address of your instance, which can be found on the detailed information tab (from it you saved parameters at the very beginning). The parameter is called IPv4 Public IP . Please note that if you do not use Elastic IP , each time the instance starts, it will have a new ip address.
Connection instructions for Windows users
- Запустите PuTTY
- В поле Host Name адрес в формате имя_пользователя@ip-адрес

- Перейдите в раздел Connection — SSH — Auth и загрузите ppk-ключ (Private key file for authentication)
- Нажмите Open и затем согласитесь доверять серверу
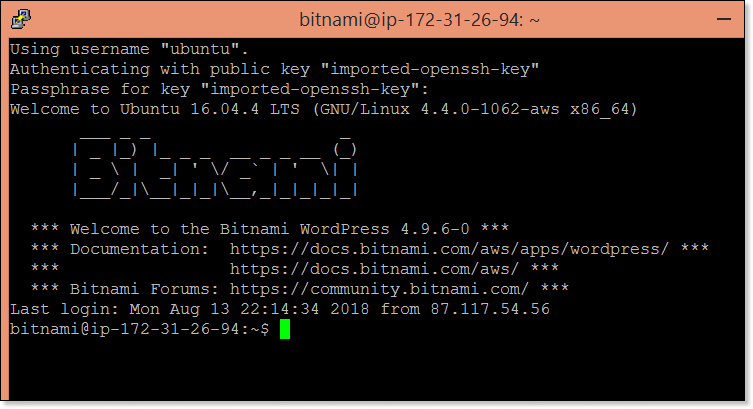
- Если вы указывали парольную фразу (passphrase) при создании ppk-ключа, введите её, чтобы подтвердить вход:
Using username "ubuntu". Authenticating with public key "imported-openssh-key" Passphrase for key "imported-openssh-key": - Вы на сервере.
Step 6. Copying keys from the temporary instance to the original one
Mount the volume that you connected to the temporary instance so that you can access its file system.
Mounting a partition
Например, если имя диска
/dev/sdf (может отображаться по-разному на вашем инстансе), используйте следующие операции для монтирования тома в /mnt/tempvol:- Определите названия разделов подключенного диска:
[user ~]$ lsblkNAME MAJ:MIN RM SIZE RO TYPE MOUNTPOINT xvda 202:0 0 10G 0 disk └─xvda1 202:1 0 10G 0 part / xvdf 202:80 0 10G 0 disk └─xvdf1 202:81 0 10G 0 part/dev/xvda1и/dev/xvdf1— разделы дисков. У/dev/xvdf1не указана точка монтирования (MOUNTPOINT), значит это раздел диска, который мы подключили ранее. - Создайте временную директорию для монтирования раздела:
[user ~]$ sudo mkdir /mnt/tempvol - Смонтируйте раздел в созданный каталог:
[user ~]$ sudo mount /dev/xvdf1 /mnt/tempvol
Copy the SSH keys from the temporary instance to the mounted partition.
Attention! Use the username specified on the command line. This is necessary, because despite the fact that you have successfully connected with a standard username, which depends on the operating system (described in step 5), it may be different in the AMI from the AWS Marketplace after logging in. For example, for AMI WordPress Certified by Bitnami, when logging in via SSH, the standard login for Ubuntu is used
ubuntu. However, the username after logging in -bitnamiCopy keys
Например, если имя пользователя
Если у вас нет прав на редактирование файлов в
ubuntu, используйте следующую команду для копирования:[user ~]$ cp .ssh/authorized_keys /mnt/tempvol/home/ubuntu/.ssh/authorized_keys
Если у вас нет прав на редактирование файлов в
/mnt/tempvol, то скопируйте файлы с использованием sudo и проверьте права, чтобы удостовериться, что вы сможете зайти на оригинальный инстанс:- Проверьте права на файл:
[user ~]$ sudo ls -l /mnt/tempvol/home/ubuntu/.ssh/authorized_keystotal 4-rw------- 1 200 500 392 Aug 15 00:06 authorized_keys
В примере, 200 — это ID пользователя и 500 — ID группы. - Перезапустите команду копирования ключей с использованием
sudo:[user ~]$ sudo cp .ssh/authorized_keys /mnt/tempvol/home/ubuntu/.ssh/authorized_keys - Проверьте, не изменились ли права на файл:
[user ~]$ sudo ls -l /mnt/tempvol/home/ubuntu/.ssh/authorized_keys
Если права изменились, восстановите их:[user ~]$ sudo chown 200:500 /mnt/tempvol/home/ubuntu/.ssh/authorized_keys
Unmount the partition:
[user ~]$ sudo umount /mnt/tempvolStep 7. Starting an instance with restored access via SSH
- In the EC2 console, select the drive that you connected to the temporary one, and in the menu: Actions - Detach Volume . Wait until the state of the disk becomes available (you can use the Refresh button to update the information).
Do not forget to stop the instance first, if the section contains AWS Marketplace codes. - For the same disk, go to the menu Actions - Attach Volume
- Select the original instance and specify the name of the root disk that you recorded at the very beginning.Image is clickable

Click Attach - Run instance
- For EC2-classic : if Elastic IP was configured for the original instance , re-associate it with it:
- Go to the Elastic IP section in the navigation pane.
- Select the Elastic IP address you recorded at the very beginning
- Next Actions - Associate address
- Select the original instance ID and click Associate.
Step 8. Access check
Connect to the restored access instance using the generated key.
If the name of the new key pair is different from the previous one, make sure that you connect using the new private key.
Step 9. The final stage
If you created a new temporary instance to perform all operations, and did not use an existing one, stop it if you no longer need it:
- Go to the Instances section of the navigation bar.
- Choose a temporary instance
- Next in the menu Actions - Instance State - Terminate
Thus, you have restored access to a Linux Amazon EC2 instance.
