3D printing of complex parts made of ABS and PLA plastics with a lot of support
Good day to you company 3Dtool ! Often there are situations when it is necessary to print a geometrically complex part on a 3D printer with one extruder, for example Hercules Strong , which you can’t do without being able to print without supports. Option - cut into pieces and glue in the context of this post will not be considered.
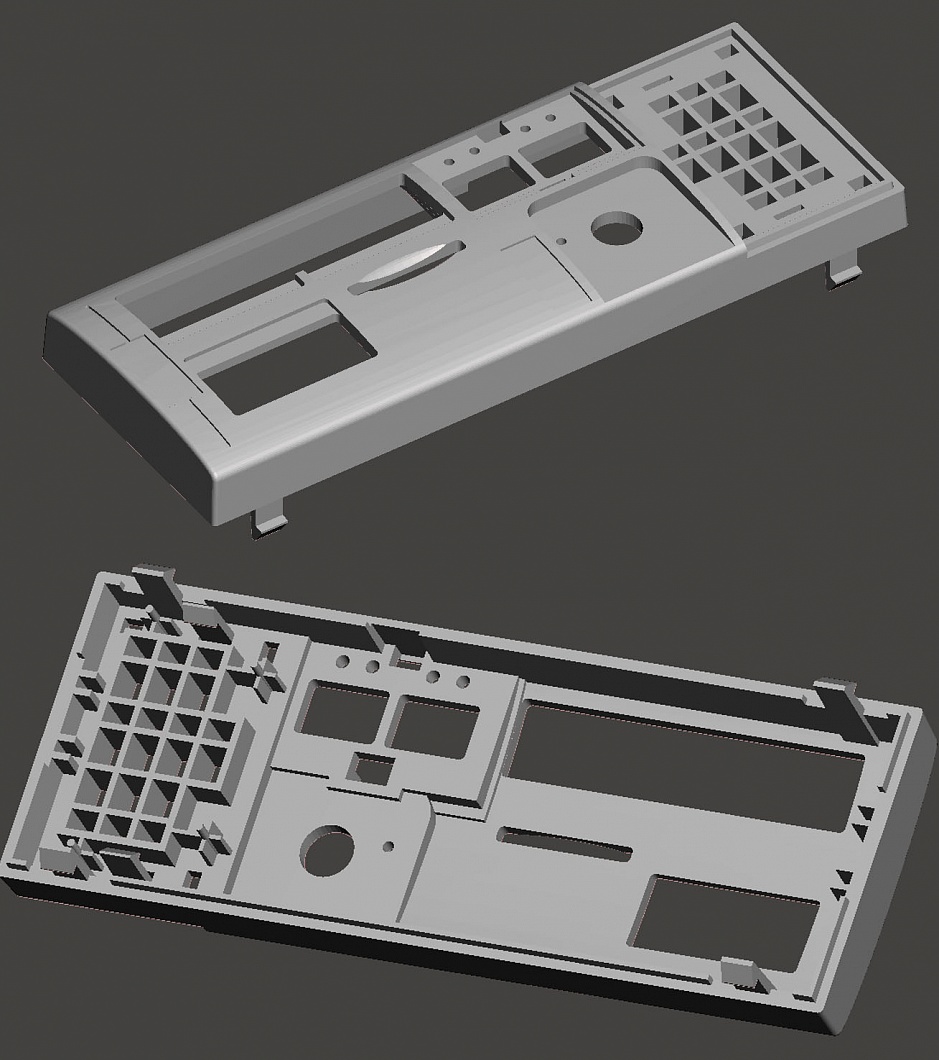
One of our customers had difficulties in preparing, printing and post-processing the part (see below). On the top of the picture is the front side, the inner side (the second picture) is printed with support.
The complexity of 3D printing lies in the fact that the support from the draft side of the part is almost impossible to remove, they are either removed with parts of the part, or the first layers of the part hang over the supports and are printed not exactly.
Load the part into Slic3r.

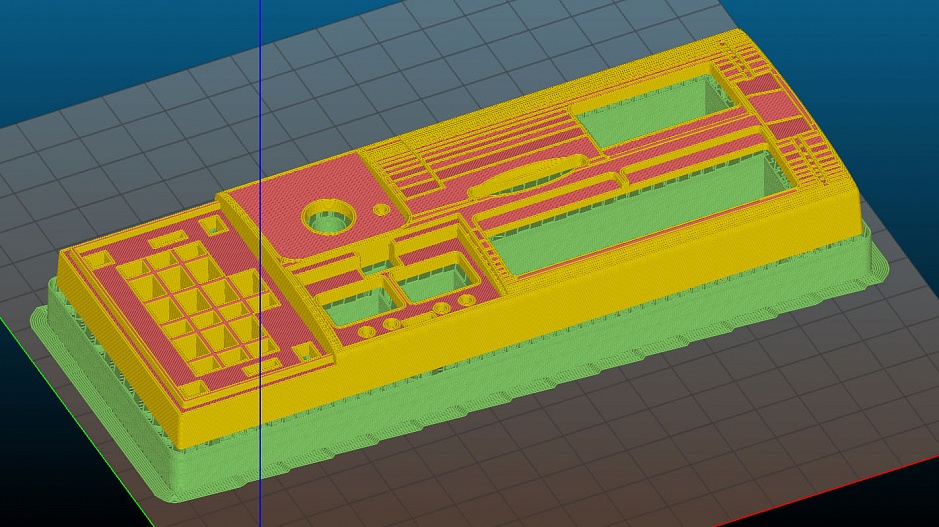
We arrange the part in such a way so that the upper part of the panel will be in good quality. It is also important to us the quality of the outer side walls. The interior of the panel is rough, so we build support in the interior.
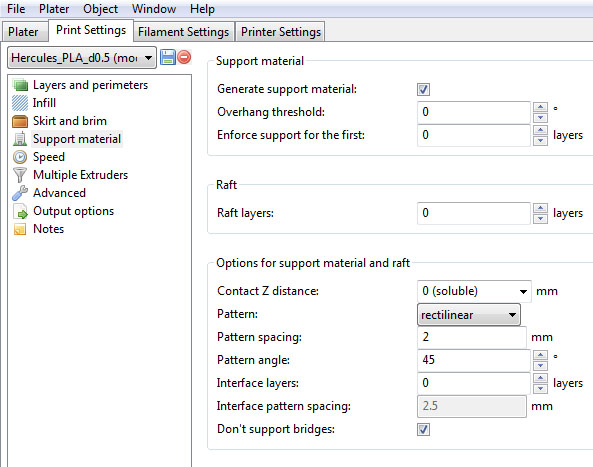
Go to Print settings → Support materials and enable support.
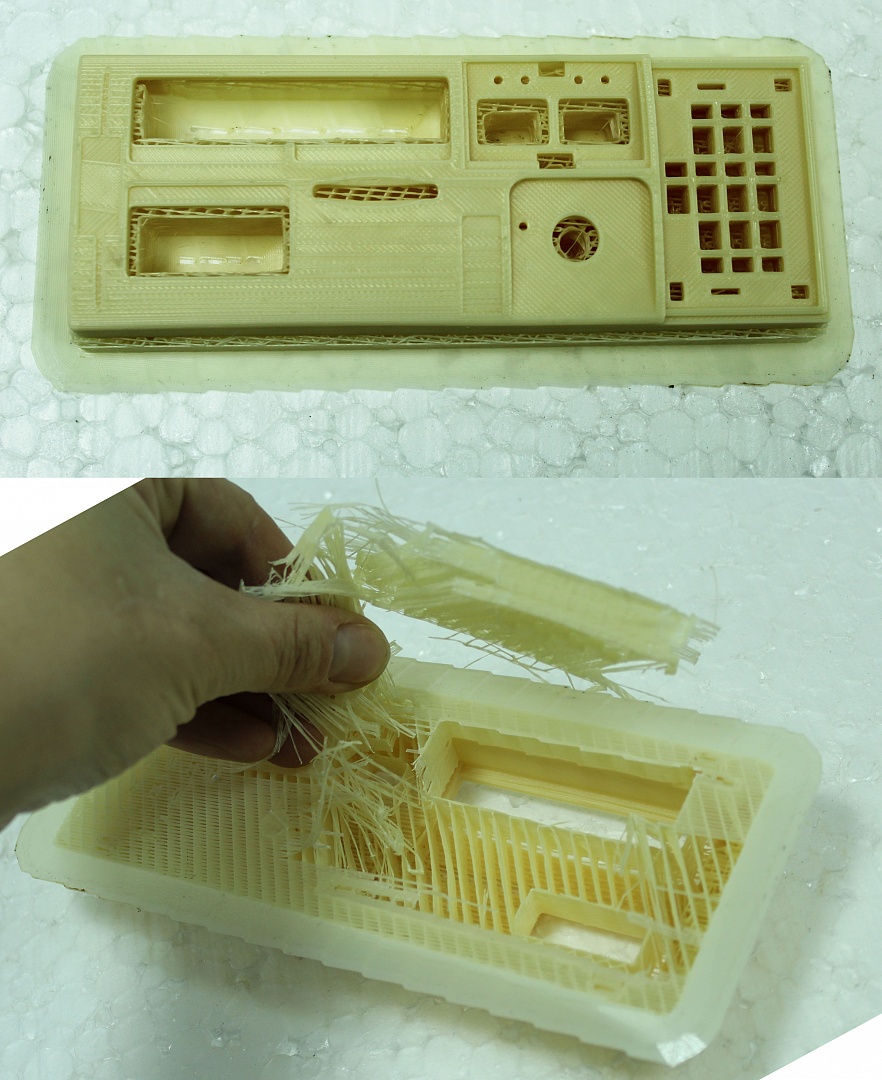
It turns out that the whole part is supported and it will be very difficult to remove them. The photo shows the result of our customer's print. It was he who threw us this interesting task. Print time 4.5 hours.

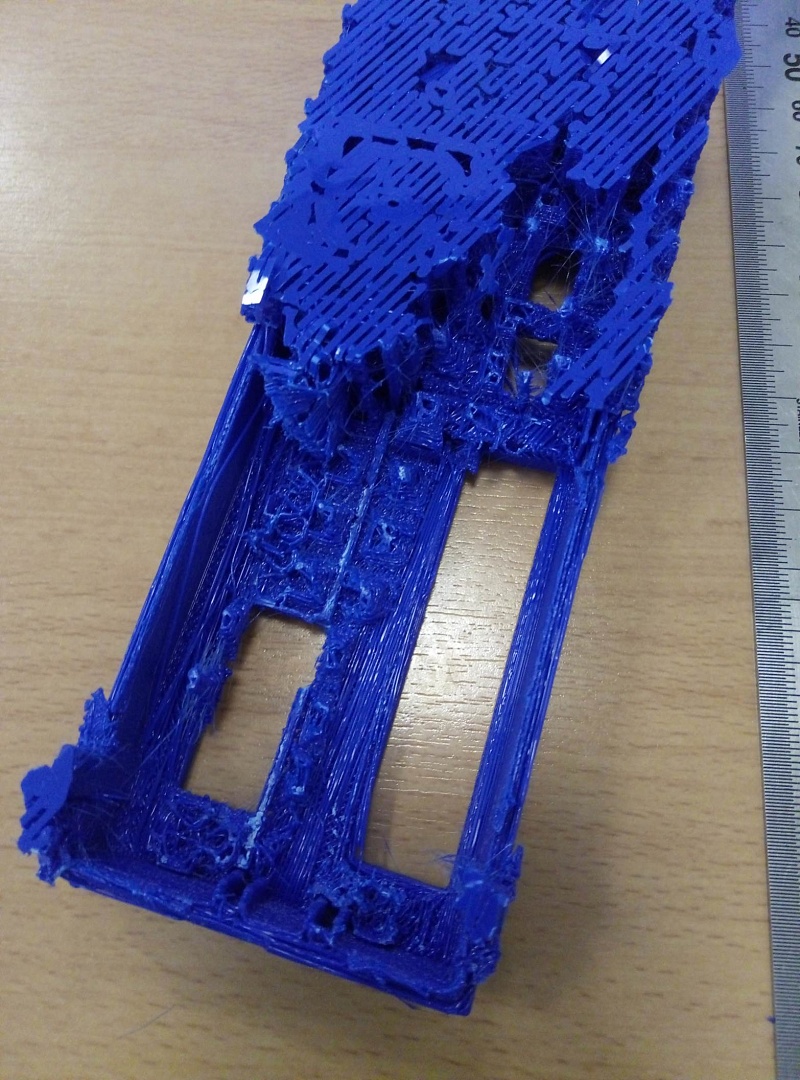
It was possible to separate the support with great difficulty with pliers. The inner surface is in very poor quality, it is impossible to process it.
The default settings in this case did not cope with the task. Therefore, we will configure the Slic3r manually.
In order for the support to be easily removed and the inside of the panel to turn out in acceptable quality, you need to change some parameters:
Go to the Support Material section
1. Reduce the extrusion width on the supports. The backing net will be printed with thin weblike threads. They are easy to remove by hand and at the same time, their strength is enough to hold the first layers of the part.
Change settings in Advanced → Extrusion width → Support material – 0.35 mm.
2In order for the threads of the first layer of the part to be printed over the support not to sag, we need the support grid to be dense, i.e., a step must be made at least 1 mm. This parameter is called Pattern Spacing. This is the distance in millimeters between the threads of the support. If we specify a short distance there, the printing of supports will take a very long time. Therefore, we will do this: we will print the support in 3 mm increments, and print the last 2 layers of support with the 1 mm pitch we need, these layers will support the first layers of the part and the 1 mm pitch will not allow the threads to sag. This saves a lot of time. Change settings:
Pattern spacing –3 mm - we print support in 3 mm increments
Interface layers –2, Interface pattern spacing – 1 mm - we set two layers between the part and the support to print lines in 1 mm increments.
3. Contact Z distance specify 0. The first layer of the part will be printed close to the support, so it will be smoother. A reduction in the extrusion width will allow us to remove support from the part surface without any problems.

4. Go to the Speed section. To ensure that the support threads do not break due to reduced extrusion, we reduce the speed for the Support material to 40 mm / s and the Interface support material to 30 mm / s.
The speed for continuous layers, the ones that will be printed over the support, is reduced to 50%. We do this so that the layers on the support lie flat and the thread does not break.
Speed → Solid Infill - 50%
Save the G-code and print.
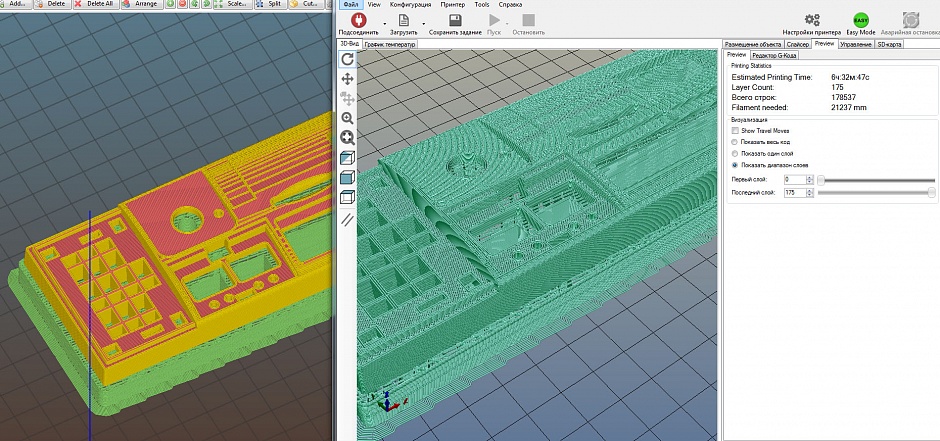
See the result.
Green PLA Esun and creamy ABS Esun. Printed on Hercules Strong nozzle 0.5 mm, layer height 0.2 mm. Printing time is 6.5 hours PLA and almost 7 hours ABS.
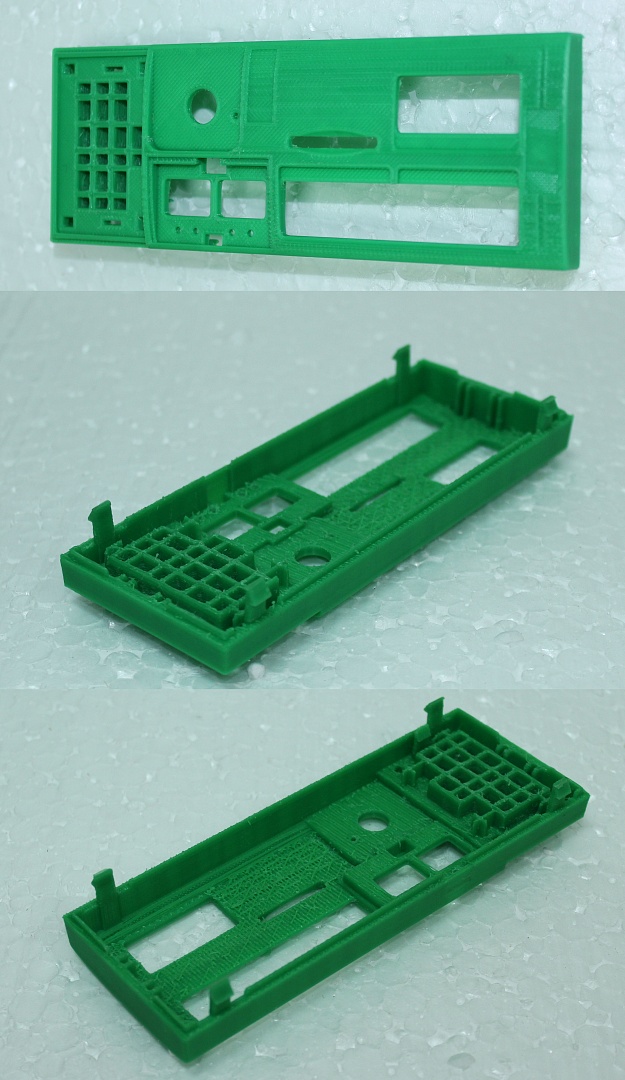
The main part of the support was easily separated by hands, the threads of the two layers between the part and the support were removed with a stationery knife and a thin flat screwdriver. The surfaces above the supports turned out to be smooth, without breaks and sagging threads.
This method allows you to print complex parts with a lot of support. The printing time will increase depending on the settings of the Slic3r, which in turn will depend on the complexity of the part, the type of plastic and the desired result. In our case, printing time has increased by almost 40%.
Experiments have shown that it is possible to reduce the extrusion width on the support to 40% of the nozzle diameter, the smaller this value, the easier it will be to separate the support, but the more likely it is that the extrusion will break and the first layers of the part will lie unevenly or not hold onto the support. Also, do not forget about the physical properties of plastic: for ABS plastic, we reduced the printing speed of support to 30 mm / s, otherwise the extrusion would fail. PLA plastic stretches well, unlike ABS, and was printed at a speed of 40mm / s without disruption. Therefore, all the listed parameters may vary in each case.
Catalog of 3D printers
Do not forget to subscribe to our YouTube channel (new videos come out every week).

One of our customers had difficulties in preparing, printing and post-processing the part (see below). On the top of the picture is the front side, the inner side (the second picture) is printed with support.
The complexity of 3D printing lies in the fact that the support from the draft side of the part is almost impossible to remove, they are either removed with parts of the part, or the first layers of the part hang over the supports and are printed not exactly.
Load the part into Slic3r.
We arrange the part in such a way so that the upper part of the panel will be in good quality. It is also important to us the quality of the outer side walls. The interior of the panel is rough, so we build support in the interior.
Go to Print settings → Support materials and enable support.
It turns out that the whole part is supported and it will be very difficult to remove them. The photo shows the result of our customer's print. It was he who threw us this interesting task. Print time 4.5 hours.
It was possible to separate the support with great difficulty with pliers. The inner surface is in very poor quality, it is impossible to process it.
The default settings in this case did not cope with the task. Therefore, we will configure the Slic3r manually.
In order for the support to be easily removed and the inside of the panel to turn out in acceptable quality, you need to change some parameters:
Go to the Support Material section
1. Reduce the extrusion width on the supports. The backing net will be printed with thin weblike threads. They are easy to remove by hand and at the same time, their strength is enough to hold the first layers of the part.
Change settings in Advanced → Extrusion width → Support material – 0.35 mm.
2In order for the threads of the first layer of the part to be printed over the support not to sag, we need the support grid to be dense, i.e., a step must be made at least 1 mm. This parameter is called Pattern Spacing. This is the distance in millimeters between the threads of the support. If we specify a short distance there, the printing of supports will take a very long time. Therefore, we will do this: we will print the support in 3 mm increments, and print the last 2 layers of support with the 1 mm pitch we need, these layers will support the first layers of the part and the 1 mm pitch will not allow the threads to sag. This saves a lot of time. Change settings:
Pattern spacing –3 mm - we print support in 3 mm increments
Interface layers –2, Interface pattern spacing – 1 mm - we set two layers between the part and the support to print lines in 1 mm increments.
3. Contact Z distance specify 0. The first layer of the part will be printed close to the support, so it will be smoother. A reduction in the extrusion width will allow us to remove support from the part surface without any problems.
4. Go to the Speed section. To ensure that the support threads do not break due to reduced extrusion, we reduce the speed for the Support material to 40 mm / s and the Interface support material to 30 mm / s.
The speed for continuous layers, the ones that will be printed over the support, is reduced to 50%. We do this so that the layers on the support lie flat and the thread does not break.
Speed → Solid Infill - 50%
Save the G-code and print.
See the result.
Green PLA Esun and creamy ABS Esun. Printed on Hercules Strong nozzle 0.5 mm, layer height 0.2 mm. Printing time is 6.5 hours PLA and almost 7 hours ABS.
The main part of the support was easily separated by hands, the threads of the two layers between the part and the support were removed with a stationery knife and a thin flat screwdriver. The surfaces above the supports turned out to be smooth, without breaks and sagging threads.
This method allows you to print complex parts with a lot of support. The printing time will increase depending on the settings of the Slic3r, which in turn will depend on the complexity of the part, the type of plastic and the desired result. In our case, printing time has increased by almost 40%.
Experiments have shown that it is possible to reduce the extrusion width on the support to 40% of the nozzle diameter, the smaller this value, the easier it will be to separate the support, but the more likely it is that the extrusion will break and the first layers of the part will lie unevenly or not hold onto the support. Also, do not forget about the physical properties of plastic: for ABS plastic, we reduced the printing speed of support to 30 mm / s, otherwise the extrusion would fail. PLA plastic stretches well, unlike ABS, and was printed at a speed of 40mm / s without disruption. Therefore, all the listed parameters may vary in each case.
Catalog of 3D printers
Do not forget to subscribe to our YouTube channel (new videos come out every week).