Recognizing objects and human emotions using the Firebase ML Kit
- Transfer
- Tutorial

If you followed Google I / O (or at least watched Keynotes), then you may have noticed the announcement of a new product as part of the Firebase platform called ML Kit.
ML Kit provides an API with which you can add powerful machine learning functions to applications (both Android and iOS), regardless of whether you are an experienced machine learning developer or just a newcomer to this field.
Although this product did not become the center of attention at the conference (thanks, Google Duplex), there are certainly many useful ways to use it in Android development.
So let's play with it and create a small application that will look like Google Lens (almost)!
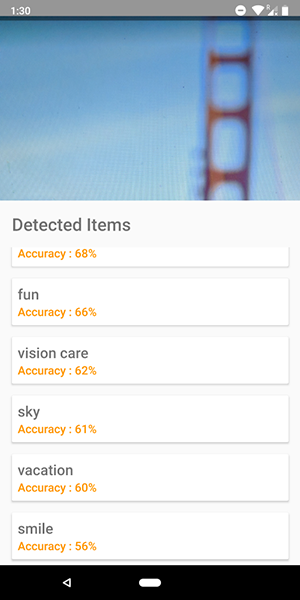
Here are some screenshots from the app. On them you can see an attempt to identify objects in the image.
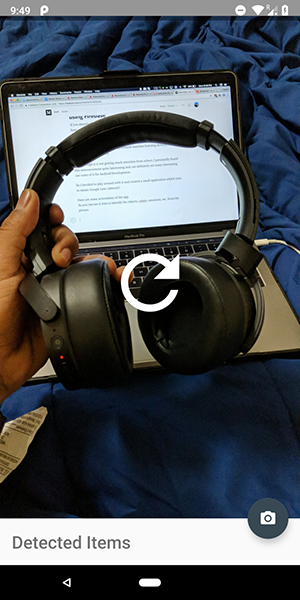
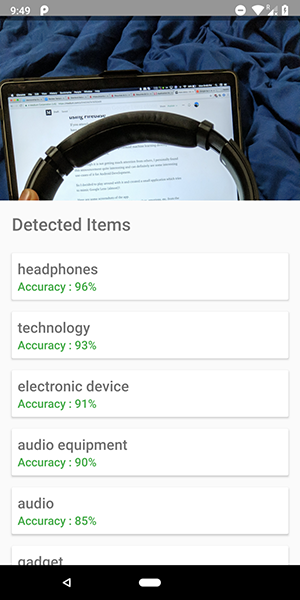
Pretty accurate, huh?
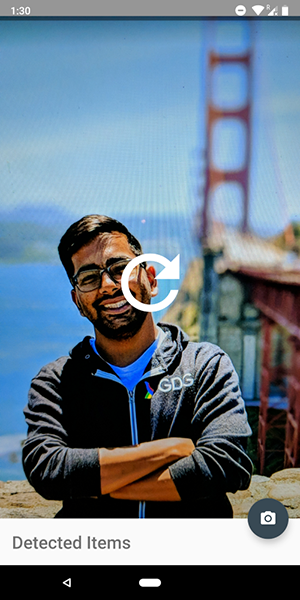
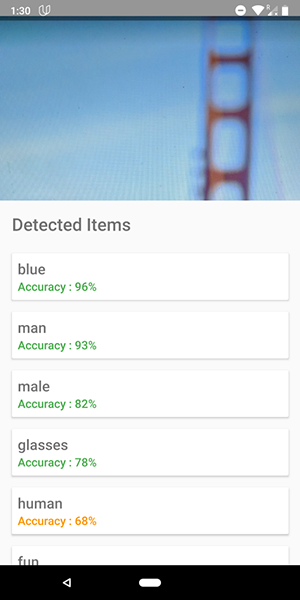
You can also use this API to define human emotions, such as happiness, sadness, anger, etc., which is even better.
Stop talking, show me the code !!!!!
ML Kit has 5 APIs:
- Text recognition (we have already released an article about the application using this functionality)
- Face detection (there is such an article in our blog)
- Barcode scanning
- Identification of objects in the image (the one we are going to use)
- Character Recognition
In this article we will use the API for identifying objects in the image. With this API, we get a list of objects that were recognized in the image: people, things, places, actions, etc.
In addition, there are 2 types of this API. The first is an API interface built into your device that works, logically, on the device itself. It is free and can recognize over 400 different objects in images.
The second is a cloud-based API that runs on Google Cloud and recognizes over 10,000 different objects. It is paid, but the first 1000 requests per month are free.
In this article, we will look at the first type of API, because it is free (but the principle of operation of the paid is similar to free).
Let's start.
- Connect Firebase to your project and add a dependency.
firebase-ml-vision
How to connect a firebase, you can see in a good tutorial from Google. You must also add the appropriate dependencies to use this API:
implementation'com.google.firebase:firebase-ml-vision:15.0.0'implementation'com.google.firebase:firebase-ml-vision-image-label-model:15.0.0'Embed the
Vision API camera function into an application, you need an image to receive data, so either create an application that allows you to upload images from the gallery, or create an application that uses the camera to make an image and instantly analyze it.
If you do not want to use the standard camera API, you can simply use the convenient and simple library for this functionality.Use the bitmap to access the Vision API. The
library mentioned above directly provides the image bitmap that can be used to access the API.
fab_take_photo.setOnClickListener {
            // cameraView is a custom View which provides camera preview
            cameraView.captureImage { cameraKitImage ->
                // Get the Bitmap from the captured shot and use it to make the API call
                getLabelsFromDevice(cameraKitImage.bitmap)
            }
}
privatefungetLabelsFromDevice(bitmap: Bitmap) {
        val image : FirebaseVisionImage = FirebaseVisionImage.fromBitmap(bitmap)
        val detector : FirebaseVisionLabelDetector = FirebaseVision.getInstance().visionLabelDetector
        detector.detectInImage(image)
                .addOnSuccessListener {
                    // Task completed successfullyfor(firebaseVision : FirebaseVisionLabel in it){
                        // Logging through the list of labels returned from the API and Log them
                        Log.d(TAG,"Item Name ${firebaseVision.confidence}")
                        Log.d(TAG,"Confidence ${firebaseVision.confidence}")
                    }
                }
                .addOnFailureListener {
                    // Task failed with an exception
                    Toast.makeText(baseContext,"Sorry, something went wrong!",Toast.LENGTH_SHORT).show()
                }
    }
In the above code snippet, we first create FirebaseVisionImagefrom bitmaps.
Then we create an instance FirebaseVisionLabelDetectorthat passes through FirebaseVisionImageand finds certain FirebaseVisionLabels(objects) that it recognizes in the provided image.
Finally, we transfer the image to the method detectInImage()and allow the detector to analyze the image.
We can set listeners to handle successful analysis and for unsuccessful ones. There we will have access to the list of objects identified in the image and to the exception that occurred.
For each recognized object you can get its name, recognition accuracy and entity id .
As mentioned earlier, this API can also be used to define human emotions in an image, as can be seen in the screenshots below:
The code for the cloud API is very similar to the code we wrote for the device API . Only the type of detector ( FirebaseVisionCloudLabelDetectoragainst FirebaseVisionLabelDetector) and the type of objects identified ( FirebaseVisionCloudLabelagainst FirebaseVisionLabels) differ:
privatefungetLabelsFromDevice(bitmap: Bitmap) {
        ...
        val detector : FirebaseVisionCloudLabelDetector = FirebaseVision.getInstance().visionCloudLabelDetector
        detector.detectInImage(image)
                .addOnSuccessListener {
                    for(firebaseVision : FirebaseVisionCloudLabel in it){
                        ...
                    }
                }
                .addOnFailureListener {
                    ...
                }
    }
In addition to changes in the code, you also need to set up billing (payment) for your project and enable the Google Vision API in your Google Cloud Console.
Please note that the API allows you to perform only 1000 free requests every month, so you do not need to pay if you want to just play with it.
The application shown in the screenshots can be found on the GitHub repository .