Launch of RabbitMQ cluster in Kubernetes
- Tutorial
In the case of microservice organization of the application, substantial work rests on the mechanisms of integration communication of microservices. Moreover, this integration should be fault tolerant, with a high degree of availability.
In our solutions, we use integration using Kafka, using gRPC, and using RabbitMQ.
In this article we will share our experience with RabbitMQ clustering, whose nodes are located in Kubernetes.

Prior to RabbitMQ version 3.7, its clustering in K8S was not a very trivial task, with a lot of hacks and not so beautiful solutions. In version 3.6, the autocluster plugin from the RabbitMQ Community was used. And in 3.7 Kubernetes Peer Discovery Backend appeared. It is integrated into the RabbitMQ base distribution and does not require separate assembly and installation.
We will describe the final configuration in its entirety, simultaneously commenting on what is happening.
The plugin has a repository on the githaba , in which there is an example of basic use .
This example is not intended for Production, which is clearly indicated in its description, and moreover, some of the settings in it are set against the logic of use in the sale. Also in the example, the storage persistence is not mentioned in any way, so in any abnormal situation our cluster will turn into zilch.
Now let us tell you what we faced and how RabbitMQ was installed and configured.
We describe the configuration of all parts of RabbitMQ as a service in K8s. Immediately clarify that we installed RabbitMQ in K8s as a StatefulSet. On each node of the K8s cluster, one instance of RabbitMQ will always function (one node in the classical cluster configuration). We will also install a RabbitMQ control panel in K8s and give access to this panel outside the cluster.
Access rights for RabbitMQ are taken entirely from the example, no changes are required in them. Create a ServiceAccount for our cluster and grant it read rights to Endpoints K8s.
Here, we took the simplest case as the persistent storage — hostPath (the usual folder on each K8s node), but you can use any of the many types of persistent volumes that are supported in K8s.
Create Volume Claim on the volume created in the previous step. This Claim will then be used in the StatefulSet as a persistent data store.
Create an internal headless service through which the Peer Discovery plugin will work.
To run applications in K8s with our cluster, we create a balancer service.
Since we need access to the RabbitMQ cluster outside of K8s, we push NodePort. RabbitMQ will be available when accessing any K8s cluster node on ports 31673 and 30673. There is no great need for this in actual operation. The question of ease of use RabbitMQ admin.
When creating a service with the NodePort type in K8s, a service with the ClusterIP type is also implicitly created for its maintenance. Therefore, applications in K8s that need to work with our RabbitMQ will be able to access the cluster at amqp: // rabbitmq: 5672
Create RabbitMQ configuration files. The main magic.
Add the necessary plugins to the allowed downloads. Now we can use automatic Peer Discovery in K8S.
We expose the necessary plugin as a backend for peer discovery.
Specify the address and port through which you can reach the kubernetes apiserver. Here you can directly specify the ip-address, but it will be more beautiful to do so.
In the namespace default, a service named kubernetes is usually created, leading to k8-apiserver. In different ways of installing K8S namespace, the service name and port may be different. If something in a particular installation is different, you need, respectively, to correct here.
For example, we are faced with the fact that in some clusters the service is on port 443, and in some on 6443. To understand that something is wrong, it will be possible in the start logs of RabbitMQ, where the connection point is clearly marked at the address specified here.
By default, in the example, the type of addressing RabbitMQ cluster nodes by ip-address was specified. But when you restart the pod, it gets a new IP each time. Surprise! The cluster dies in agony.
Change addressing to hostname. StatefulSet guarantees us the immutability of the hostname within the life cycle of the entire StatefulSet that we are completely satisfied.
Since if one of the nodes is lost, we assume that it will recover sooner or later, we disable self-deletion by the cluster of inaccessible nodes. In this case, as soon as the node returns to online, it will enter the cluster without losing its previous state.
This parameter determines the actions of the cluster with the loss of quorum. Here you should just read the documentation on this topic and understand for yourself what is closer to a specific use case.
We determine the choice of wizard for the new queues. With this setting, the wizard will select the node with the least number of queues, so the queues will be distributed evenly across the nodes of the cluster.
We set the name of the K8s headless service (created by us earlier), through which the RabbitMQ nodes will communicate with each other.
An important thing to work addressing in a cluster by hostname. FQDN hearth K8s is formed as a short name (rabbitmq-0, rabbitmq-1) + suffix (domain part). Here we specify this suffix. In K8S, it looks like . <Service name>. <Namespace name> .svc.cluster.local
kube-dns without any additional configuration resolves names of the type rabbitmq-0.rabbitmq-internal.our-namespace.svc.cluster.local in the ip-address of a specific hearth, which makes possible the entire clustering magic by hostname.
Actually, StatefulSet itself. Note the interesting moments.
We prescribe the name of a headless service, through which pods communicate in the StatefulSet.
Set the number of replicas in the cluster. We have it is equal to the number of working nodes K8s.
When one of the K8s nodes falls, the statefulset tends to keep the number of instances in the set, so it creates several sub-streams on the same K8s node. This behavior is completely undesirable and, in principle, meaningless. Therefore, we prescribe an anti-affinity rule for hearths from a statefulset. The rule is made tough (Required) so that kube-scheduler cannot break it when scheduling pods.
The point is simple: it is forbidden for the scheduler to place (within the namespace) more than one poda with the app: rabbitmq tag on each node. Nodes are distinguished by the value of the label kubernetes.io/hostname . Now, if for some reason the number of working K8S nodes is less than the required number of replicas in the StatefulSet, new replicas will not be created until the free node reappears.
We register ServiceAccount under which our scams work.
The image of RabbitMQ is completely standard and is taken from the docker hub, does not require any reassembly and modification by the file.
The persistent data of RabbitMQ is stored in / var / lib / rabbitmq / mnesia. Here we mount our Persistent Volume Claim into this folder, so that when restarting the sub / node or even the entire StatefulSet data (both official, including the collected cluster, and user data) remain intact and intact. There are some examples where the entire / var / lib / rabbitmq / folder is made persistent. We came to the conclusion that this is not the best idea, since it also begins to remember all the information specified by the Rabbit configs. That is, in order to change something in the configuration file, it is necessary to clean the persistent storage, which is very inconvenient in operation.
With this set of environment variables, we first tell RabbitMQ to use the FQDN name as the identifier of the cluster members, and second, we set the format of this name. The format was described earlier when parsing the config.
The name of a headless service for communicating cluster members.
The contents of the Erlang Cookie should be the same on all nodes of the cluster, you need to register your own value. A node with a different cookie will not be able to enter the cluster.
We define a plug-in volume from the previously created Persistent Volume Claim.
At this point, we are done with customization in K8s. The result is a RabbitMQ cluster that evenly distributes queues among nodes and is resistant to problems in the runtime environment.

If one of the cluster nodes is unavailable, the queues contained in it will no longer be available, everything else will continue to work. As soon as the node returns to the system, it will return to the cluster, and the queues for which it was the Master will become operational again, saving all the data contained in them (if the persistent storage is not broken, of course). All these processes are fully automatic and do not require intervention.
In one of the projects was a nuance. The requirements sounded complete mirroring of all data contained in the cluster. It is necessary that in a situation where at least one cluster node is operational, from the point of view of the application, everything continues to work. This moment is in no way connected with K8s, we describe it simply as a mini how-to.
To enable full HA, you need to create a Policy in the RabbitMQ dashboard on the Admin -> Policies tab . The name is arbitrary, Pattern is empty (all queues), in Definitions add two parameters: ha-mode: all , ha-sync-mode: automatic .
After that, all the queues created in the cluster will be in High Availability mode: when the Master node is unavailable, the new master will automatically select one of the Slaves. And the data arriving in the queue will be mirrored to all the nodes of the cluster. What, actually, was required to receive.
Read more about HA in RabbitMQ here.
Successes!
In our solutions, we use integration using Kafka, using gRPC, and using RabbitMQ.
In this article we will share our experience with RabbitMQ clustering, whose nodes are located in Kubernetes.
Prior to RabbitMQ version 3.7, its clustering in K8S was not a very trivial task, with a lot of hacks and not so beautiful solutions. In version 3.6, the autocluster plugin from the RabbitMQ Community was used. And in 3.7 Kubernetes Peer Discovery Backend appeared. It is integrated into the RabbitMQ base distribution and does not require separate assembly and installation.
We will describe the final configuration in its entirety, simultaneously commenting on what is happening.
In theory
The plugin has a repository on the githaba , in which there is an example of basic use .
This example is not intended for Production, which is clearly indicated in its description, and moreover, some of the settings in it are set against the logic of use in the sale. Also in the example, the storage persistence is not mentioned in any way, so in any abnormal situation our cluster will turn into zilch.
On practice
Now let us tell you what we faced and how RabbitMQ was installed and configured.
We describe the configuration of all parts of RabbitMQ as a service in K8s. Immediately clarify that we installed RabbitMQ in K8s as a StatefulSet. On each node of the K8s cluster, one instance of RabbitMQ will always function (one node in the classical cluster configuration). We will also install a RabbitMQ control panel in K8s and give access to this panel outside the cluster.
Rights and Roles:
rabbitmq_rbac.yaml
---
apiVersion: v1
kind: ServiceAccount
metadata:
  name: rabbitmq
---
kind: Role
apiVersion: rbac.authorization.k8s.io/v1beta1
metadata:
  name: endpoint-reader
rules:
- apiGroups: [""]
  resources: ["endpoints"]
  verbs: ["get"]
---
kind: RoleBinding
apiVersion: rbac.authorization.k8s.io/v1beta1
metadata:
  name: endpoint-reader
subjects:
- kind: ServiceAccount
  name: rabbitmq
roleRef:
  apiGroup: rbac.authorization.k8s.io
  kind: Role
  name: endpoint-reader
Access rights for RabbitMQ are taken entirely from the example, no changes are required in them. Create a ServiceAccount for our cluster and grant it read rights to Endpoints K8s.
Persistent storage:
rabbitmq_pv.yaml
kind: PersistentVolume
apiVersion: v1
metadata:
  name: rabbitmq-data-sigma
  labels:
    type: local
  annotations:
    volume.alpha.kubernetes.io/storage-class: rabbitmq-data-sigma
spec:
  storageClassName: rabbitmq-data-sigma
  capacity:
    storage: 10Gi
  accessModes:
    - ReadWriteMany
  persistentVolumeReclaimPolicy: Recycle
  hostPath:
    path: "/opt/rabbitmq-data-sigma"
Here, we took the simplest case as the persistent storage — hostPath (the usual folder on each K8s node), but you can use any of the many types of persistent volumes that are supported in K8s.
rabbitmq_pvc.yaml
kind: PersistentVolumeClaim
apiVersion: v1
metadata:
  name: rabbitmq-data
spec:
  storageClassName: rabbitmq-data-sigma
  accessModes:
    - ReadWriteMany
  resources:
    requests:
      storage: 10Gi
Create Volume Claim on the volume created in the previous step. This Claim will then be used in the StatefulSet as a persistent data store.
Services:
rabbitmq_service.yaml
kind: Service
apiVersion: v1
metadata:
  name: rabbitmq-internal
  labels:
    app: rabbitmq
spec:
  clusterIP: None
  ports:
   - name: http
     protocol: TCP
     port: 15672
   - name: amqp
     protocol: TCP
     port: 5672
  selector:
    app: rabbitmq
Create an internal headless service through which the Peer Discovery plugin will work.
rabbitmq_service_ext.yaml
kind: Service
apiVersion: v1
metadata:
  name: rabbitmq
  labels:
    app: rabbitmq
    type: LoadBalancer
spec:
  type: NodePort
  ports:
   - name: http
     protocol: TCP
     port: 15672
     targetPort: 15672
     nodePort: 31673
   - name: amqp
     protocol: TCP
     port: 5672
     targetPort: 5672
     nodePort: 30673
  selector:
    app: rabbitmq
To run applications in K8s with our cluster, we create a balancer service.
Since we need access to the RabbitMQ cluster outside of K8s, we push NodePort. RabbitMQ will be available when accessing any K8s cluster node on ports 31673 and 30673. There is no great need for this in actual operation. The question of ease of use RabbitMQ admin.
When creating a service with the NodePort type in K8s, a service with the ClusterIP type is also implicitly created for its maintenance. Therefore, applications in K8s that need to work with our RabbitMQ will be able to access the cluster at amqp: // rabbitmq: 5672
Configuration:
rabbitmq_configmap.yaml
apiVersion: v1
kind: ConfigMap
metadata:
  name: rabbitmq-config
data:
  enabled_plugins: |
      [rabbitmq_management,rabbitmq_peer_discovery_k8s].
  rabbitmq.conf: |
      cluster_formation.peer_discovery_backend  = rabbit_peer_discovery_k8s
      cluster_formation.k8s.host = kubernetes.default.svc.cluster.local
      cluster_formation.k8s.port = 443
      ### cluster_formation.k8s.address_type = ip
      cluster_formation.k8s.address_type = hostname
      cluster_formation.node_cleanup.interval = 10
      cluster_formation.node_cleanup.only_log_warning = true
      cluster_partition_handling = autoheal
      queue_master_locator=min-masters
      cluster_formation.randomized_startup_delay_range.min = 0
      cluster_formation.randomized_startup_delay_range.max = 2
      cluster_formation.k8s.service_name = rabbitmq-internal
      cluster_formation.k8s.hostname_suffix = .rabbitmq-internal.our-namespace.svc.cluster.local
Create RabbitMQ configuration files. The main magic.
enabled_plugins: |
  [rabbitmq_management,rabbitmq_peer_discovery_k8s].
Add the necessary plugins to the allowed downloads. Now we can use automatic Peer Discovery in K8S.
cluster_formation.peer_discovery_backend = rabbit_peer_discovery_k8s
We expose the necessary plugin as a backend for peer discovery.
cluster_formation.k8s.host = kubernetes.default.svc.cluster.local
cluster_formation.k8s.port = 443
Specify the address and port through which you can reach the kubernetes apiserver. Here you can directly specify the ip-address, but it will be more beautiful to do so.
In the namespace default, a service named kubernetes is usually created, leading to k8-apiserver. In different ways of installing K8S namespace, the service name and port may be different. If something in a particular installation is different, you need, respectively, to correct here.
For example, we are faced with the fact that in some clusters the service is on port 443, and in some on 6443. To understand that something is wrong, it will be possible in the start logs of RabbitMQ, where the connection point is clearly marked at the address specified here.
### cluster_formation.k8s.address_type = ip
cluster_formation.k8s.address_type = hostname
By default, in the example, the type of addressing RabbitMQ cluster nodes by ip-address was specified. But when you restart the pod, it gets a new IP each time. Surprise! The cluster dies in agony.
Change addressing to hostname. StatefulSet guarantees us the immutability of the hostname within the life cycle of the entire StatefulSet that we are completely satisfied.
cluster_formation.node_cleanup.interval = 10
cluster_formation.node_cleanup.only_log_warning = true
Since if one of the nodes is lost, we assume that it will recover sooner or later, we disable self-deletion by the cluster of inaccessible nodes. In this case, as soon as the node returns to online, it will enter the cluster without losing its previous state.
cluster_partition_handling = autohealThis parameter determines the actions of the cluster with the loss of quorum. Here you should just read the documentation on this topic and understand for yourself what is closer to a specific use case.
queue_master_locator=min-mastersWe determine the choice of wizard for the new queues. With this setting, the wizard will select the node with the least number of queues, so the queues will be distributed evenly across the nodes of the cluster.
cluster_formation.k8s.service_name = rabbitmq-internalWe set the name of the K8s headless service (created by us earlier), through which the RabbitMQ nodes will communicate with each other.
cluster_formation.k8s.hostname_suffix = .rabbitmq-internal.our-namespace.svc.cluster.localAn important thing to work addressing in a cluster by hostname. FQDN hearth K8s is formed as a short name (rabbitmq-0, rabbitmq-1) + suffix (domain part). Here we specify this suffix. In K8S, it looks like . <Service name>. <Namespace name> .svc.cluster.local
kube-dns without any additional configuration resolves names of the type rabbitmq-0.rabbitmq-internal.our-namespace.svc.cluster.local in the ip-address of a specific hearth, which makes possible the entire clustering magic by hostname.
Configuration StatefulSet RabbitMQ:
rabbitmq_statefulset.yaml
apiVersion: apps/v1beta1
kind: StatefulSet
metadata:
  name: rabbitmq
spec:
  serviceName: rabbitmq-internal
  replicas: 3
  template:
    metadata:
      labels:
        app: rabbitmq
      annotations:
        scheduler.alpha.kubernetes.io/affinity: >
            {
              "podAntiAffinity": {
                "requiredDuringSchedulingIgnoredDuringExecution": [{
                  "labelSelector": {
                    "matchExpressions": [{
                      "key": "app",
                      "operator": "In",
                      "values": ["rabbitmq"]
                    }]
                  },
                  "topologyKey": "kubernetes.io/hostname"
                }]
              }
            }
    spec:
      serviceAccountName: rabbitmq
      terminationGracePeriodSeconds: 10
      containers:
      - name: rabbitmq-k8s
        image: rabbitmq:3.7
        volumeMounts:
          - name: config-volume
            mountPath: /etc/rabbitmq
          - name: rabbitmq-data
            mountPath: /var/lib/rabbitmq/mnesia
        ports:
          - name: http
            protocol: TCP
            containerPort: 15672
          - name: amqp
            protocol: TCP
            containerPort: 5672
        livenessProbe:
          exec:
            command: ["rabbitmqctl", "status"]
          initialDelaySeconds: 60
          periodSeconds: 10
          timeoutSeconds: 10
        readinessProbe:
          exec:
            command: ["rabbitmqctl", "status"]
          initialDelaySeconds: 10
          periodSeconds: 10
          timeoutSeconds: 10
        imagePullPolicy: Always
        env:
          - name: MY_POD_IP
            valueFrom:
              fieldRef:
                fieldPath: status.podIP
          - name: HOSTNAME
            valueFrom:
              fieldRef:
                fieldPath: metadata.name
          - name: NAMESPACE
            valueFrom:
              fieldRef:
                fieldPath: metadata.namespace
          - name: RABBITMQ_USE_LONGNAME
            value: "true"
          - name: RABBITMQ_NODENAME
            value: "rabbit@$(HOSTNAME).rabbitmq-internal.$(NAMESPACE).svc.cluster.local"
          - name: K8S_SERVICE_NAME
            value: "rabbitmq-internal"
          - name: RABBITMQ_ERLANG_COOKIE
            value: "mycookie"
      volumes:
        - name: config-volume
          configMap:
            name: rabbitmq-config
            items:
            - key: rabbitmq.conf
              path: rabbitmq.conf
            - key: enabled_plugins
              path: enabled_plugins
        - name: rabbitmq-data
          persistentVolumeClaim:
            claimName: rabbitmq-data
Actually, StatefulSet itself. Note the interesting moments.
serviceName: rabbitmq-internalWe prescribe the name of a headless service, through which pods communicate in the StatefulSet.
replicas: 3Set the number of replicas in the cluster. We have it is equal to the number of working nodes K8s.
annotations:
        scheduler.alpha.kubernetes.io/affinity: >
            {
              "podAntiAffinity": {
                "requiredDuringSchedulingIgnoredDuringExecution": [{
                  "labelSelector": {
                    "matchExpressions": [{
                      "key": "app",
                      "operator": "In",
                      "values": ["rabbitmq"]
                    }]
                  },
                  "topologyKey": "kubernetes.io/hostname"
                }]
              }
            }
When one of the K8s nodes falls, the statefulset tends to keep the number of instances in the set, so it creates several sub-streams on the same K8s node. This behavior is completely undesirable and, in principle, meaningless. Therefore, we prescribe an anti-affinity rule for hearths from a statefulset. The rule is made tough (Required) so that kube-scheduler cannot break it when scheduling pods.
The point is simple: it is forbidden for the scheduler to place (within the namespace) more than one poda with the app: rabbitmq tag on each node. Nodes are distinguished by the value of the label kubernetes.io/hostname . Now, if for some reason the number of working K8S nodes is less than the required number of replicas in the StatefulSet, new replicas will not be created until the free node reappears.
serviceAccountName: rabbitmqWe register ServiceAccount under which our scams work.
image: rabbitmq:3.7The image of RabbitMQ is completely standard and is taken from the docker hub, does not require any reassembly and modification by the file.
- name: rabbitmq-data
    mountPath: /var/lib/rabbitmq/mnesia
The persistent data of RabbitMQ is stored in / var / lib / rabbitmq / mnesia. Here we mount our Persistent Volume Claim into this folder, so that when restarting the sub / node or even the entire StatefulSet data (both official, including the collected cluster, and user data) remain intact and intact. There are some examples where the entire / var / lib / rabbitmq / folder is made persistent. We came to the conclusion that this is not the best idea, since it also begins to remember all the information specified by the Rabbit configs. That is, in order to change something in the configuration file, it is necessary to clean the persistent storage, which is very inconvenient in operation.
          - name: HOSTNAME
            valueFrom:
              fieldRef:
                fieldPath: metadata.name
          - name: NAMESPACE
            valueFrom:
              fieldRef:
                fieldPath: metadata.namespace
          - name: RABBITMQ_USE_LONGNAME
            value: "true"
          - name: RABBITMQ_NODENAME
            value: "rabbit@$(HOSTNAME).rabbitmq-internal.$(NAMESPACE).svc.cluster.local"
With this set of environment variables, we first tell RabbitMQ to use the FQDN name as the identifier of the cluster members, and second, we set the format of this name. The format was described earlier when parsing the config.
- name: K8S_SERVICE_NAME
            value: "rabbitmq-internal"
The name of a headless service for communicating cluster members.
- name: RABBITMQ_ERLANG_COOKIE
            value: "mycookie"
The contents of the Erlang Cookie should be the same on all nodes of the cluster, you need to register your own value. A node with a different cookie will not be able to enter the cluster.
volumes:
        - name: rabbitmq-data
          persistentVolumeClaim:
            claimName: rabbitmq-data
We define a plug-in volume from the previously created Persistent Volume Claim.
At this point, we are done with customization in K8s. The result is a RabbitMQ cluster that evenly distributes queues among nodes and is resistant to problems in the runtime environment.
If one of the cluster nodes is unavailable, the queues contained in it will no longer be available, everything else will continue to work. As soon as the node returns to the system, it will return to the cluster, and the queues for which it was the Master will become operational again, saving all the data contained in them (if the persistent storage is not broken, of course). All these processes are fully automatic and do not require intervention.
Bonus: set up HA
In one of the projects was a nuance. The requirements sounded complete mirroring of all data contained in the cluster. It is necessary that in a situation where at least one cluster node is operational, from the point of view of the application, everything continues to work. This moment is in no way connected with K8s, we describe it simply as a mini how-to.
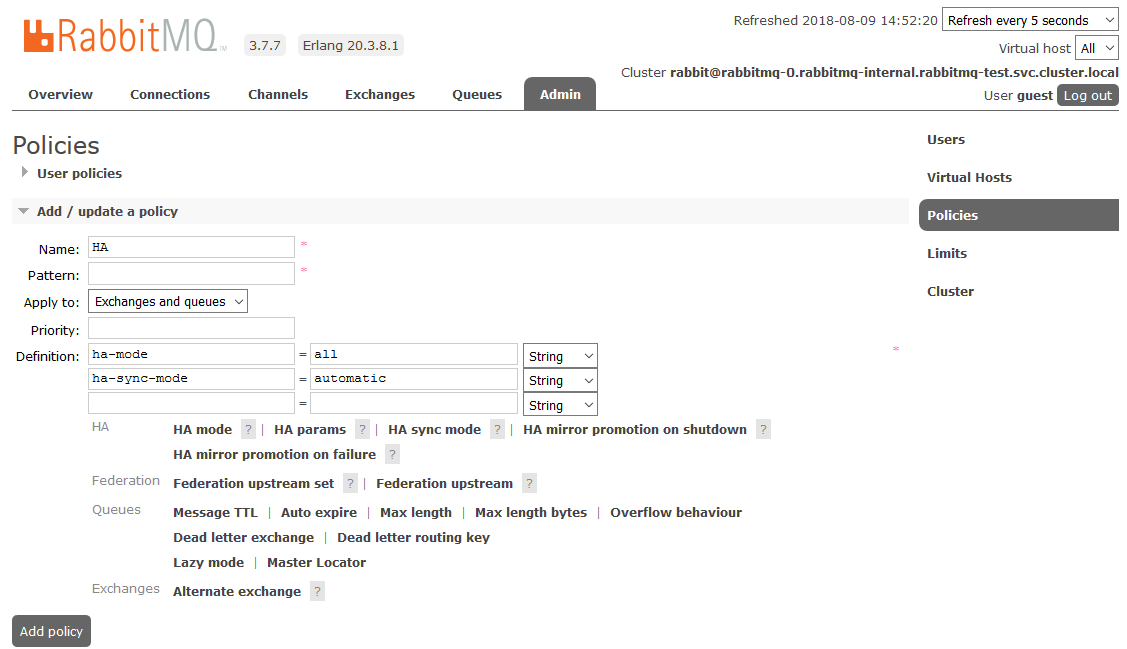
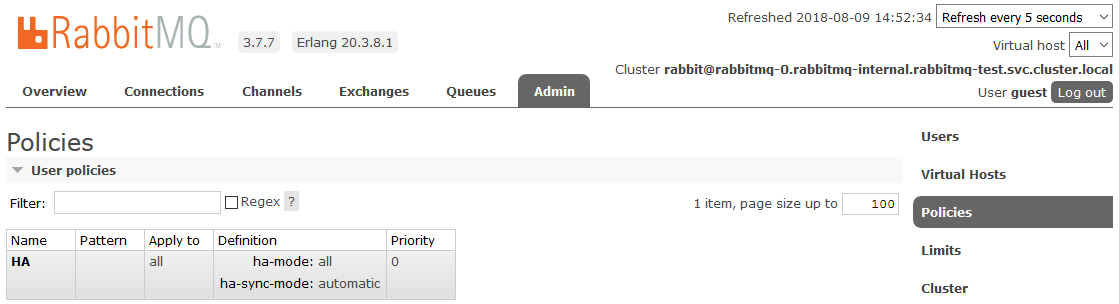
To enable full HA, you need to create a Policy in the RabbitMQ dashboard on the Admin -> Policies tab . The name is arbitrary, Pattern is empty (all queues), in Definitions add two parameters: ha-mode: all , ha-sync-mode: automatic .
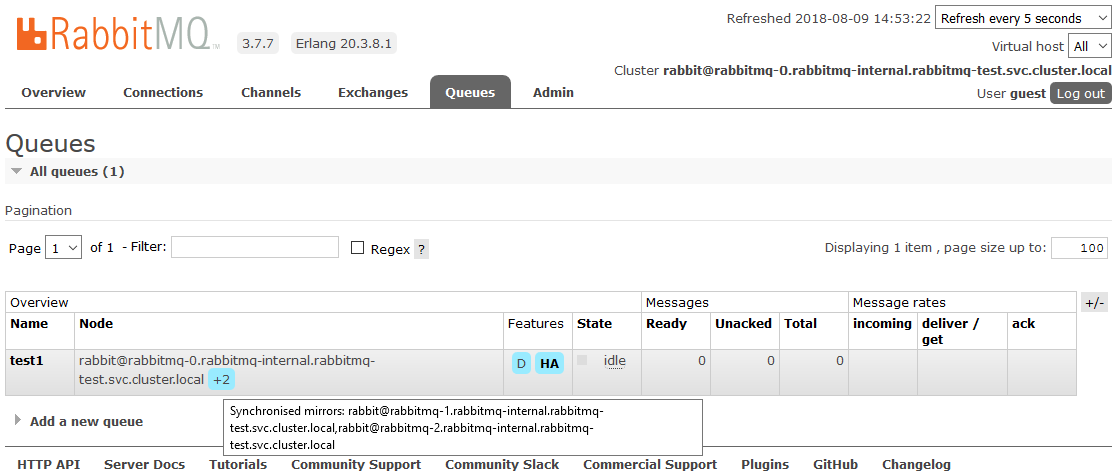
After that, all the queues created in the cluster will be in High Availability mode: when the Master node is unavailable, the new master will automatically select one of the Slaves. And the data arriving in the queue will be mirrored to all the nodes of the cluster. What, actually, was required to receive.
Read more about HA in RabbitMQ here.
Useful literature:
- Repository RabbitMQ Peer Discovery Kubernetes Plugin
- Configuration example for RabbitMQ deployment in K8S
- Description of the principles of cluster formation, the mechanism of Peer Discovery and plug-ins for it
- An epic discussion about how to properly configure hostname-based discovery
- RabbitMQ Clustering Guide
- Description of split-brain clustering problems and solutions
- High Availability Queues in RabbitMQ
- Setting Policies
Successes!