Replacing the standard and installing a second hard drive in MAC mini 2012
MAC mini is quite a powerful computer and for the first six months after the purchase I was completely satisfied with it, but still, over time, I wanted more from this device. Replacing the processor with MAC mini 2012 is not possible, all that needs to be upgraded is RAM and a hard drive. Let's talk about the second in more detail.
If you are going to replace your native HDD with a larger or faster one, then you will need an external hard drive, on which you will need to create a backup of OS X and a set of screwdrivers. I will not describe in detail the process of transferring the OS from the hard drive to the hard drive. the Internet is full of detailed information about this process. If you want to put a fresh OS on a new hard drive, you can do it as follows, connect a new drive via a SATA USB adapter to a MAC, select the system overload and hold down the Command (⌘) and R key combination. After a while, the “OS X Utilities” window will appear .
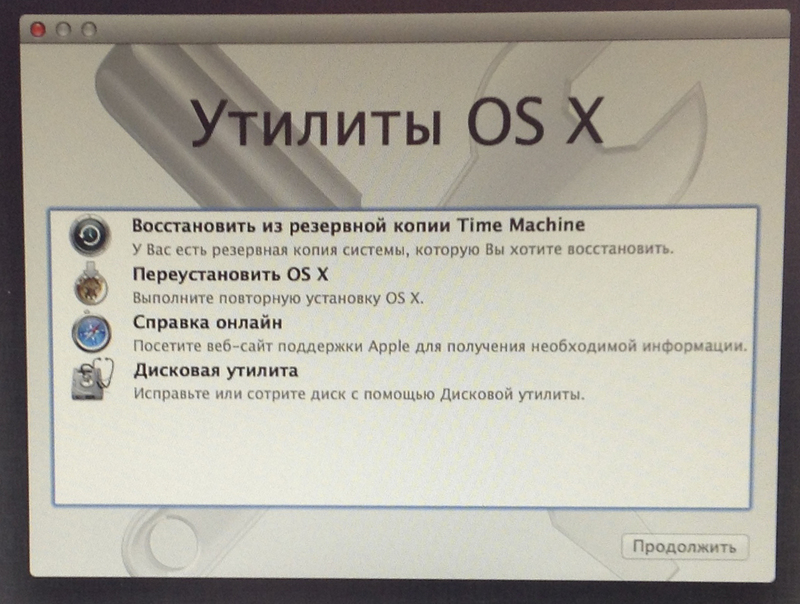
Selecting “Disk Utility”, format the new disk as “MAC OS Extended (journal)”. After that, select "Reinstall OS X". Using a simple and intuitive interface, put the OS on a new hard drive. I used the SATA USB 2.0 adapter, the installation process took a little less than an hour.
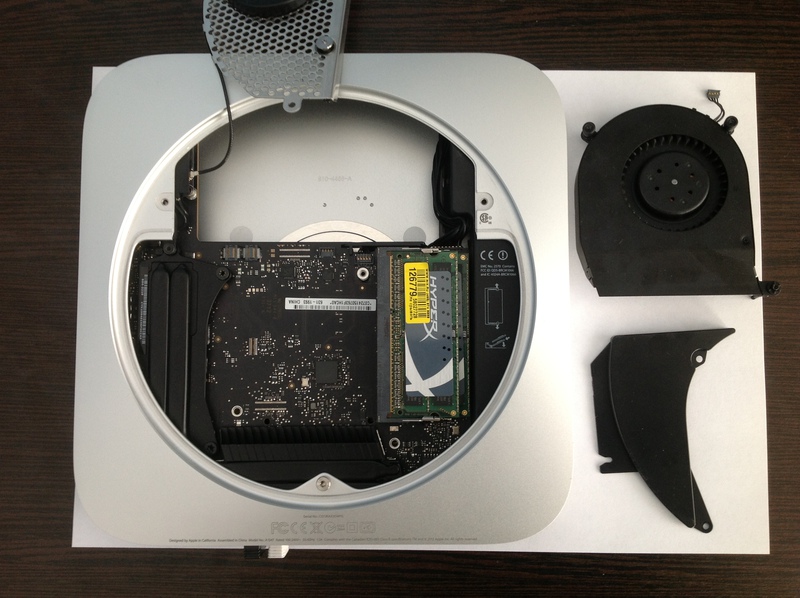
After installing the new disk on a regular place. Replacing a hard drive does not require complete disassembly, it is enough to remove the cooling fan, a wi-fi antenna and a plastic panel pressing the connector of the SATA cable to the motherboard.
We rearrange the loop and guide screws.

The cable is quite freely removed from the disk, so I secured it with a piece of tape.
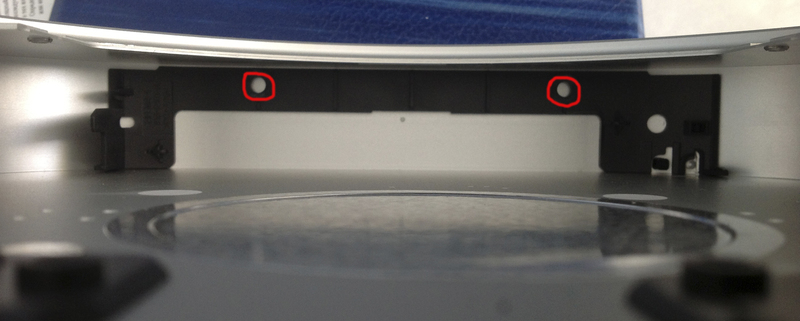
When reassembling, it may be difficult to get the guide screws into the housing bore holes.
 Having suffered a bit, I found a solution to this problem for myself.

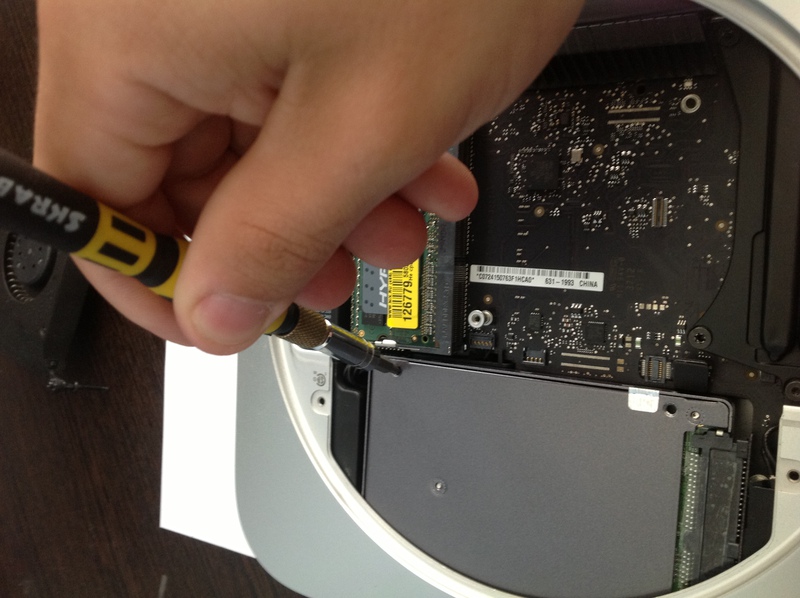
Everything is quite simple, insert a screwdriver into the mounting hole of the hard drive and get the opportunity to freely manipulate it. After that, the process of getting into the landing holes of the hull is not any difficulty.
After installation, we assemble in the reverse order.
We load the MAC and after the standard settings of the new system we can fully use the computer already with the new hard drive.
MAC mini 2012 has three basic configurations. I won’t, delves into the details of the differences, I will focus only on one point, the Server version has two physical hard drives, and not one like the others. But the owners of the usual MAC mini also have the opportunity to install a second HDD or SSD. To install, you need a set of screwdrivers and an original SATA cable. This cable, unfortunately, is quite difficult to buy, in addition, the price is unreasonably high. For example, in Moscow it can be bought for 2,500 rubles - 3,500 rubles. You can go a longer and unreliable way by ordering a cable on eBay, where the cost will be in the region of 1,000 rubles. I also came across the site of the American company OWC where you can also order this cable for $ 34.99 + delivery, this pageI was interested not in price, but in the presence of a detailed video on installing a second hard drive.
As a rule, a SATA cable is sold complete with four damper spacers, two guides and two retaining screws for mounting the hard drive. Also, a bracket is usually inserted into the kit to remove the motherboard, a plastic spatula to disconnect the plugs, by the way, a very convenient thing, and sometimes a set of screwdrivers.
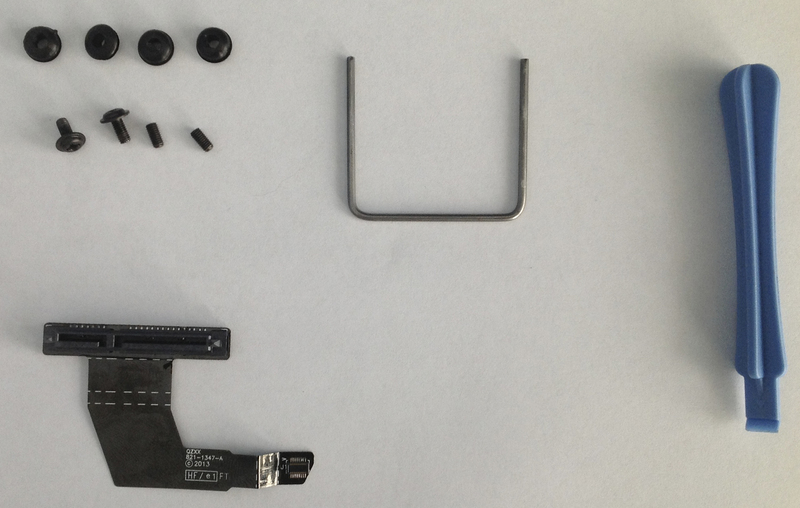
Of all the above purchase options, I chose eBay. The easiest way is to look for a cable, indicating its number #: 922-9560, 076-1391 .. Having paid a total of 1,000 rubles , and after waiting about two and a half months, I received a package from a Chinese seller, here are its contents:
Guided by the OWC video clip , the installation was quick, without any problems.
After booting the computer, I regretfully noticed that the second disk did not work. After that, “dancing with a tambourine” began, checked the operability of the hard drives separately on another computer, interchanged the loops (this is possible only with a partially disassembled poppy due to the different configuration of the SATA loops). As a result, it became clear that the acquired loop was faulty.
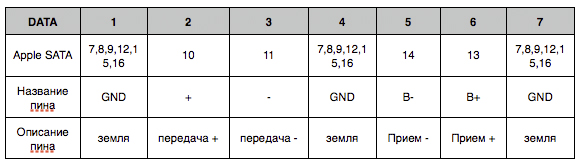
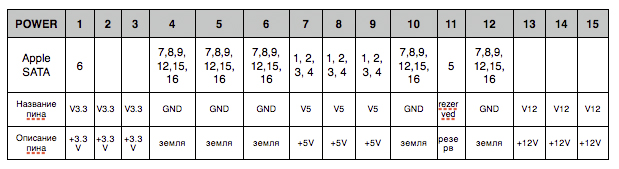
After the multimeter dialed two loops, the following pinout turned out:

Pinout of the original SATA loop:
Pinout of the Chinese SATA loop:
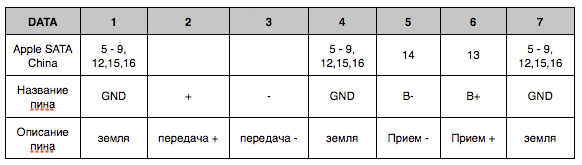

The loop turned out to be simply defective, four lines did not ring, some of the conclusions were shorted to the ground.
After a long process of exchanging defective goods, which dragged on for a couple of months, I received a new loop, which was immediately checked by me and then installed on the MAC. After loading the computer, the new hard drive was formatted using the OS X disk utility and continued to work without any complaints.
Winchester replacement.
If you are going to replace your native HDD with a larger or faster one, then you will need an external hard drive, on which you will need to create a backup of OS X and a set of screwdrivers. I will not describe in detail the process of transferring the OS from the hard drive to the hard drive. the Internet is full of detailed information about this process. If you want to put a fresh OS on a new hard drive, you can do it as follows, connect a new drive via a SATA USB adapter to a MAC, select the system overload and hold down the Command (⌘) and R key combination. After a while, the “OS X Utilities” window will appear .
Selecting “Disk Utility”, format the new disk as “MAC OS Extended (journal)”. After that, select "Reinstall OS X". Using a simple and intuitive interface, put the OS on a new hard drive. I used the SATA USB 2.0 adapter, the installation process took a little less than an hour.
After installing the new disk on a regular place. Replacing a hard drive does not require complete disassembly, it is enough to remove the cooling fan, a wi-fi antenna and a plastic panel pressing the connector of the SATA cable to the motherboard.
We rearrange the loop and guide screws.
The cable is quite freely removed from the disk, so I secured it with a piece of tape.
When reassembling, it may be difficult to get the guide screws into the housing bore holes.
 Having suffered a bit, I found a solution to this problem for myself.
Everything is quite simple, insert a screwdriver into the mounting hole of the hard drive and get the opportunity to freely manipulate it. After that, the process of getting into the landing holes of the hull is not any difficulty.
After installation, we assemble in the reverse order.
We load the MAC and after the standard settings of the new system we can fully use the computer already with the new hard drive.
Installing a second hard drive.
MAC mini 2012 has three basic configurations. I won’t, delves into the details of the differences, I will focus only on one point, the Server version has two physical hard drives, and not one like the others. But the owners of the usual MAC mini also have the opportunity to install a second HDD or SSD. To install, you need a set of screwdrivers and an original SATA cable. This cable, unfortunately, is quite difficult to buy, in addition, the price is unreasonably high. For example, in Moscow it can be bought for 2,500 rubles - 3,500 rubles. You can go a longer and unreliable way by ordering a cable on eBay, where the cost will be in the region of 1,000 rubles. I also came across the site of the American company OWC where you can also order this cable for $ 34.99 + delivery, this pageI was interested not in price, but in the presence of a detailed video on installing a second hard drive.
As a rule, a SATA cable is sold complete with four damper spacers, two guides and two retaining screws for mounting the hard drive. Also, a bracket is usually inserted into the kit to remove the motherboard, a plastic spatula to disconnect the plugs, by the way, a very convenient thing, and sometimes a set of screwdrivers.
Of all the above purchase options, I chose eBay. The easiest way is to look for a cable, indicating its number #: 922-9560, 076-1391 .. Having paid a total of 1,000 rubles , and after waiting about two and a half months, I received a package from a Chinese seller, here are its contents:
Guided by the OWC video clip , the installation was quick, without any problems.
After booting the computer, I regretfully noticed that the second disk did not work. After that, “dancing with a tambourine” began, checked the operability of the hard drives separately on another computer, interchanged the loops (this is possible only with a partially disassembled poppy due to the different configuration of the SATA loops). As a result, it became clear that the acquired loop was faulty.
After the multimeter dialed two loops, the following pinout turned out:
Pinout of the original SATA loop:
Pinout of the Chinese SATA loop:
The loop turned out to be simply defective, four lines did not ring, some of the conclusions were shorted to the ground.
After a long process of exchanging defective goods, which dragged on for a couple of months, I received a new loop, which was immediately checked by me and then installed on the MAC. After loading the computer, the new hard drive was formatted using the OS X disk utility and continued to work without any complaints.