[Translation] How does Graal - JIT JVM compiler in Java
Hi, Habr! I present to your attention the translation of the article " Understanding How Graal Works - a Java JIT Compiler Written in Java ".
Introduction
One of the reasons why I became a researcher of programming languages is that, in a large community of people connected with computer technologies, almost all use programming languages, and many are interested in how they work. When I first encountered programming as a child and became acquainted with a programming language, the first thing I wanted to know was how it works, and the very first thing I wanted to do was create my own language.
In this presentation, I will show some of the mechanisms of the language used by all of you - Java. A special feature is that I will use a project called Graal , which implements the concept of Java in Java .
Graal is only one of the components in the work of Java - it is just-in-time compiler. This is the part of the JVM that converts Java bytecode to machine code during program operation, and is one of the factors ensuring high platform performance. It also seems to me that most people consider one of the most complex and hazy parts of the JVM, which is beyond their comprehension. To change this opinion is the purpose of this talk.
If you know what a JVM is; in general, you understand what the terms bytecode and machine code mean ; and are able to read code written in Java, then I hope this will be enough to understand the stated material.
I will begin by discussing why we might want a new JIT compiler for JVM written in Java, and then I’ll show that there is nothing extra special about how you might think by breaking the task down into compiler build, use, and demonstration that its code is the same as in any other application.
I’ll touch on the theory quite a bit, and then I will show how it is applied during the whole compilation process from bytecode to machine code. I will also show some details, and in the end we will talk about the benefits of this feature besides implementing Java in Java for its own sake.
I will use screenshots of the code in Eclipse, instead of running them during the presentation, to avoid the inevitable problems of live coding.
What is a JIT compiler?
I am sure that many of you know what a JIT compiler is, but nevertheless I will touch on the basics so that no one is sitting here afraid to ask this main question.
When you run a command javacor compile-on-save in the IDE, your Java program is compiled from Java code into JVM bytecode, which is a binary representation of the program. It is more compact and simple than Java source code. However, the usual processor of your laptop or server cannot simply execute JVM bytecode.
The JVM interprets this bytecode for your program to work. Interpreters are usually much slower than machine code run on a processor. For this reason, while the program is running, the JVM can start another compiler that converts your bytecode to machine code, which the processor is already able to execute.
This compiler is usually much more sophisticated than javacit does complex optimization in order to produce high-quality machine code as a result.
Why write a JIT compiler in Java?
Today, a JVM implementation called OpenJDK includes two main JIT compilers. The client compiler, known as C1 , is designed to run faster, but it also produces less optimized code. The server compiler, known as opto or C2 , takes a little more time to work, but produces more optimized code.
The idea was that the client compiler was better suited for desktop applications, where long JIT compiler pauses are undesirable, and server compilers are suitable for long-running server applications in which it is possible to spend more time on compilation.
Today, they can be combined so that the code is first compiled with C1, and then, if it continues to be intensively executed and it makes sense to spend additional time, - C2. This is called speed compilation ( tiered compilation ).
Let's take a look at the C2 server compiler, which performs more optimizations.
We can clone OpenJDK from a mirror on GitHub , or just open a project tree on the site.
$ git clone https://github.com/dmlloyd/openjdk.gitThe C2 code is in openjdk / hotspot / src / share / vm / opto .

First of all, it is worth noting that C2 is written in C ++ . Of course, this is not something bad, but there are certain disadvantages. C ++ is an insecure language. This means that errors in C ++ can crash the VM. It is possible that the reason for this is the age of the code, but C2 code in C ++ has become very difficult to maintain and develop.
One of the key figures behind the C2 compiler, Cliff Click, said that he would never write VM again in C ++, and we heard the Twitter JVM team express the opinion that C2 had become stagnant and needed to be replaced due to difficulties of further development.
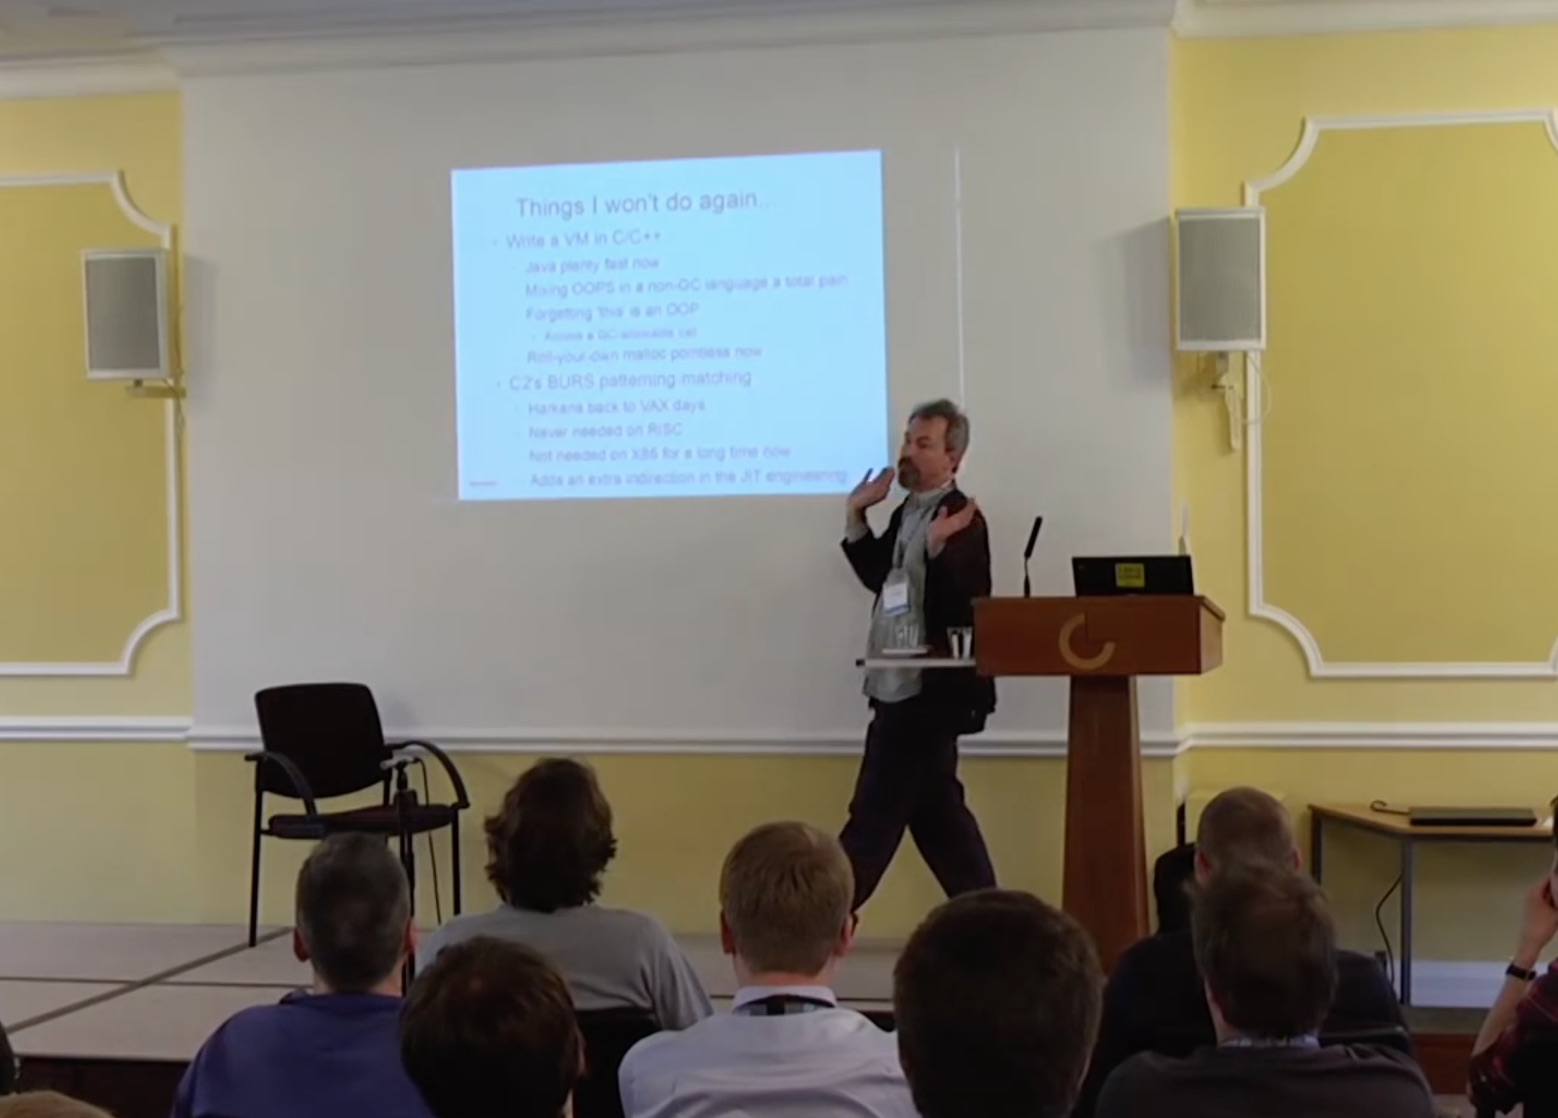
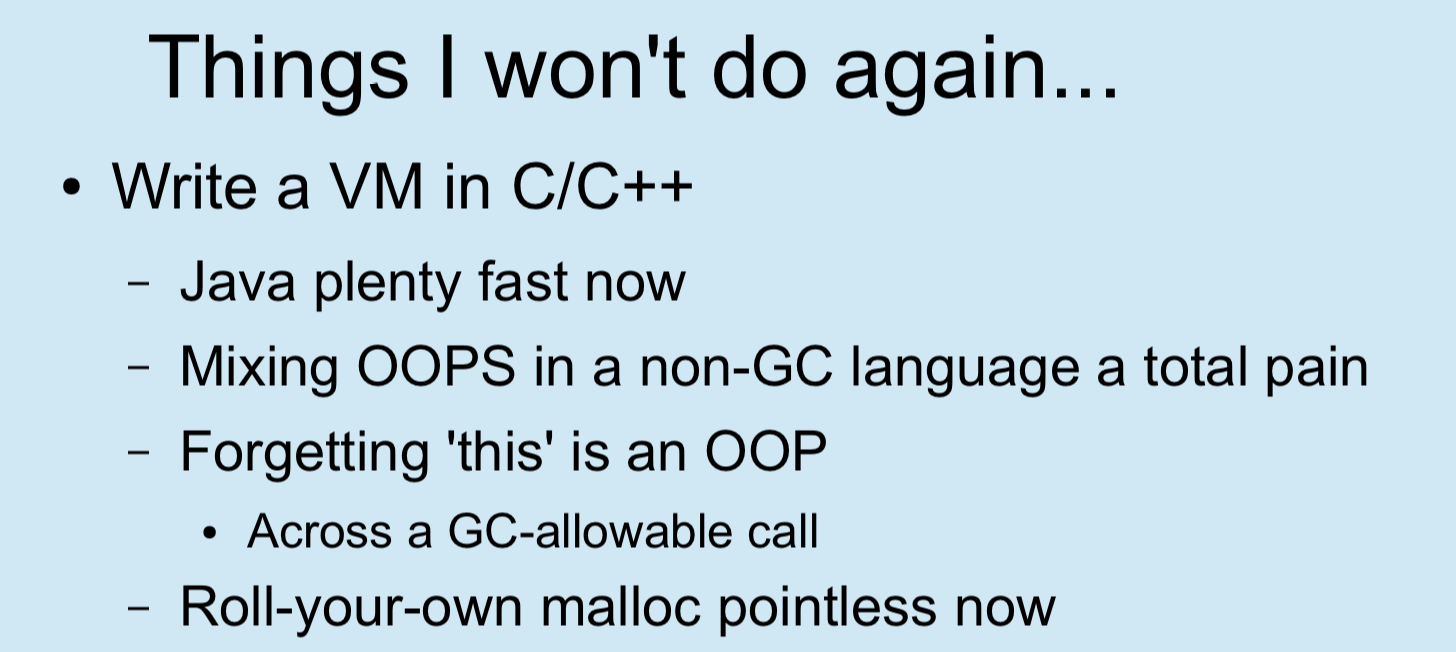
https://www.youtube.com/watch?v=Hqw57GJSrac
So, going back to the question, what is there in Java that can help solve these problems? The same thing that gives writing a program in Java instead of C ++. This is probably security (exceptions instead of crashes, no real memory leaks or dangling pointers), good tools (debuggers, profilers, and tools like VisualVM ), good support for IDE, etc.
You might think: How can I write something like a JIT compiler in Java? , and that this is only possible in a low-level system programming language, such as C ++. In this speech, I hope to convince you that this is not the case at all! Essentially, the JIT compiler should simply accept the JVM bytecode and provide the machine code — you give it byte[]the input, and you also want to get it back byte[]. It takes a lot of complicated work to do this, but it doesn’t affect the system level in any way, and therefore does not require a system language such as C or C ++.
Setting Graal
The first thing we need is Java 9. The Graal interface used called JVMCI was added to Java as part of the JEP 243 Java-Level JVM Compiler Interface and the first version that includes it is Java 9. I use 9 + 181 . In case of any particular requirements there are ports (backports) for Java 8.
$ export JAVA_HOME=`pwd`/jdk9
$ export PATH=$JAVA_HOME/bin:$PATH
$ java -version
java version "9"
Java(TM) SE Runtime Environment (build 9+181)
Java HotSpot(TM) 64-BitServer VM (build 9+181, mixed mode)
The next thing we need is an assembly system called mx. It is a bit like Maven or Gradle , but, most likely, you would not choose it for your application. It implements certain functionality to support some complex use cases, but we will use it only for simple assemblies.
You mxcan clone with github . I use commit #7353064. Now just add the executable file to the path.
$ git clone https://github.com/graalvm/mx.git
$ cd mx; git checkout 7353064
$ export PATH=`pwd`/mx:$PATH
Now we need to slope Graal himself. I am using a distribution called GraalVM version 0.28.2 .
$ git clone https://github.com/graalvm/graal.git --branch vm-enterprise-0.28.2This repository contains other projects that are not interesting to us now, so we will simply move to the compiler subproject , which is the Graal JIT compiler, and build it using mx.
$ cd graal/compiler
$ mx build
I’ll use the Eclipse IDE to work with Graal code . I am using Eclipse 4.7.1. mxcan generate Eclipse-project files for us.
$ mx eclipseinitTo access a directory Graal as a workspace ( workspace ) you need to perform File, Import ..., General, Existing projects and select the directory again Graal . If you are running Eclipse not in Java 9, then you may also need to attach the JDK sources.

Good. Now that everything is ready, let's see how it works. We will use this very simple code.
classDemo{
  publicstaticvoidmain(String[] args){
    while (true) {
      workload(14, 2);
    }
  }
  privatestaticintworkload(int a, int b){
    return a + b;
  }
}
First we compile this code javac, and then run the JVM. First, I will show the work of the standard C2 JIT compiler. To do this, we specify several flags: -XX:+PrintCompilationwhich is necessary for the JVM to write a log when compiling a method, and -XX:CompileOnly=Demo::workloadso that only this method is compiled. If we do not do this, too much information will be displayed, and the JVM will be smarter than we need and optimize the code we want to see.
$ javac Demo.java
$ java \
  -XX:+PrintCompilation \
  -XX:CompileOnly=Demo::workload \
  Demo
...
    11313       Demo::workload (4 bytes)
...
I will not explain it in detail, but I will say only that this is a log output, which shows that the method workloadwas compiled.
Now, as a JIT compiler for our Java 9 JVM, we use the newly compiled Graal. For this you need to add a few more flags.
--module-path=...and --upgrade-module-path=...add Graal to the module path . Recall that the module path appeared in Java 9 as part of the Jigsaw module system , and for our purposes we can treat it by analogy with the classpath .
We need a flag -XX:+UnlockExperimentalVMOptionsdue to the fact that the JVMCI (the interface used by Graal) in this version is an experimental feature.
The flag is -XX:+EnableJVMCIneeded to say that we want to use JVMCI, and -XX:+UseJVMCICompiler- to enable and install a new JIT compiler.
In order not to complicate the example, and instead of using C1 together with JVMCI, to have only the JVMCI compiler, we specify a flag -XX:-TieredCompilationthat disables stepwise compilation.
As before, we indicate the flags -XX:+PrintCompilationand -XX:CompileOnly=Demo::workload.
As in the previous example, we see that one method was compiled. But, this time, for compilation, we used the newly compiled Graal. For now, just take my word for it.
$ java \  --module-path=graal/sdk/mxbuild/modules/org.graalvm.graal_sdk.jar:graal/truffle/mxbuild/modules/com.oracle.truffle.truffle_api.jar \  --upgrade-module-path=graal/compiler/mxbuild/modules/jdk.internal.vm.compiler.jar \  -XX:+UnlockExperimentalVMOptions \  -XX:+EnableJVMCI \  -XX:+UseJVMCICompiler \  -XX:-TieredCompilation \  -XX:+PrintCompilation \  -XX:CompileOnly=Demo::workload \  Demo
...
    583   25             Demo::workload (4 bytes)
...
JVM Compiler Interface
Do not you think that we have done something quite unusual? We have an installed JVM, and we replaced the JIT compiler with the newly compiled new one without changing anything in the JVM itself. This feature is provided by a new JVM interface called JVMCI, the JVM compiler interface , which I mentioned above was JEP 243 and was included in Java 9.
The idea is similar to some other existing JVM technologies.
Perhaps you've ever been exposed to additional processing source code javacusing the Java API for processing annotations ( the Java of annotation processing the API ). This mechanism makes it possible to identify the annotations and the model of the source code in which they are used, and to create new files based on them.
Also, you may use additional processing bytecode in the JVM using the Java-agents ( the Java agents ). This mechanism allows you to modify Java bytecode by intercepting it at boot.
The idea of JVMCI is similar. It allows you to connect your own Java JIT compiler written in Java.
Now I want to say a few words about how I will show the code during this presentation. First, to understand the idea, I will show some simplified identifiers and logic in the form of text on slides, and then I will switch to Eclipse screenshots and show real code, which may be a little more complicated, but the main idea will remain the same. The main part of this speech is intended to show that you can really work with a real project code, and therefore I don’t want to hide it, although it may be somewhat complicated.
From this point on, I begin to dispel the opinion that you might have, that the JIT compiler is very difficult.
What does the JIT compiler take as input? It accepts the bytecode of the method to be compiled. A baytkod, as the name suggests, is just an array of bytes.
What does the JIT compiler produce as a result? It gives the machine code of the method. Machine code is also just an array of bytes.
As a result, the interface that needs to be implemented when writing a new JIT compiler to embed it in the JVM will look something like this.
interfaceJVMCICompiler{
    byte[] compileMethod(byte[] bytecode);
}
Therefore, if you could not imagine how Java can do something as low-level as JIT compilation into machine code, now it is clear that this is not such a low-level work. True? This is just a feature from byte[]to byte[].
In fact, everything is somewhat more complicated. Only bytecode is not enough - we also need some more information, such as the number of local variables, the required stack size, and the information collected by the interpreter profiler to understand how the code is executed in fact. Therefore, we present the input in the form CompilationRequestthat tells us about the required compilation JavaMethod, and will provide all the necessary information.
interfaceJVMCICompiler{
  voidcompileMethod(CompilationRequest request);
}
interfaceCompilationRequest{
    JavaMethod getMethod();
}
interfaceJavaMethod{
    byte[] getCode();
    intgetMaxLocals();
    intgetMaxStackSize();
    ProfilingInfo getProfilingInfo();
    ...
}
Also, the interface does not require the return of the compiled code. Instead, to install the machine code in the JVM, another API is used.
HotSpot.installCode(targetCode);Now, to write a new JIT compiler for the JVM, you just need to implement this interface. We get information about the method that needs to be compiled, and we have to compile it into machine code and call it installCode.
classGraalCompilerimplementsJVMCICompiler{
  voidcompileMethod(CompilationRequest request){
    HotSpot.installCode(...);
  }
}
Let's switch to Eclipse IDE with Graal and take a look at some real interfaces and classes. As mentioned earlier, they will be somewhat more complicated, but not by much.
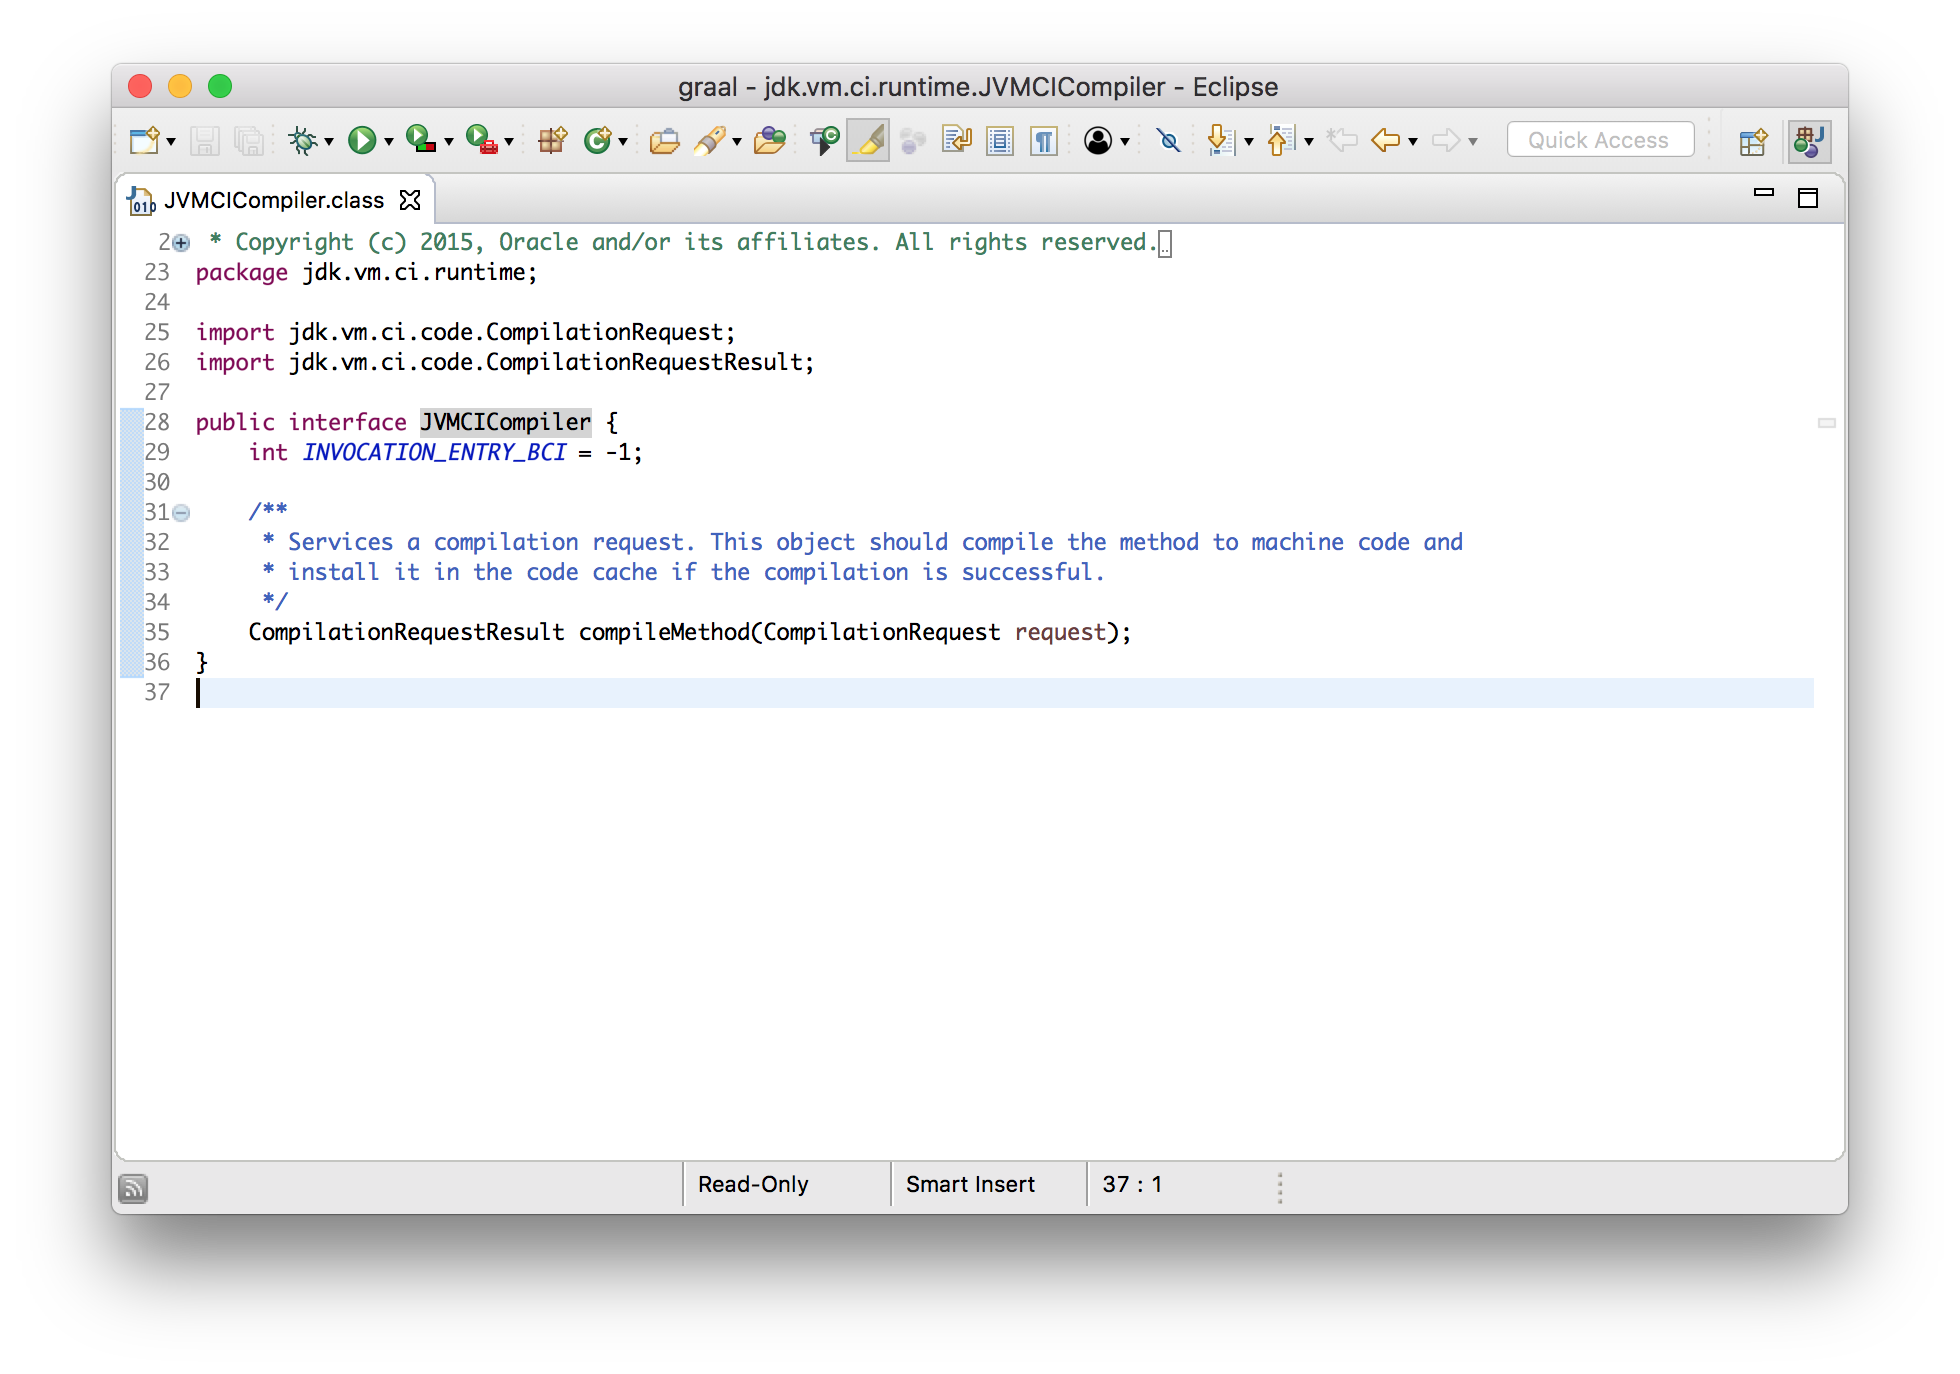
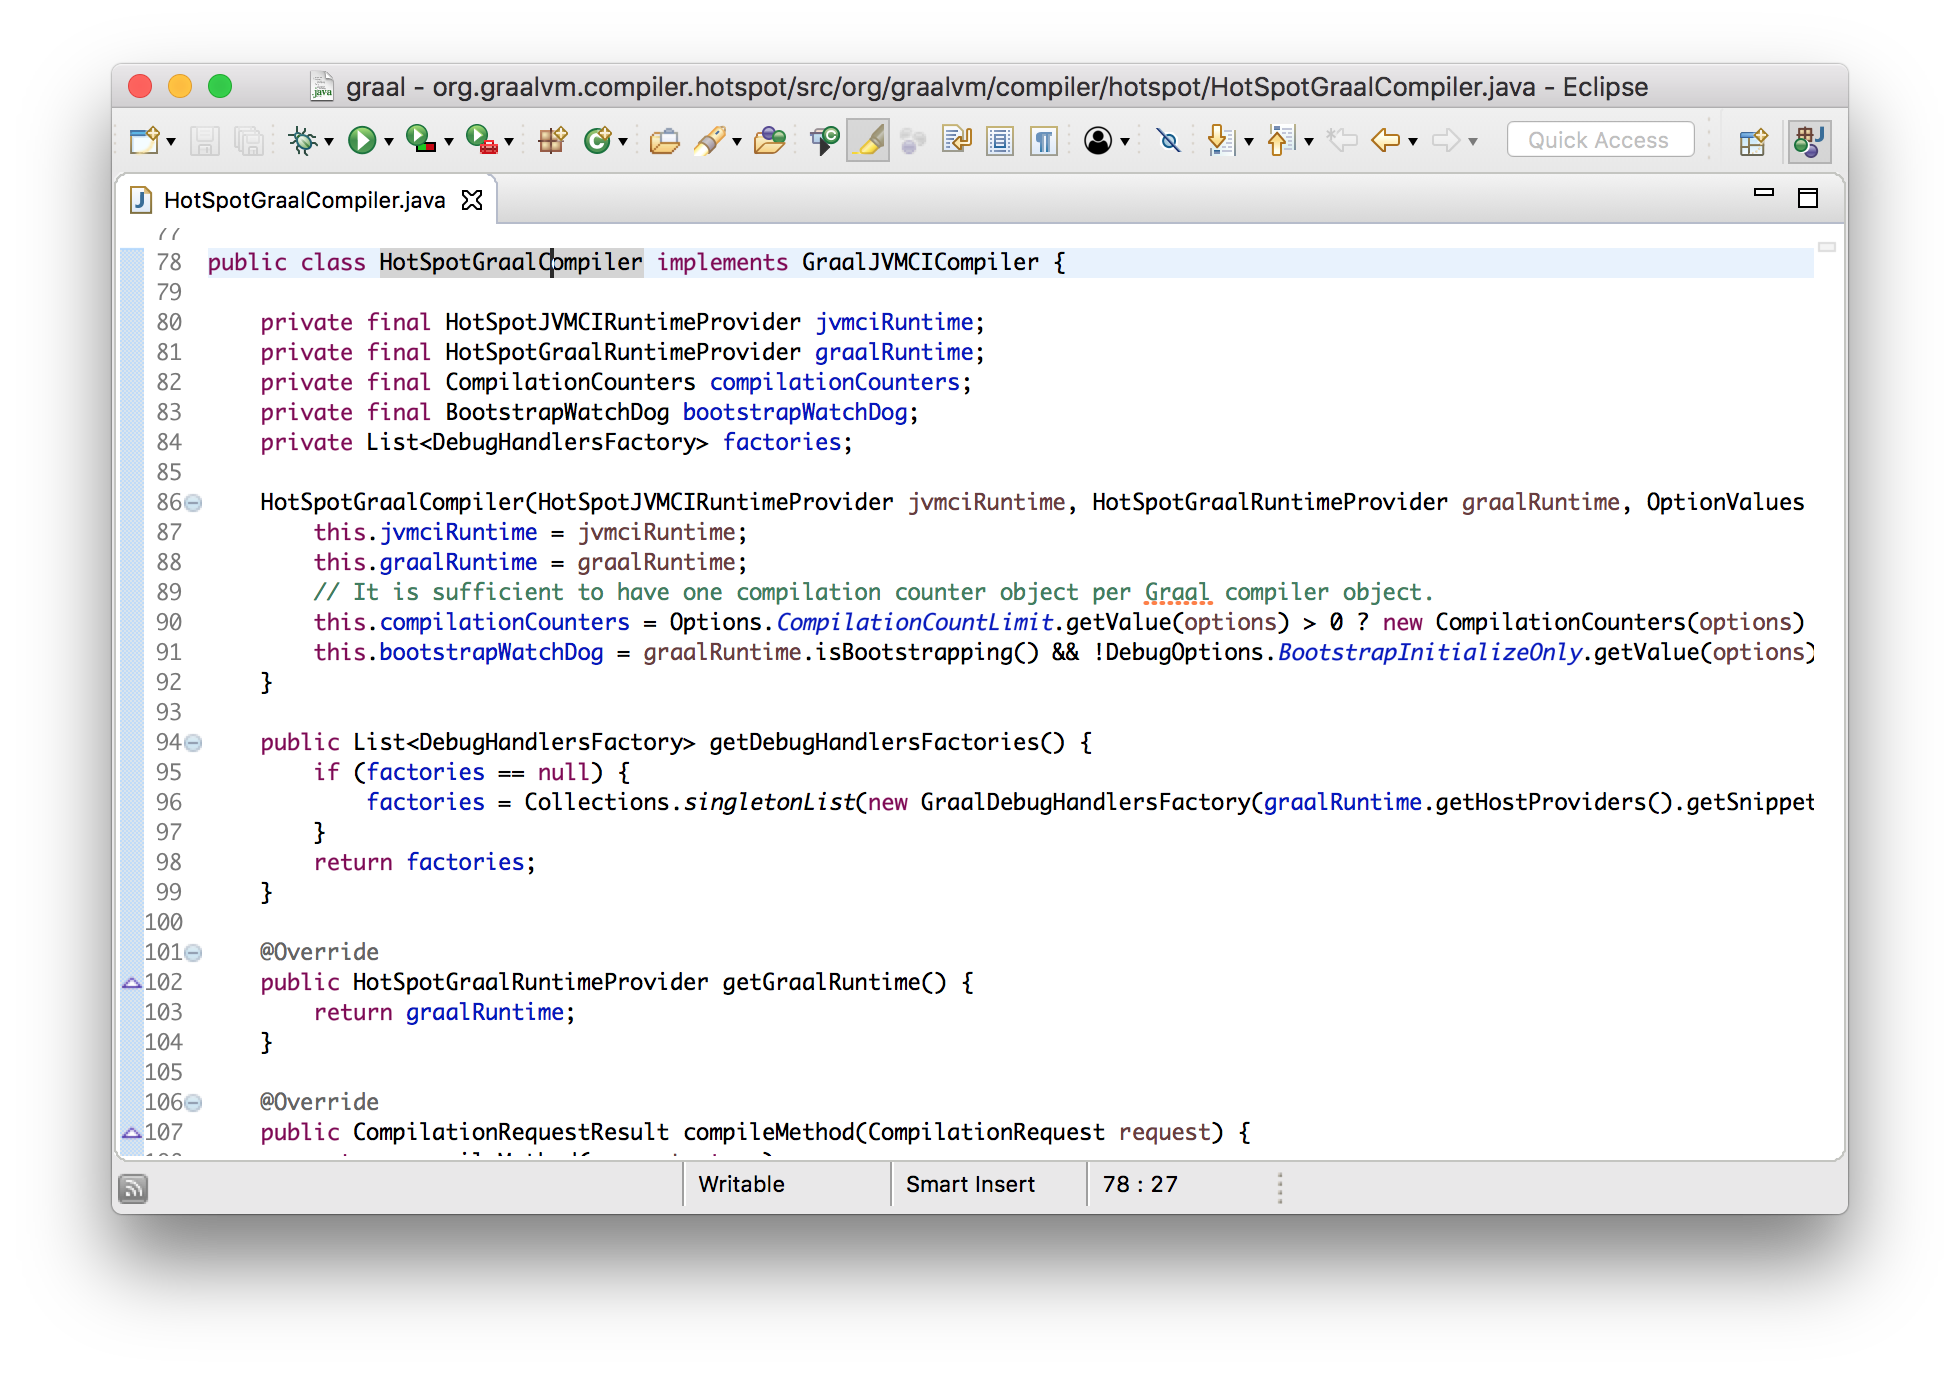
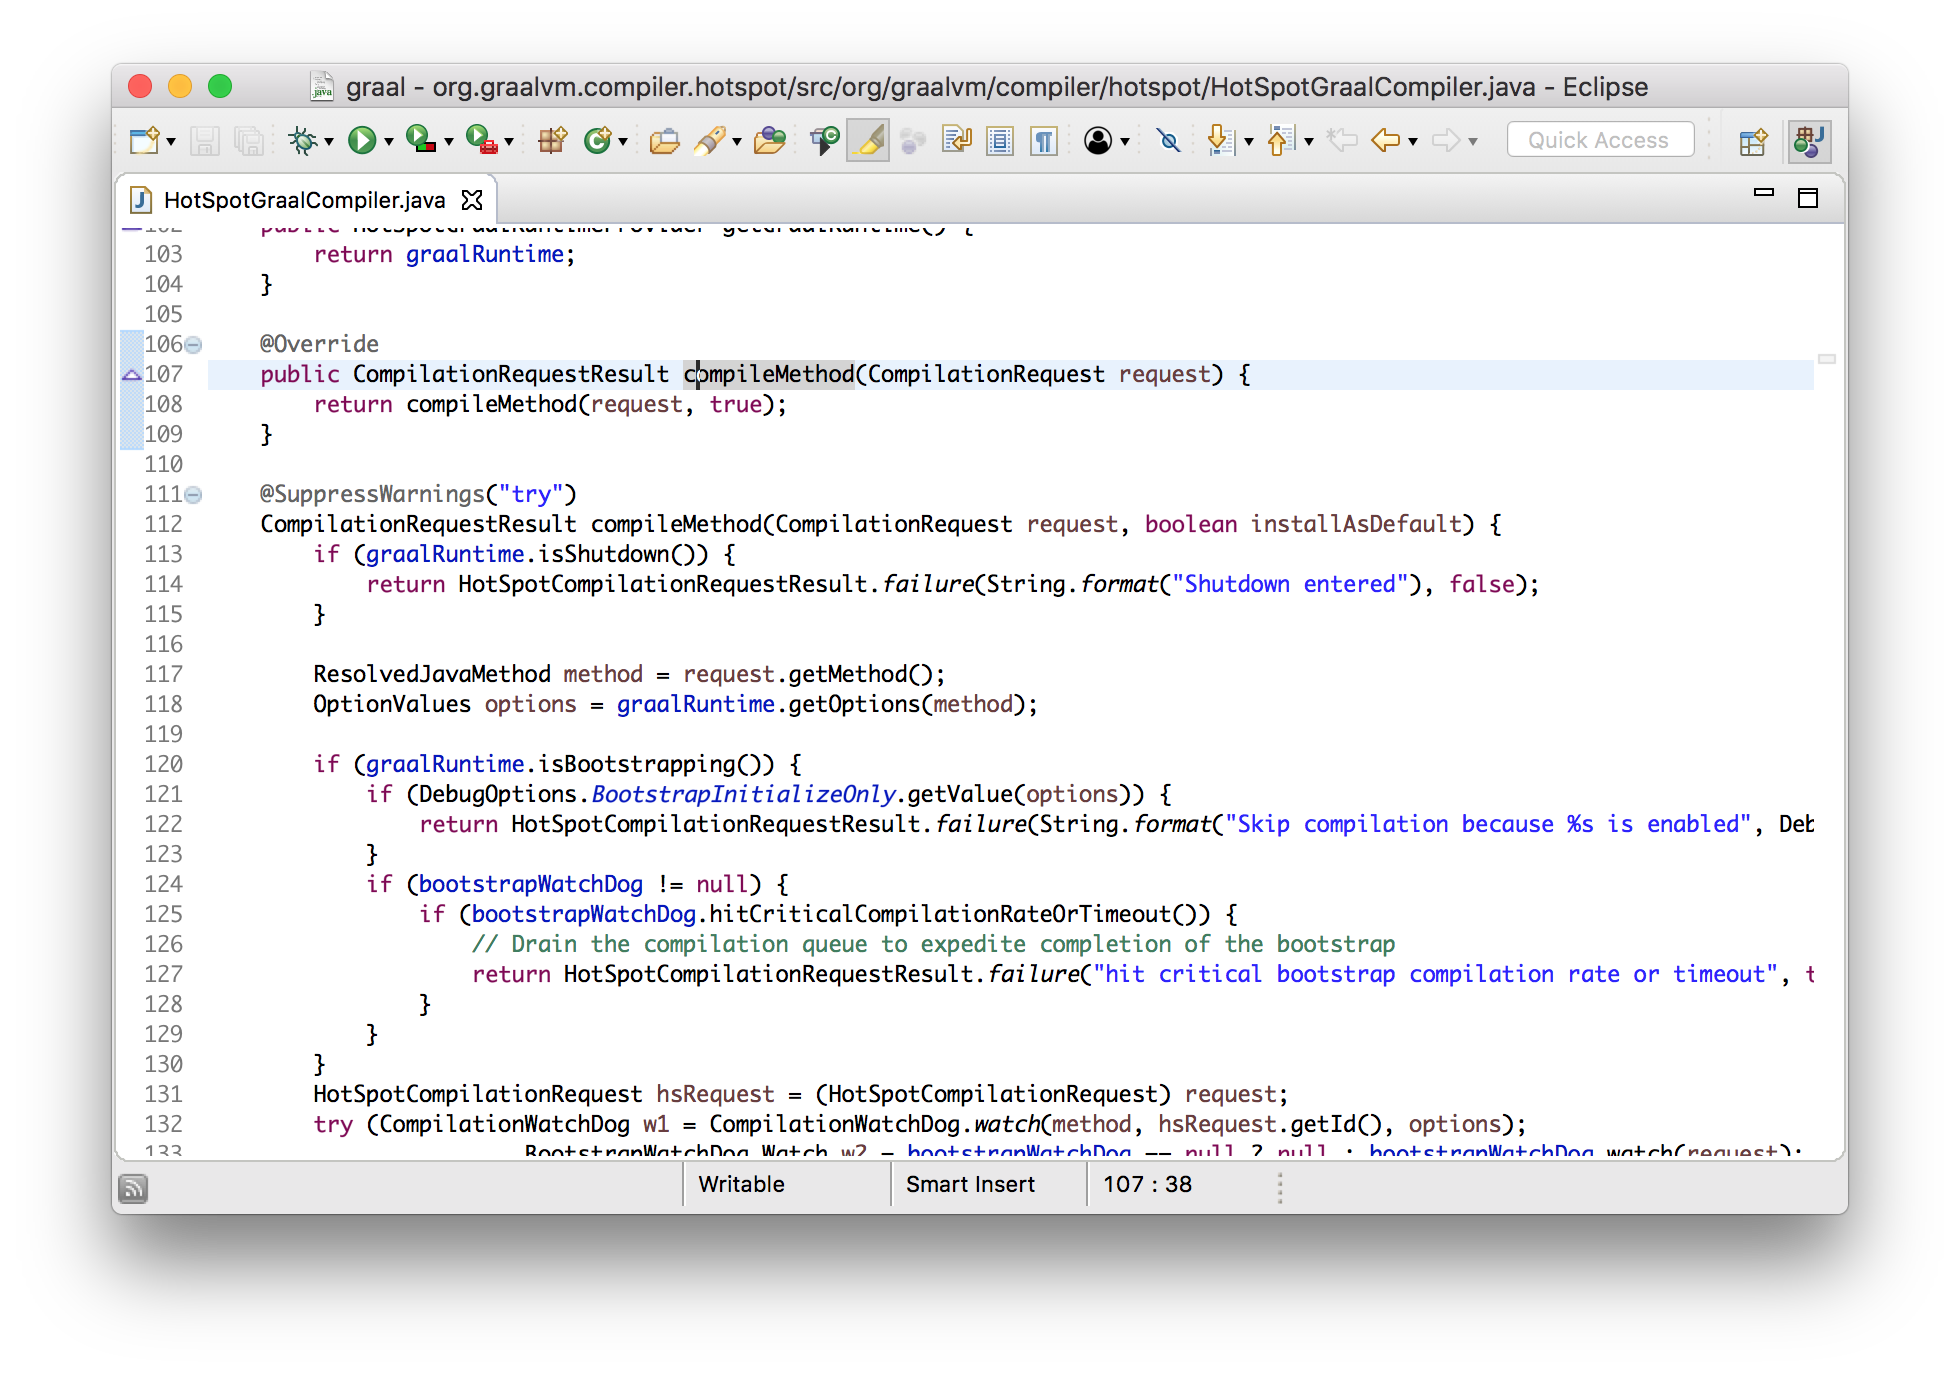
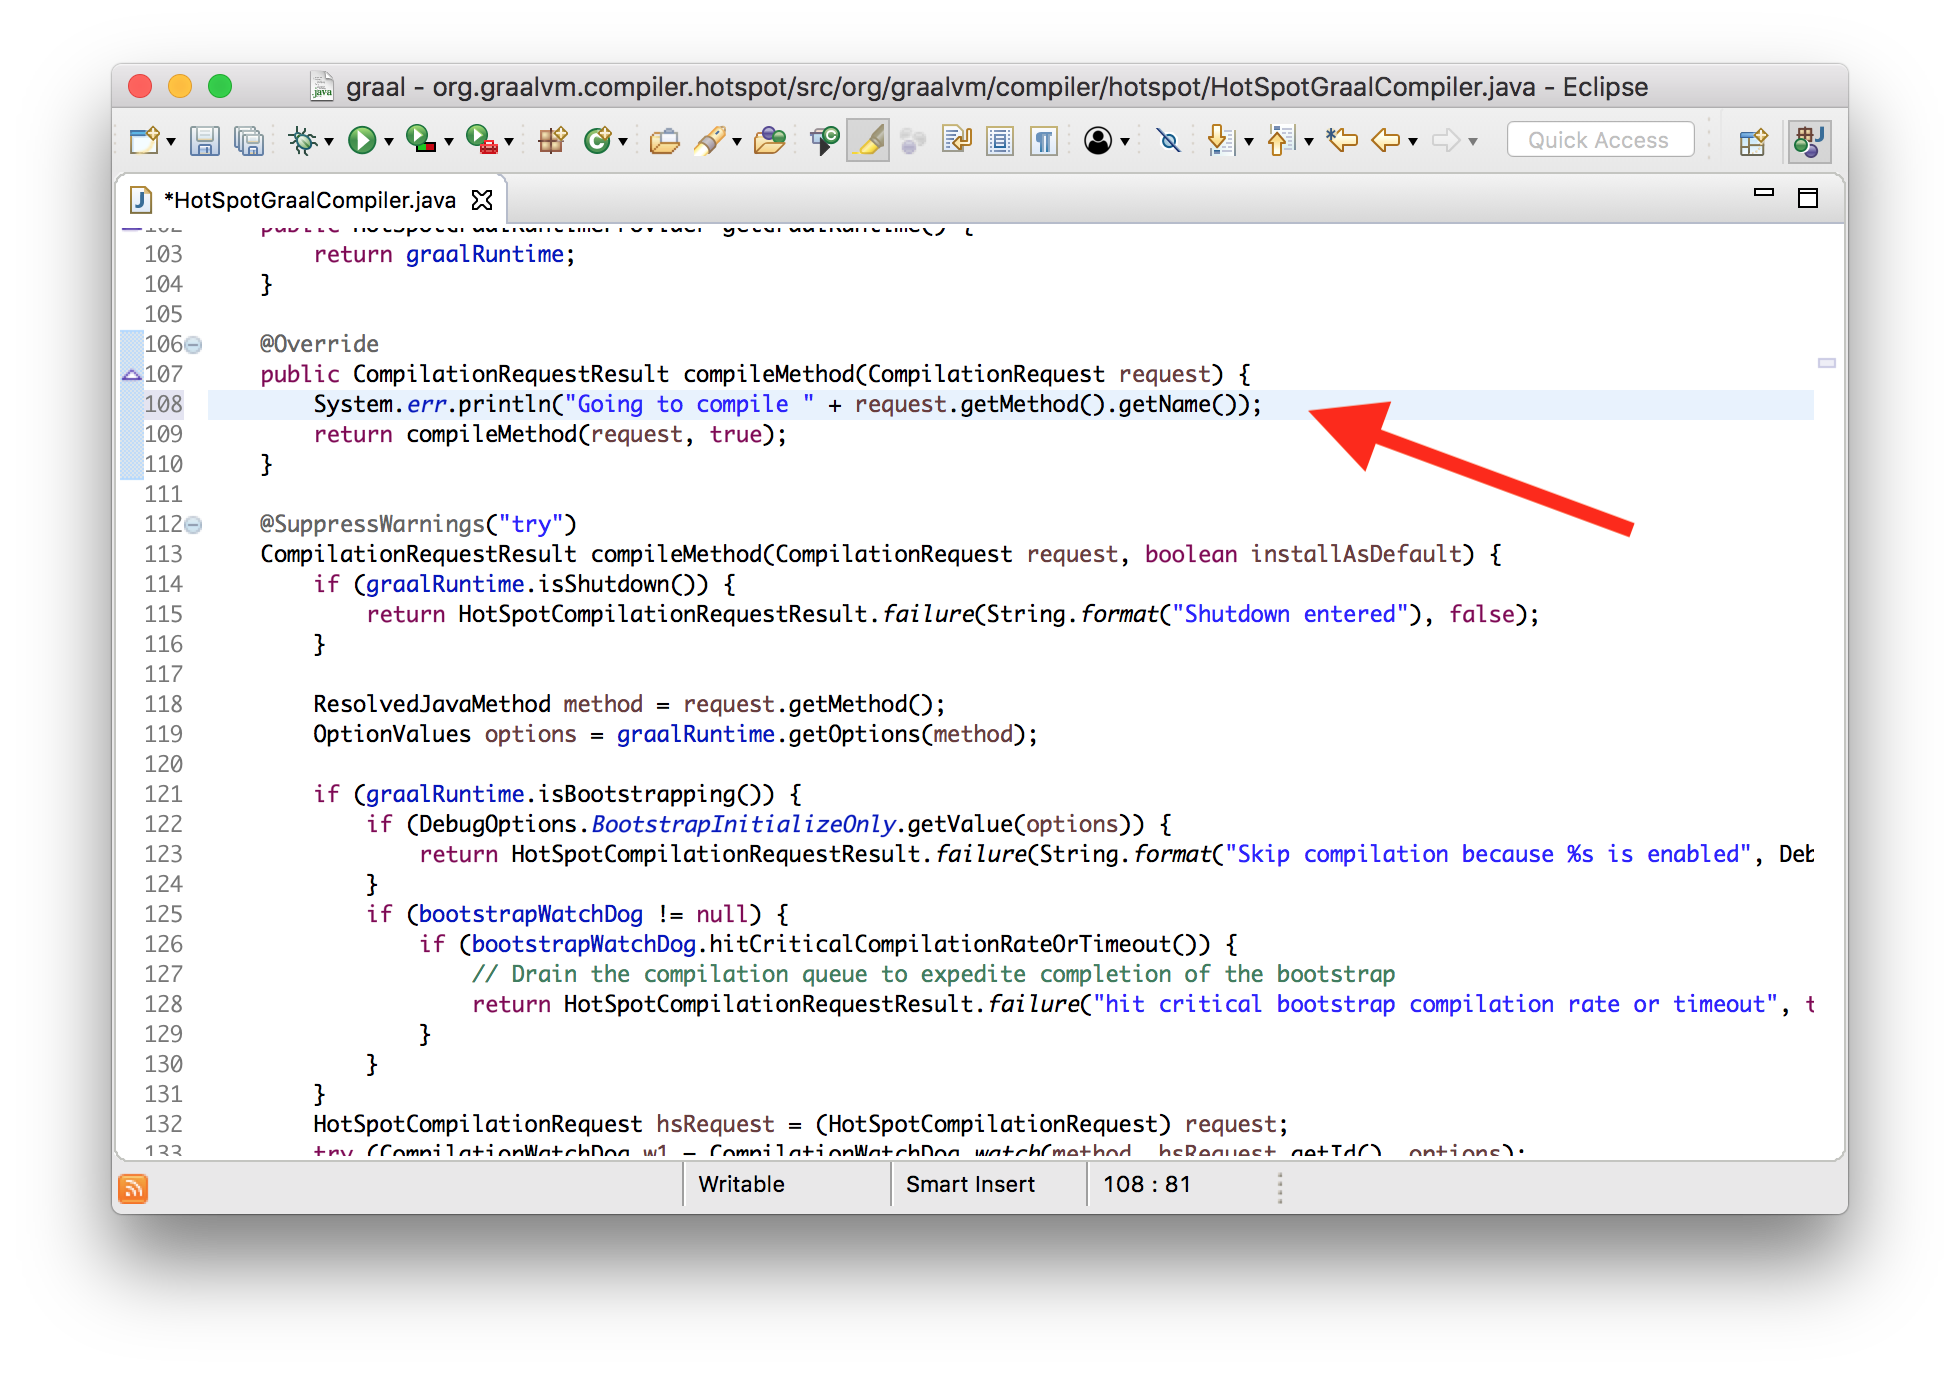
Now I want to show that we can make changes to Graal, and immediately use them in Java 9. I will add a new log message, which will be displayed when compiling a method using Graal. Add it to the implemented interface method, which is called by the JVMCI.
classHotSpotGraalCompilerimplementsJVMCICompiler{
  CompilationRequestResult compileMethod(CompilationRequest request){
    System.err.println("Going to compile " + request.getMethod().getName());
    ...
  }
}
For now, disable the compilation logging that exists in HotSpot. Now we can see our message from the modified version of the compiler.
$ java \
  --module-path=graal/sdk/mxbuild/modules/org.graalvm.graal_sdk.jar:graal/truffle/mxbuild/modules/com.oracle.truffle.truffle_api.jar \
  --upgrade-module-path=graal/compiler/mxbuild/modules/jdk.internal.vm.compiler.jar \
  -XX:+UnlockExperimentalVMOptions \
  -XX:+EnableJVMCI \
  -XX:+UseJVMCICompiler \
  -XX:-TieredCompilation \
  -XX:CompileOnly=Demo::workload \
  Demo
Going to compile workload
If you try to repeat it yourself, you will notice that even the launch of our build system is not required mx build. Enough for Eclipse, compile on save . And certainly we don’t need to rebuild the JVM itself. We simply embed the modified compiler into the existing JVM.
Graph graal
Well, we know that Graal converts one byte[]into another byte[]. Now let's talk about the theory and data structures that it uses, because they are a bit unusual even for a compiler.
Essentially, the compiler handles the processing of your program. To do this, the program must be represented in the form of a data structure. One option is bytecode and similar instruction lists, but they are not very expressive.
Instead, Graal uses a graph to represent your program. If we take a simple addition operator that adds two local variables, then the graph will include one node to load each variable, one node for the sum, and two edges, which show that the result of loading local variables goes to the input of the addition operator.
Sometimes it is called dependency graph of the program ( program the dependency graph ).
Having the expression of the form x + ywe get the nodes for the local variables xand y, and the node of their sum.
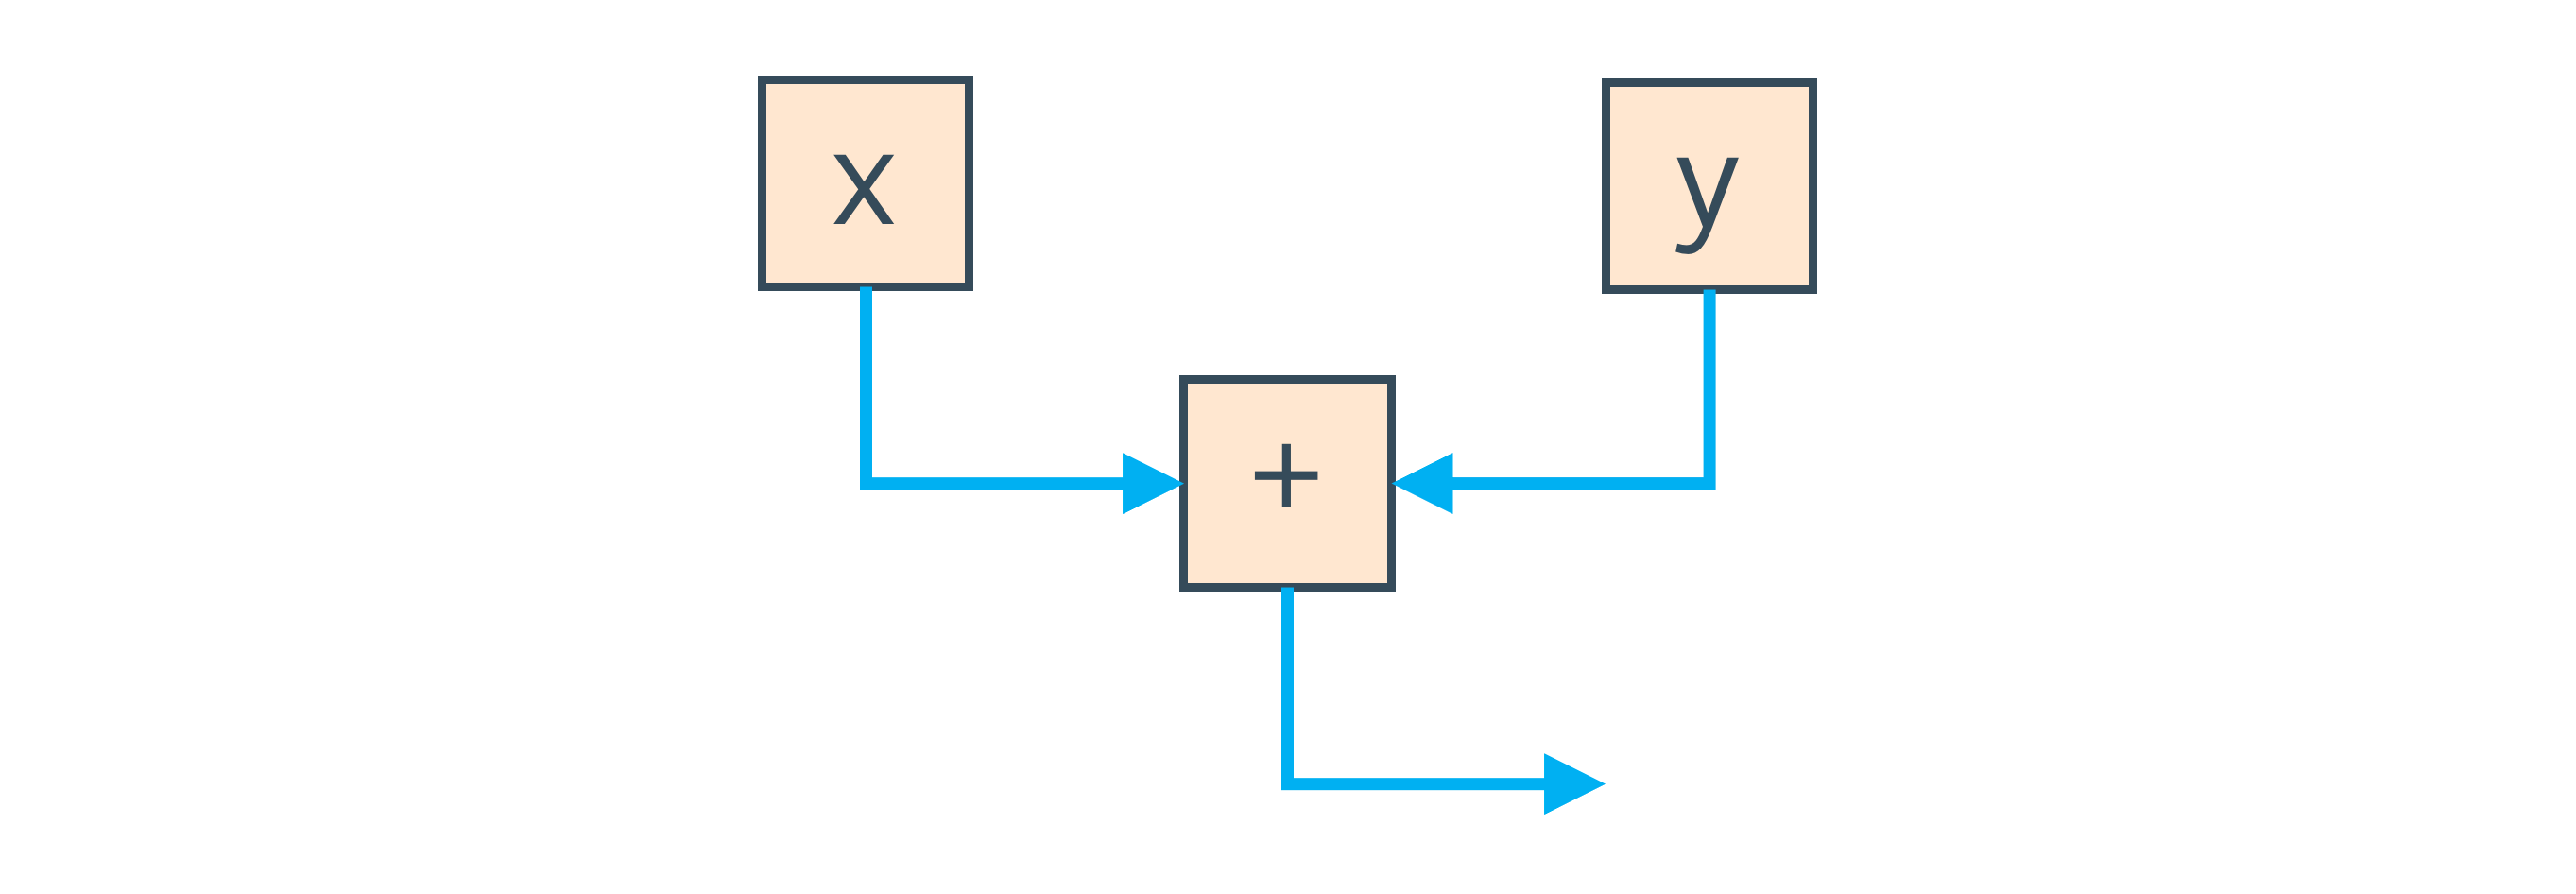
The blue edges on this graph indicate the direction of data flow from reading local variables to summation.
Also, we can use edges to reflect the order of program execution. If, instead of reading local variables, we call methods, then we need to remember the order of the call, and we cannot rearrange them in places (without knowing the code inside). For this there are additional edges that define this order. They are shown in red.
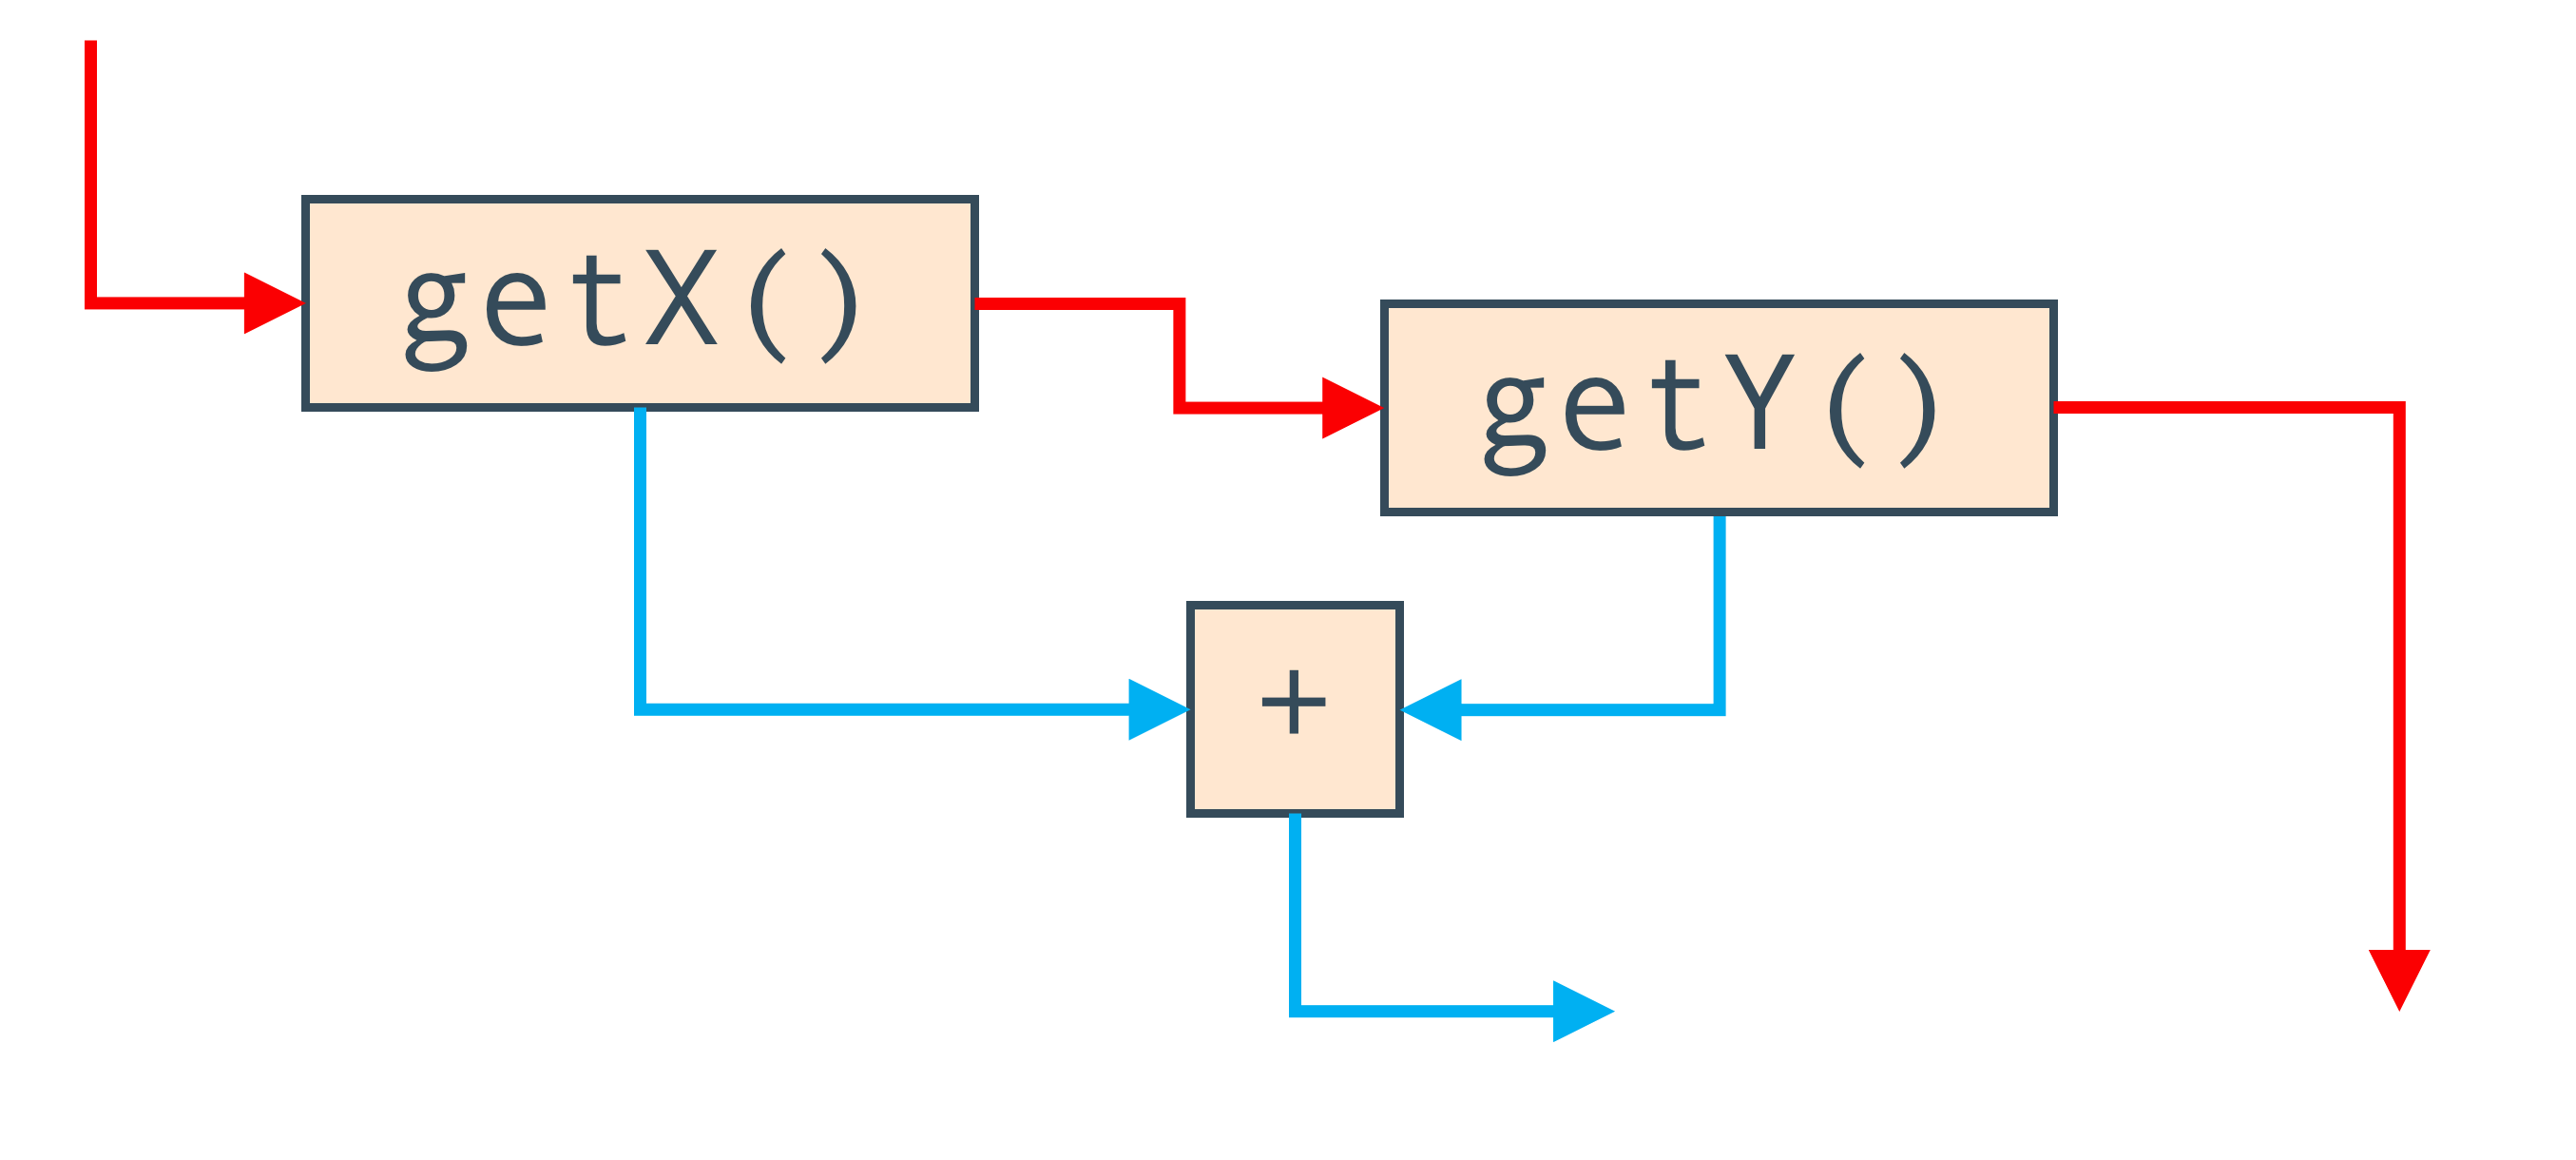
So, the Graal graph, in fact, is two graphs combined in one. Nodes are the same, but some edges show the direction of data flow, while others show the transfer of control between them.
To see the Graal graph, you can use a tool called IdealGraphVisualiser or IGV . The launch is done with the command mx igv.
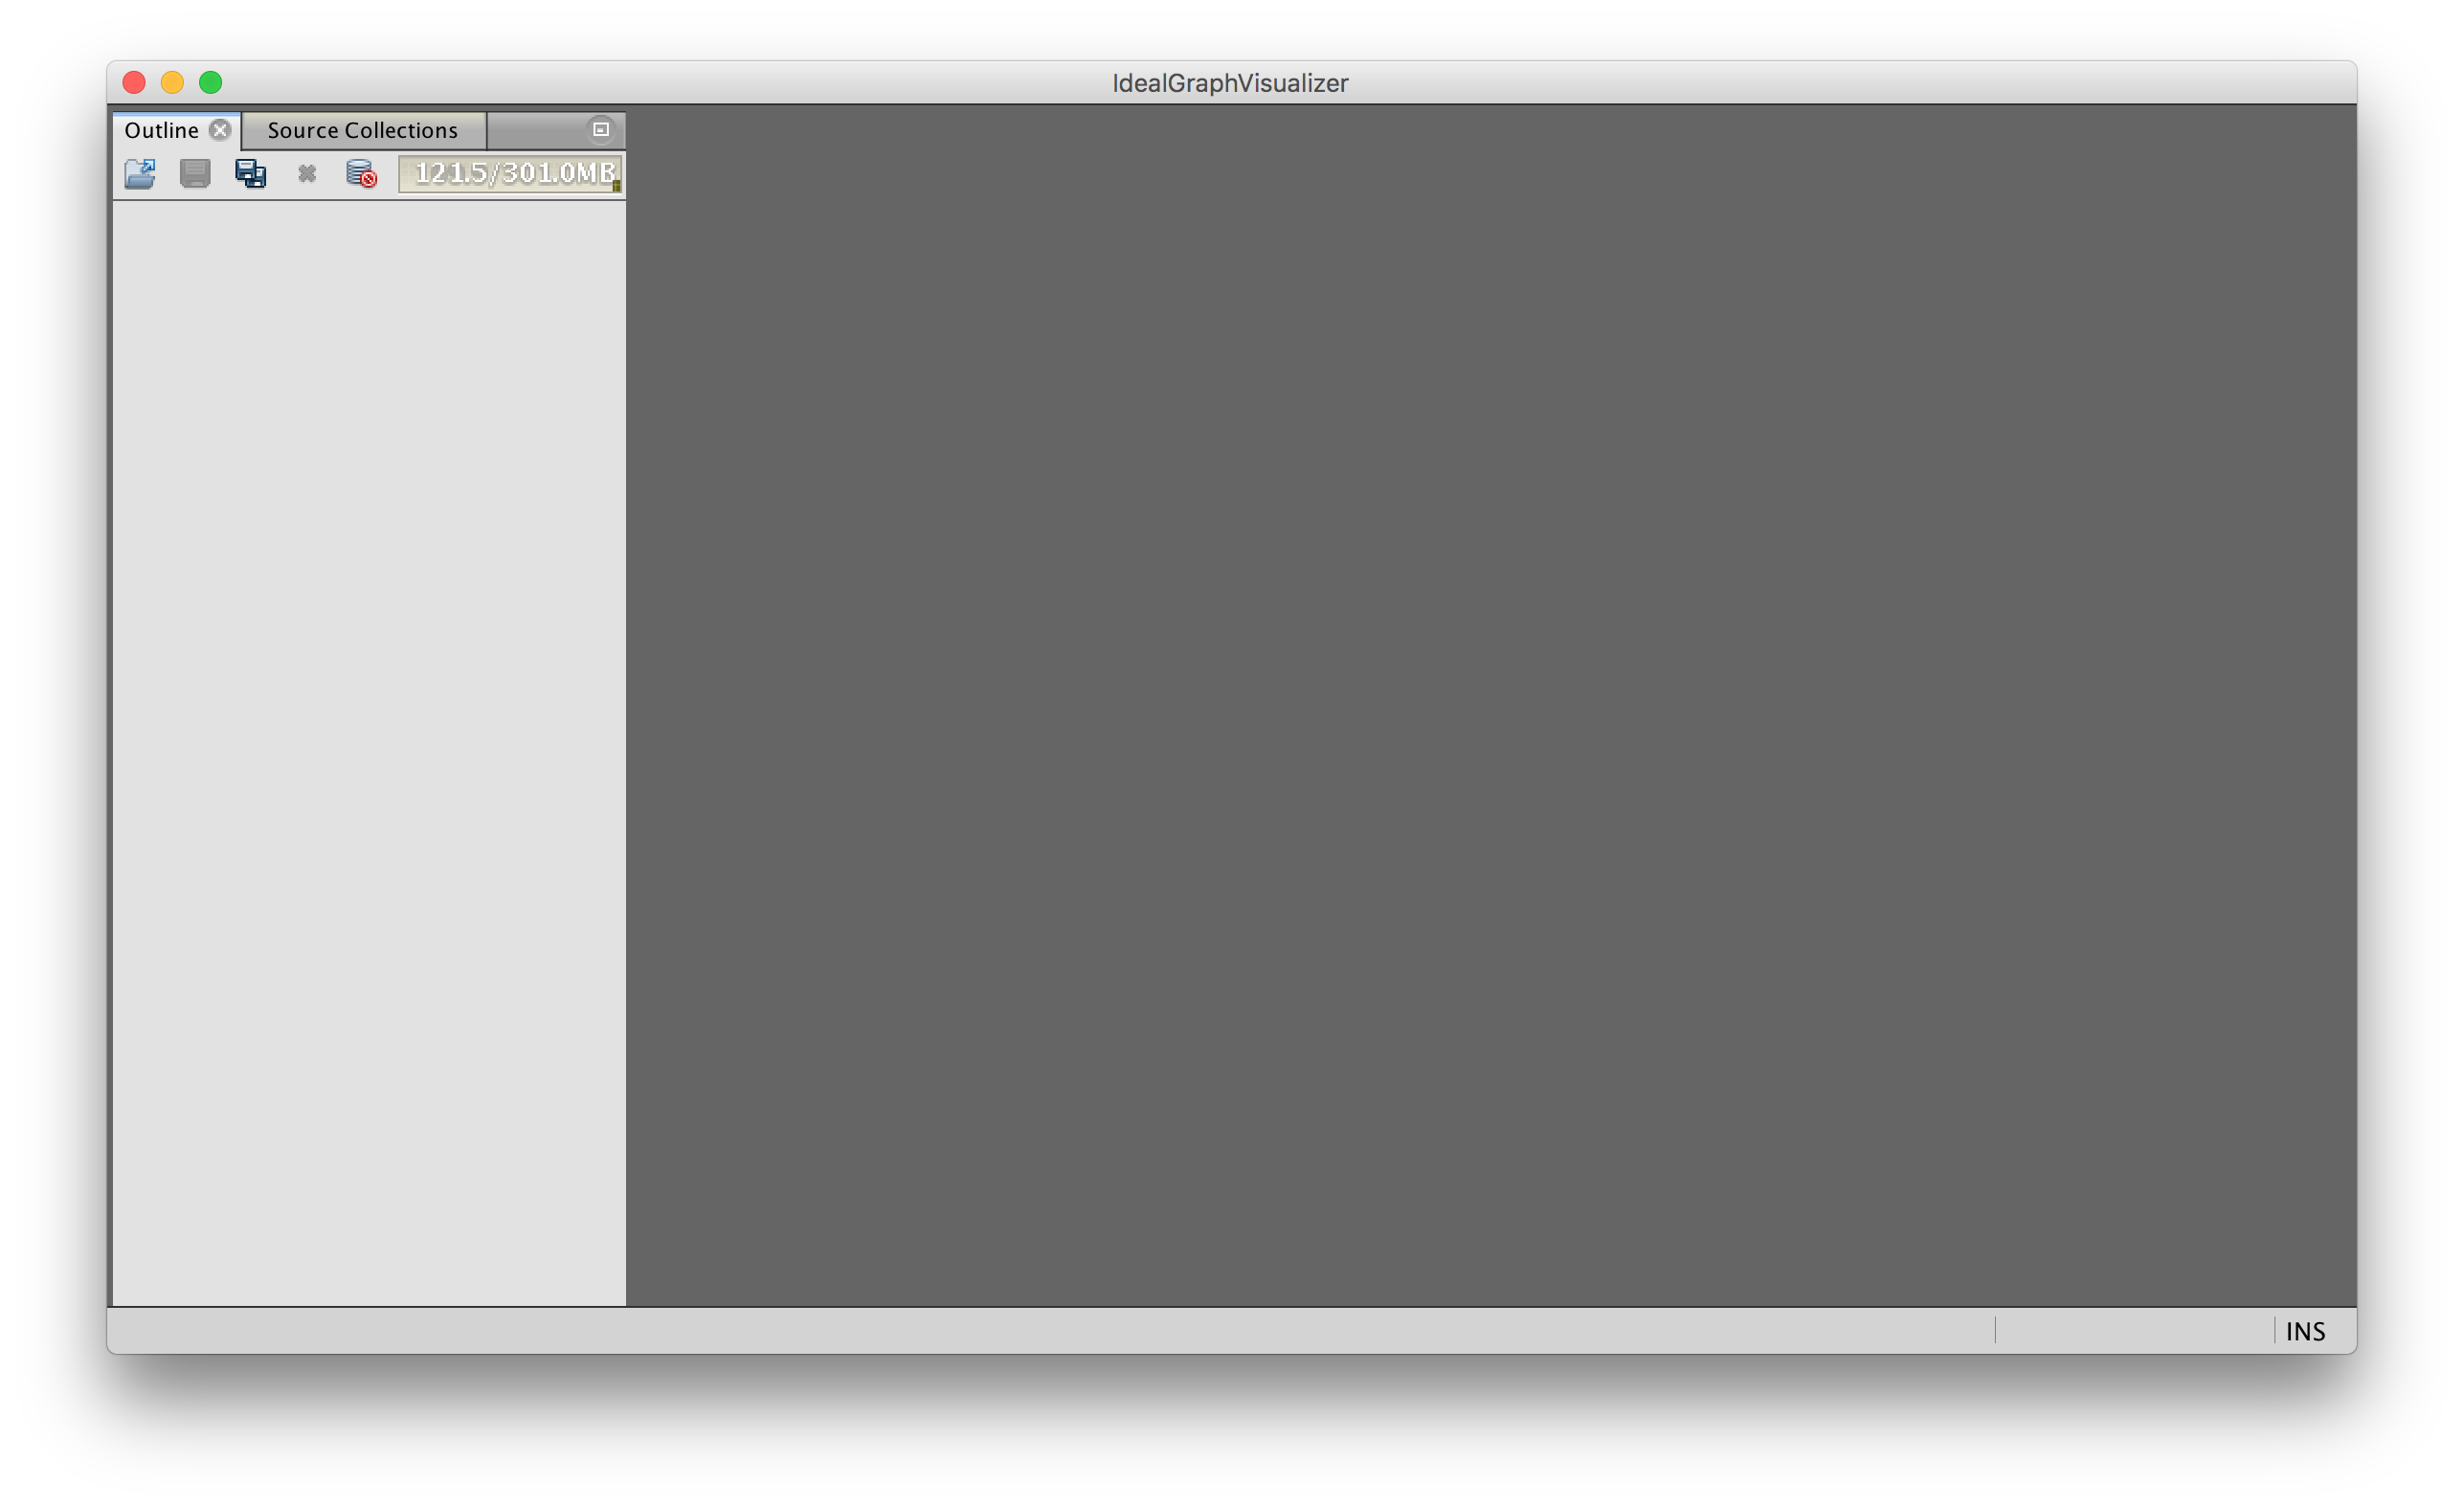
After that, run the JVM with the flag -Dgraal.Dump.
A simple data stream can be seen by writing a simple expression.
intaverage(int a, int b){
  return (a + b) / 2;
}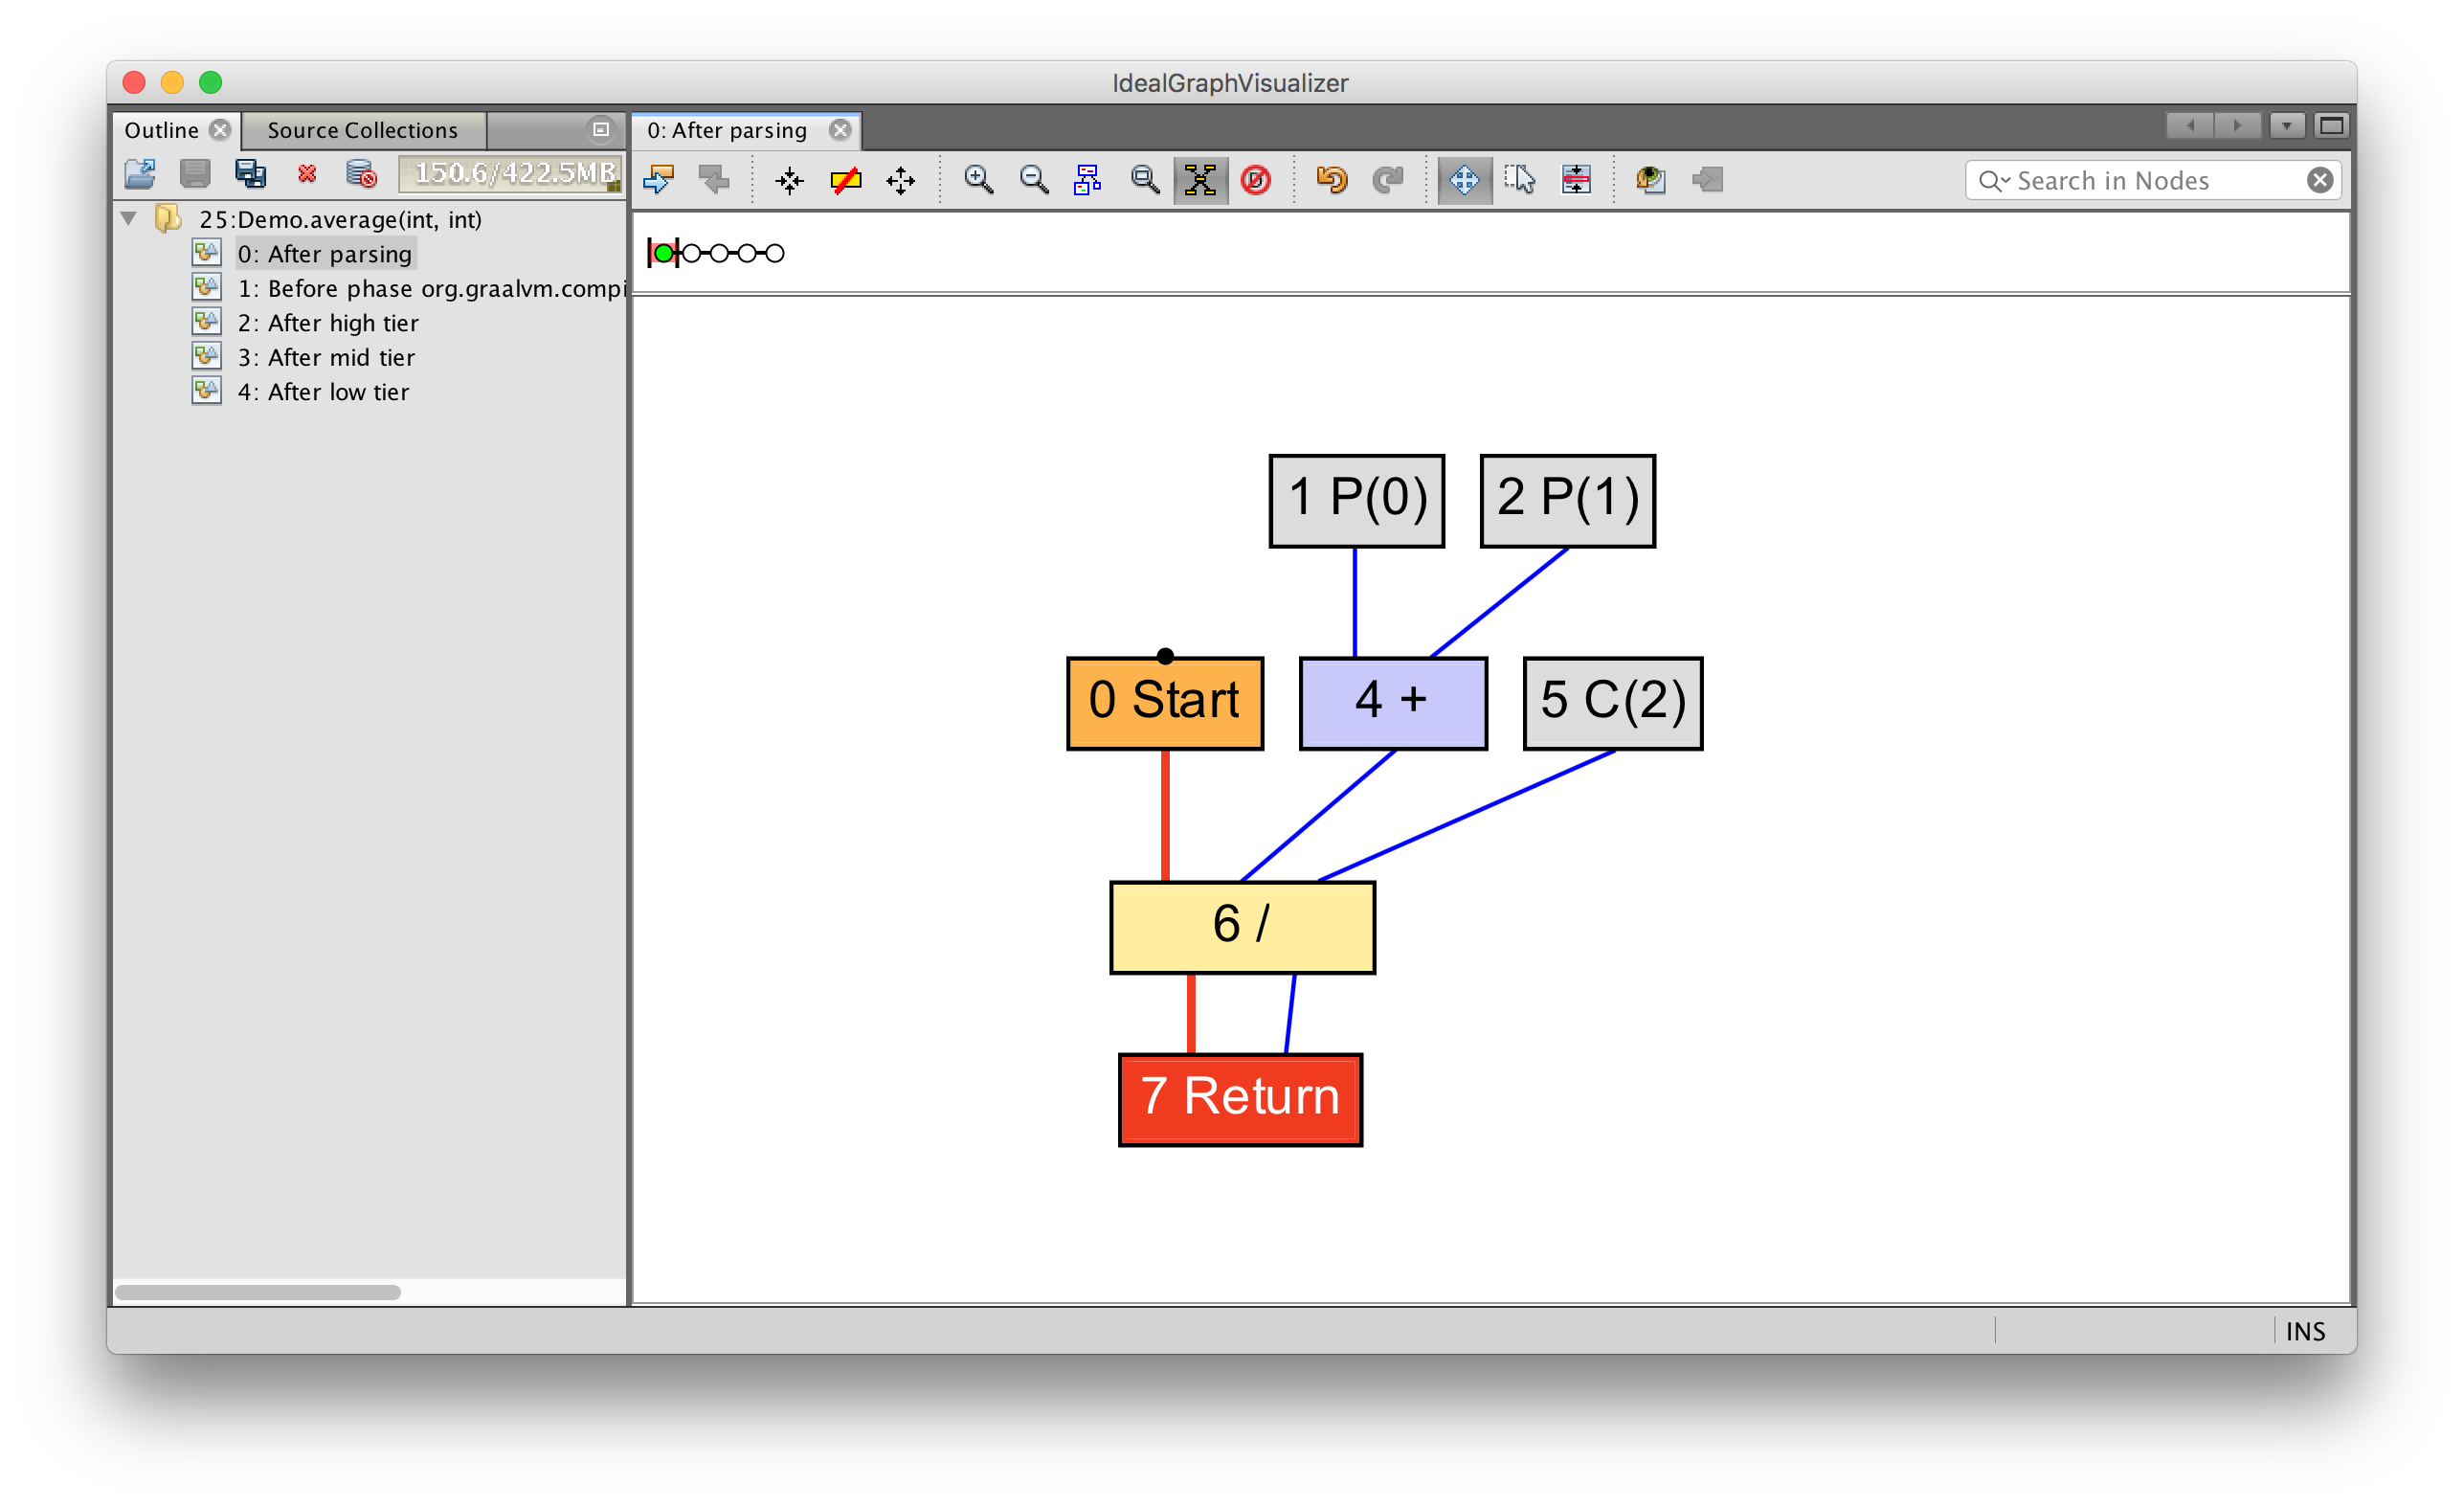
You can see how the parameters 0( P(0) and 1( P(1)) are fed to the input of the addition operation, which, together with the constant 2( C(2)), goes to the input of the division operation. After this value is returned.
In order to look at a more complex data flow and control, we introduce a loop.
intaverage(int[] values){
  int sum = 0;
  for (int n = 0; n < values.length; n++) {
    sum += values[n];
  }
  return sum / values.length;
}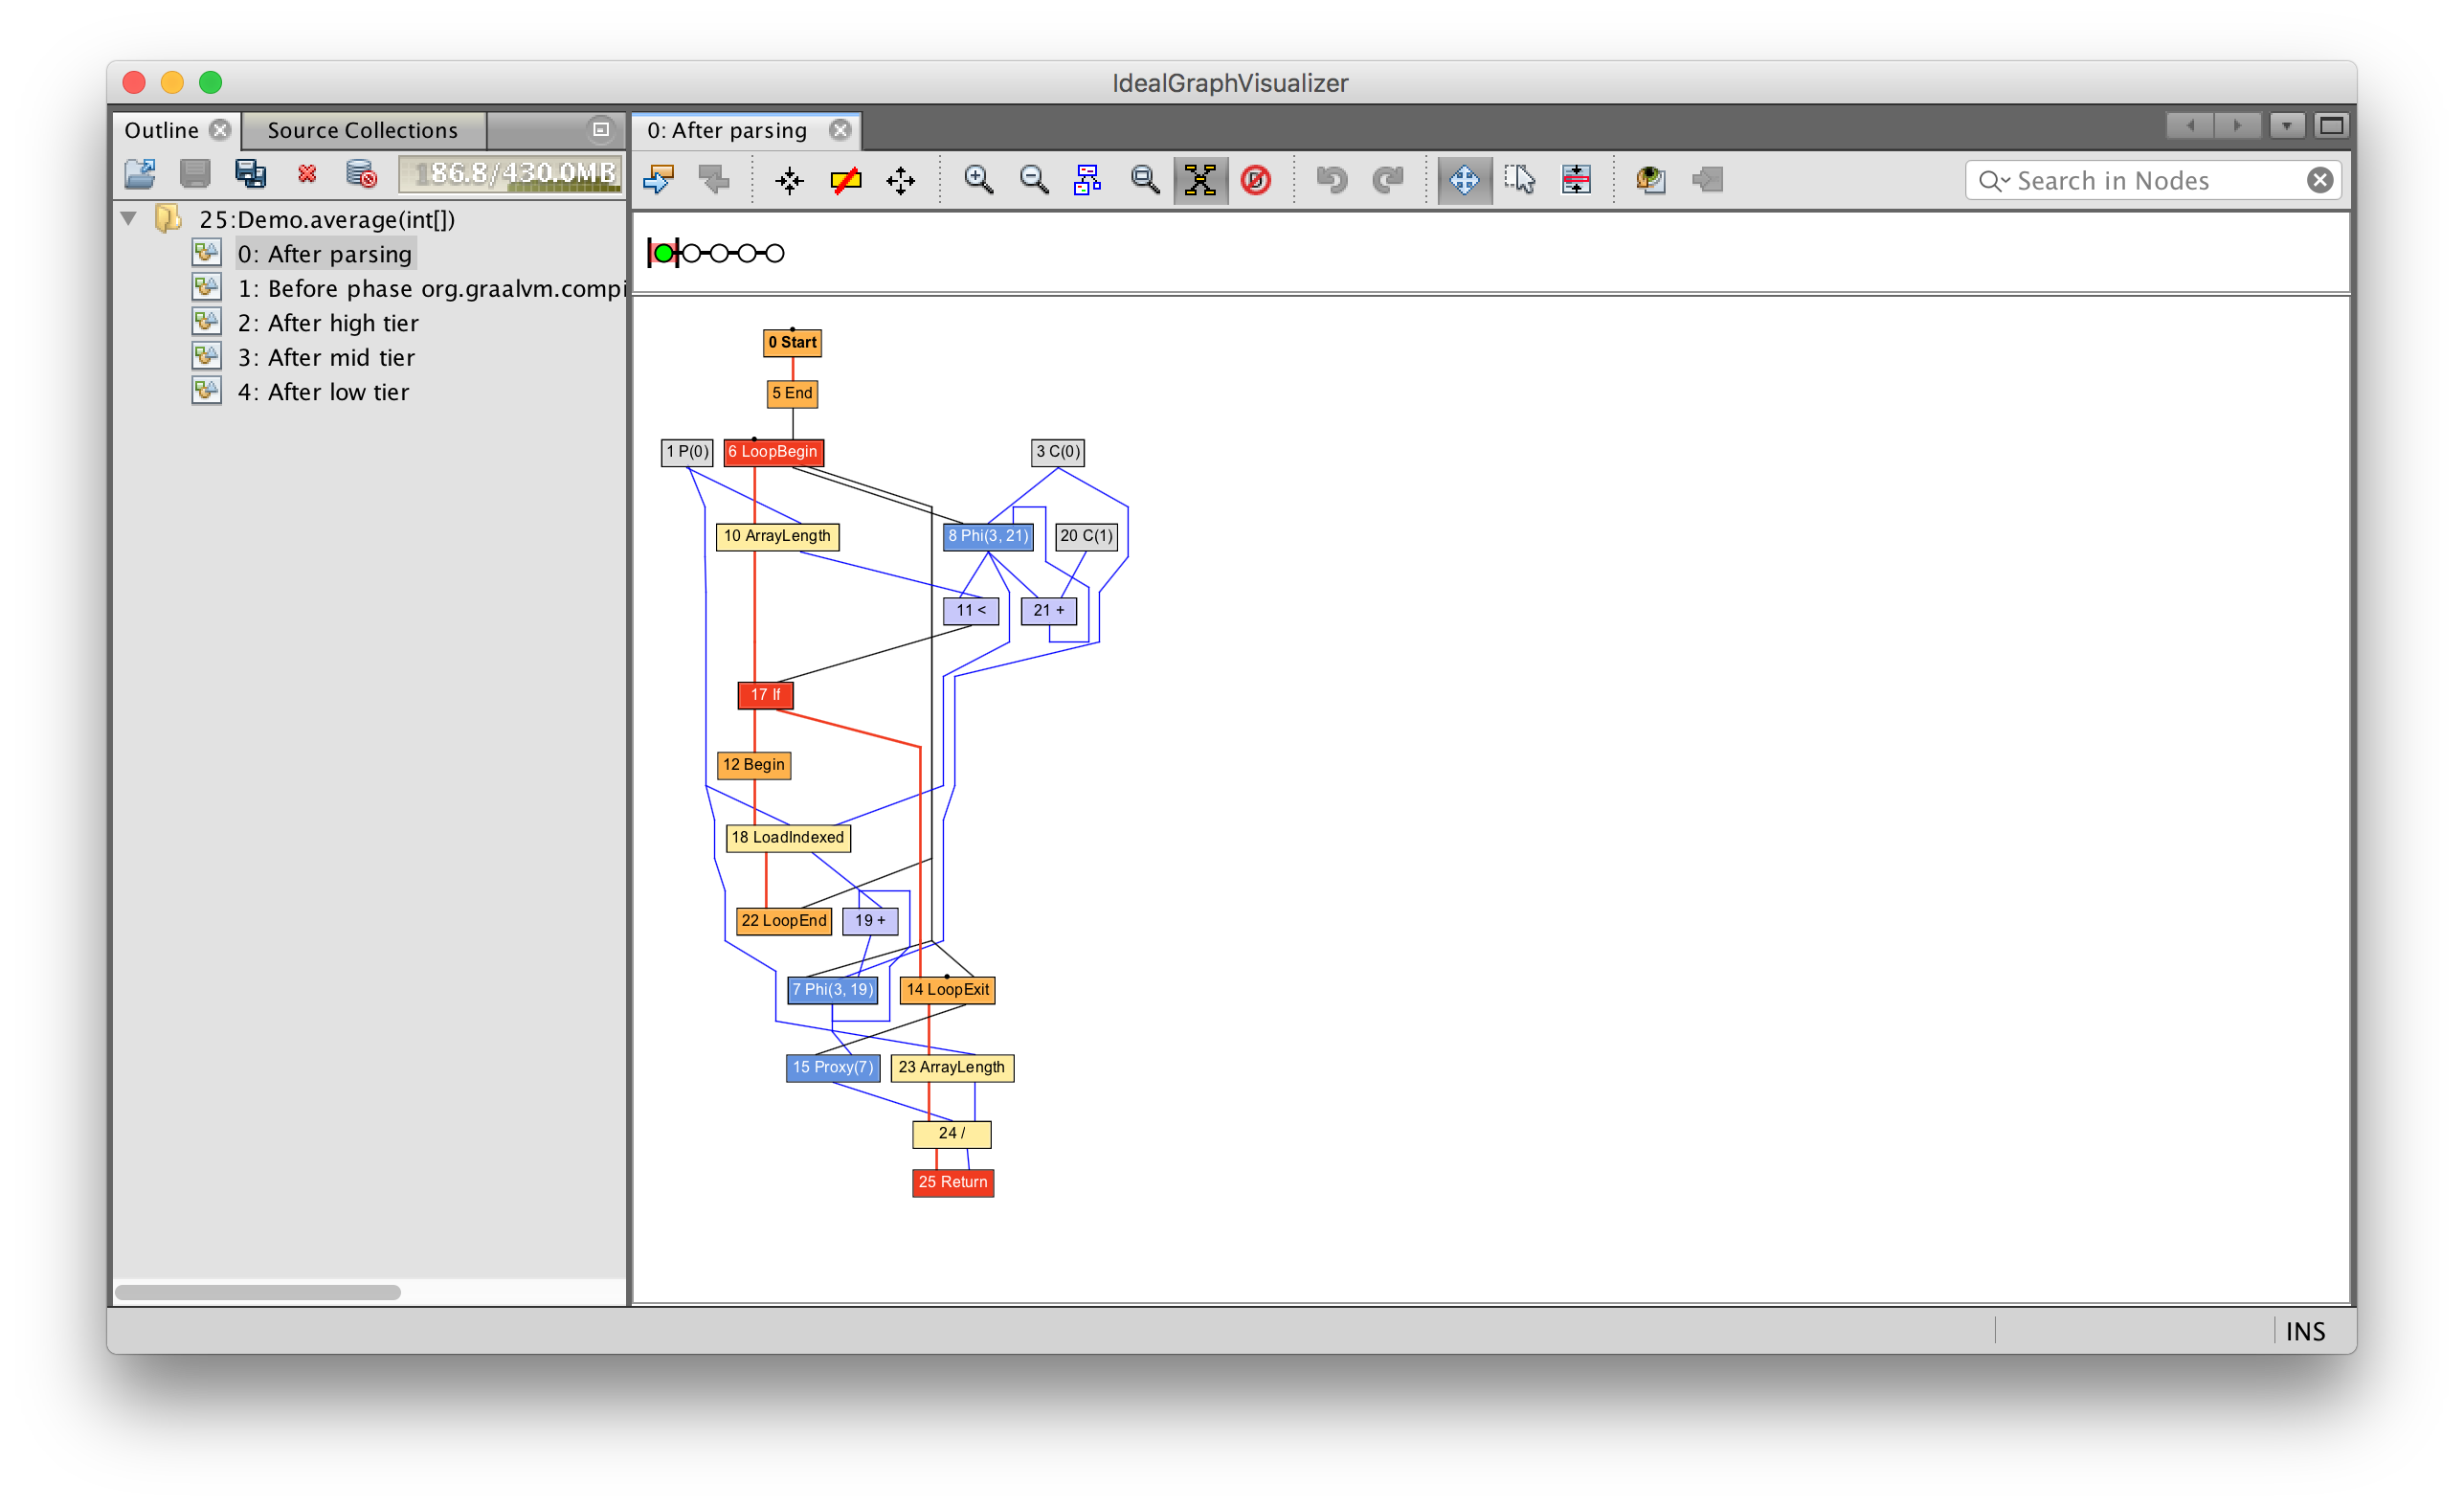
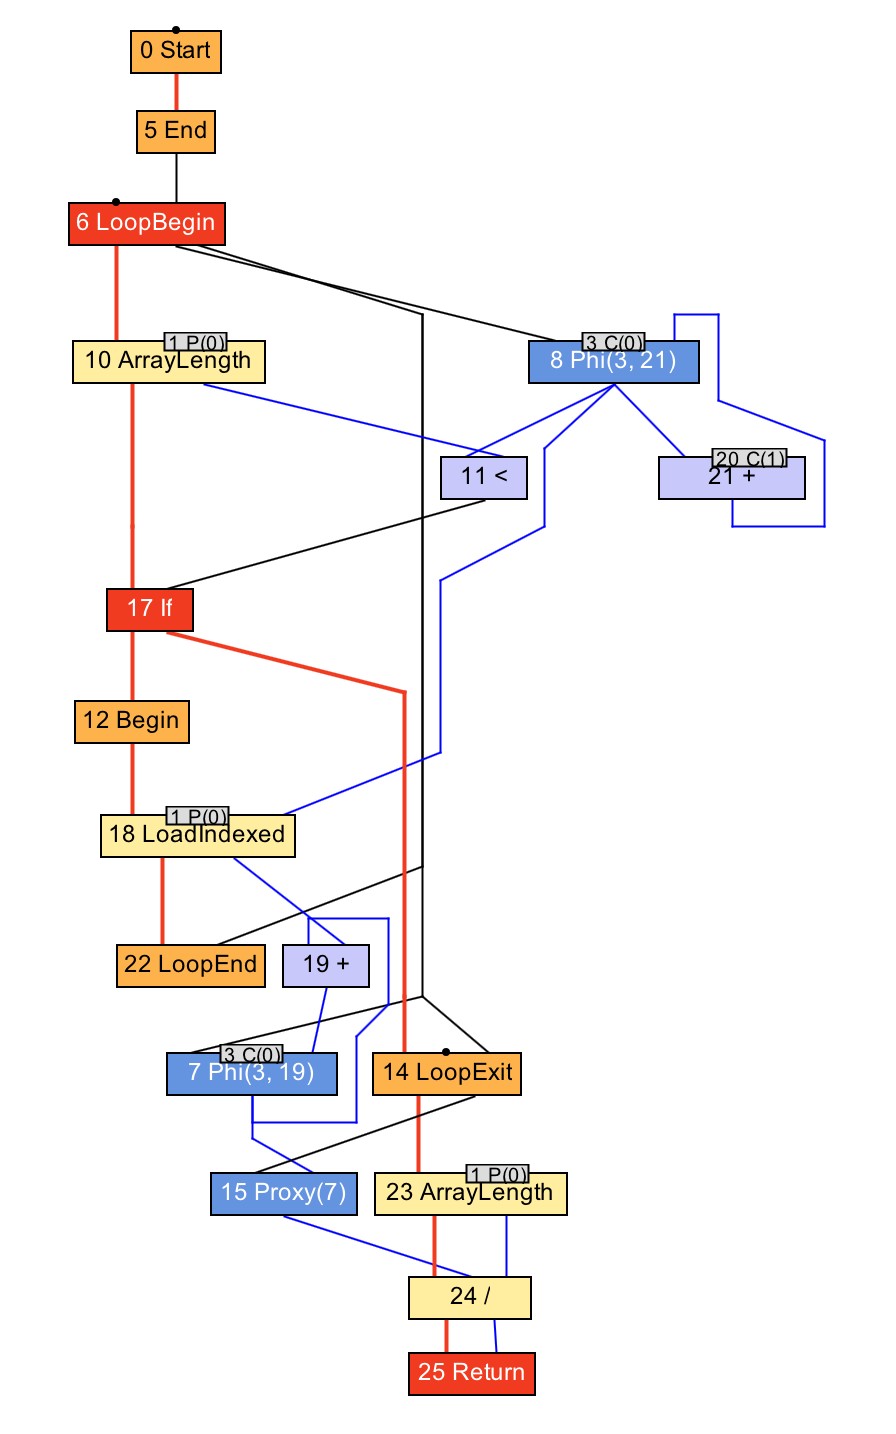
In this case, we have nodes at the beginning and end of the loop, reading the elements of the array, and reading the length of the array. As before, the blue lines show the direction of data flow, and the red lines indicate the flow of control.
Now you can see why this data structure is sometimes called sea knots ( sea of nodes ) or a -bag units ( soup of nodes ).
I want to say that C2 uses a very similar data structure, and, in fact, it was C2 that popularized the idea of the compiler of the sea of nodes , so this is not an innovation of Graal.
I will not show the process of building this graph until the next part of the speech, but when Graal gets the program in this format, optimization and compilation is performed by modifying this data structure. And this is one of the reasons why writing a JIT compiler in Java makes sense. Java is an object-oriented language, and a graph is a collection of objects connected by edges as links.
From bytecode to machine code
Let's see how these ideas look in practice, and follow some of the steps in the compilation process.
Getting bytecode
Compilation starts with bytecode. Let's return to our small example with summation.
intworkload(int a, int b){
  return a + b;
}
Let's output the input bytecode immediately before the compilation starts.
classHotSpotGraalCompilerimplementsJVMCICompiler{
  CompilationRequestResult compileMethod(CompilationRequest request){
    System.err.println(request.getMethod().getName() + " bytecode: "
      + Arrays.toString(request.getMethod().getCode()));
    ...
  }
}
workload bytecode: [26, 27, 96, -84]As you can see, the input to the compiler is bytecode.
Bytecode parser and graph builder
The builder , perceiving this array of bytes as JVM bytecode, converts it into a Graal graph. This is a kind of abstract interpretation - the builder interprets Java bytecode, but instead of transmitting values, it manipulates the free ends of the edges and gradually connects them to each other.
Let's take advantage of the fact that Graal is written in Java, and see how it works using the Eclipse navigation tools. We know that in our example there is an addition node, so let's find where it is created.
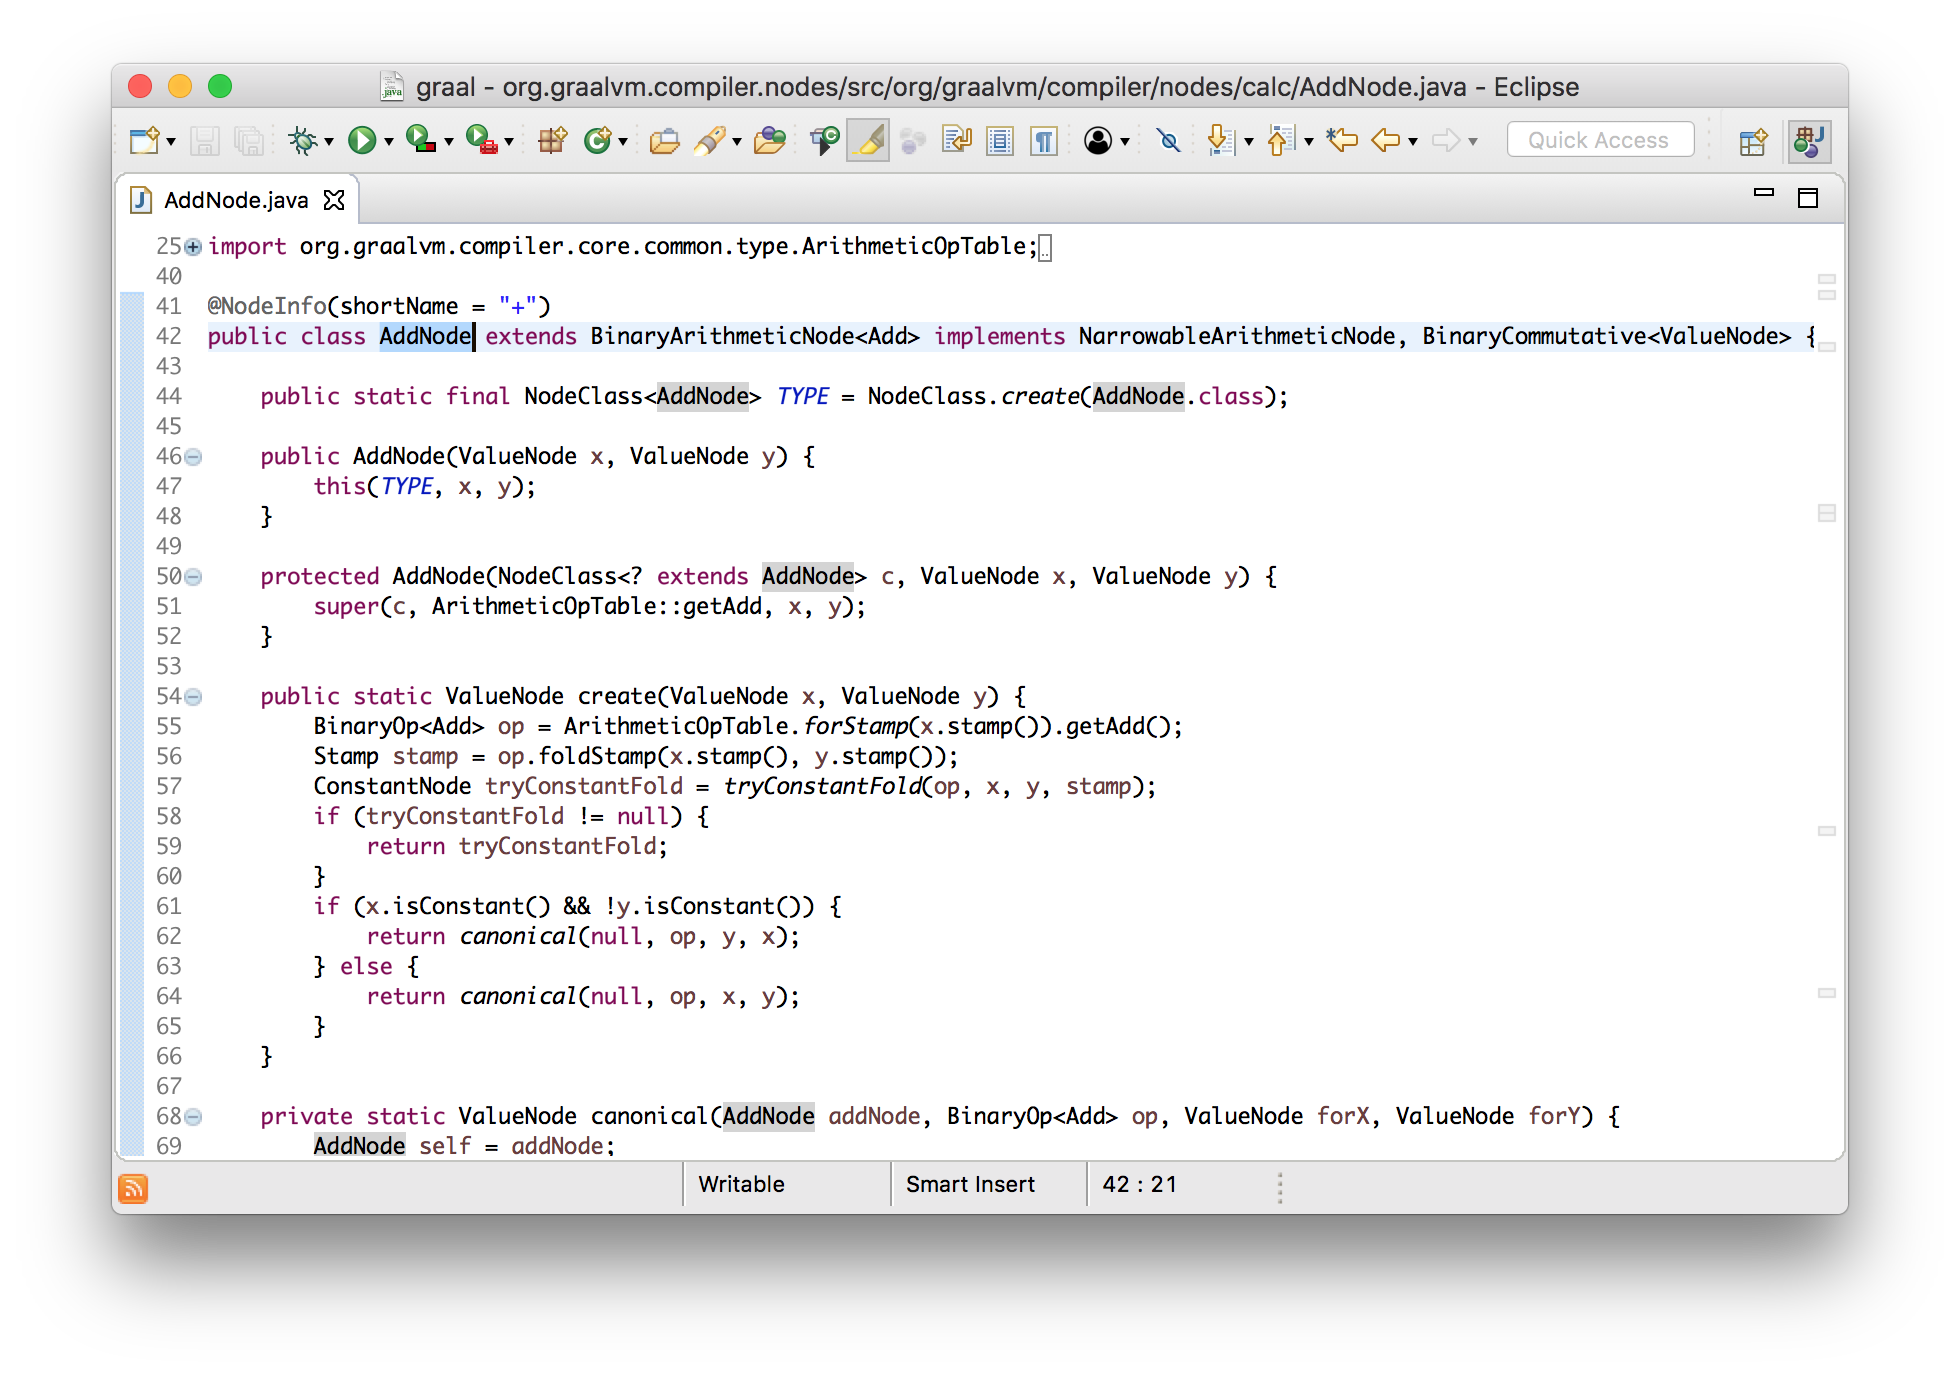
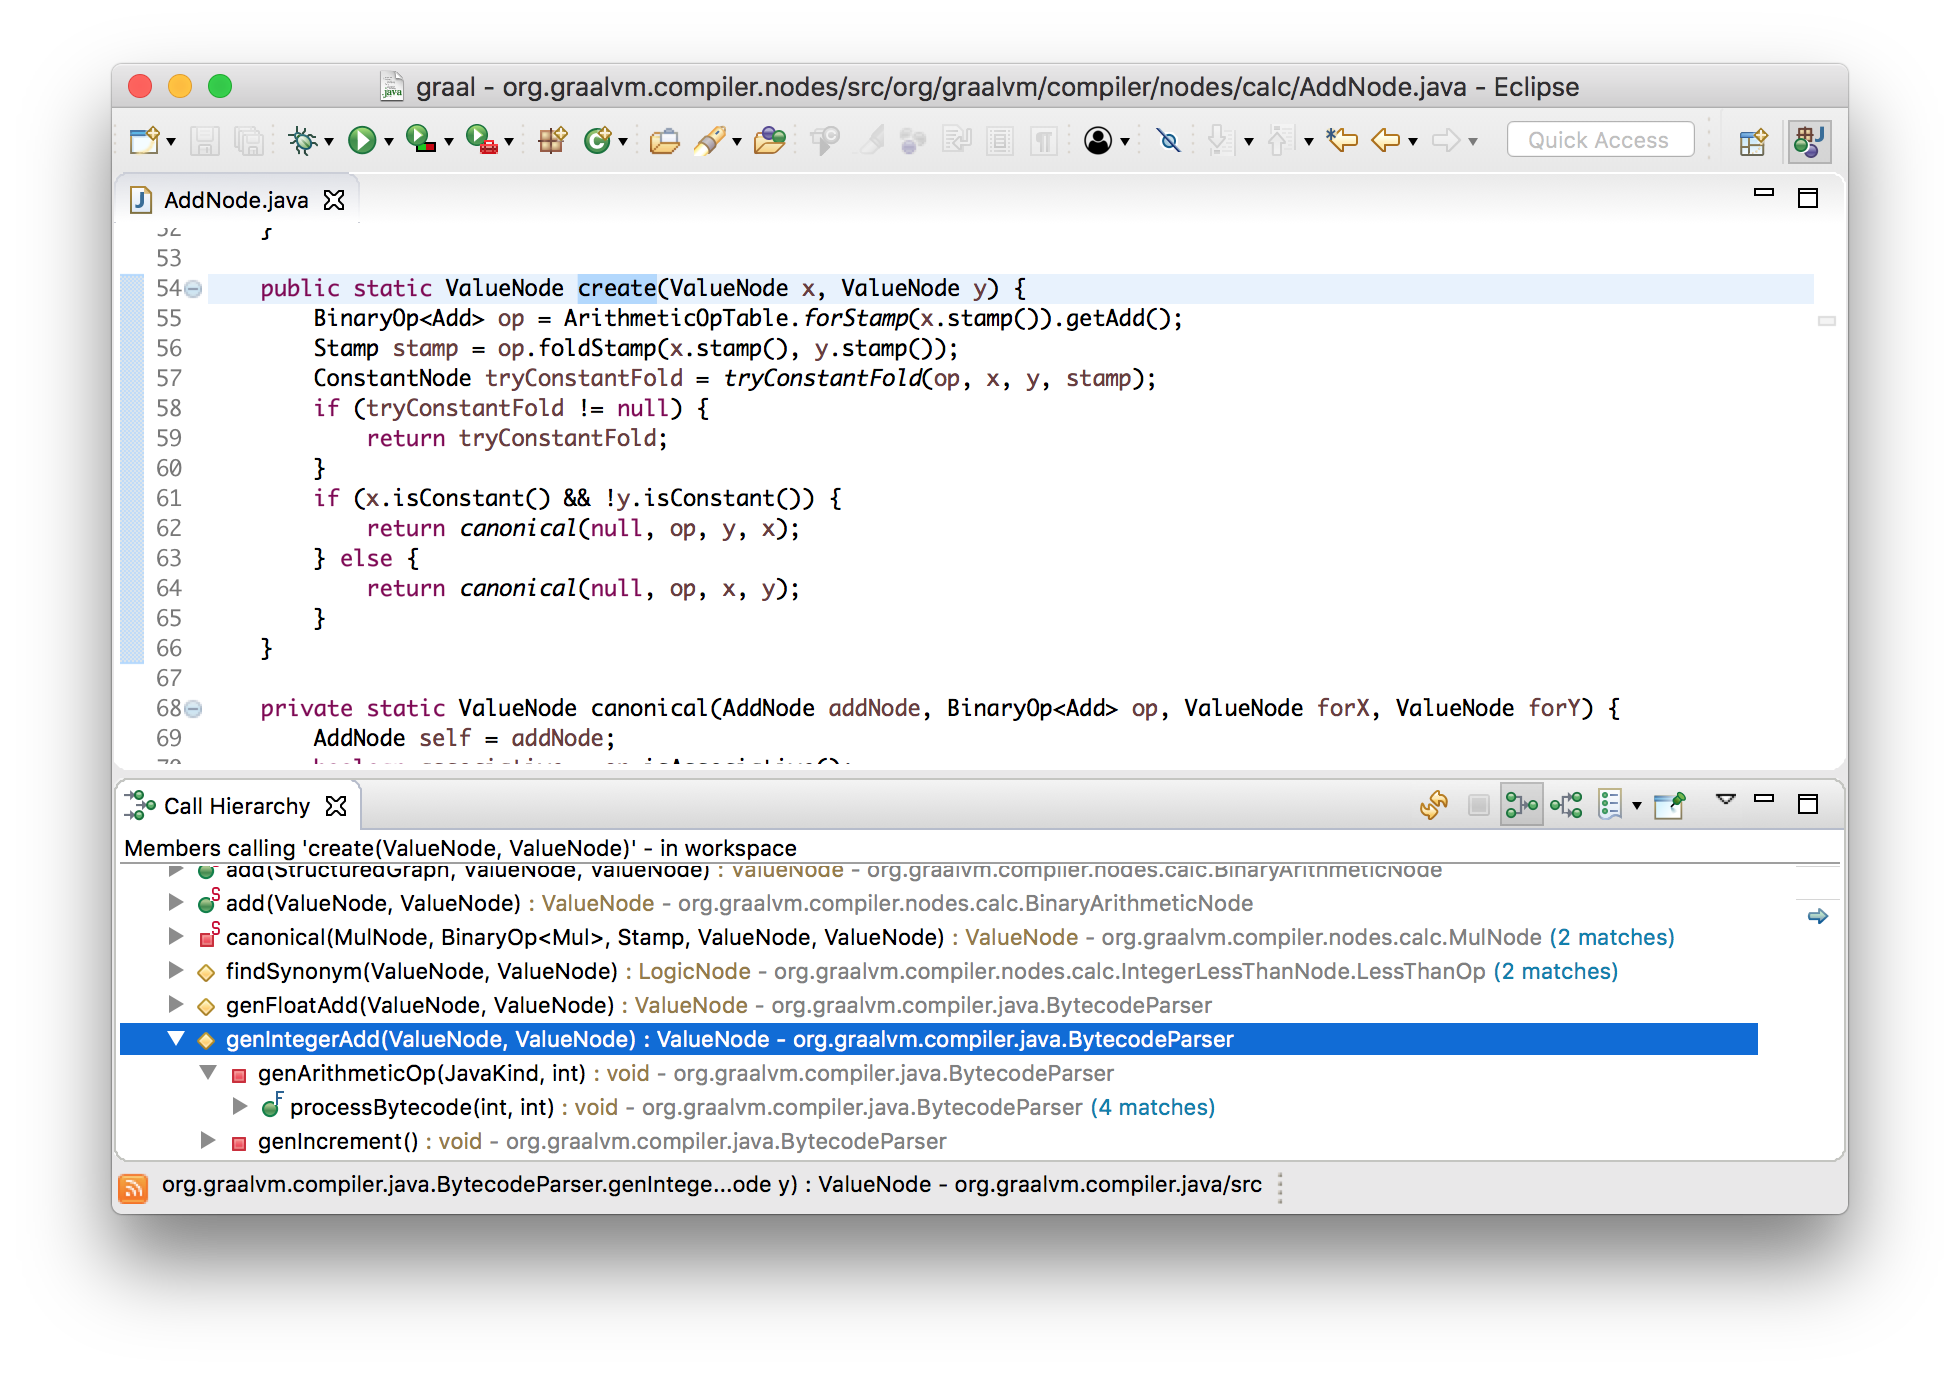
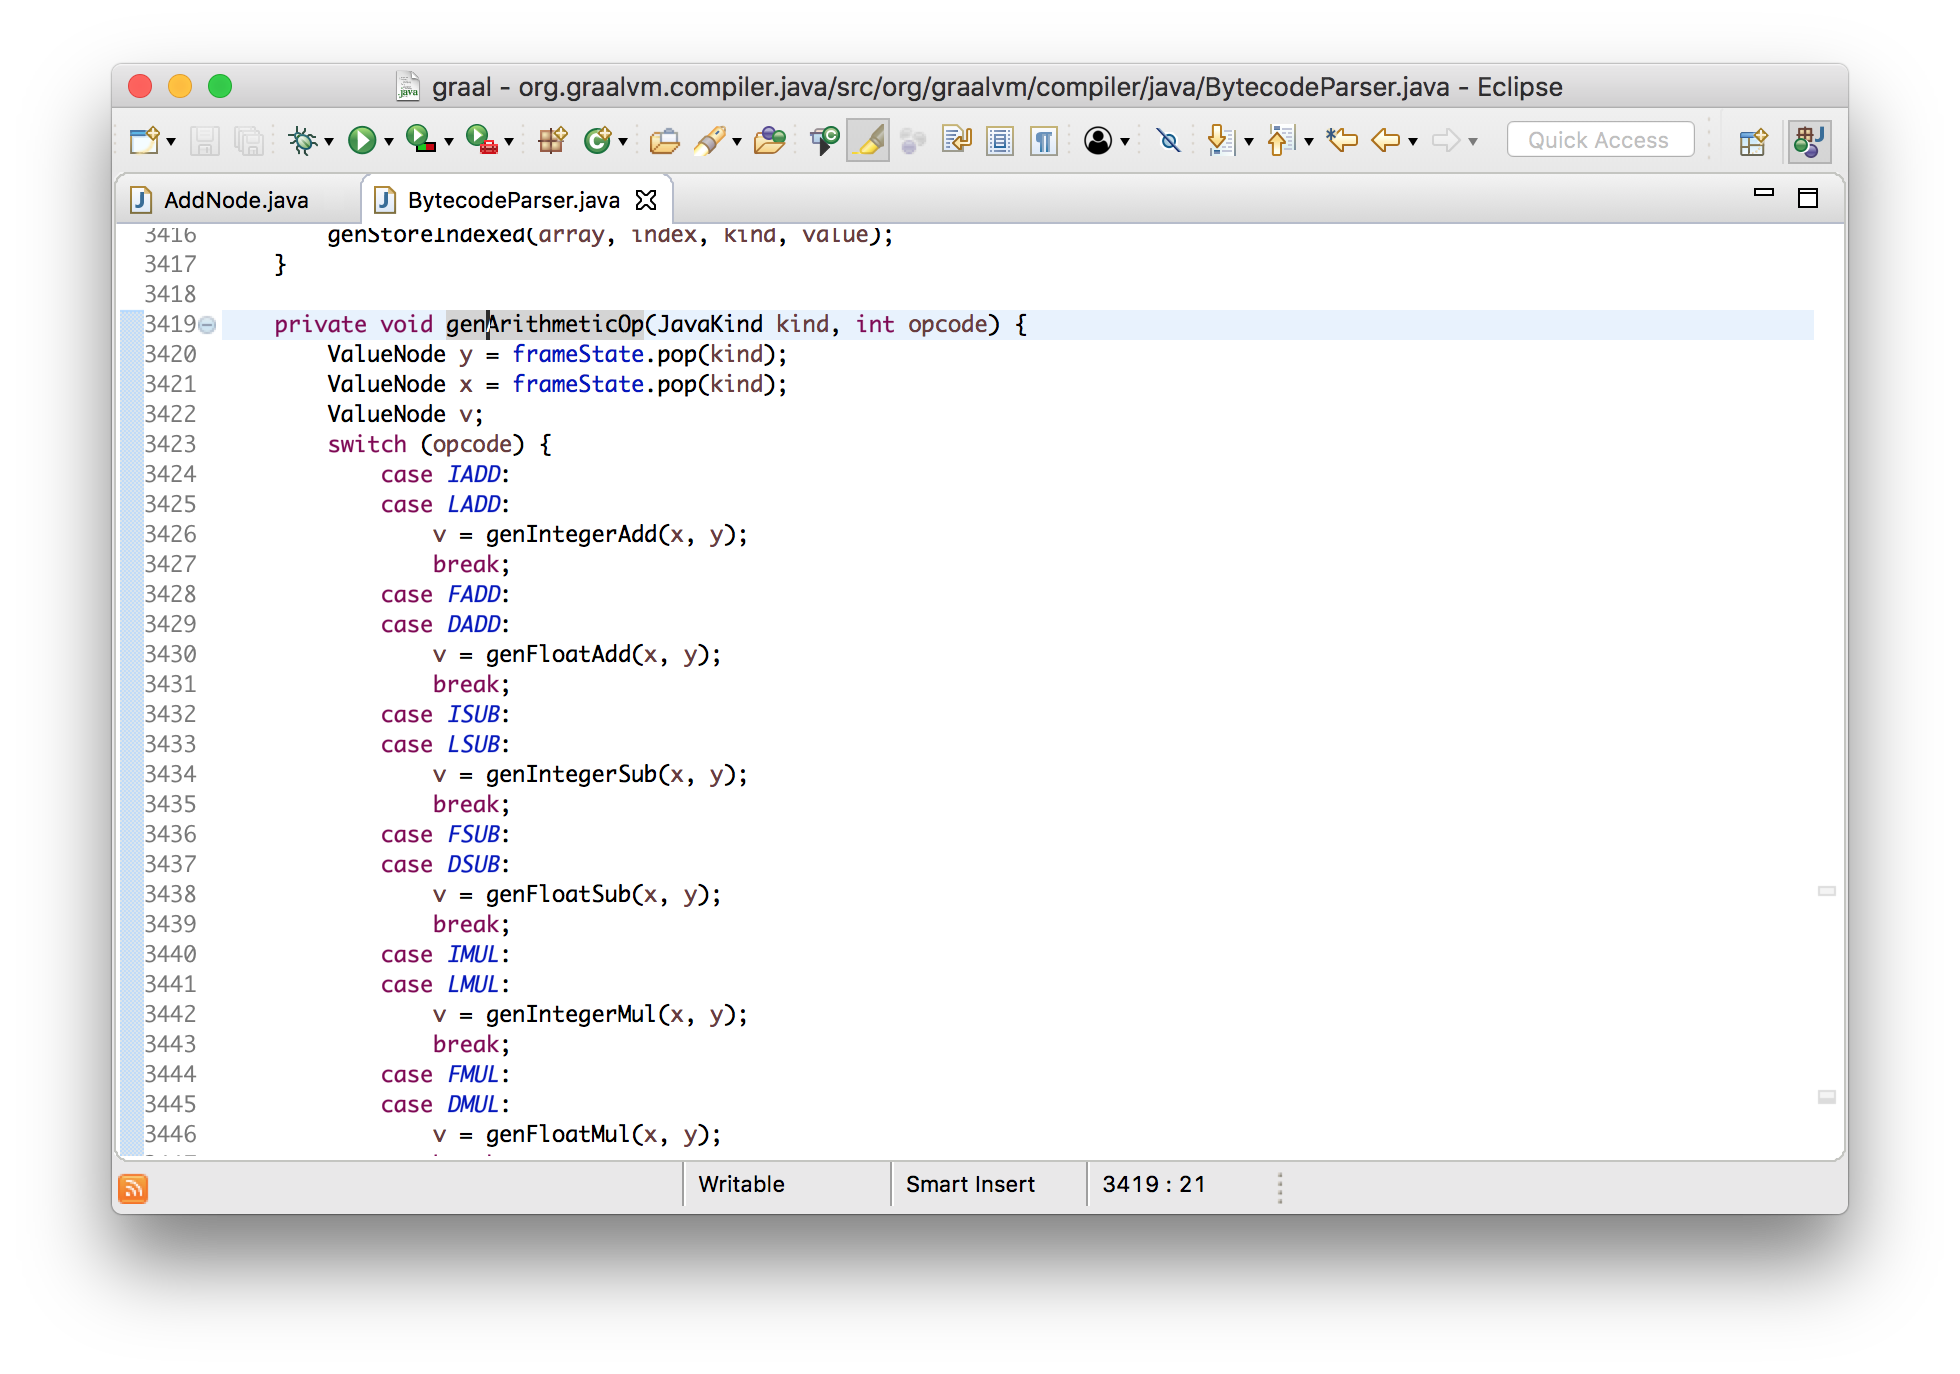
It can be seen that they are created by the bytecode parser, and this led us to the processing code IADD( 96which we saw in the printed input array).
privatevoidgenArithmeticOp(JavaKind kind, int opcode){
    ValueNode y = frameState.pop(kind);
    ValueNode x = frameState.pop(kind);
    ValueNode v;
    switch (opcode) {
        ...
        case LADD:
            v = genIntegerAdd(x, y);
            break;
        ...
    }
    frameState.push(kind, append(v));
}
I have said above that this is an abstract interpretation, since All this is very similar to the bytecode interpreter. If this were a real JVM interpreter, then he would have removed two values from the stack, performed addition, and put the result back. In this case, we remove two nodes from the stack, which, when the program is started, will be a calculation, add, representing the result of summation, a new node for addition, and place it on the stack.
Thus is built the graph Graal.
Getting the machine code
To convert a Graal graph into machine code, you need to generate bytes for all its nodes. This is done separately for each node by calling its method generate.
voidgenerate(Generator gen){
    gen.emitAdd(a, b);
}
Again, here we work at a very high level of abstraction. We have a class with which we issue machine code instructions without going into details of how it works.
The details are emitAddsomewhat complex and abstract, for the reason that arithmetic operators require coding for many different combinations of operands, but they can also share most of their code. Therefore, I will simplify the program a little more.
intworkload(int a){
  return a + 1;
}
In this case, the increment instruction will be used, and I will show how it looks in an assembler.
voidincl(Register dst){
    int encode = prefixAndEncode(dst.encoding);
    emitByte(0xFF);
    emitByte(0xC0 | encode);
}
voidemitByte(int b){
    data.put((byte) (b & 0xFF));
}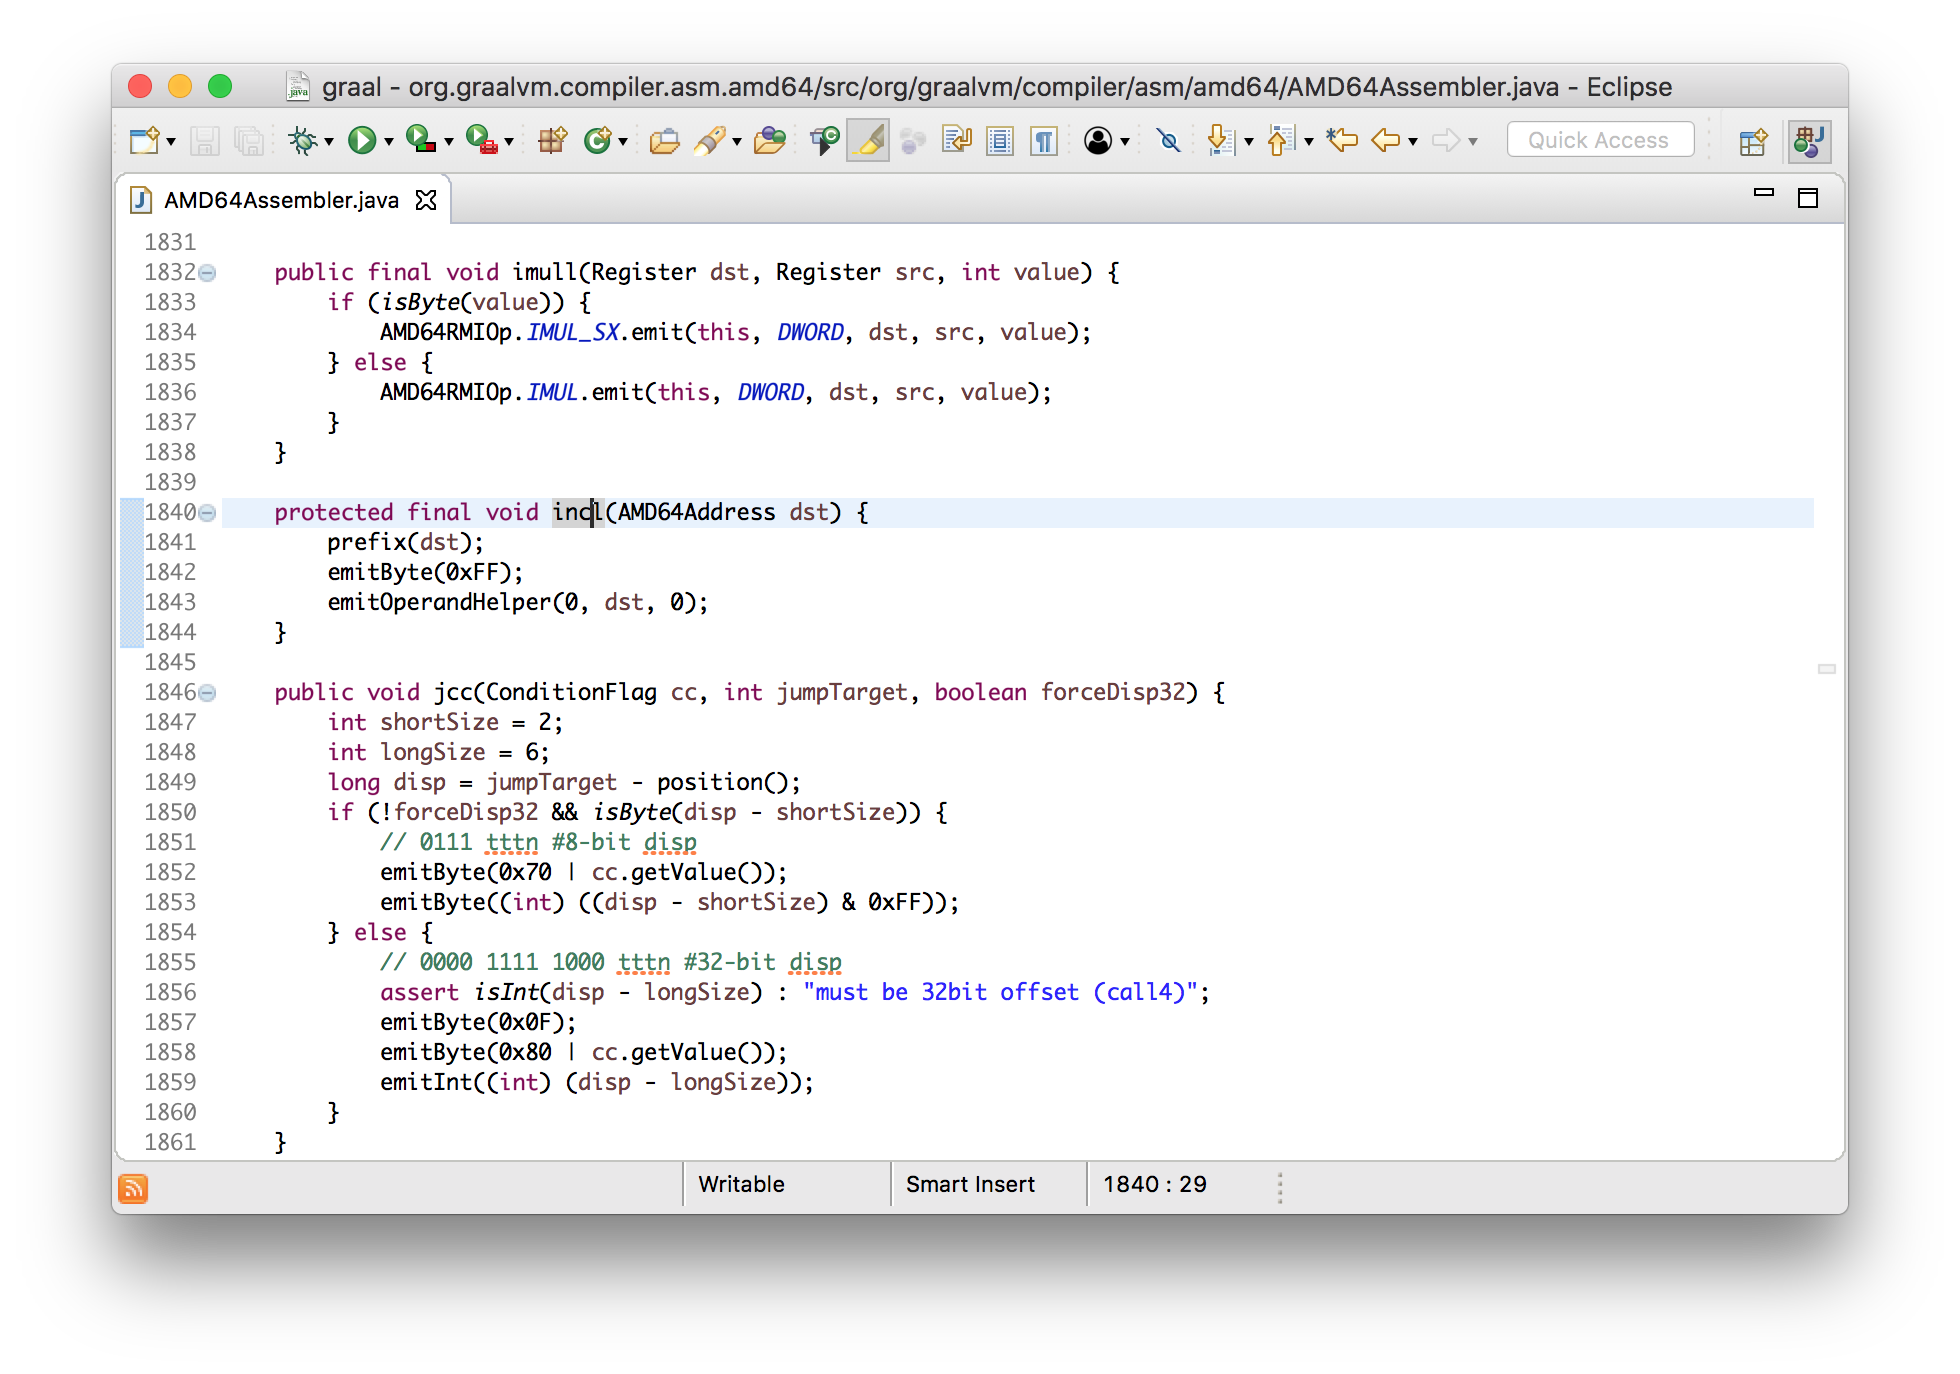
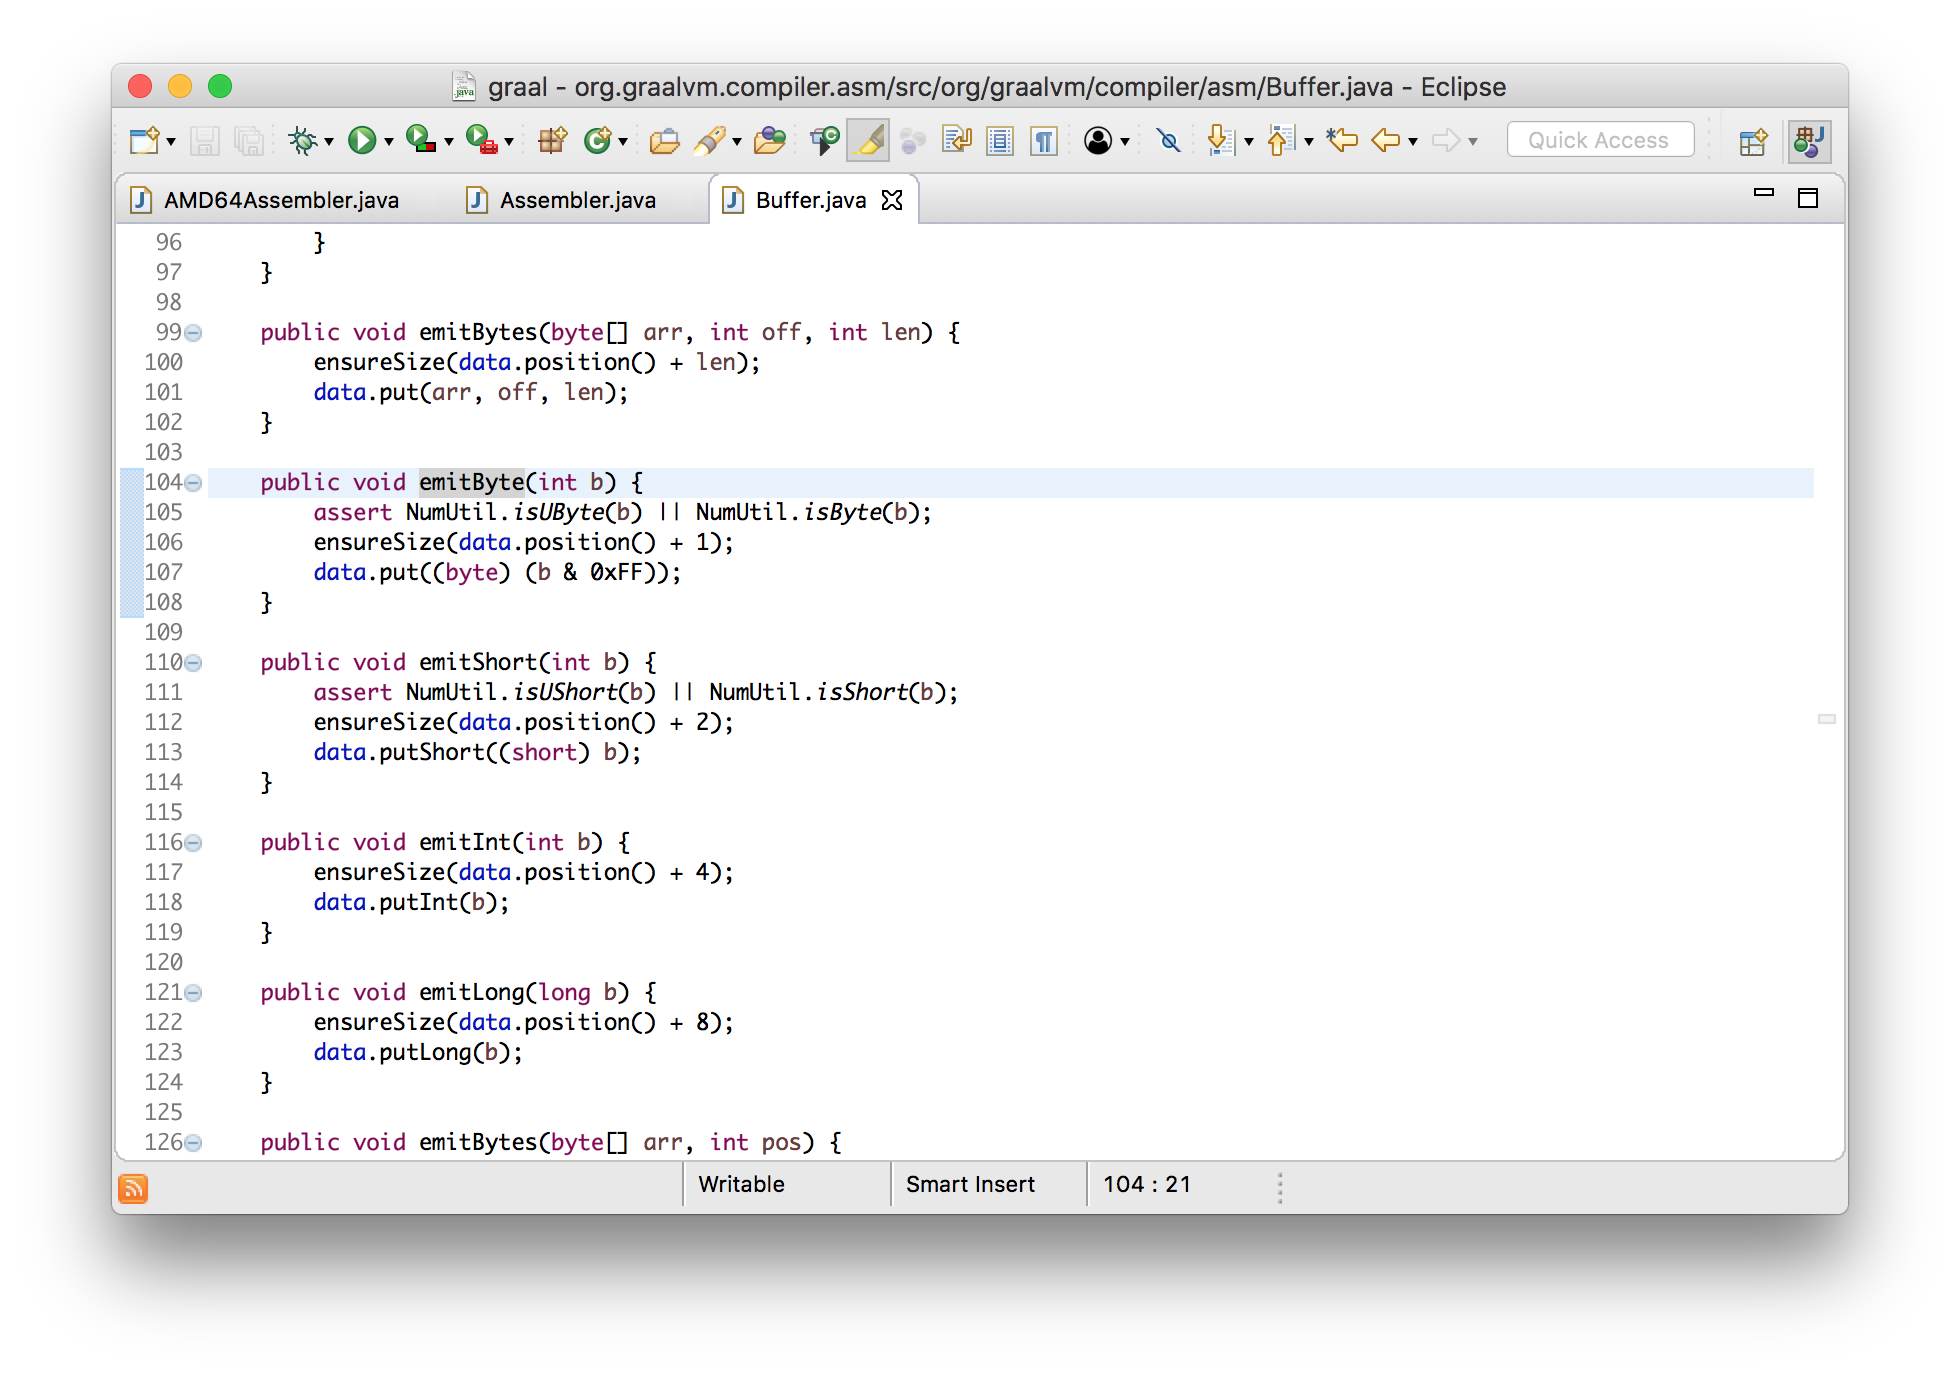
You can see that the result is the bytes that are added to the standard ByteBuffer- just the creation of an array of bytes.
Machine output code
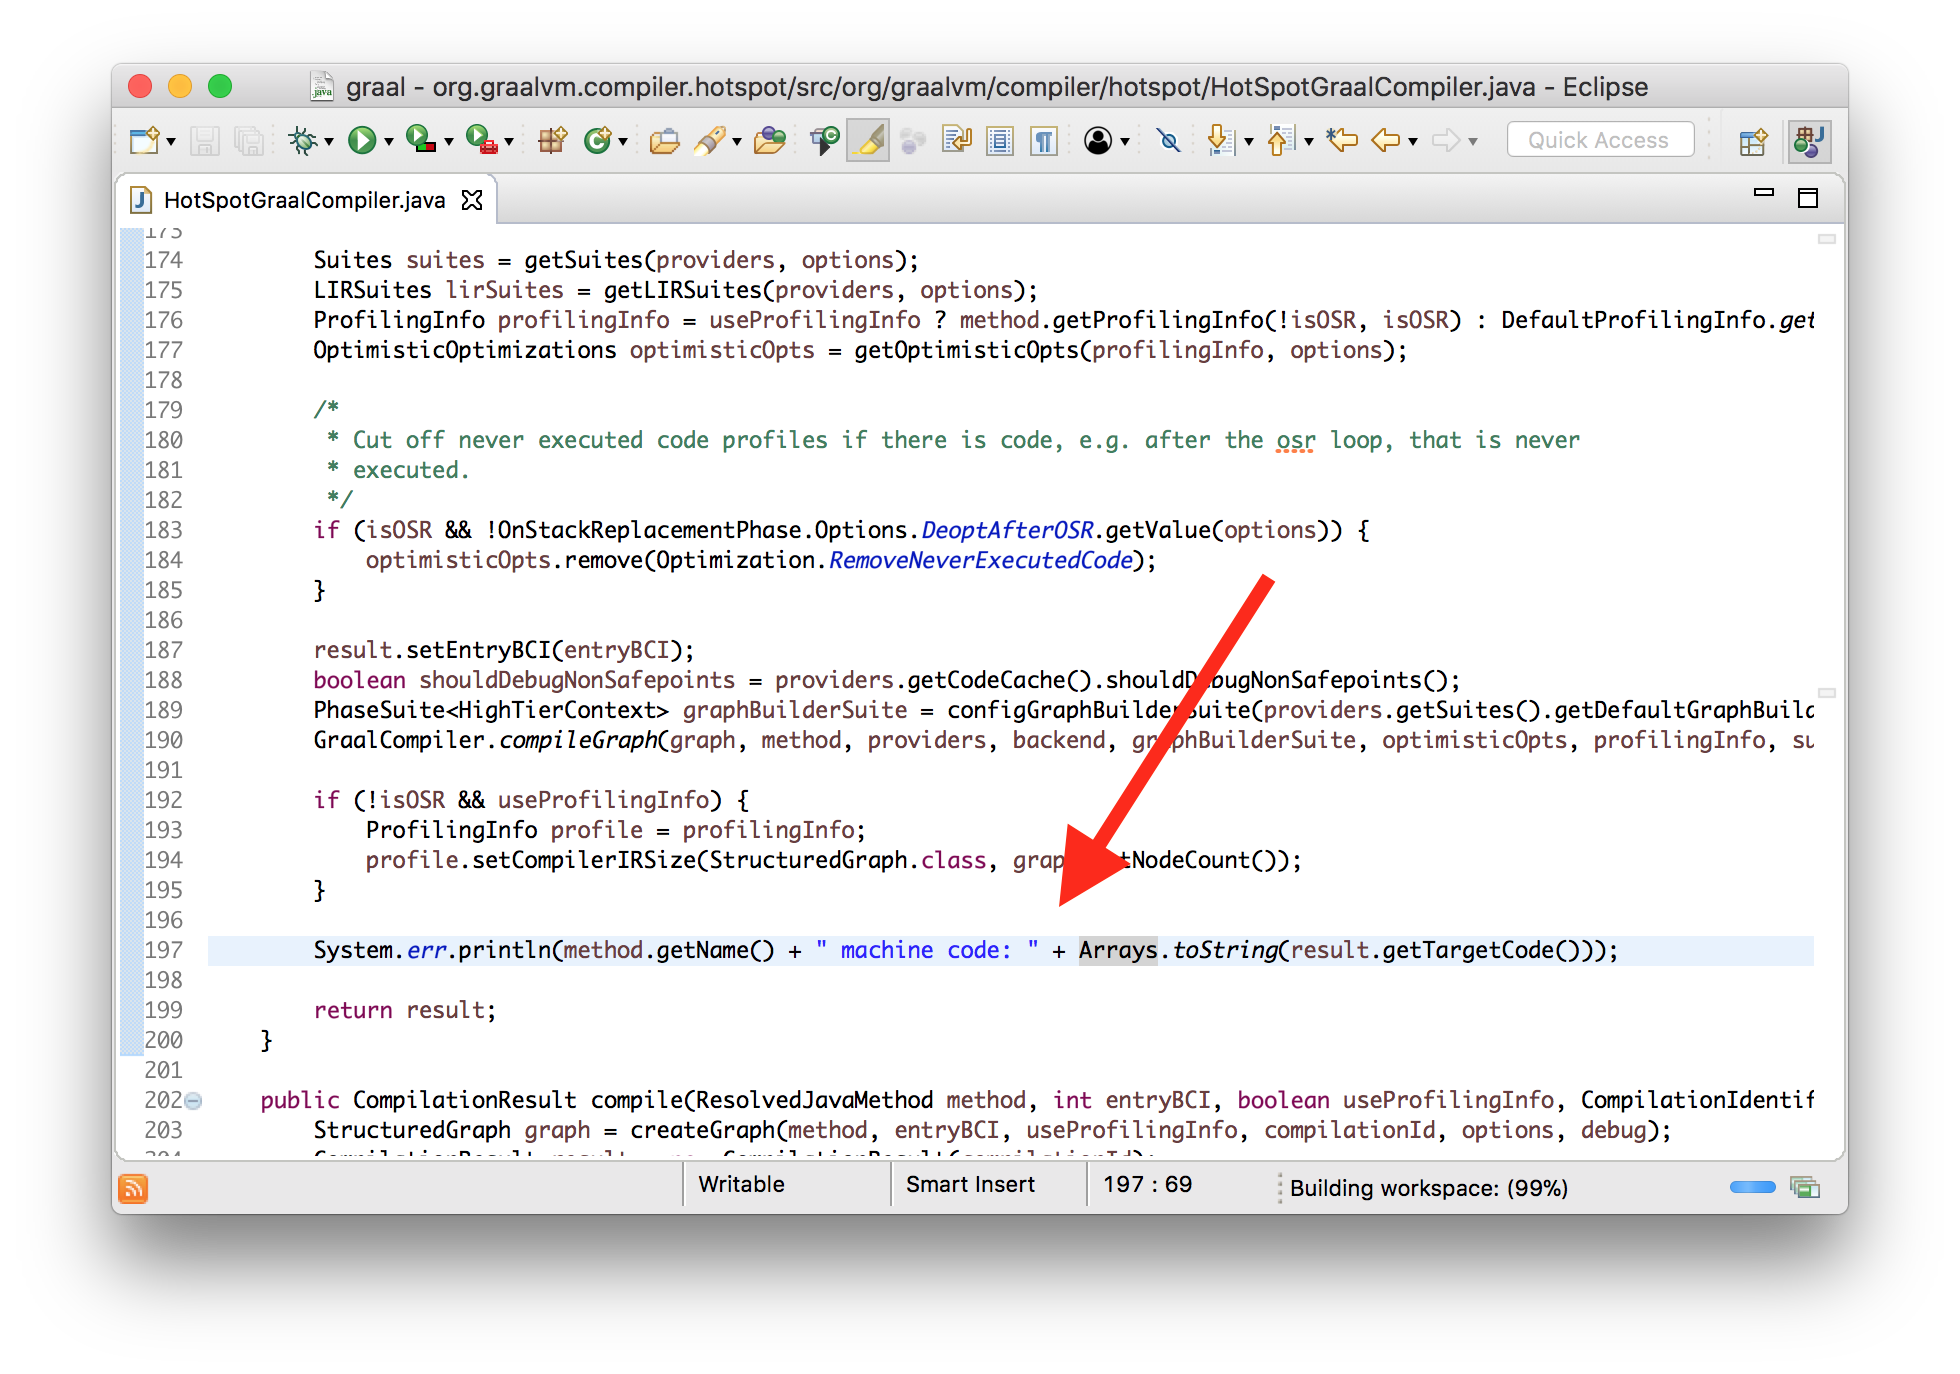
Let's look at the output machine code as we previously did with the input bytecode - we will add a printout of bytes in the place of its installation.
classHotSpotGraalCompilerimplementsJVMCICompiler{
  CompilationResult compileHelper(...){
    ...
    System.err.println(method.getName() + " machine code: "
      + Arrays.toString(result.getTargetCode()));
    ...
  }
}
I will also use the tool that disassembles the machine code when it is installed. This is the standard HotSpot tool. I'll show you how to assemble it. It is in the OpenJDK repository, but, by default, is not included in the JVM distribution, so we need to build it ourselves.
$ cd openjdk/hotspot/src/share/tools/hsdis
$ curl -O http://ftp.heanet.ie/mirrors/gnu/binutils/binutils-2.24.tar.gz
$ tar -xzf binutils-2.24.tar.gz
$ make BINUTILS=binutils-2.24ARCH=amd64 CFLAGS=-Wno-error
$ cp build/macosx-amd64/hsdis-amd64.dylib ../../../../../..
I will also add two new flags: -XX:+UnlockDiagnosticVMOptionsand -XX:+PrintAssembly.
$ java \ --module-path=graal/sdk/mxbuild/modules/org.graalvm.graal_sdk.jar:graal/truffle/mxbuild/modules/com.oracle.truffle.truffle_api.jar \ --upgrade-module-path=graal/compiler/mxbuild/modules/jdk.internal.vm.compiler.jar \ -XX:+UnlockExperimentalVMOptions \ -XX:+EnableJVMCI \ -XX:+UseJVMCICompiler \ -XX:-TieredCompilation \ -XX:+PrintCompilation \ -XX:+UnlockDiagnosticVMOptions \ -XX:+PrintAssembly \ -XX:CompileOnly=Demo::workload \ DemoNow we can run our example and see the output of instructions for our addition.
workload machine code: [15, 31, 68, 0, 0, 3, -14, -117, -58, -123, 5, ...]
...
0x000000010f71cda0: nopl   0x0(%rax,%rax,1)
0x000000010f71cda5: add    %edx,%esi          ;\*iadd {reexecute=0 rethrow=0 return_oop=0}
                                              ; - Demo::workload@2 (line 10)
0x000000010f71cda7: mov    %esi,%eax          ;\*ireturn {reexecute=0 rethrow=0 return_oop=0}
                                              ; - Demo::workload@3 (line 10)
0x000000010f71cda9: test   %eax,-0xcba8da9(%rip)        # 0x0000000102b74006
                                              ;   {poll_return}0x000000010f71cdaf: vzeroupper
0x000000010f71cdb2: retq
Good. Let's check that we really control all this and turn summation into subtraction. I will change the generatesummation node method so that instead of the addition instruction, it will issue an instruction for subtraction.
classAddNode{
  voidgenerate(...){
    ... gen.emitSub(op1, op2, false) ...  // changed from emitAdd
  }
}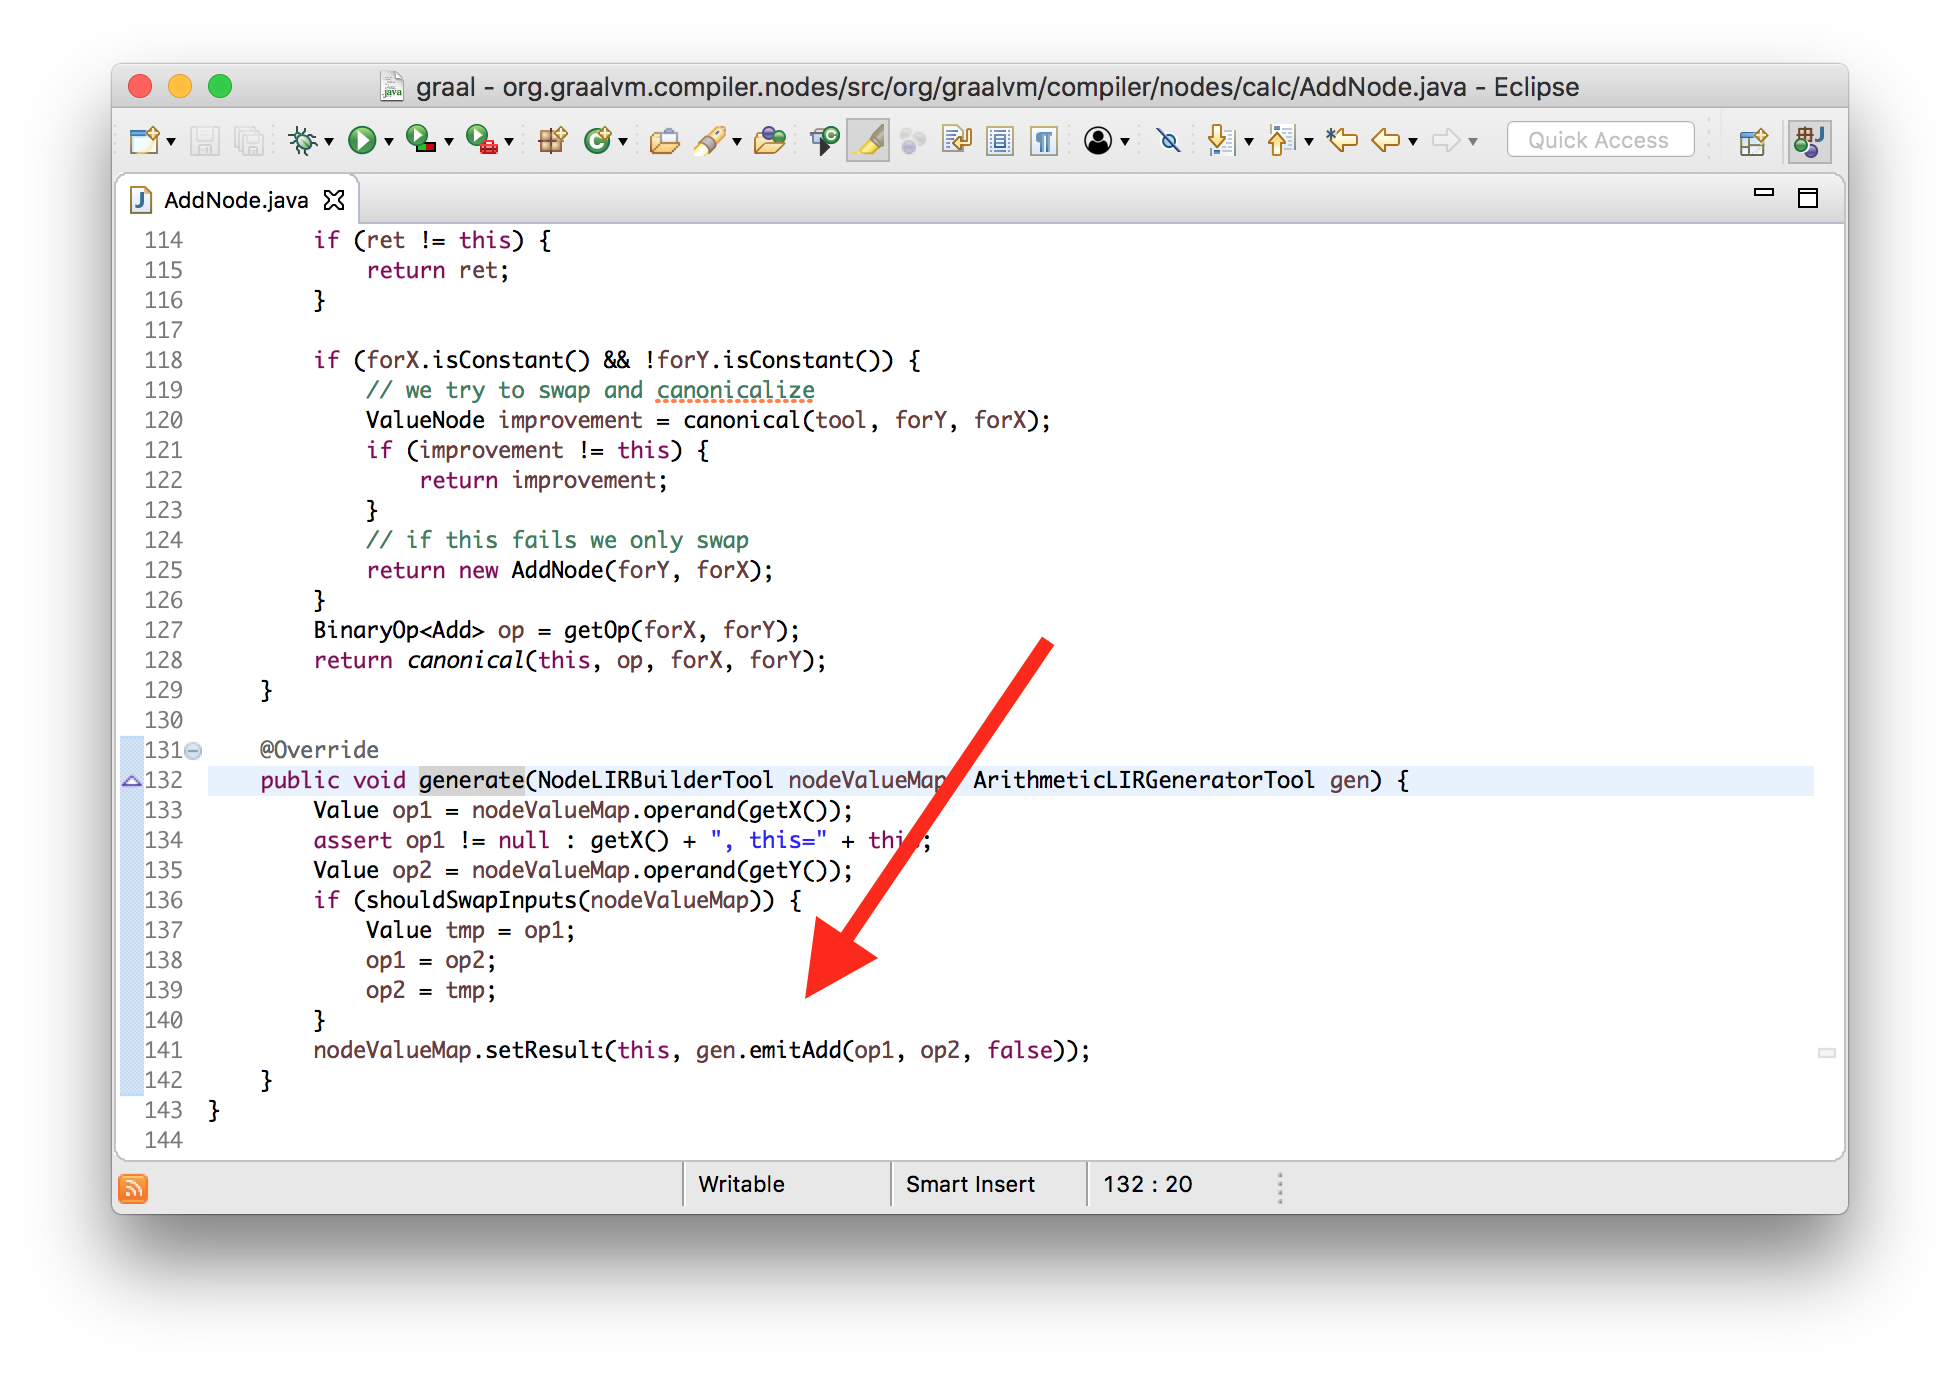
If we run this, we see that both bytes of the machine code have changed, and new instructions are printed.
workload mechine code: [15, 31, 68, 0, 0, 43, -14, -117, -58, -123, 5, ...]
0x0000000107f451a0: nopl   0x0(%rax,%rax,1)
0x0000000107f451a5: sub    %edx,%esi;\*iadd {reexecute=0 rethrow=0 return_oop=0}
                                              ; - Demo::workload@2 (line 10)
0x0000000107f451a7: mov    %esi,%eax          ;\*ireturn {reexecute=0 rethrow=0 return_oop=0}
                                              ; - Demo::workload@3 (line 10)
0x0000000107f451a9: test   %eax,-0x1db81a9(%rip)        # 0x000000010618d006
                                              ;   {poll_return}0x0000000107f451af: vzeroupper
0x0000000107f451b2: retq
So what have we learned? Graal simply takes an array of bytes bytecode; we can see how a node graph is created from it; we can see how the nodes issue instructions; and how they are encoded. We have seen that we can make changes to the Graal itself.
[26, 27, 96, -84] → [15, 31, 68, 0, 0, 43, -14, -117, -58, -123, 5, ...]Optimization
And so, we looked at how the graph is built, and how the nodes of the graph are converted into machine code. Now let's talk about how Graal optimizes the graph, making it more efficient.
The optimization phase is simply a method that has the ability to modify the graph. Phases are created using an interface implementation.
interfacePhase{
  voidrun(Graph graph);
}
Canonization (canonicalisation)
Canonicalization means reordering the nodes into a uniform representation. This technique has other tasks, but for the purposes of this talk, I’ll say that in reality this means rolling out constants ( constant folding ) and trimming the nodes.
Nodes themselves are responsible for their simplification - for this they have a method canonical.
interfaceNode{
  Node canonical();
}
Let us, for example, consider the negation operation node, which is a unary subtraction operator. The negation operation node will delete itself and its descendant if it is applied to another negation operation — only the value itself remains. This optimization will simplify -(-x)up x.
classNegateNodeimplementsNode{
  Node canonical(){
    if (value instanceof NegateNode) {
      return ((NegateNode) value).getValue();
    } else {
      returnthis;
    }
  }
}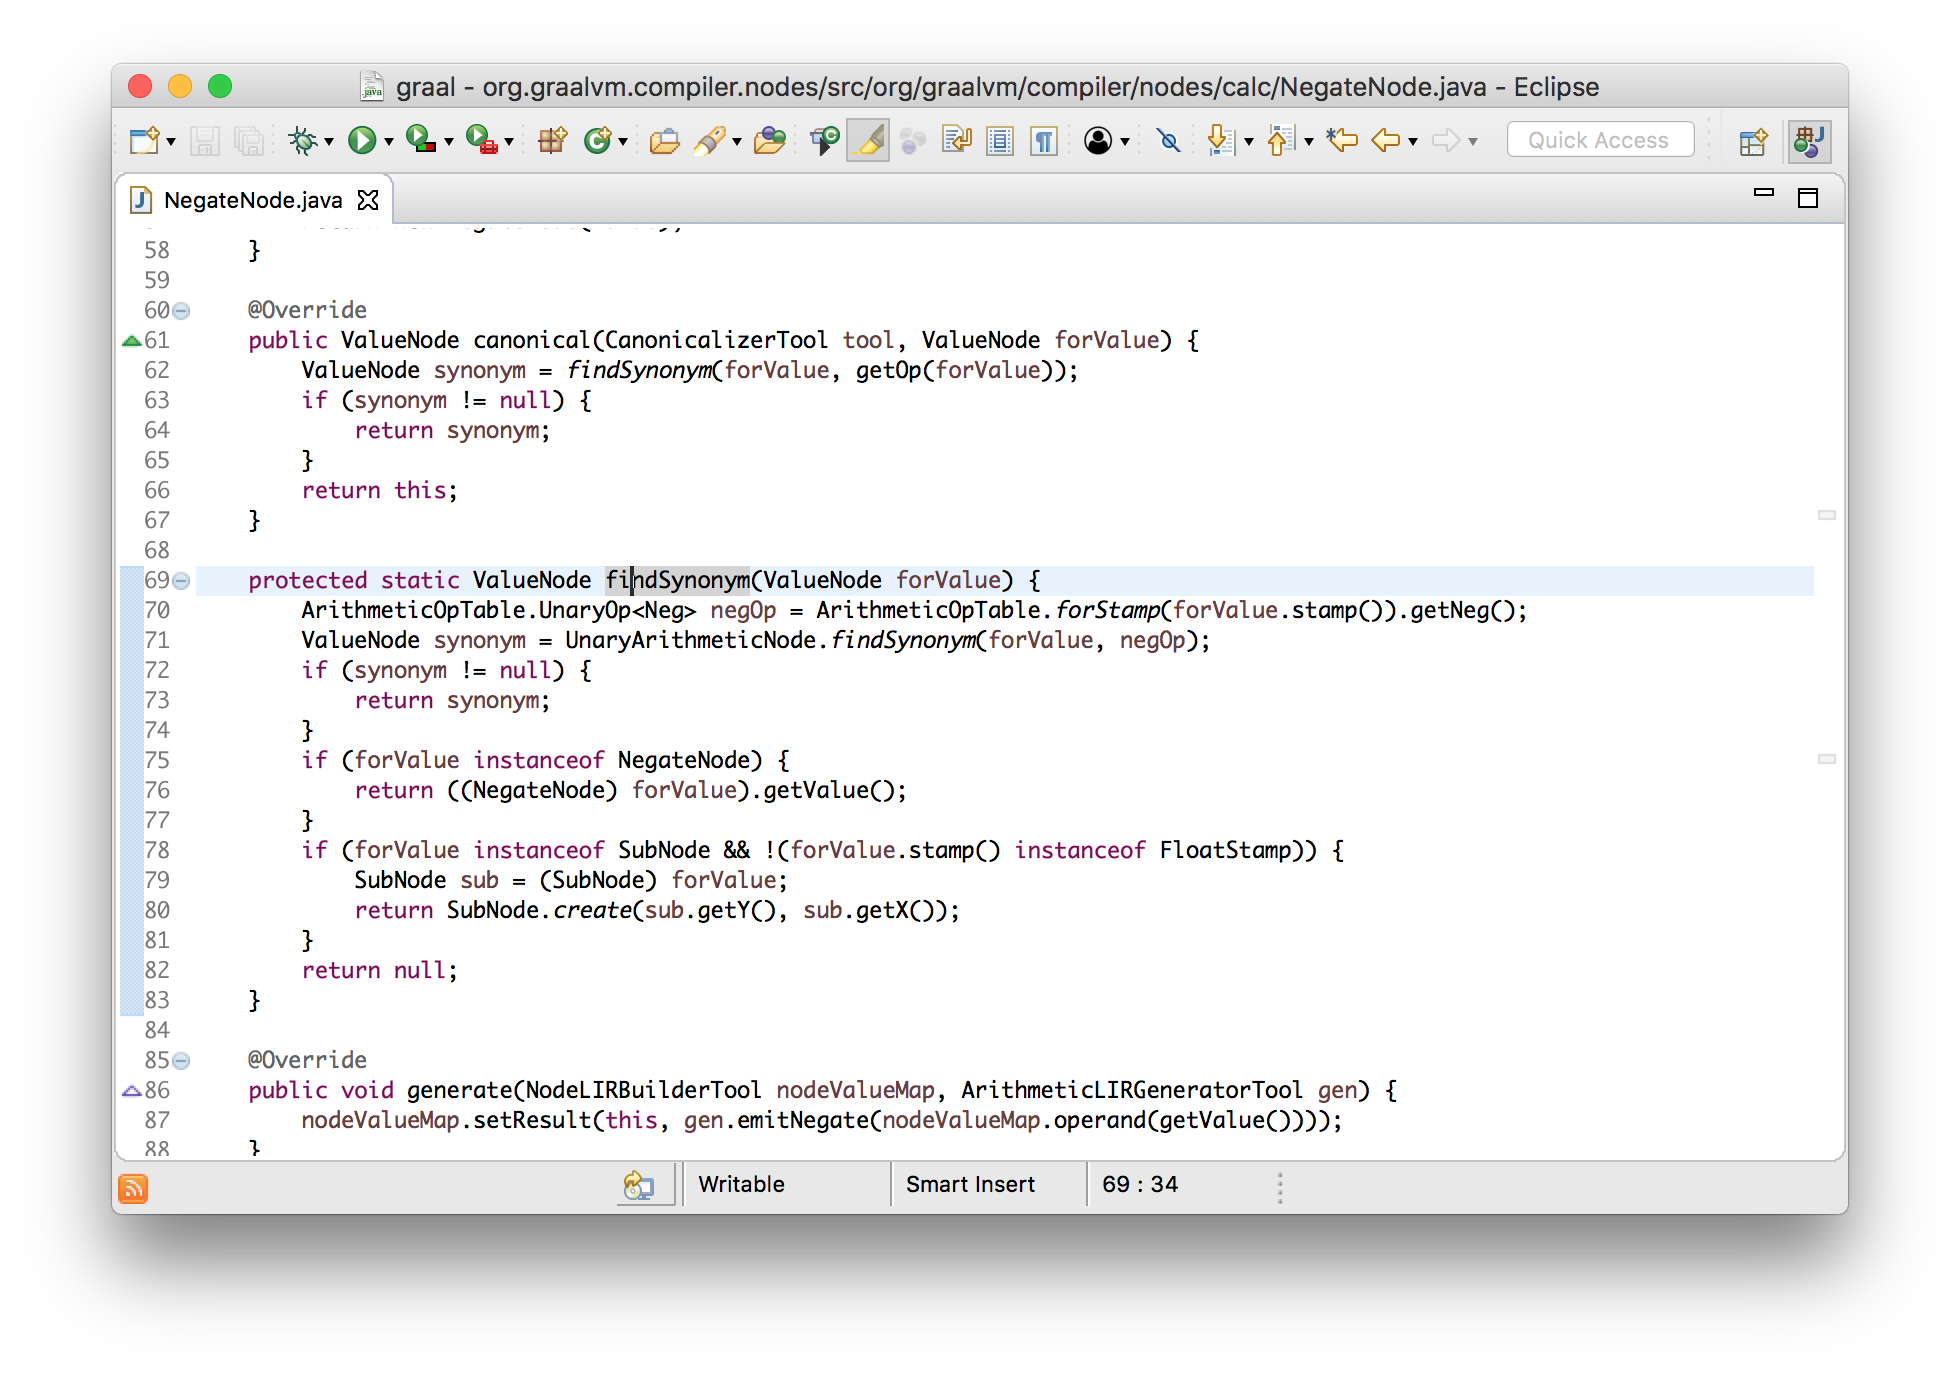
This is a really good example of how easy to understand Graal. In practice, this logic is as simple as possible.
If you have a good idea how to simplify an operation in Java, you can implement it in a method canonical.
Global value numbering
Global value numbering (GVN) is a technique for removing repetitive redundant code. In the example below, it a + bcan be calculated once, and the result reused.
intworkload(int a, int b){
  return (a + b) * (a + b);
}
Graal can compare nodes for equality. It's simple - they are equal if they have the same input values. In the GVN phase, the same nodes are searched for and replaced with a single copy. The effectiveness of this operation is achieved through the use of hash map in the form of a kind of node cache.
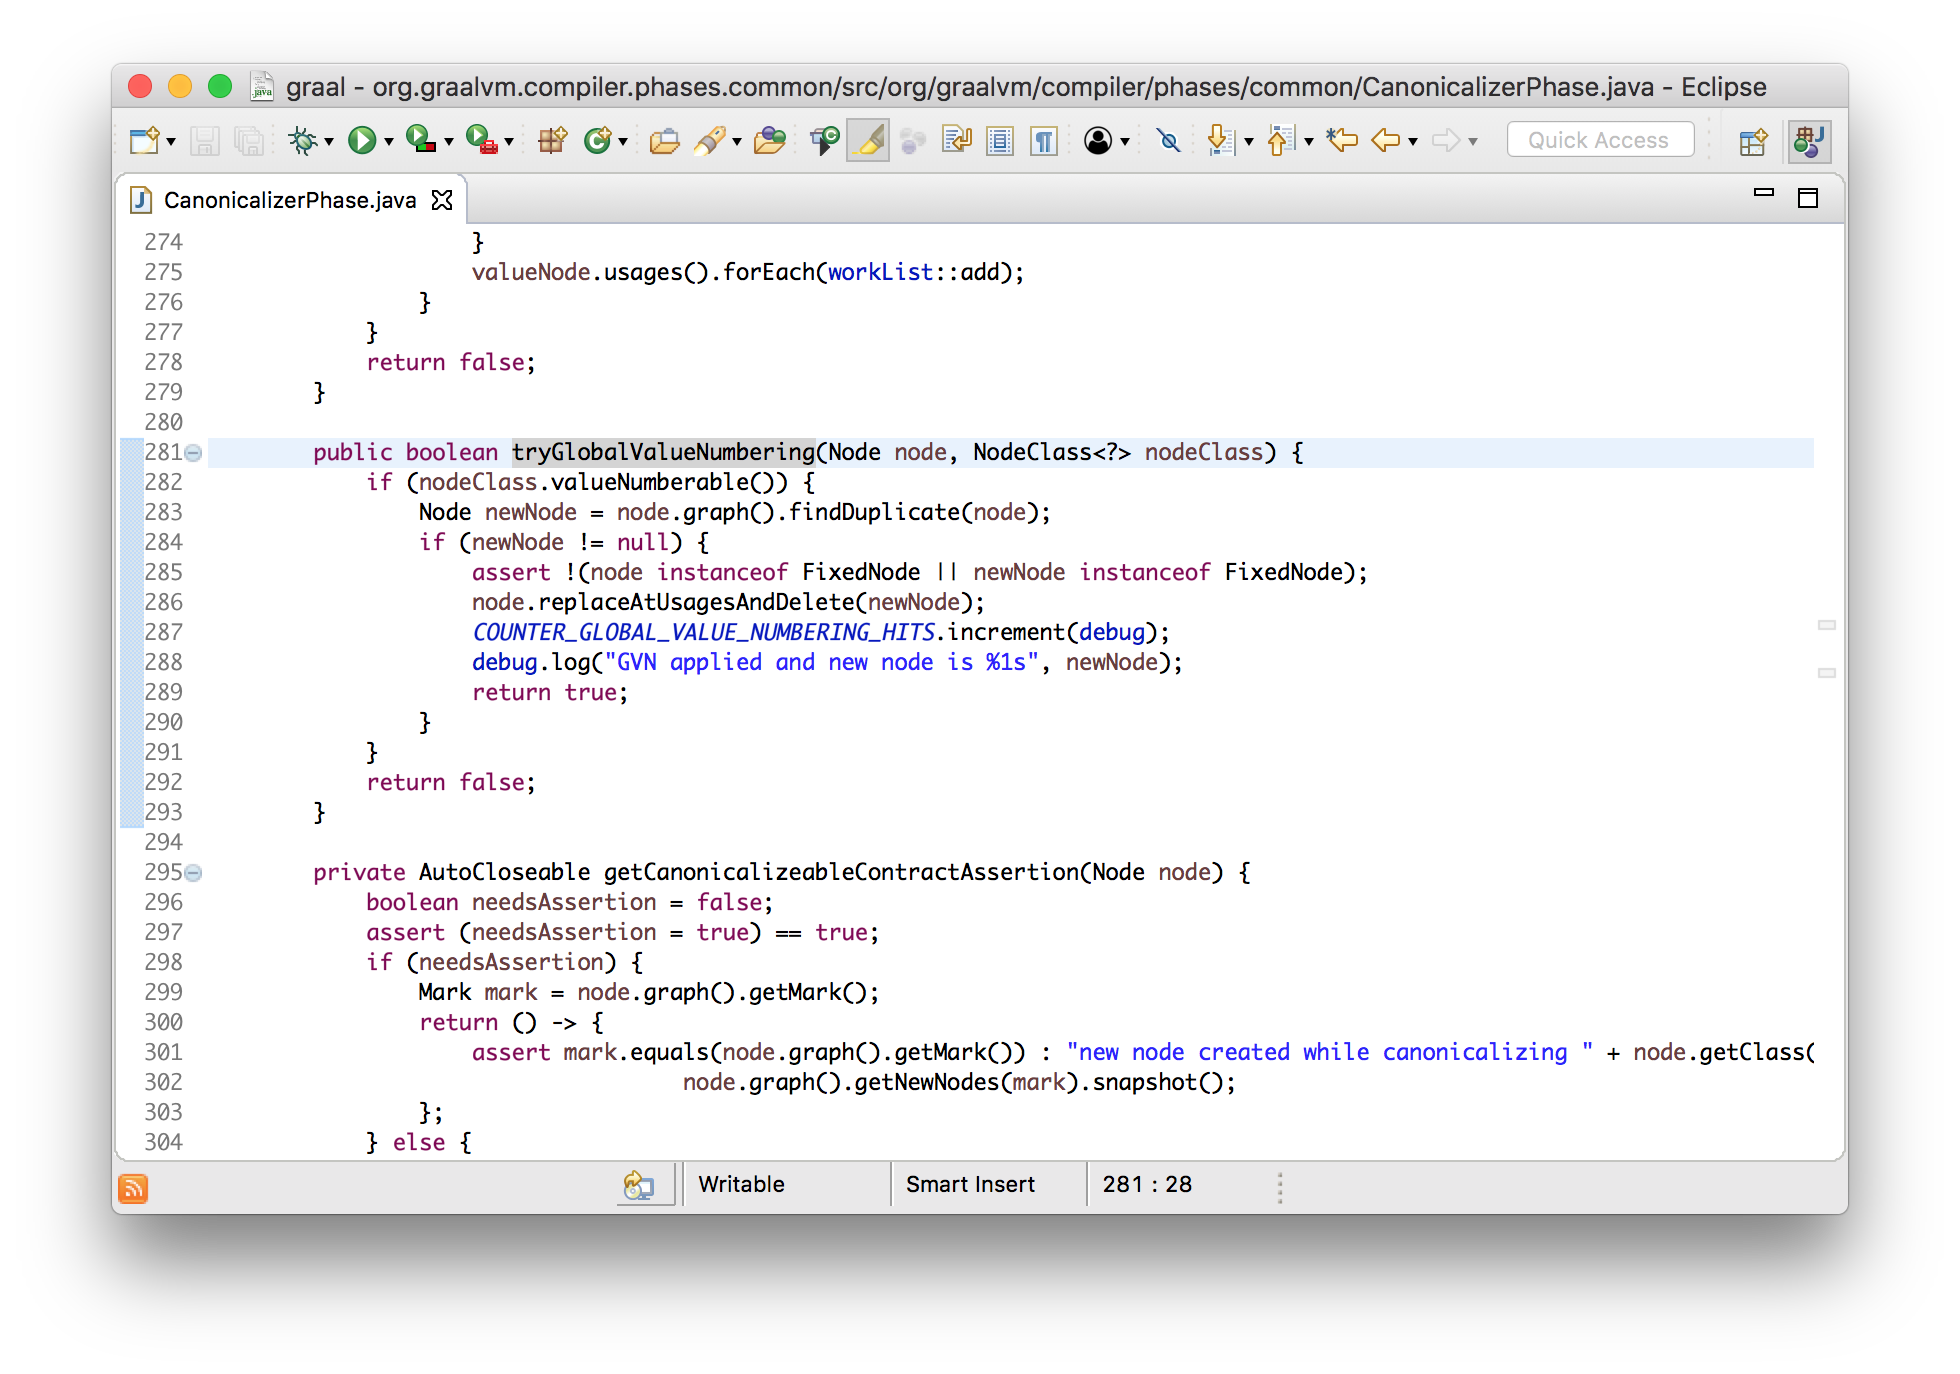
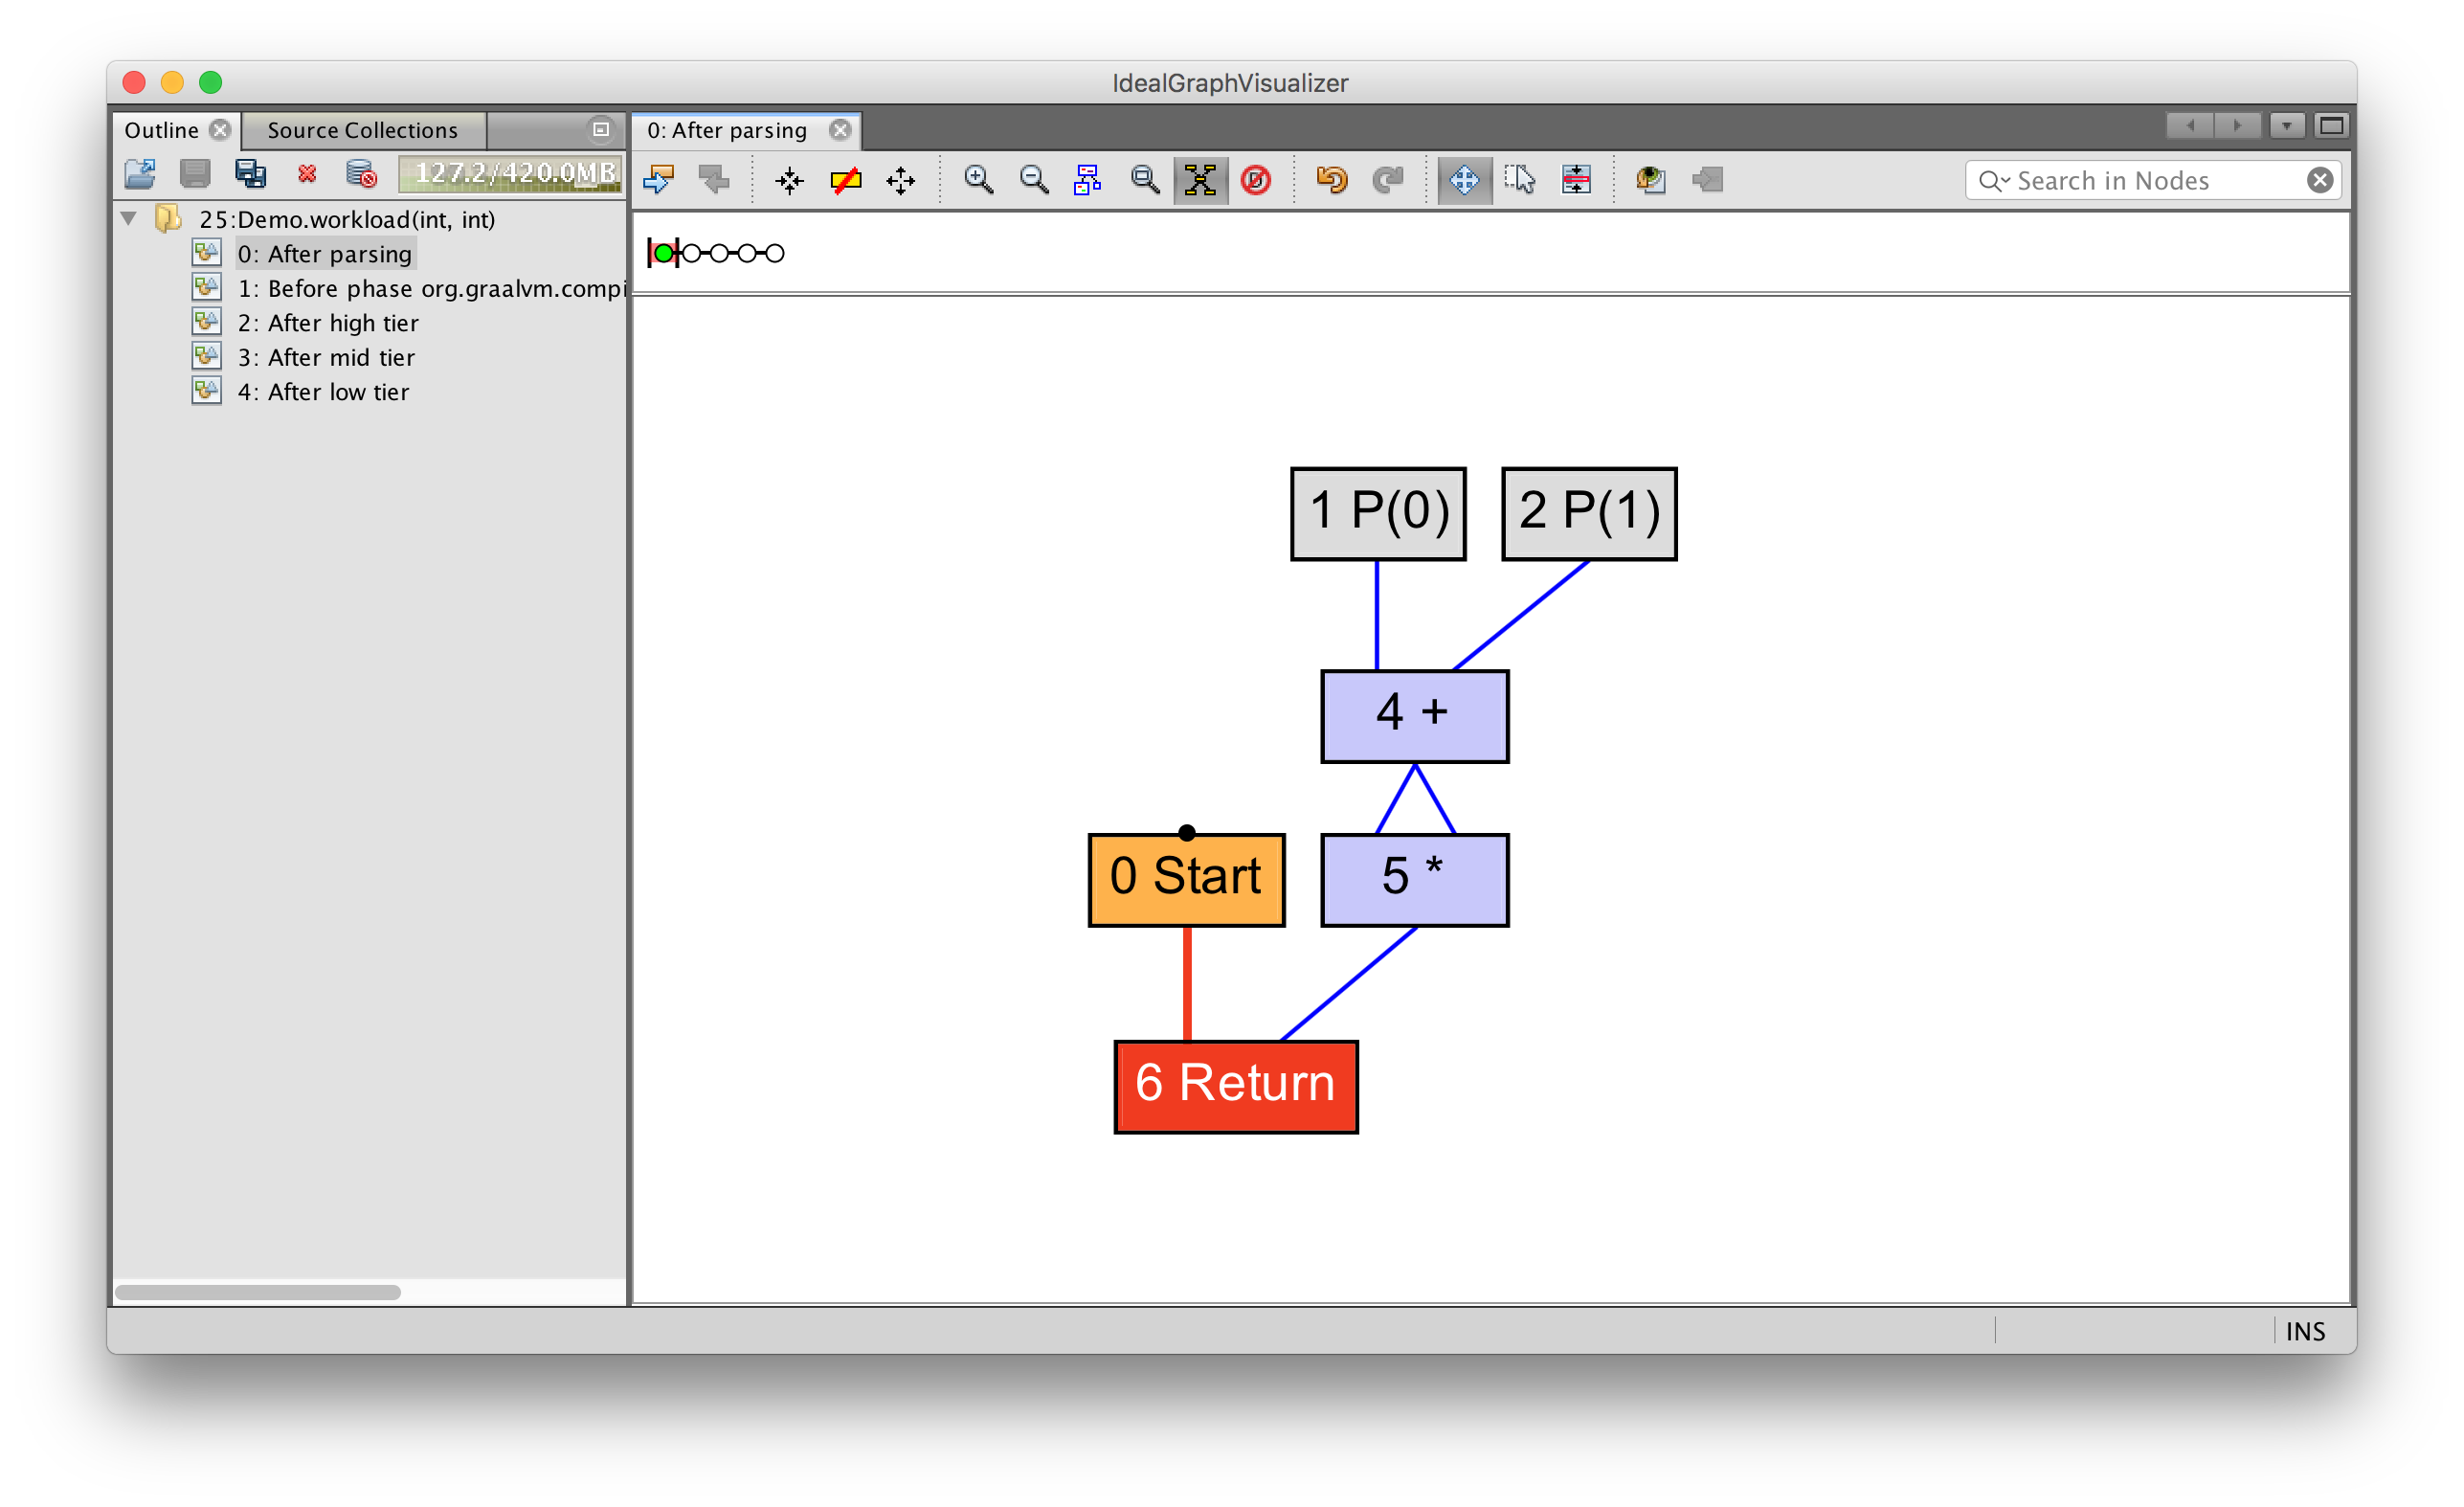
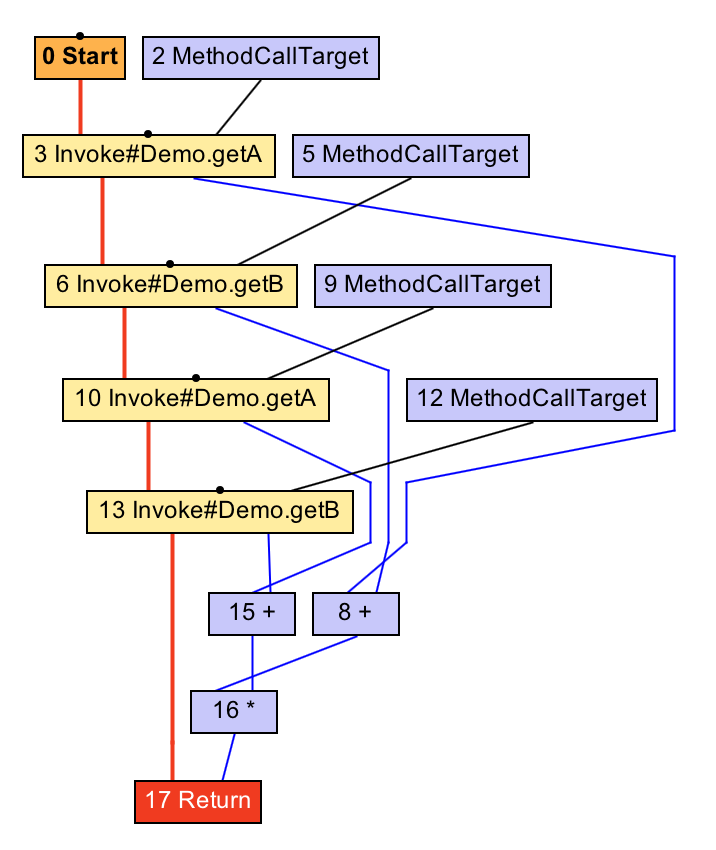
Notice the check that the node is not fixed - this means that it does not have a side effect that may occur at some point in time. If, instead, the method was called, the term would become fixed and non-redundant, and their merging into one would be impossible.
intworkload(){
  return (getA() + getB()) * (getA() + getB());
}
Enlargement of locks (lock coarsening)
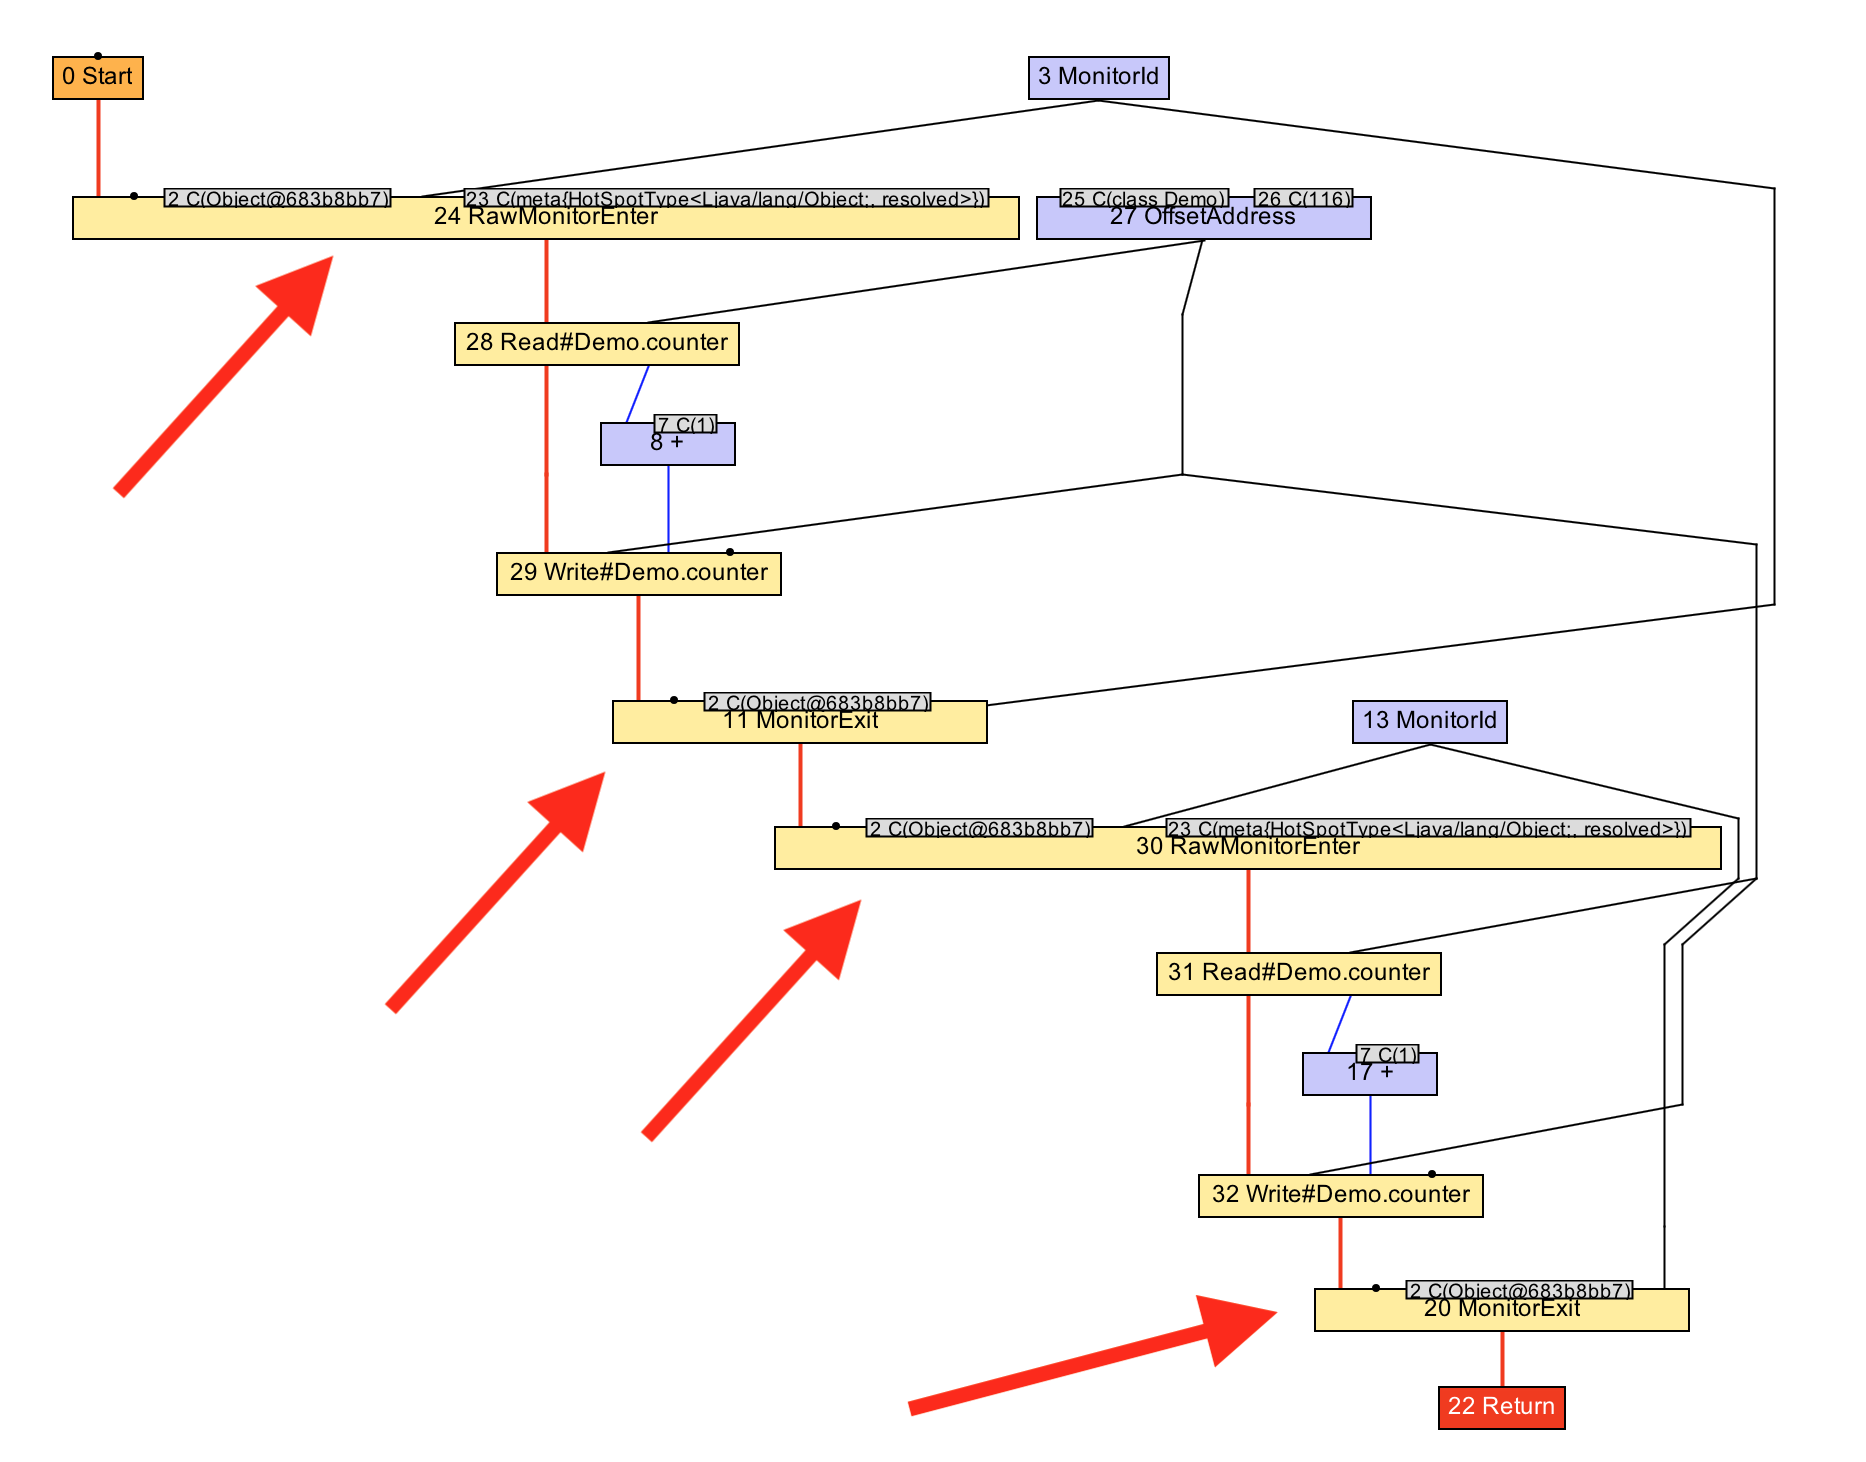
Let's look at a more complex example. Sometimes programmers write code that is synchronized twice in a row on the same monitor . It is possible that they did not write, but it was the result of other optimizations, such as inlining ( inlining ).
voidworkload(){
  synchronized (monitor) {
    counter++;
  }
  synchronized (monitor) {
    counter++;
  }
}
If you expand the structure, we will see what actually happens.
voidworkload(){
  monitor.enter();
  counter++;
  monitor.exit();
  monitor.enter();
  counter++;
  monitor.exit();
}
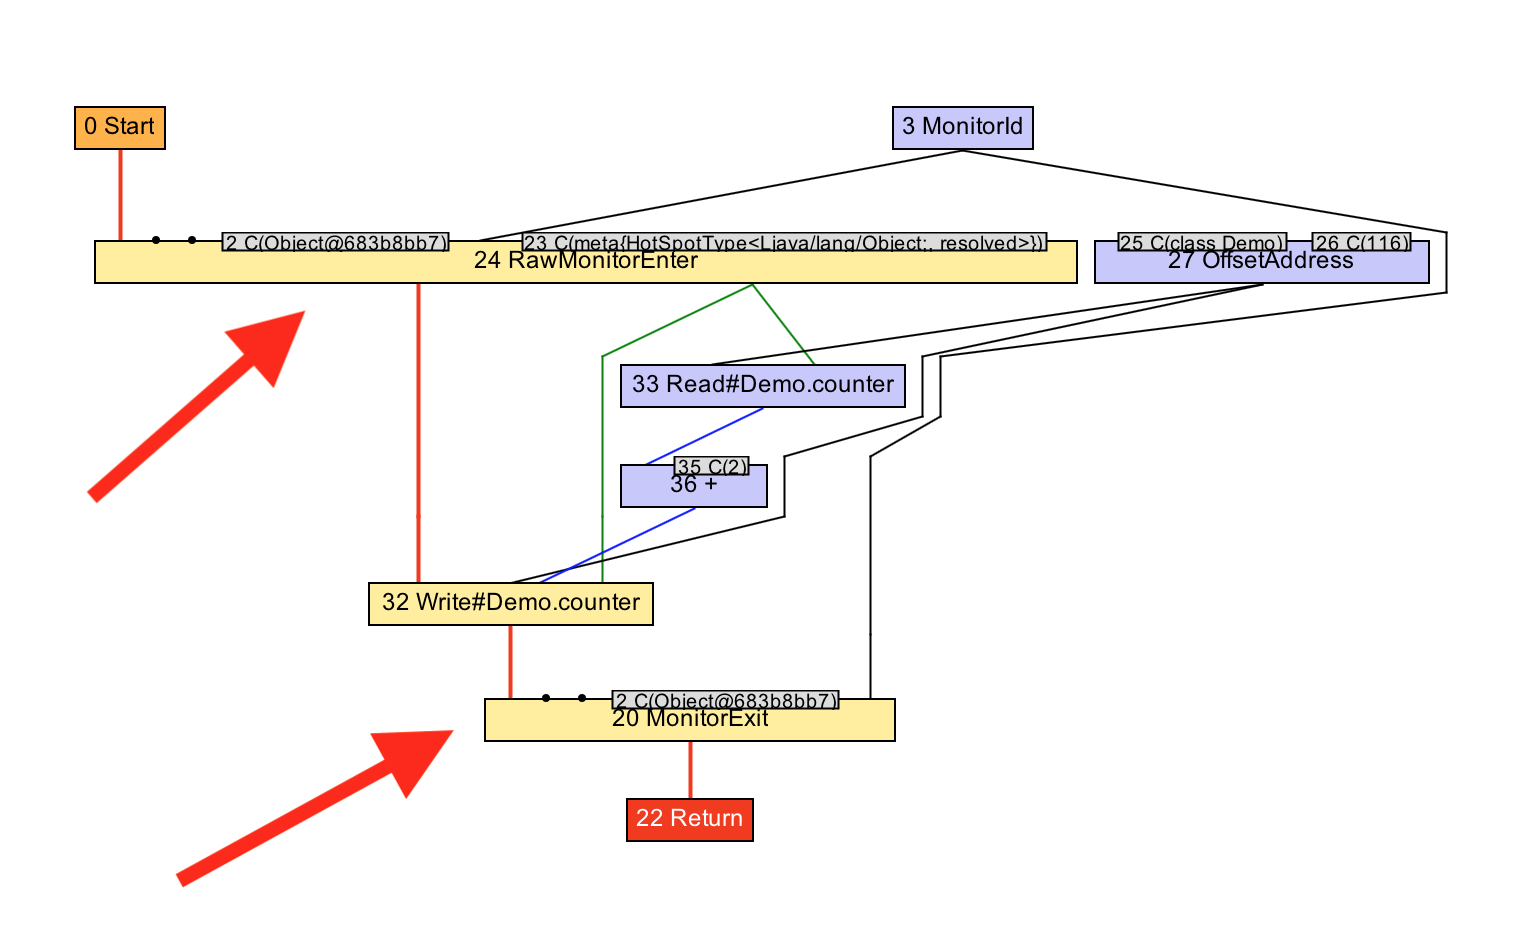
We can optimize this code by capturing the monitor only once instead of freeing it and re-capturing it in the very next step. This is the enlargement of locks .
voidworkload(){
  monitor.enter();
  counter++;
  counter++;
  monitor.exit();
}
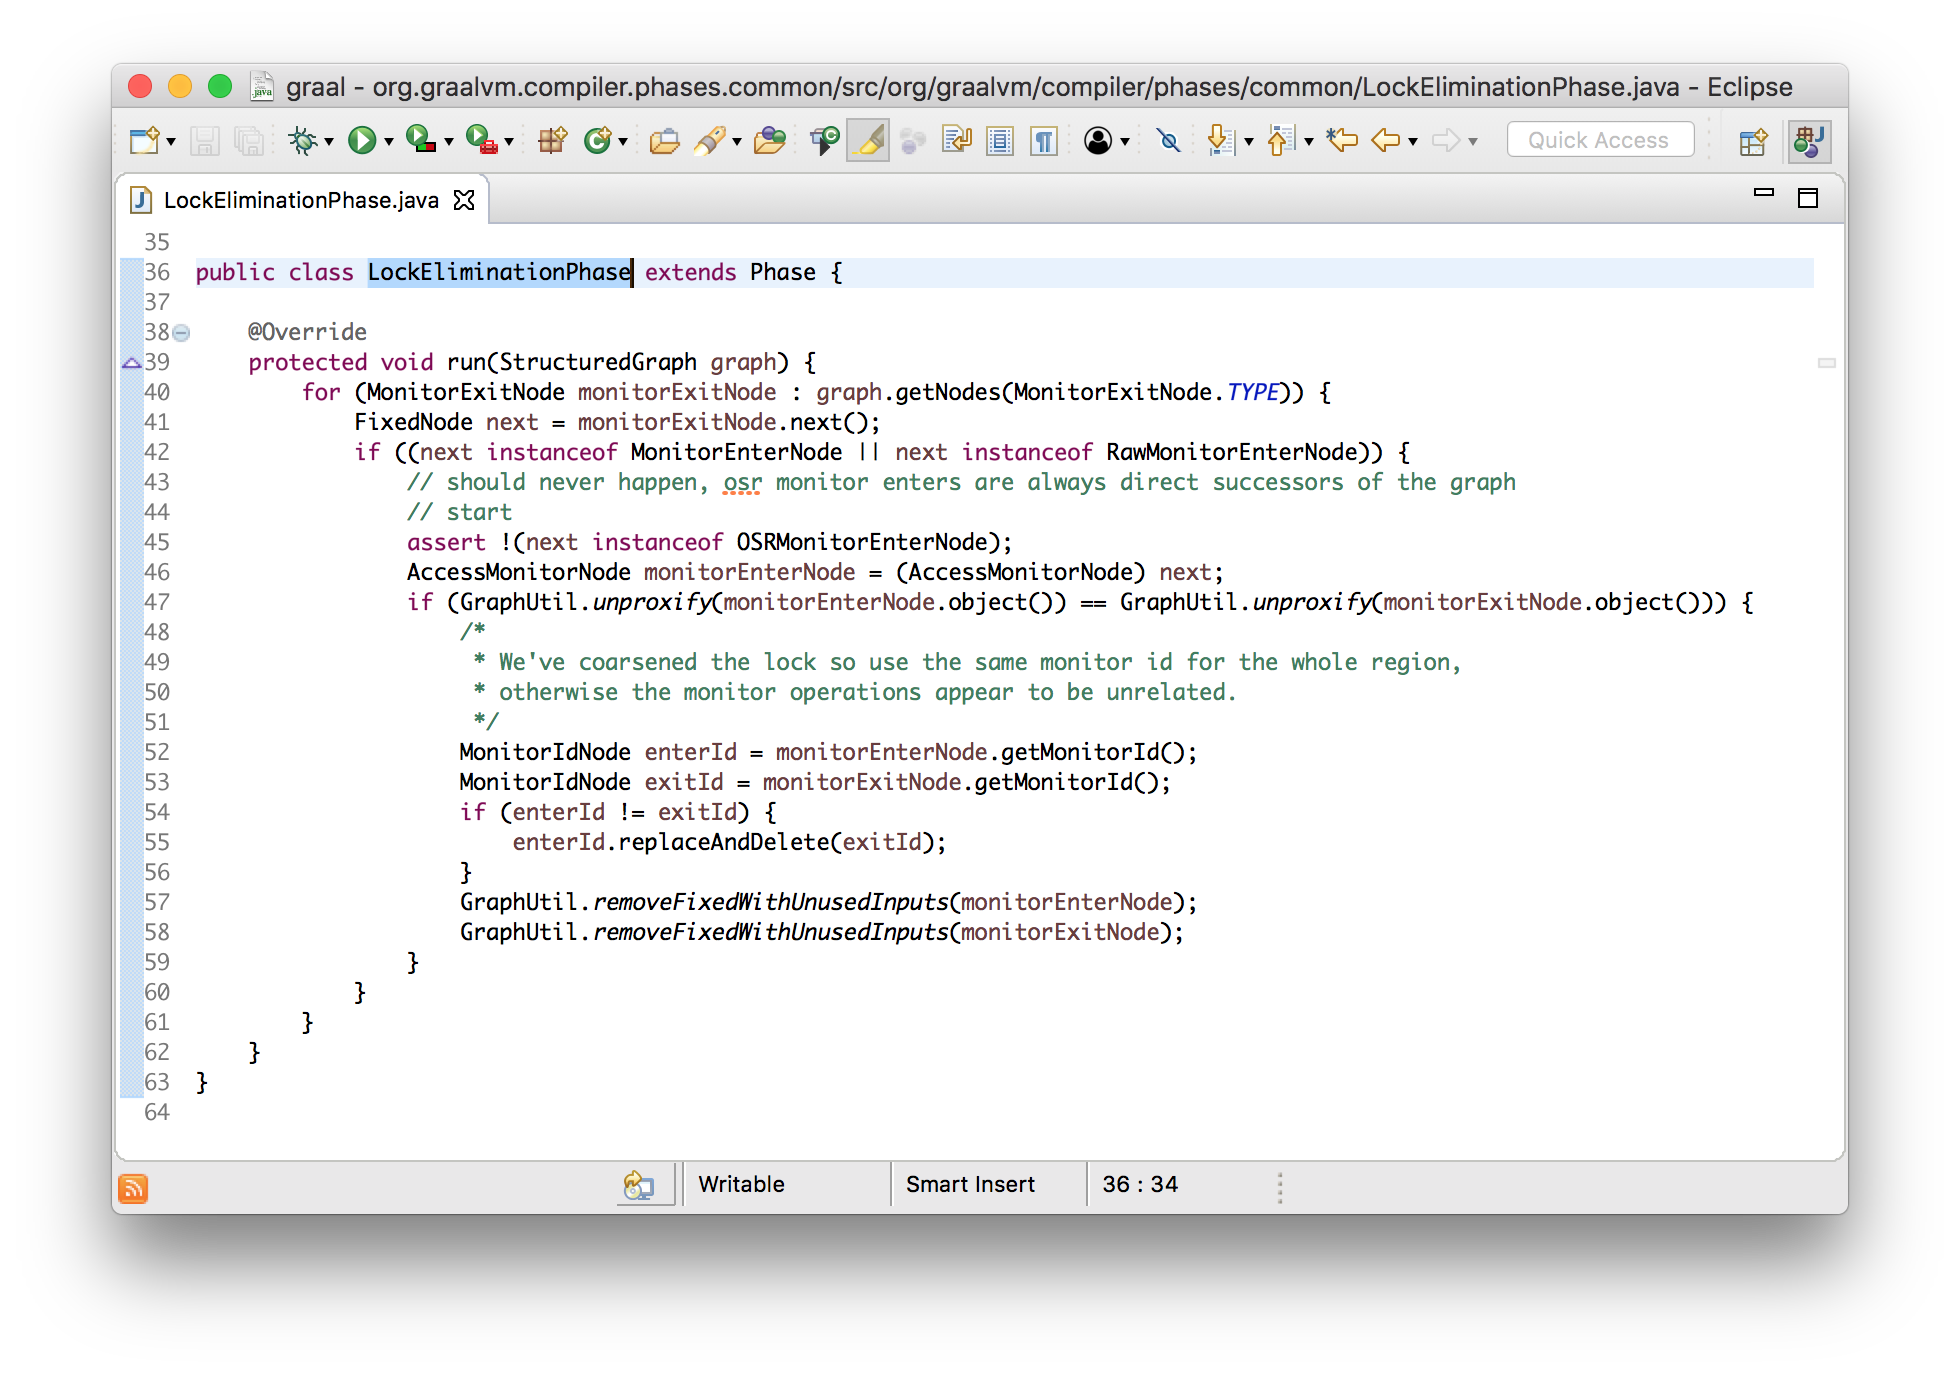
In Graal, this is implemented in a phase called LockEliminationPhase. The method runsearches for all monitor release nodes and checks that the capture nodes directly follow them. After that, in the case of using the same monitor, they are removed and only inclusive capture and release units remain.
voidrun(StructuredGraph graph){
  for (monitorExitNode monitorExitNode : graph.getNodes(MonitorExitNode.class)) {
    FixedNode next = monitorExitNode.next();
    if (next instanceof monitorEnterNode) {
      AccessmonitorNode monitorEnterNode = (AccessmonitorNode) next;
      if (monitorEnterNode.object() ## monitorExitNode.object()) {
        monitorExitNode.remove();
        monitorEnterNode.remove();
      }
    }
  }
}
The main reason for this optimization is to reduce the code of redundant captures and releases, but, also, it allows you to perform other optimizations, such as a combination of two increments in one addition with 2.
voidworkload(){
  monitor.enter();
  counter += 2;
  monitor.exit();
}
Let's take a look at IGV how it works. We see, after performing the optimization, how the graph goes from two pairs of capture / release of the monitor to one, and how, after, the two increments are converted into one addition with 2.
Unexpected practical aspects
Considering the work of Graal at a high level, of course, I missed a lot of important practical details that ensure its good work and the creation of effective machine code. In fact, I also missed some basic things necessary for its work in principle.
I didn’t talk about some parts of Graal, for the reason that they are, conceptually, not as simple to demonstrate as the code above, but I’ll show you where you can find them if you like.
Register Assignment
In the Graal graph model, we have nodes along which, with the help of edges, values are moved. But what are these edges in reality? If machine instructions need input or the ability to return a result, then what do they use for this?
Edges, as a result, are displayed on the registers of the processor. Registers are similar to local variables for the processor. They are the highest part of the system memory hierarchy, being above different levels of processor caches, which, in turn, are above RAM. Machine instructions can write and read from registers, and values can thus be passed from one instruction to another by writing them first and, after, reading the second.
Selecting registers for each task is called ribs destination register ( register allocation ). Graal uses, similar to other JIT-compiler, register assignment algorithm - an algorithm streak ( linear scan algorithm ).
Dispatching
Another basic problem that I didn’t mention is that we have a node graph without any exact order of their execution, and the processor requires a linear sequence of instructions in a certain order.
For example, the addition instruction takes as input two values that need to be summed, and if there is no need to calculate one value before the other (that is, they do not have a side effect), the graph also does not tell us about it. But, when issuing a machine code, it is necessary to determine the order of the input values.
This problem is called the scheduling graph ( graph scheduling ). The dispatcher is required to determine the processing order of the nodes. It defines the sequence of calling the code given the requirement that all values must be calculated at the time of their use. You can create a dispatcher that will simply work, but it is possible to improve the performance of the code, for example, by not calculating the value until its actual use.
You can make it even more cunning by applying knowledge of the available processor resources and giving it work in such a way that they are used most efficiently.
When to use Graal?
At the beginning of the speech in the introductory slide, I said that, at the moment, Graal is a research project, and not an Oracle- supported product . What could be the practical application of research carried out within the framework of Graal?
Low level compiler (final-tier compiler)
With the help of JVMCI, Graal can be used as a lower-level compiler in HotSpot - this is what I demonstrated above. As new (and missing in HotSpot) optimizations in Graal become available, it can become a compiler used to improve performance.
Twitter talked about how they use Graal for this purpose, and with the release of Java 9 and the desire to experiment, you can start practicing it today. To start you need only flags: -XX:+UseJVMCICompilerand others.
The huge benefit of the JVMCI is that it allows you to load Graal separately from the JVM. You can deploy (deploy) some version of the JVM, and separately connect new versions of Graal. As with Java agents, when using Graal, updating the compiler does not require rebuilding the JVM itself.
The OpenJDK project called Metropolis aims to implement most of the JVM in Java. Graal is one of the steps in this direction.
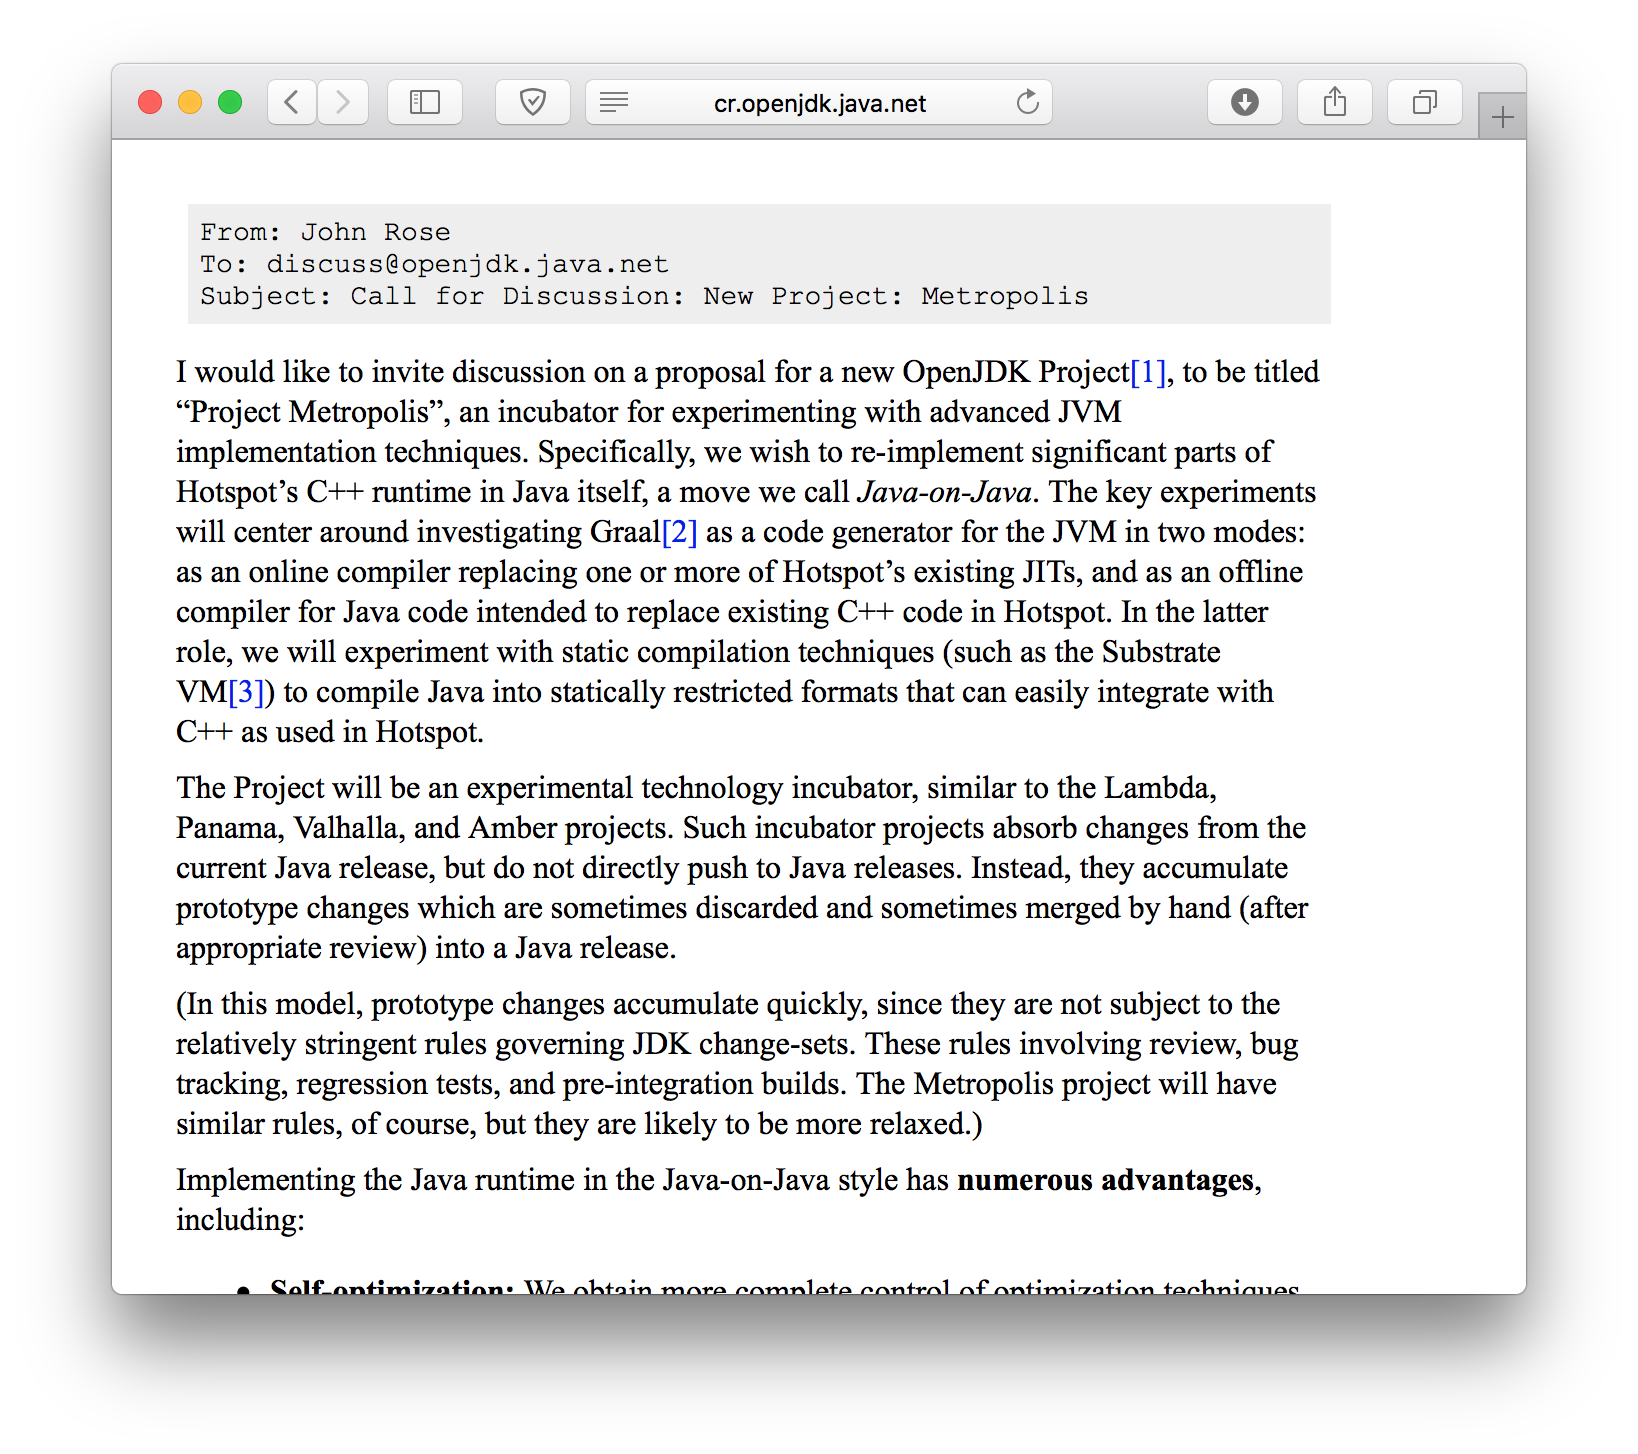
http://cr.openjdk.java.net/\~jrose/metropolis/Metropolis-Proposal.html
Custom optimizations
Graal can be extended with additional optimizations. Just as Graal connects to the JVM, it is possible to connect to the Graal new compilation phases. If you want to apply a certain optimization to your application, in Graal you can write a new phase for this. Or, if you have some special set of machine instruction codes that you want to use, you can simply write a new method instead of using a low-level code and then calling it using JNI.
Charles Nutter has already proposed doing this for JRuby and has demonstrated an increase in productivity from the addition of a new Graal phase to soften the identification of objects for packed Ruby numbers. I think that soon he will speak with this at some conference.
AOT (ahead-of-time) compilation
Graal is just a Java library. JVMCI provides the interface used by Graal to implement low-level actions, such as setting up machine code, but most of Graal is quite isolated from all of this. This means that you can use Graal for other applications, and not just as a JIT compiler.
In fact, there is not much difference between the JIT and AOT compilers, and Graal can be used in both cases. In fact, there are two projects implementing AOT with Graal.
Java 9 includes a tool to precompile classes into native code to reduce the time required for JIT compilation, especially during the application launch phase. JVM is still needed for this code to work, but instead of running the compiler on demand, precompiled code is used.
AOT Java 9 uses a slightly outdated version of Graal, which is included only in assemblies for Linux. It is for this reason that I did not use it for the demo and, instead, demonstrated building a more recent version and the command line arguments to use.
The second project is more ambitious. SubstrateVM is an AOT compiler that compiles a Java application into JVM-independent machine code. In fact, you have a statically linked executable at the output. In this case, the JVM is not required, and the executable file can be only a few megabytes in size. To perform this compilation, SubstrateVM uses Graal. In some configurations, to compile code at runtime ( just-in-time ), SubstrateVM can also compile Graal into itself. Thus, Graal AOT compiles itself.
$ javac Hello.java
$ graalvm-0.28.2/bin/native-image Hello
   classlist:     966.44 ms
       (cap):     804.46 ms
       setup:   1,514.31 ms
  (typeflow):   2,580.70 ms
   (objects):     719.04 ms
  (features):      16.27 ms
    analysis:   3,422.58 ms
    universe:     262.09 ms
     (parse):     528.44 ms
    (inline):   1,259.94 ms
   (compile):   6,716.20 ms
     compile:   8,817.97 ms
       image:   1,070.29 ms
   debuginfo:     672.64 ms
       write:   1,797.45 ms
     [total]:  17,907.56 ms
$ ls -lh hello
-rwxr-xr-x  1 chrisseaton  staff   6.6M  4 Oct 18:35 hello
$ file ./hello
./hellojava: Mach-O 64-bit executable x86_64
$ time ./hello
Hello!
real0m0.010s
user0m0.003s
sys 0m0.003s
Truffle
Another project using Graal as a library is called Truffle . Truffle is a framework for creating interpreters of programming languages on top of the JVM.
Most languages that run on a JVM issue a bytecode, which is then JIT-compiled as usual (but, as I said above, for the reason that the JIT JVM compiler is a black box, it is rather difficult to control what happens with this bytecode). Truffle uses a different approach - you're writing a simple interpreter for your language, following certain rules and Truffle, automatically combines the program and interpreter for an optimized machine code using a technique known as partial evaluation ( partial Evaluation Download now ).
Partial calculation is based on an interesting theoretical part, but from a practical point of view we can speak of this as the inclusion of code ( inlining ) and folding of constants ( constant folding ) of a program along with the data it uses. Graal has the functionality of including code and folding constants, so Truffle can use it as a partial solver.
This is how I met Graal through Truffle. I’m working on a Ruby programming language called TruffleRuby that uses the Truffle framework and also Graal. TruffleRuby is the fastest implementation of Ruby, usually 10 times faster than others, which, in doing so, implements almost all the features of the language and the standard library.
https://github.com/graalvm/truffleruby
findings
The main idea I wanted to convey with this speech is that you can work with the Java JIT compiler just like any other code. JIT compilation involves many complexities, mainly inheriting them from the underlying architecture and, also, because of the desire to issue as much optimized code as possible in the shortest possible time. But still, this is a top-level task. The interface to the JIT compiler is no more than a byte[]JVM bytecode converter to byte[]machine code.
This task is well suited for Java implementation. Compilation itself is not a task requiring a low-level and insecure programming language such as C ++.
Graal Java code is not some kind of magic. I will not pretend that it is always simple, but an interested beginner will be able to read and understand most of it.
I strongly advise you to experiment with this using these tips. If you start by studying the above classes, you won’t get lost in the code for the first time by opening Eclipse and seeing a long list of packages. From these starting points you can move to implementations of methods (definitions), places to call them, etc. gradually exploring the code base.
If you already have experience with monitoring and tuning JIT using tools for existing JIT JVM compilers such as JITWatch , you will notice that reading the code will help you better understand why Graal compiles your code this way and not otherwise. And, if you realize that something is not working as expected, you can make changes to Graal and simply restart the JVM. To do this, you do not even need to leave your IDE, as I showed in the hello-world example .
We are working on such amazing research projects as SubstrateVM and Truffle that use Graal, and really change the picture of what will be possible in Java in the future. All this is possible due to the fact that the whole Graal is written in plain Java. If, for writing our compiler, we used something like LLVM , as some companies suggest, in many cases, reusing the code would be difficult.
And finally, at the moment there is an opportunity to use Graal without making changes to the JVM itself. Because JVMCI is part of Java 9, Graal can be connected as well as, already existing, annotation processors or Java agents.
Graal is a big project that many people work on. As mentioned above, I am not working directly on Graal. I just use it, and you can do it too!
More information about TruffleRuby
Top 10 Things To Do With GraalVM
Ruby Objects as C Struts and Vice Versa
Understanding How Graal Works - A Java JIT Compiler Written in Java
Flip-Flops - the 1-in-10-million operator
JRuby + Truffle Very High Performance C Extensions
Optimize Small Data Structures in JRuby + Truffle
Pushing Pixels with JRuby + Truffle
Tracing With Zero Overhead in JRuby + Truffle
How Method Dispatch Works in JRuby + Truffle
