Bare-Metal Deployment - or how cloud elasticity is maintained in System Center 2012 SP1 Virtual Machine Manager
All fiery Monday, colleagues and enthusiasts!
Today, April 29, Monday - there are very few left before the holidays - and why not replenish your knowledge a bit before your long-awaited vacation (well, in the light format - without tough and abstruse moralizing). This time I would like to talk a little about how the Bare-Metal functions of deploying hypervisors to servers are arranged - or, in other words - how to provide automation of the elasticity of your private cloud based on System Center 2012 SP1 .

In more detail under a cat.
Before telling in detail and in detail about the process of "bare-iron deployment", it is worth paying a little attention to that characteristic, that feature of the cloud model that this process covers. Let's recall the main characteristics of the cloud model according to NIST (National Institute of Standards and Technology). In order not to catch up with melancholy, I will immediately list all the main distinguishing features of the cloud from the traditional IT consumption model.

1) Measured services . It is understood that any service that is provided through the clouds must be measurable, which ultimately leads to the fact that the service has a cost - as a result, measurability serves as a tool for billing IT services.
2) Instant elasticity. This component implies that the cloud, regardless of the level of the service model (IaaS, PaaS or SaaS), should be able to instantly (relatively instantly) increase or decrease the volume of its resources. It is about the increase in resources in terms of elasticity that we will talk with you today in the context of SCVMM 2012 SP1. After all, automation of the process of deploying hypervisors and including them in host groups and clouds is nothing more than providing elasticity in the direction of increasing the amount of resources.
3) Resource Pool. A very important feature of the cloud is the abstraction from physical hosts, as resources, to the level of their computing power. In other words, now to receive a service or service you do not take into account the number of servers, but the amount of their resources, which are grouped into categories - CPU, RAM, Disk resources and data transfer networks - all the main objects of virtualization that we have long known.
4) Broadband. This is a completely natural thing, since we are talking about a “very client-server”, or even more correctly, service-oriented architecture (SOA) - the load and requirements for the data transmission channel are greatly increasing - and this is true for the provider (it needs to be provided a lot of high-quality connections), as well as on the client’s side (the volume of traffic for exchange increases significantly with this model).
5) Self-service on demand. This postulate means the availability of a tool for either an automated or fully automatic process of providing a service or service to an end user. Typically, this tool is a web portal that serves as an interface between the end user and the orchestration processes (workflow automation) involved in the provision and deployment of a particular service or service.
Now that you and I have recalled the basic characteristics of the cloud, we also understood what place the BMD (Bare-Metal Deployment) process occupies in the cloud characteristics, it's time to consider it in more detail.
Before disassembling the process of deploying a hypervisor to bare metal, it would be nice to familiarize yourself with the requirements for this process .
In short, we need servers with a BMC controller (for example, iLO , iDRAC , SMASH , IPMI and others), as well as credentials for accessing the server through this same controller.
A PXE server based on Windows Server 2008 R2 or Windows Server 2012 will also be far from superfluous, but a necessary component.
Also, we will really need the installed WAIK package - Windows Automation and Installation Toolkit.
We also need a generalized image of the hypervisor (Windows Server 2008 R2 or Windows Server 2012 - Hyper-V Server is also suitable) in the format of a virtual VHD hard drive.
Do not forget that you must enable the virtualization functions on the processors of your server, activate the BMC controller and know its credentials for access, and configure the server to boot over the network using PXE.
If you look at the process sequentially, the picture will be like this.
1) The VMM server needs the WAIK component with the prepared WInPE image.
2) Next, as I said, we need a deployed WDS (Windows Deployment Services) server.
3) We will also need a DHCP server to issue IP addresses.
4) Next, you need to add our aforementioned WDS server to the VMM server using the wizard (Add Resources -> PXE Server Wizard).
5) Next, VMM will install its agent on the WDS server.
6) Next, the% WDS_Image_Source% \ RemoteInstall folder will be created on the WDS server (that is, the RemoteInstall subdirectory for official purposes will be created in the directory where your images are stored on the WDS server).
7) Next, the customized WInPE image from the VMM server is published on the WDS server - the publication process means the introduction of a VMM agent and a security certificate into the image).
At this point in time, we have reviewed the configuration process with you.
1) Reboot via OOB (Out-of-Band Management). Here, just the VMM server uses its native capabilities of communication with external BMC-controllers of the servers - specifically, it sends a signal to reboot the server.
2) Next, the target server boots via PXE and wants to get the download from our WDS server.
3) Before enabling the target server through PXE, the WDS server authorizes the download to the VMM server.
4) After that, the target server receives a custom WinPE image from the WDS server.
5) After that, the target server runs scripts to execute general-purpose commands (GCE scripts - General Command Execution). This point is very important, as it includes updating the firmware of your server in automatic mode, managing the RAID controller of your server to create hard disk partitions and more. All these parameters are set in the host profile in the VMM server.
6) Next, the VHD image is loaded with the necessary hypervisor from the VMM library.
7) After that the drivers necessary for a particular model of equipment are added.
8) Next is the process of installing the server, its configuration and inclusion in the domain.
9) Install the VMM agent and enable the Hyper-V role.
10) Execution of additional post-installation scripts. Examples of such scripts include mechanisms for combining network adapters into aggregates, and iSCSI connection settings. Such examples are any commands for remote execution.
In the course of the article, I mentioned such words, host profiles or host profiles, as well as about the VHD-disk, which is necessary for deployment.
Let's take a closer look at how to set up a host profile and associate it with a VHD drive.
1) First, in VMM, go to the Library -> Profiles -> Host Profiles -> right-click and Create Host profile sections .
2) Enter a profile name.
3) Select the required VHD image with the necessary version of Hyper-V hypervisor (by the way, for deployment to bare metal VMM can only boast of Hyper-V support - it cannot deploy other hypervisors).

4) In the hardware configuration area, go to the driver filtering item Filter driver and specify the driver label for your servers.

5) In the OS settings tab, specify all the necessary information.
6) In the host settings field, you can not touch anything and click Next and on the Summary tab - press Fininsh to complete the process of creating a host profile.
Now let's look at the process of deploying a host to a piece of iron in this case on a Dell R710.
1) First go to Fabric -> Home -> Add Resources -> Hyper-V Hosts and Clusters.
2) In the resource location, select “Physical computer to be provisioned into Hyper-V” and click Next.
3) Next, enter the data to obtain the administrative level of access to your BMC-controller (I recommend even creating a “Run As” account so that you don’t have to do this manually - I'm talking about the production environment).

In this case, I choose the IPMI protocol .
4) In the Discovery Scope area, specify the IP address configured on the BMC controller .
5) On the target resources (Target Resources), VMM should say "server detected!"
6) After that, in the deployment options (Deployment Options) specify the name that you entered or you have it set for the BMC adapter.
7) After that, check all the data for validity and click Finish in order to start the process of server deployment - you can go and drink coffee!
So, colleagues, we have examined how the automatic deployment of Hyper-V hypervisor to bare metal works using the SC VMM tools and Windows Server components. We also discussed what an important task this mechanism solves from the point of view of the cloud model of the provision and consumption of services. It remains to be hoped that in future versions it will be possible to upload third-party hypervisors to hardware as well - this is in case of heterogeneous scenarios. But impossible things do not happen - today you can solve this problem using the System Center Configuration Manager, but that's another story ...
Sincerely,
fire man
George A. Gadzhiev
Information Infrastructure Expert
Microsoft Corporation.
Today, April 29, Monday - there are very few left before the holidays - and why not replenish your knowledge a bit before your long-awaited vacation (well, in the light format - without tough and abstruse moralizing). This time I would like to talk a little about how the Bare-Metal functions of deploying hypervisors to servers are arranged - or, in other words - how to provide automation of the elasticity of your private cloud based on System Center 2012 SP1 .
In more detail under a cat.
A bit about the cloud, about elasticity
Before telling in detail and in detail about the process of "bare-iron deployment", it is worth paying a little attention to that characteristic, that feature of the cloud model that this process covers. Let's recall the main characteristics of the cloud model according to NIST (National Institute of Standards and Technology). In order not to catch up with melancholy, I will immediately list all the main distinguishing features of the cloud from the traditional IT consumption model.
1) Measured services . It is understood that any service that is provided through the clouds must be measurable, which ultimately leads to the fact that the service has a cost - as a result, measurability serves as a tool for billing IT services.
2) Instant elasticity. This component implies that the cloud, regardless of the level of the service model (IaaS, PaaS or SaaS), should be able to instantly (relatively instantly) increase or decrease the volume of its resources. It is about the increase in resources in terms of elasticity that we will talk with you today in the context of SCVMM 2012 SP1. After all, automation of the process of deploying hypervisors and including them in host groups and clouds is nothing more than providing elasticity in the direction of increasing the amount of resources.
3) Resource Pool. A very important feature of the cloud is the abstraction from physical hosts, as resources, to the level of their computing power. In other words, now to receive a service or service you do not take into account the number of servers, but the amount of their resources, which are grouped into categories - CPU, RAM, Disk resources and data transfer networks - all the main objects of virtualization that we have long known.
4) Broadband. This is a completely natural thing, since we are talking about a “very client-server”, or even more correctly, service-oriented architecture (SOA) - the load and requirements for the data transmission channel are greatly increasing - and this is true for the provider (it needs to be provided a lot of high-quality connections), as well as on the client’s side (the volume of traffic for exchange increases significantly with this model).
5) Self-service on demand. This postulate means the availability of a tool for either an automated or fully automatic process of providing a service or service to an end user. Typically, this tool is a web portal that serves as an interface between the end user and the orchestration processes (workflow automation) involved in the provision and deployment of a particular service or service.
Bare-Metal or Nudity
Now that you and I have recalled the basic characteristics of the cloud, we also understood what place the BMD (Bare-Metal Deployment) process occupies in the cloud characteristics, it's time to consider it in more detail.
What is possible and what is not?
Before disassembling the process of deploying a hypervisor to bare metal, it would be nice to familiarize yourself with the requirements for this process .
In short, we need servers with a BMC controller (for example, iLO , iDRAC , SMASH , IPMI and others), as well as credentials for accessing the server through this same controller.
A PXE server based on Windows Server 2008 R2 or Windows Server 2012 will also be far from superfluous, but a necessary component.
Also, we will really need the installed WAIK package - Windows Automation and Installation Toolkit.
We also need a generalized image of the hypervisor (Windows Server 2008 R2 or Windows Server 2012 - Hyper-V Server is also suitable) in the format of a virtual VHD hard drive.
Do not forget that you must enable the virtualization functions on the processors of your server, activate the BMC controller and know its credentials for access, and configure the server to boot over the network using PXE.
If you look at the process sequentially, the picture will be like this.
1) The VMM server needs the WAIK component with the prepared WInPE image.
2) Next, as I said, we need a deployed WDS (Windows Deployment Services) server.
3) We will also need a DHCP server to issue IP addresses.
4) Next, you need to add our aforementioned WDS server to the VMM server using the wizard (Add Resources -> PXE Server Wizard).
5) Next, VMM will install its agent on the WDS server.
6) Next, the% WDS_Image_Source% \ RemoteInstall folder will be created on the WDS server (that is, the RemoteInstall subdirectory for official purposes will be created in the directory where your images are stored on the WDS server).
7) Next, the customized WInPE image from the VMM server is published on the WDS server - the publication process means the introduction of a VMM agent and a security certificate into the image).
At this point in time, we have reviewed the configuration process with you.
The process itself
1) Reboot via OOB (Out-of-Band Management). Here, just the VMM server uses its native capabilities of communication with external BMC-controllers of the servers - specifically, it sends a signal to reboot the server.
2) Next, the target server boots via PXE and wants to get the download from our WDS server.
3) Before enabling the target server through PXE, the WDS server authorizes the download to the VMM server.
4) After that, the target server receives a custom WinPE image from the WDS server.
5) After that, the target server runs scripts to execute general-purpose commands (GCE scripts - General Command Execution). This point is very important, as it includes updating the firmware of your server in automatic mode, managing the RAID controller of your server to create hard disk partitions and more. All these parameters are set in the host profile in the VMM server.
6) Next, the VHD image is loaded with the necessary hypervisor from the VMM library.
7) After that the drivers necessary for a particular model of equipment are added.
8) Next is the process of installing the server, its configuration and inclusion in the domain.
9) Install the VMM agent and enable the Hyper-V role.
10) Execution of additional post-installation scripts. Examples of such scripts include mechanisms for combining network adapters into aggregates, and iSCSI connection settings. Such examples are any commands for remote execution.
In the course of the article, I mentioned such words, host profiles or host profiles, as well as about the VHD-disk, which is necessary for deployment.
Let's take a closer look at how to set up a host profile and associate it with a VHD drive.
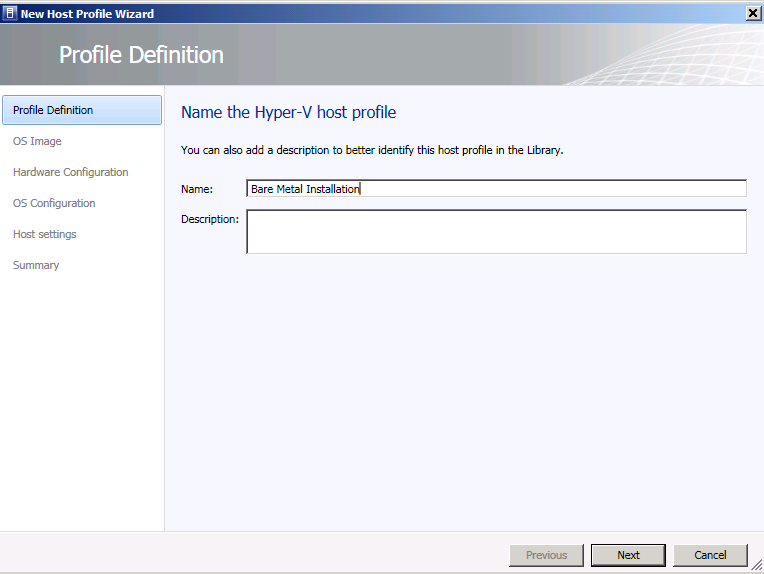
1) First, in VMM, go to the Library -> Profiles -> Host Profiles -> right-click and Create Host profile sections .
2) Enter a profile name.
3) Select the required VHD image with the necessary version of Hyper-V hypervisor (by the way, for deployment to bare metal VMM can only boast of Hyper-V support - it cannot deploy other hypervisors).
4) In the hardware configuration area, go to the driver filtering item Filter driver and specify the driver label for your servers.
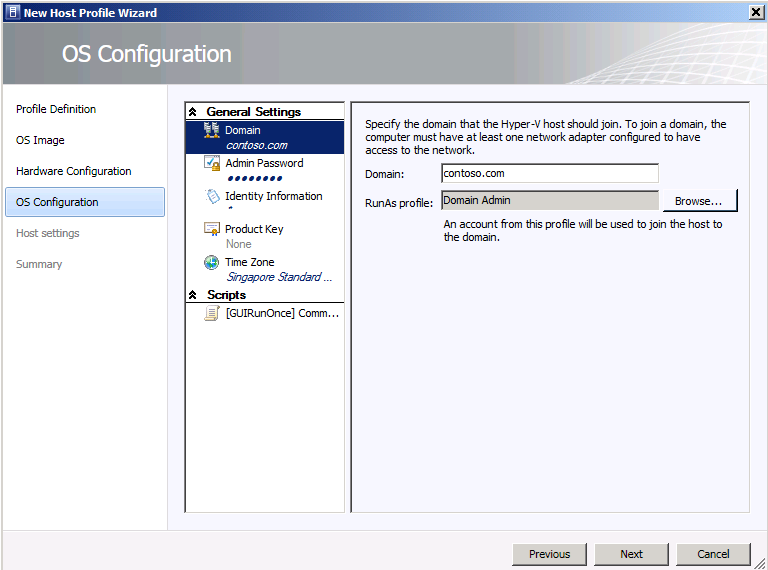
5) In the OS settings tab, specify all the necessary information.
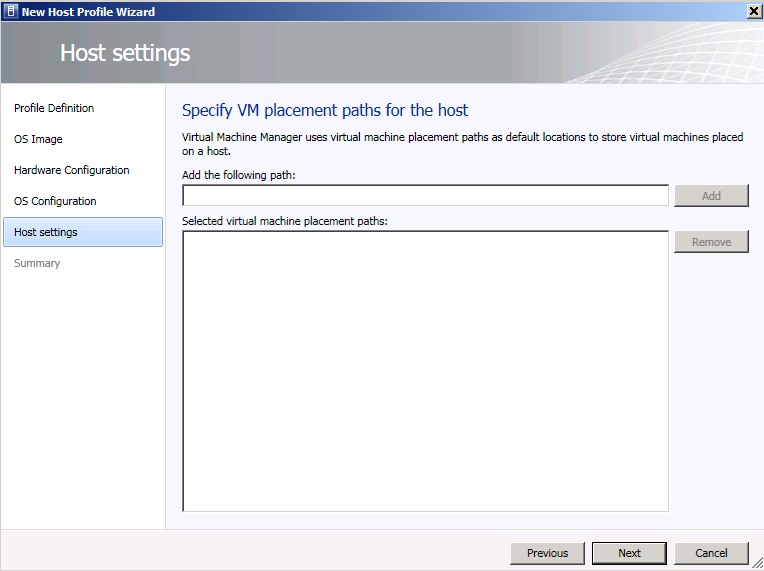
6) In the host settings field, you can not touch anything and click Next and on the Summary tab - press Fininsh to complete the process of creating a host profile.
Now let's look at the process of deploying a host to a piece of iron in this case on a Dell R710.
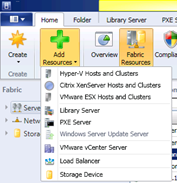
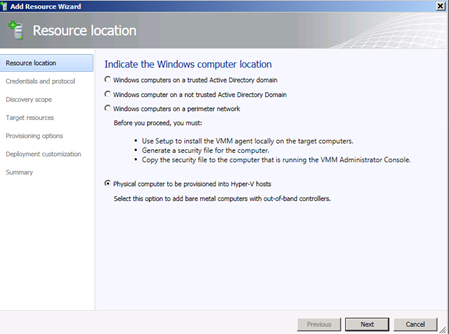
1) First go to Fabric -> Home -> Add Resources -> Hyper-V Hosts and Clusters.
2) In the resource location, select “Physical computer to be provisioned into Hyper-V” and click Next.
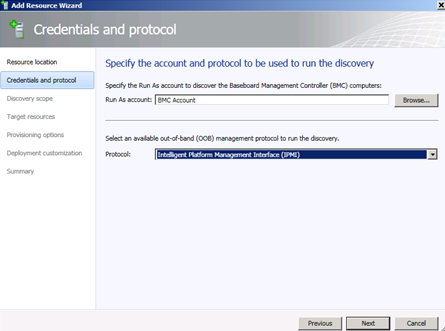
3) Next, enter the data to obtain the administrative level of access to your BMC-controller (I recommend even creating a “Run As” account so that you don’t have to do this manually - I'm talking about the production environment).
In this case, I choose the IPMI protocol .
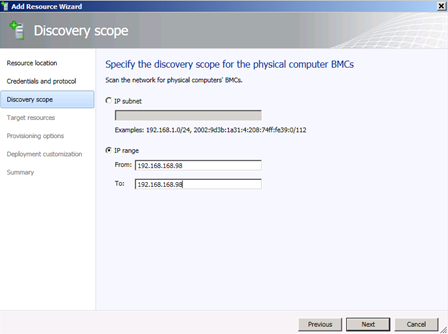
4) In the Discovery Scope area, specify the IP address configured on the BMC controller .
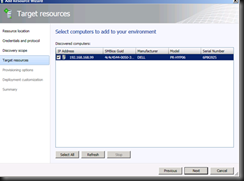
5) On the target resources (Target Resources), VMM should say "server detected!"
6) After that, in the deployment options (Deployment Options) specify the name that you entered or you have it set for the BMC adapter.
7) After that, check all the data for validity and click Finish in order to start the process of server deployment - you can go and drink coffee!
A small summary
So, colleagues, we have examined how the automatic deployment of Hyper-V hypervisor to bare metal works using the SC VMM tools and Windows Server components. We also discussed what an important task this mechanism solves from the point of view of the cloud model of the provision and consumption of services. It remains to be hoped that in future versions it will be possible to upload third-party hypervisors to hardware as well - this is in case of heterogeneous scenarios. But impossible things do not happen - today you can solve this problem using the System Center Configuration Manager, but that's another story ...
Sincerely,
fire man
George A. Gadzhiev
Information Infrastructure Expert
Microsoft Corporation.