Mobile devices from the inside. Unlocking the tablet loader
All publications from the series Mobile devices from the inside
1. The structure of the images of partitions containing the file system. Part 1.
2.Memory markup, the structure of the description and markup memory files.
3. The structure of the images of partitions containing the file system. Part 2. 4.
What is GPT?
5.Change the memory layout of the YB1 tablet.
6. Investigation of the loading modes of the YB1-X90L tablet.
2.Memory markup, the structure of the description and markup memory files.
3. The structure of the images of partitions containing the file system. Part 2. 4.
What is GPT?
5.Change the memory layout of the YB1 tablet.
6. Investigation of the loading modes of the YB1-X90L tablet.
TABLE OF CONTENTS
1. Introduction
Creating home-made, custom, firmware, or even just replacing screensavers in mobile devices (MUs) implies the ability to install partition images created by a third-party developer, and not the manufacturer. This requires unlocking the bootloader MU.
This process previously varied significantly depending on the manufacturer, but recently it has begun to come to a standard form a little. Therefore, almost everything that is described below can be used as a practical guide for working at the MU of many manufacturers.
We will dwell on a detailed step-by-step guide on unlocking the YB1-X90L tablet loader, based on my experience.
2. Unlocking the bootloader
In the YB1-X90L tablet, the manufacturer provided the possibility for the user to unlock the OS loader independently. To do this, you must first perform the following steps:
- become a developer ;
- perform factory unlock bootloader.
2.1. How to become a "developer"
Any MU issued by the developer has a special section of commands designed to perform settings and test the hardware and software of your MU. But these commands are not needed by a simple user in his daily process of communication with MU. Therefore, initially they are hidden from you, but in order to gain access, you need to perform a kind of shamanic dance with a tambourine .
To perform this operation, you need to open the Settings application in the downloaded tablet , go to the System settings section and select the About device menu item . In the menu that opens, you need to find the Build number item , which is located almost at the very bottom of the list,
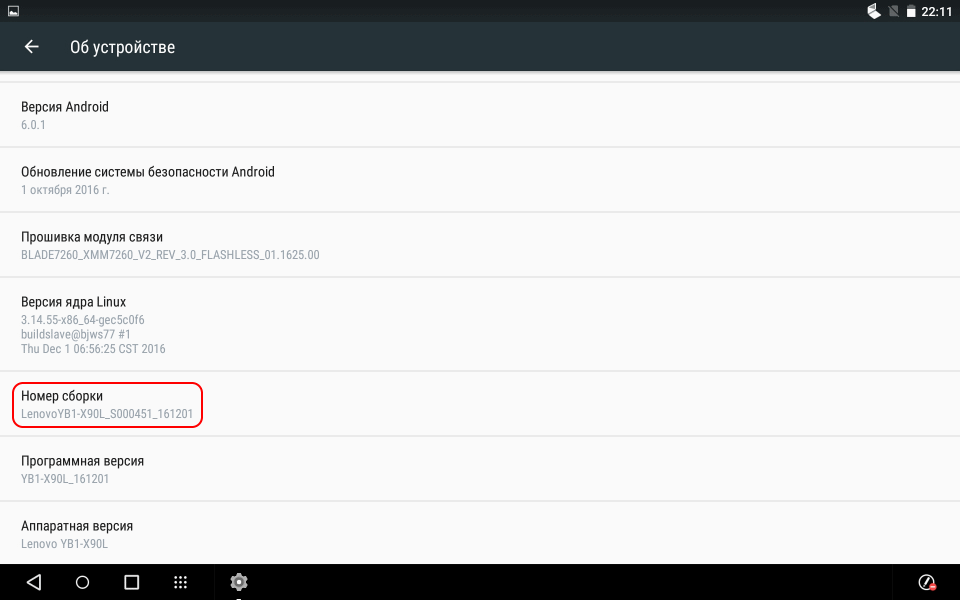
Fig. 1. Device Menu
and click on it 7 times. A message should appear You are a developer .
After that, return to the System settings section . In connection with the previous steps, an additional menu item For developers will appear in it , which was not previously available:
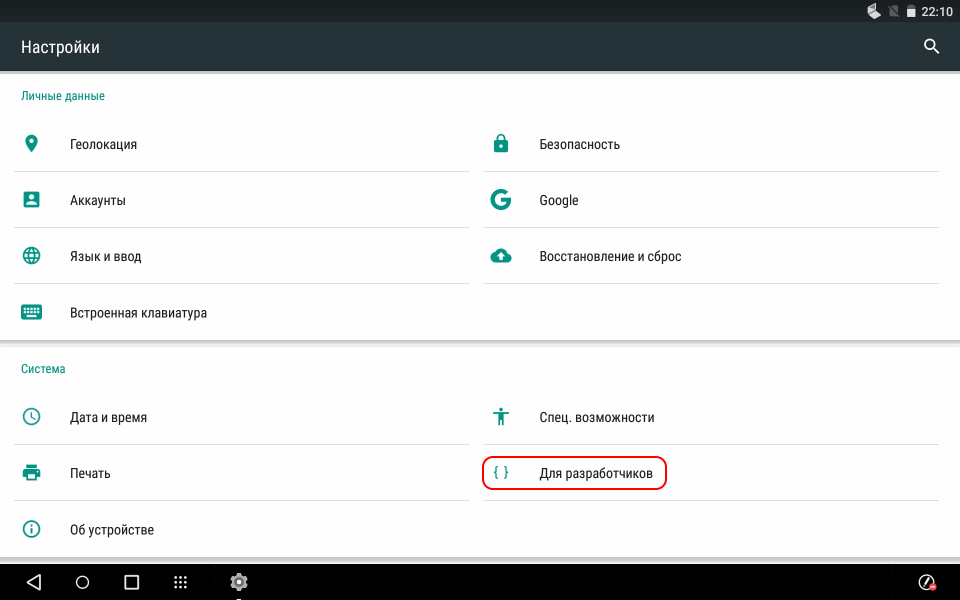
Fig.2. Menu For Developers
Everything, the tablet recognized you as a developer and new interesting teams became available to you, for example:
- USB debugging, which allows you to enable debugging mode when connecting the tablet to a computer via USB;
- Running applications , which allows you to view and manage running tablet applications;
- Factory unlock , a command to unlock the bootloader.
Now you can go directly to the removal of the factory lock.
2.2. Factory unlock
NOTE. Getting started on the firmware of the tablet, the first thing to do is enable the debugging mode via USB.
To do this, without leaving the For Developers menu , set the switch located next to this command to the on state. A warning will appear immediately:
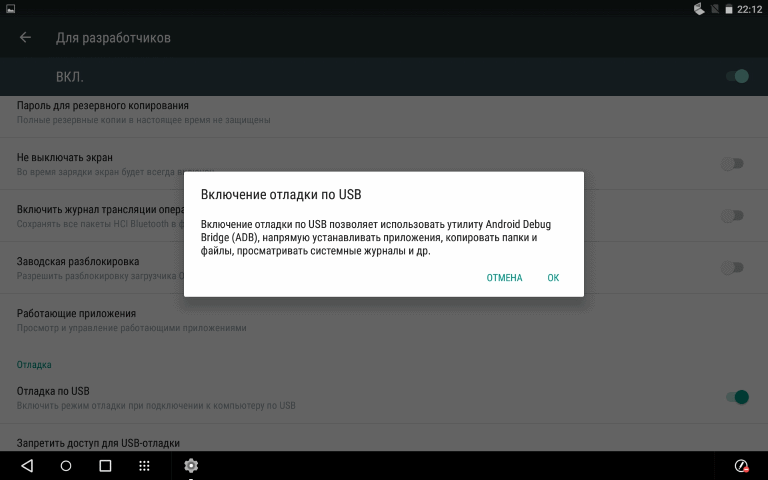
Fig. 3. On warning USB debugging
If the answer is yes, the debugging mode will be turned on:
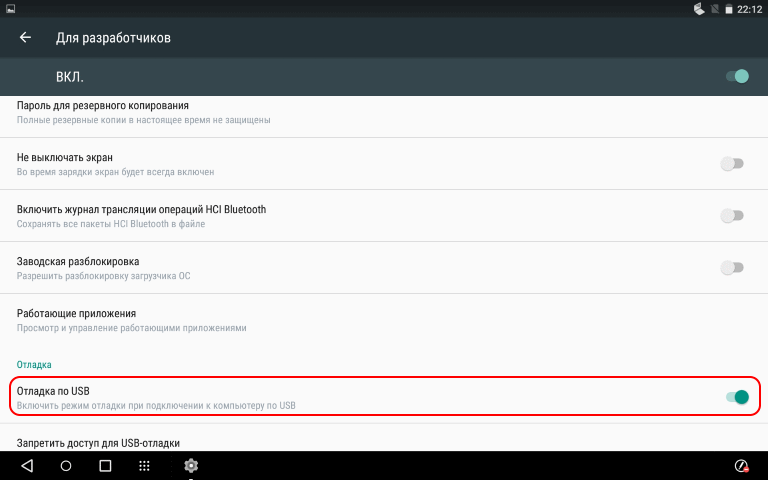
Fig. 4. On USB debugging mode
Now, if during the work a malfunction occurs, for example:
- the tablet at startup will reach the output of the logo image and freeze;
- the tablet will stop loading at all, i.e. do not even show logo;
- It will be overloaded on its own;
You will have a chance to restore its performance by connecting to it from a PC using ADB.
Here, execute the Factory Unlock command . Why set the switch next to this command to the on state. A warning message will appear:
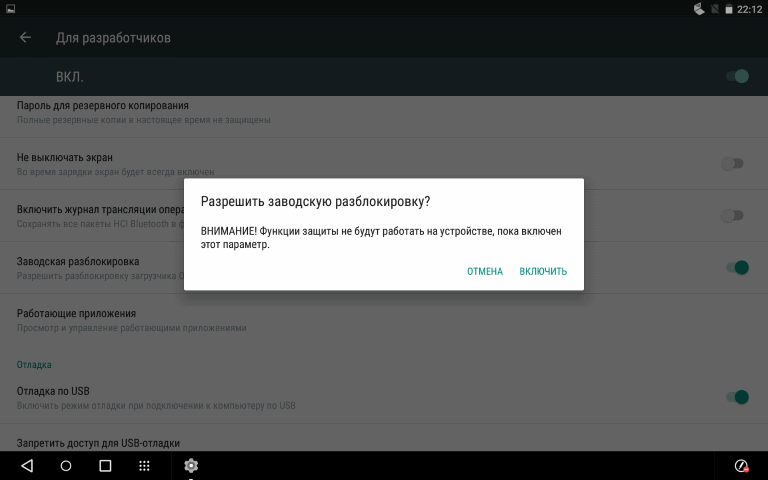
Fig. 5. Request to turn on the factory unlock
If the answer is yes, the unlock mode will be turned on:
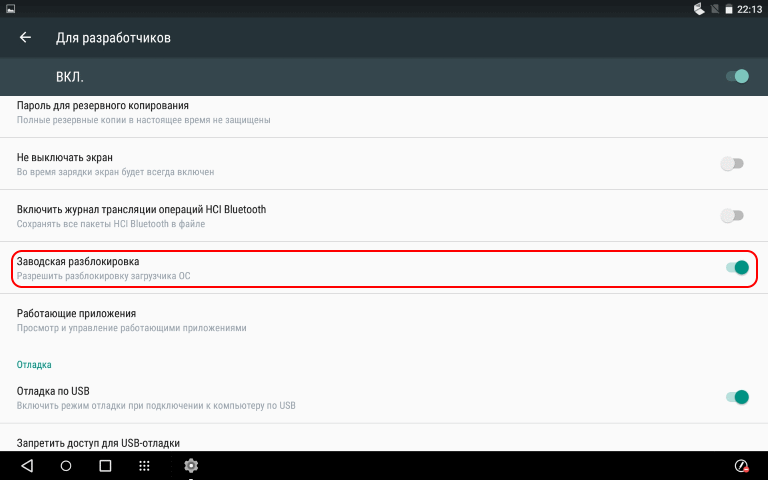
Fig.6. Enable Factory Unlock mode.
Think everything, the tablet loader is unlocked? Nooo, the manufacturer only ALLOWED you to use the ability to unlock the bootloader, which is performed using the FASTBOOT commands in FASTBOOT MODE. If you don’t know what the mode is and how to get into it, read .
2.3. Direct release of bootloader lock
From the side of the security system of the Android OS, it looks like this: you can only unlock it with the FASTBOOT commands , which require permission to access obtained consciously from the user who has become a developer.
To unlock the bootloader, you must do the following:
- install on a computer (PC) that connects to the tablet, drivers for working through ADB .
- execute a command in FASTBOOT MODE
Those. we reboot the tablet into FASTBOOT MODE mode , while the bootloader locked message is visible on the screen in the parameter list . We connect the tablet via a USB cable to the PC and in the PC terminal we execute the command
fastboot flashing unlock.
A request appears on the tablet to clear the data section.
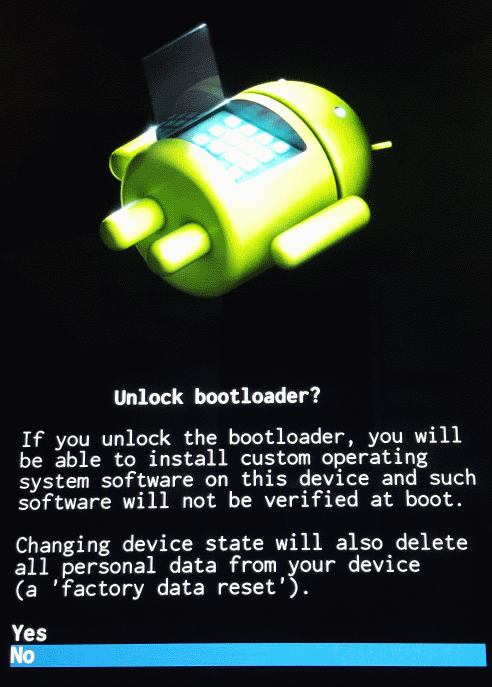
Fig. 7. A request to clear the data section.
If you answer Yes , the tablet will clear and unlock. If you answer No , neither cleaning nor unlocking will occur.
After unlocking the bootloader when entering FASTBOOT MODE on the screen in the parameter list, the inscription will change to LOCK STATE - unlocked :
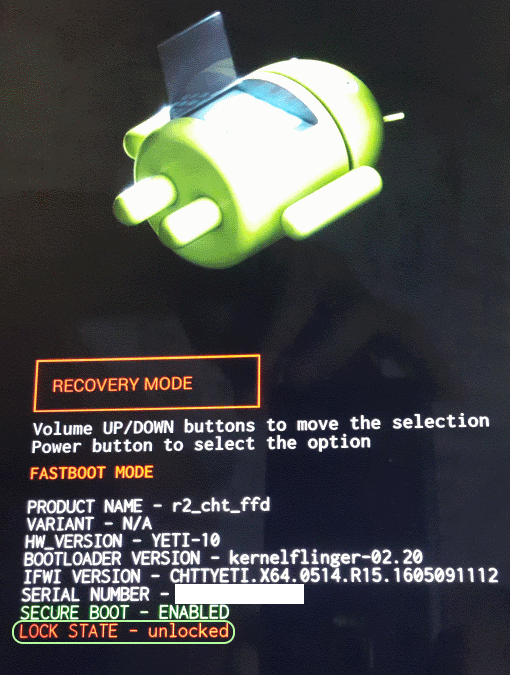
Fig. 8. The bootloader is unlocked.
To return the lock, you need to run the reverse command
fastboot flashing lock.
ATTENTION. When the bootloader lock is restored, another security rule is triggered: so that no one can read your data or bring the “infection” inside the tablet again, the data section is completely CLEARED, destroying all the contents.Instead of typing the above commands, you can run the fb_unlock_YB.bat command file on the PC with the following contents:
fb_unlock_YB.bat
@echo off
echo.
echo devices
echo.
adb devices
echo.
echo reboot bootloader
echo.
adb reboot bootloader
echo.
echo variable before unlock/lock
echo.
fastboot getvar all > 1_Y.txt 2>&1
echo.
echo unlock/lock
echo.
fastboot flashing unlock
::fastboot flashing lock
echo.
echo variable after unlock/lock
echo.
fastboot getvar all > 2_Y.txt 2>&1
echo.
echo Termination
pause
To verify the installation / removal of the bootloader lock, in this case, two service files will be created next to the command file containing the tablet loader settings:
- 1_Y.txt - before the operation:

Fig. 9. Preloader boot loader settings - 2_Y.txt - after the operation: Fig.

10 Parameters of the bootloader settings after the operation
We are interested in the parameters (bootloader) unlocked (first line of the file) and (bootloader) device-state (fifth line of the file). Before the operation is completed, the first line is (bootloader) unlocked: no , and the fifth is (bootloader) device-state: locked , because the bootloader is locked. After execution - (bootloader) unlocked: yes and (bootloader) device-state: unlocked respectively, i.e. The tablet loader is unlocked.
3. Conclusion
We examined how the YB1-X90L tablet loader is unlocked. Next time, we will try to install custom recovery on it in order to obtain, for example, “God's rights”, i.e. ROOT access, the ability to re-partition memory or install custom firmware , etc.
4. Sources of information
The study of the loading modes of the tablet YB1-X90L.
