Smart home: a new dimension of comfort and commitment to excellence. Part two
In the first part, I talked about the transition from simply monitoring systems to the smart home itself. At that stage, an understanding of the enormous potential for increasing comfort came, and the possibilities of the chosen technological stack excited excitement in the development and integration of new components.
Let us consider the aspect of "excitement". After the steps taken, the smart home has become difficult to stop in development. After the USR IOT WiFi devices came the turn of the beloved DIY microcontroller ESP8266. I used ESP8266-12 assemblies with LoLin v3 NodeMCU and Wemos D1 mini USB ports. Started by highlighting the picture, which was already mentioned above. Sketches for ESP8266 are conveniently developed in the Arduino IDE after connecting the appropriate plug-in. There you can find many examples that make development very simple, even without preparation. Therefore, by the way, there is no point in listing listings.
In the photo LoLin v3 NodeMCU with ESP8266-12. Connector - micro USB.
 It is only important to agree on an interaction protocol with openHAB. I did not use MQTT, but did the integration directly, since it more closely matches the selected centralized management model.
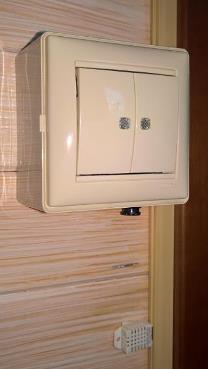 On the controller with ESP8266, the simplest server rises, which receives the request, parses it and executes the extracted command. The request is sent by openHAB (either “manually” or as a result of the rule operation) using the curl utility. Confirmation of the receipt of the command, the value of the measured parameters, the status of the connected actuators, the controller sends over the local network back to openHAB through its REST API. In total, at the time of writing the article on similar circuits, 4 ESP8266 based controllers and one on the Arduino with an Ethernet module connected are integrated in the smart home. Let me remind you that all this is done not simply in order to be able to turn on or turn off something from the smartphone, but, first of all, in order for the devices to turn on automatically when conditions for this come.
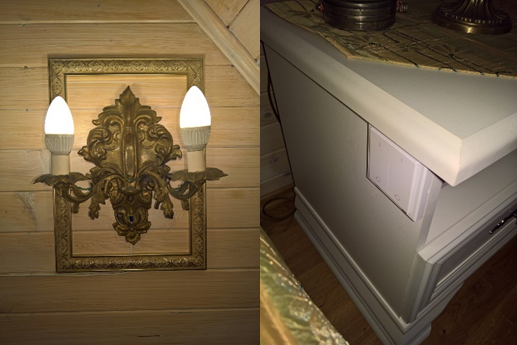
The photo shows a conventional Legrand switch, automated with the Wemos D1 Mini. All components fit in a standard box for external installation. At the same time it measures temperature / humidity (sensor below) and light (for the future).
For example, the picture illumination is turned on only once a day, when the house is disarmed and when the light level is below a certain level and when the time is close to the sunset time. Moreover, some devices, for example, street lamps do not have physical switches at all and are mainly used in automatic mode.
Anyone who has been to Obi or Leroy Merlin must have seen sets of remote-controlled outlets or even starter kits with the loud name “smart home”. Most of them integrate 433 MHz communication and this connection is one-way. Those. sending a command it is impossible to know whether it was received by the actuator or not. Low cost compensates for this disadvantage. For example, you can buy a controlled outlet and a flat switch on the battery for them for 1300 and 1400 rubles.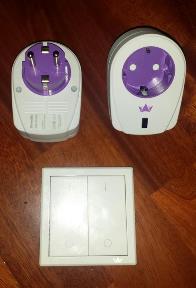 Such schemes are convenient to use for lighting devices with a separate wire, for being moved or appeared as the design idea develops. I have such elements as the wall lamp, converted from an antique candlestick and a small floor lamp. Both in the bedroom. A switch is conveniently located on the bedside table. Why such a long introduction? It makes no sense to abandon the devices that make life more comfortable and fuller, just because they are not supported by the installed smart home system. It’s easy to get into this situation by betting on a single supplier or a single technology.
In the photo there is a set of controlled outlets and a Brenin switch. 433MHz
But we have technology agnostic smart home! Therefore, we boldly look for a device hub for all 433 MHz components. There are such hubs,Broadlink , for example. However, their major drawback is the indirect control, the hub must be connected to the cloud. As you remember from the previous article, I consider this approach wrong, albeit simple and convenient. As a result, the search ends with the decision to make a simplified hub on the Arduino. As a peripheral, we connect a 433 MHz receiver and transmitter to the Arduino. Further, using a special sketch, we listen to the code sent by the transmitter in the Brenin switch and learn to transmit it ourselves. All sketches are completely based on examples to libraries and do not cause difficulties. Moreover, the code of the control signal can be represented as a constant in openHAB and, if desired, expand the number of actuators.
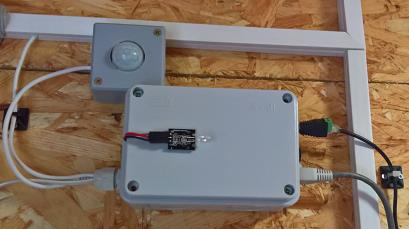 Homemade hub for 433 MHz devices. Over time, motion detection and light control in the boiler room was added to it. And air conditioning control (IR-LED on the cover). In addition, to improve the stability of the data exchange with openHAB transferred from nRF24L01 + to the Ethernet board ENC82J60, see the LAN wire.
What happened? It turned out controlled by a wireless set of lighting in the room. In addition, the opportunity to manage this lighting from a smart home. As you remember, the problem with such systems is the lack of feedback. Partially solved in this case due to the fact that the commands transmitted on the 433 MHz switch can be intercepted by the developed hub and sent them in an openHAB, in a working way, in which the rule is triggered and changes the state of the switch in the interface. Those. pseudo-feedback system was obtained. This is better than nothing. And of course, it is clear that such an approach is not suitable for controlling critical devices. It is not reliable and unsafe in terms of interception.
The design element which appeared with time, a sconce. Operated by a power outlet and a Brenin switch.
Further more. I wanted to make beautiful switches on the second floor. And of course, remotely controlled. The choice fell on the touch switches Livolo . They are also at 433 MHz and, importantly, can be connected "without a zero." This is true if a full zero and phase are not connected to the socket, and the switch is in the break of the chandelier's power supply circuit. Although this is not my case, such input conditions should be taken into account. As a result, beautiful switches appeared in the house, connected to a smart house with the help of a previously developed hub.

Set of two touch switches and a Livolo remote control.
However, there are two “but”. The first. Livolo switches really lack feedback, they do not transmit anything. Those. if you turn them on in the old-fashioned way with your finger, the smart home will not see the state change. Of course, this is not an obstacle for the home-builder, but I decided not to fence the garden of additional sensors, and not integrate more similar Livolo devices. The second. The standard library did not manage to decipher the control signals from the Livolo console purchased with the switches, I had to look for libraries developed by enthusiasts specifically for the Livolo switches.
I want to end the conversation about integrating new components exactly from what we started in the previous article: from Z-Wave. No matter how expensive the Z-Wave devices are, their range is gradually expanding and actuating devices appear that there is no point in making oneself or which for some reason the competing technologies do not have. The most striking example is controlled thermostatic heads for radiators. Wireless. Another example is compact relays and dimmers into plug-ins to turn existing switches into smart ones without changing the design. Moreover, with feedback, i.e. with mechanical control preserved, the smart home will be able to see the status of the switches.
In the photo Z-Wave thermostatic head Grundfos on the radiator in the hallway.
How is the integration? OpenHAB has the appropriate binding to connect the USB Z-Wave stick. In addition, the openHAB bundle has a special HABmin application for setting up the network operation of Z-Wave devices. So, we connect the USB-stick Z-Wave.Me , install the binding Z-Wave, run HABmin, add the devices to the network. Further we configure according to documentation to binding corresponding items, we write rules for switches, thermal heads, multi sensors and voila. It seems simple. However, it happened only partially. The problem is that HABmin works only with devices registered in the open database . If you bought a new device or a modification of an old one that is not in the database, you will not be able to configure such a device.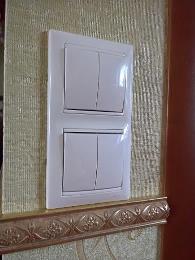 You can make a pull request to this database, but I found this approach to be fundamentally wrong, since Z-Wave devices have self discovery function. This is one of the reasons for the high compatibility of devices and controllers from different manufacturers of Z-Wave. As a result, I had to buy a license for the Z-Wave software controller, the Z-Way server , which installed it on the same server / nettop as openHAB. It is used only when it is necessary to add / remove a device to the Z-Wave network and / or configure it. The rest of the time the software controller is turned off.
In the photo - conventional switches Legrand. Automated using Z-Wave micromodules in podozetniki. The bottom has become a dimmer.
As a result, I had thermal heads on radiators, a dimmer and switches to power sockets, controlled sockets that measure voltage and power, and even a multi-sensor (motion, temperature, light). It should be noted that I did not set up associations at the Z-Wave level, since I still have a centralized management model. That is, despite the possibility of direct control of the device-device, they are all centrally controlled from openHAB using rules. Well, or additionally mechanically, as in the case of switches in the socket.
What happened in terms of smart home:
There is something else. So far we have been talking about the integration of physical components with a smart home. However, openHAB allows integration with software systems. For example, with software DVRs or IP cameras. It's not just about displaying an image in the openHAB interface, which of course has been done, but also about reacting to events. For example, if a recorder or camera is configured to detect motion, this event can be sent to openHAB and used in management. In the above rule for turning on the light at night when going down stairs, the camera detects motion on the first floor (so as not to turn on the light when I go up the stairs). Another example: in the security mode, you can take a picture of the intruder and send the photo by mail, and the violation can be fixed with a conventional PIR motion sensor, which is much more efficient than detecting movement with a camera or a DVR. Moreover, the PIR-sensor can be connected to a smart home using arbitrary technology.
Integration with the Kodi media center is also made , for this there is a special binding. When you start a video in the living room lights turn off, when you stop - turns on. Also made, just in case, the management of the smart home by Kodi himself. It is less convenient to use it than with the Kore software control panel, but it is possible to launch Kodi from the interface of the smart home, which Kore cannot.
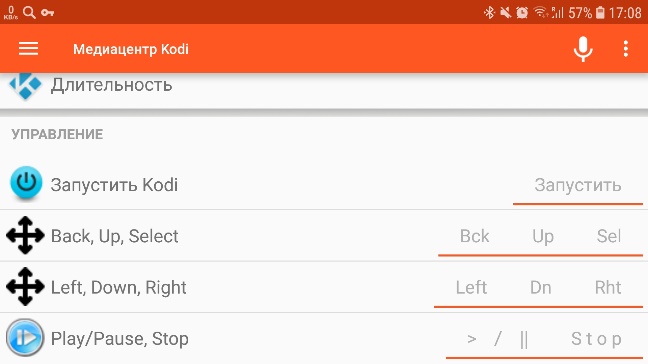
Interface page with Kodi control and launch button. Above shows the status of the player, the name of the song, the remaining time and duration.
 Anticipating questions about the use of the MQTT protocol, let me remind you that with a centralized management model, intermediate links between the server and devices are possible, but, of course, reduce reliability. Therefore, until now, all integration ties have been direct, without intermediaries. However, if we talk about a possible transition in the future or a partial transition to decentralized control, as potentially more expandable and more fault tolerant, then the choice of MQTT is standard. This is a common transport for peer devices on a local network.
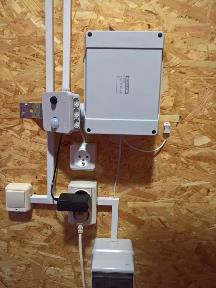
Multifunctional controller based on Raspberry Pi 3B. Visible temperature and humidity sensor, motion sensor, camera controlled socket, a switch that has become a sensor.
OpenHAB, of course, has binding for MQTT. Mosquitto is selected as the MQTT server itself .. But on what to install it - the question. If it is implicitly or explicitly to pursue the goal of decentralizing management, then putting Mosquitto on a nettop, which has already become a single point of failure, is wrong. And here the following logic worked. The only non-automated room is a garage. There is something to be done: to detect movement, light the lights inside and outside the house, open and monitor the state of the garage doors, conduct video surveillance, control the outlet for garden equipment. And even something else that can only be done on a full-fledged operating system and that relates to ensuring information security. As a result, the choice falls on the Raspberry Pi. It also has pins for connecting standard DIY peripherals and full-fledged Linux with a huge number of ported applications. And a video camera can be connected to it and broadcast the stream to the network. And, importantly, the resources of the system, unlike the Arduino, allow you to build business logic of almost any reasonable complexity, getting rid of openHAB. And all this can be programmed in familiar programming languages.
As a result, all of these tasks have been solved, plus an MQTT server has appeared on the network, through which interaction with openHAB is organized and which will be used later when new devices with decentralized control appear.
What happened in the end, if we describe in standard terms the characteristics of the entire system at the time of this writing?
Summary:
Technologies used:
Instead of a conclusion. We have not yet considered many aspects, for example, voice control, text-to-speech, air conditioner IR control, etc. All this is done and working. The purpose of this article was to show the course of thought, to share the experience of choosing solutions, to show the benefits of open standards and technologies through the description of ease of integration. Everything that was done could have been done differently, better or worse, more expensive or cheaper, more functional or more reliable. You get used to good things quickly and after some time, questions from family members like: “But can't you do it from a smartphone?” Or “why does this flowerbed need to be watered manually?” Make you move on to unattainable perfection.
And I also believe in the limitless possibilities of the Internet of Things. All that is done belongs to this category, but this is only a small part. If after reading this article the number of IoT enthusiasts grows a little, I will consider my task fully accomplished.
Let us consider the aspect of "excitement". After the steps taken, the smart home has become difficult to stop in development. After the USR IOT WiFi devices came the turn of the beloved DIY microcontroller ESP8266. I used ESP8266-12 assemblies with LoLin v3 NodeMCU and Wemos D1 mini USB ports. Started by highlighting the picture, which was already mentioned above. Sketches for ESP8266 are conveniently developed in the Arduino IDE after connecting the appropriate plug-in. There you can find many examples that make development very simple, even without preparation. Therefore, by the way, there is no point in listing listings.
In the photo LoLin v3 NodeMCU with ESP8266-12. Connector - micro USB.
It is only important to agree on an interaction protocol with openHAB. I did not use MQTT, but did the integration directly, since it more closely matches the selected centralized management model.On the controller with ESP8266, the simplest server rises, which receives the request, parses it and executes the extracted command. The request is sent by openHAB (either “manually” or as a result of the rule operation) using the curl utility. Confirmation of the receipt of the command, the value of the measured parameters, the status of the connected actuators, the controller sends over the local network back to openHAB through its REST API. In total, at the time of writing the article on similar circuits, 4 ESP8266 based controllers and one on the Arduino with an Ethernet module connected are integrated in the smart home. Let me remind you that all this is done not simply in order to be able to turn on or turn off something from the smartphone, but, first of all, in order for the devices to turn on automatically when conditions for this come.The photo shows a conventional Legrand switch, automated with the Wemos D1 Mini. All components fit in a standard box for external installation. At the same time it measures temperature / humidity (sensor below) and light (for the future).
For example, the picture illumination is turned on only once a day, when the house is disarmed and when the light level is below a certain level and when the time is close to the sunset time. Moreover, some devices, for example, street lamps do not have physical switches at all and are mainly used in automatic mode.
Anyone who has been to Obi or Leroy Merlin must have seen sets of remote-controlled outlets or even starter kits with the loud name “smart home”. Most of them integrate 433 MHz communication and this connection is one-way. Those. sending a command it is impossible to know whether it was received by the actuator or not. Low cost compensates for this disadvantage. For example, you can buy a controlled outlet and a flat switch on the battery for them for 1300 and 1400 rubles.
Such schemes are convenient to use for lighting devices with a separate wire, for being moved or appeared as the design idea develops. I have such elements as the wall lamp, converted from an antique candlestick and a small floor lamp. Both in the bedroom. A switch is conveniently located on the bedside table. Why such a long introduction? It makes no sense to abandon the devices that make life more comfortable and fuller, just because they are not supported by the installed smart home system. It’s easy to get into this situation by betting on a single supplier or a single technology. In the photo there is a set of controlled outlets and a Brenin switch. 433MHz
But we have technology agnostic smart home! Therefore, we boldly look for a device hub for all 433 MHz components. There are such hubs,Broadlink , for example. However, their major drawback is the indirect control, the hub must be connected to the cloud. As you remember from the previous article, I consider this approach wrong, albeit simple and convenient. As a result, the search ends with the decision to make a simplified hub on the Arduino. As a peripheral, we connect a 433 MHz receiver and transmitter to the Arduino. Further, using a special sketch, we listen to the code sent by the transmitter in the Brenin switch and learn to transmit it ourselves. All sketches are completely based on examples to libraries and do not cause difficulties. Moreover, the code of the control signal can be represented as a constant in openHAB and, if desired, expand the number of actuators.
Homemade hub for 433 MHz devices. Over time, motion detection and light control in the boiler room was added to it. And air conditioning control (IR-LED on the cover). In addition, to improve the stability of the data exchange with openHAB transferred from nRF24L01 + to the Ethernet board ENC82J60, see the LAN wire.What happened? It turned out controlled by a wireless set of lighting in the room. In addition, the opportunity to manage this lighting from a smart home. As you remember, the problem with such systems is the lack of feedback. Partially solved in this case due to the fact that the commands transmitted on the 433 MHz switch can be intercepted by the developed hub and sent them in an openHAB, in a working way, in which the rule is triggered and changes the state of the switch in the interface. Those. pseudo-feedback system was obtained. This is better than nothing. And of course, it is clear that such an approach is not suitable for controlling critical devices. It is not reliable and unsafe in terms of interception.
The design element which appeared with time, a sconce. Operated by a power outlet and a Brenin switch.
Further more. I wanted to make beautiful switches on the second floor. And of course, remotely controlled. The choice fell on the touch switches Livolo . They are also at 433 MHz and, importantly, can be connected "without a zero." This is true if a full zero and phase are not connected to the socket, and the switch is in the break of the chandelier's power supply circuit. Although this is not my case, such input conditions should be taken into account. As a result, beautiful switches appeared in the house, connected to a smart house with the help of a previously developed hub.
Set of two touch switches and a Livolo remote control.
However, there are two “but”. The first. Livolo switches really lack feedback, they do not transmit anything. Those. if you turn them on in the old-fashioned way with your finger, the smart home will not see the state change. Of course, this is not an obstacle for the home-builder, but I decided not to fence the garden of additional sensors, and not integrate more similar Livolo devices. The second. The standard library did not manage to decipher the control signals from the Livolo console purchased with the switches, I had to look for libraries developed by enthusiasts specifically for the Livolo switches.
I want to end the conversation about integrating new components exactly from what we started in the previous article: from Z-Wave.
No matter how expensive the Z-Wave devices are, their range is gradually expanding and actuating devices appear that there is no point in making oneself or which for some reason the competing technologies do not have. The most striking example is controlled thermostatic heads for radiators. Wireless. Another example is compact relays and dimmers into plug-ins to turn existing switches into smart ones without changing the design. Moreover, with feedback, i.e. with mechanical control preserved, the smart home will be able to see the status of the switches. In the photo Z-Wave thermostatic head Grundfos on the radiator in the hallway.
How is the integration? OpenHAB has the appropriate binding to connect the USB Z-Wave stick. In addition, the openHAB bundle has a special HABmin application for setting up the network operation of Z-Wave devices. So, we connect the USB-stick Z-Wave.Me , install the binding Z-Wave, run HABmin, add the devices to the network. Further we configure according to documentation to binding corresponding items, we write rules for switches, thermal heads, multi sensors and voila. It seems simple. However, it happened only partially. The problem is that HABmin works only with devices registered in the open database . If you bought a new device or a modification of an old one that is not in the database, you will not be able to configure such a device.
You can make a pull request to this database, but I found this approach to be fundamentally wrong, since Z-Wave devices have self discovery function. This is one of the reasons for the high compatibility of devices and controllers from different manufacturers of Z-Wave. As a result, I had to buy a license for the Z-Wave software controller, the Z-Way server , which installed it on the same server / nettop as openHAB. It is used only when it is necessary to add / remove a device to the Z-Wave network and / or configure it. The rest of the time the software controller is turned off. In the photo - conventional switches Legrand. Automated using Z-Wave micromodules in podozetniki. The bottom has become a dimmer.
As a result, I had thermal heads on radiators, a dimmer and switches to power sockets, controlled sockets that measure voltage and power, and even a multi-sensor (motion, temperature, light). It should be noted that I did not set up associations at the Z-Wave level, since I still have a centralized management model. That is, despite the possibility of direct control of the device-device, they are all centrally controlled from openHAB using rules. Well, or additionally mechanically, as in the case of switches in the socket.
What happened in terms of smart home:
- Automated light control.
- The movement at the stairs on the second floor is controlled. Depending on the state of protection, either a set of alarming rules is triggered, or the light on the first floor is lit so that it is light to descend the stairs at night. Since the multi-sensor is used, the air temperature is also measured.
- Automated management of multiple radiators. When arming, they switch to the low temperature set in the settings in order to save electricity due to a more rational distribution of heat. In addition, the control of night temperature in the bedroom is made - it automatically decreases by 1 degree for a comfortable sleep. And of course the temperature can be set from a smart home.
- Control of the heated towel rail is automated. Now it does not need to manually turn on / off. In addition, it can be turned on remotely, in advance before arrival.
There is something else. So far we have been talking about the integration of physical components with a smart home. However, openHAB allows integration with software systems. For example, with software DVRs or IP cameras. It's not just about displaying an image in the openHAB interface, which of course has been done, but also about reacting to events. For example, if a recorder or camera is configured to detect motion, this event can be sent to openHAB and used in management. In the above rule for turning on the light at night when going down stairs, the camera detects motion on the first floor (so as not to turn on the light when I go up the stairs). Another example: in the security mode, you can take a picture of the intruder and send the photo by mail, and the violation can be fixed with a conventional PIR motion sensor, which is much more efficient than detecting movement with a camera or a DVR. Moreover, the PIR-sensor can be connected to a smart home using arbitrary technology.
An example of a disturbing email with a photo of the intruder at the guest house.
Fortunately, the offender is forty. Detected by PIR sensor.

Integration with the Kodi media center is also made , for this there is a special binding. When you start a video in the living room lights turn off, when you stop - turns on. Also made, just in case, the management of the smart home by Kodi himself. It is less convenient to use it than with the Kore software control panel, but it is possible to launch Kodi from the interface of the smart home, which Kore cannot.
Interface page with Kodi control and launch button. Above shows the status of the player, the name of the song, the remaining time and duration.
Anticipating questions about the use of the MQTT protocol, let me remind you that with a centralized management model, intermediate links between the server and devices are possible, but, of course, reduce reliability. Therefore, until now, all integration ties have been direct, without intermediaries. However, if we talk about a possible transition in the future or a partial transition to decentralized control, as potentially more expandable and more fault tolerant, then the choice of MQTT is standard. This is a common transport for peer devices on a local network.Multifunctional controller based on Raspberry Pi 3B. Visible temperature and humidity sensor, motion sensor, camera controlled socket, a switch that has become a sensor.
OpenHAB, of course, has binding for MQTT. Mosquitto is selected as the MQTT server itself .. But on what to install it - the question. If it is implicitly or explicitly to pursue the goal of decentralizing management, then putting Mosquitto on a nettop, which has already become a single point of failure, is wrong. And here the following logic worked. The only non-automated room is a garage. There is something to be done: to detect movement, light the lights inside and outside the house, open and monitor the state of the garage doors, conduct video surveillance, control the outlet for garden equipment. And even something else that can only be done on a full-fledged operating system and that relates to ensuring information security. As a result, the choice falls on the Raspberry Pi. It also has pins for connecting standard DIY peripherals and full-fledged Linux with a huge number of ported applications. And a video camera can be connected to it and broadcast the stream to the network. And, importantly, the resources of the system, unlike the Arduino, allow you to build business logic of almost any reasonable complexity, getting rid of openHAB. And all this can be programmed in familiar programming languages.
As a result, all of these tasks have been solved, plus an MQTT server has appeared on the network, through which interaction with openHAB is organized and which will be used later when new devices with decentralized control appear.
Interesting detail
В процессе разработки возникла необходимость измерения аналоговых сигналов (датчик освещенности, датчик тока, датчик качества воздуха). Плюс часть периферии отказалась работать на штатных для Raspberry Pi 3.3В, им нужно 5В. Решились эти проблемы просто и дешево. С обеими задачами справилась установленная дополнительно Arduino Nano, связанная с Raspberry Pi проводами по I2C-протоколу. Т.е. на Arduino по-прежнему никакой логики кроме измерения физических параметров и исполнения команд нет. Вся бизнес-логика на Raspberry Pi и openHAB.
What happened in the end, if we describe in standard terms the characteristics of the entire system at the time of this writing?
Summary:
- Number of temperature sensors: 25.
- Number of light control points: 37, including dual switches, a dimmer, and points without mechanical switches.
- In addition to light, a well pump, a DHW recirculation pump, cranes on heating branches, a boiler, a boiler, automatic gates, heating radiators, etc. are operated. Measured humidity, voltage, current, light, air quality, etc.
Technologies used:
- Central software: openHAB with bindings, Xeoma, Z-Way server, TTS, Mosquitto server, Kodi, separate C / C ++ applications. OS - Ubuntu.
- Local controllers: Arduino + nRF24L01 +, Arduino + ENC82J60, ESP8266-12, Raspberry Pi 3 B, software written in C ++.
- Ready devices: USR IOT WiFi devices, Z-Wave (relays, sockets, dimmer, sensor, thermal heads) from different manufacturers, 433 MHz (switches with Livolo remote control, sockets and Brenin switch), Schneider Electric TCP-Modbus gateway, opening sensors and etc.
What's next?
На очереди стоит отключение радиаторов отопления при открывании окон над ними, контроль качества воздуха в гостиной с камином, более уверенное детектирование движения в гостиной и т.д. Есть и более приземленные задачи: когда появится теплица, автоматизировать полив по данным температуры и влажности почвы.
Instead of a conclusion. We have not yet considered many aspects, for example, voice control, text-to-speech, air conditioner IR control, etc. All this is done and working. The purpose of this article was to show the course of thought, to share the experience of choosing solutions, to show the benefits of open standards and technologies through the description of ease of integration. Everything that was done could have been done differently, better or worse, more expensive or cheaper, more functional or more reliable. You get used to good things quickly and after some time, questions from family members like: “But can't you do it from a smartphone?” Or “why does this flowerbed need to be watered manually?” Make you move on to unattainable perfection.
And I also believe in the limitless possibilities of the Internet of Things. All that is done belongs to this category, but this is only a small part. If after reading this article the number of IoT enthusiasts grows a little, I will consider my task fully accomplished.