Configure EMC VNX 5100 Storage
- Tutorial
Good day to all who read these lines. I recently had the opportunity to configure the EMC VNX 5100 disk shelf as a storage system for a cluster. As it turned out, there is nothing particularly complicated in it, but in the process there are some features that distract time and attention. If you want to use this storage, but don’t want to spend too much time walking on a rake, I ask for cat.
The VNX 5100 disk shelf is an entry-level storage system, structurally consists of the actual disk array and SPS (Stanby Power Supply) module. The array occupies 3 units, and can contain 15 3.5-inch drives (my version), or 25 2.5-inch ones. The first four disks are occupied by the operating system, and it is not recommended to use them in operation. SPS-module occupies 1 unit, contains built-in batteries, can hold two disk arrays. Its main task is to turn off the shelf correctly complete all disk operations and write the contents of the cache to disks. Nothing more. This is not just a rake, but a children's rake. With corresponding consequences in case of attack. Despite its own battery, the system does not make the slightest attempt to pose as a UPS, and in the event of a power failure it calmly lays down.
The system is packed with a soul, the weight in the package is just over 90 kg, so it’s better to invite muscular friends to “skid the body”. And if on the way to the server room there are steep stairs and narrow doors, then friends will be especially grateful for the pleasure.
The device can be sold with or without bundled software. Anyway, if you did not find any installation disks in the box - do not be discouraged. This is normal.
We will not dwell on the installation in the rack, everything is going without problems. The only thing - pay attention to the power cords that come with the kit. Maybe I was so lucky with the shelves, maybe with rack-mounted uninterruptible power supplies, but the cords from the kit are sitting in the UPS connectors quite freely. Of my three shelves, one set of cords had to be almost completely replaced with UPS cords, otherwise they would simply fall out.
Before proceeding with the setup, register on the manufacturer's website emc.com and pump out the necessary software. On the networks, they recommend downloading the VNX Installation Toolbox installation package , which contains almost everything you need, but I would advise taking the necessary utilities in bulk. Firstly, not all necessary utilities are included in the toolbox, and secondly, they are created by the installerInstallAnywere , which does not work correctly under Windows Server 2012. You will need the latest versions of the following utilities (they are already pinched by the InstallAware installer , which works fine):
Before installing on the hosts, we perform all the necessary actions - FC connection, network setup, factory to the domain, etc. For some utilities to work, Java is required, so we install it too. At the time of setup, I advise you to pay off the internal interfaces on all nodes of the future cluster, otherwise the shelf during registration can pick them up, and not external ones. Not that it was critical, it will work this way and that way, but all of a sudden, sometime in a future regiment, you will want to communicate over the network with your hosts. Next, I will describe each utility, indicating its version. This is not necessarily the latest version at the moment, but this version is guaranteed to work for me.
EMC Unisphere Storage System Initialization
(UnisphereInitTool-Win-32-x86-en_US-1.2.25.1.0163-1.exe)
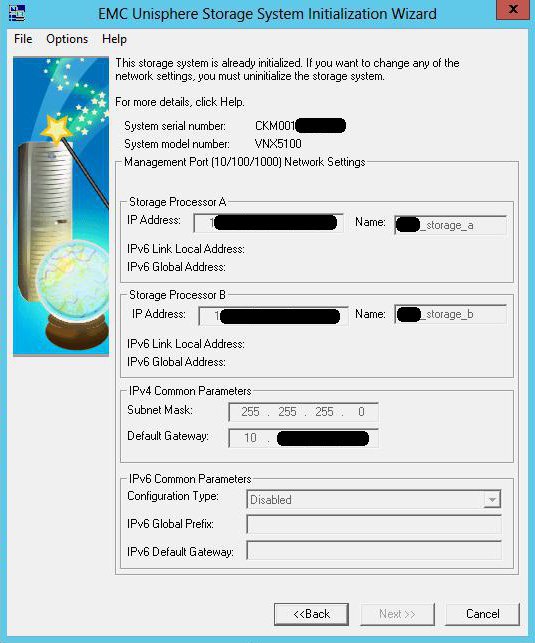
This utility initializes your shelf. Before installing it, connect the host interface and the control interfaces of the disk shelf to the same subnet, on the same physical switch. Turn on the shelf. It starts quite slowly, so there is time for a cup of coffee. We install, run the utility, it scans the subnet and shows all the found storage systems with an indication of their serial number. Please note that while the utility is running, you need to turn off the firewall, otherwise the search will fail. By the number we determine the desired one, initialize it, and set the IP addresses on the control interfaces. Unfortunately, on this point I have only theoretical knowledge, from the manuals, since my pieces of iron came from the supplier already initialized, with addresses on interfaces of the form 1.1.1.1. So I just made sure that the device was initialized, but detected its ip.
EMC Unisphere Server Utility
(UnisphereServerUtil-Win-32-x86-en_US-1.2.25.1.0163-1.exe)
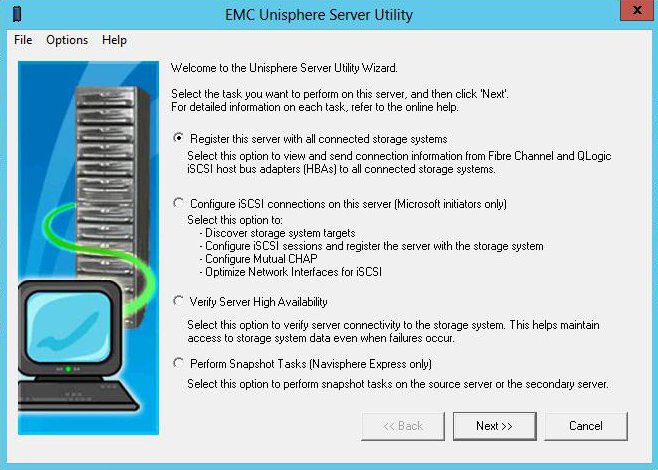
The utility registers the host on the disk shelf, allowing it to be assigned logical drives in the future. If the iSCSI initiator is not running, then it starts. If necessary, registration can be done by hand, from the web interface - it will work. But it’s more correct to do it automatically. After starting, select Register this server with all connected storage system.
EMC Unisphere Server
(UnisphereServer-Win-32-x86-en_US-1.2.25.1.0156-1.exe)
EMC Unisphere VNX Client
(UnisphereClient-Win-32-x86-en_US-1.2.25.1.0156-1.exe)
Provides access to the shelf management web interface. The client part asks for the address of the shelf, and connects to it, the server side provides the same thing on the host IP address. Powered by Java. For the server part to work correctly, configure the firewall permissions. You can connect to the same shelf interface by simply entering the shelf ip address in the browser. Please note that the first time you connect, you need to create an administrator account.

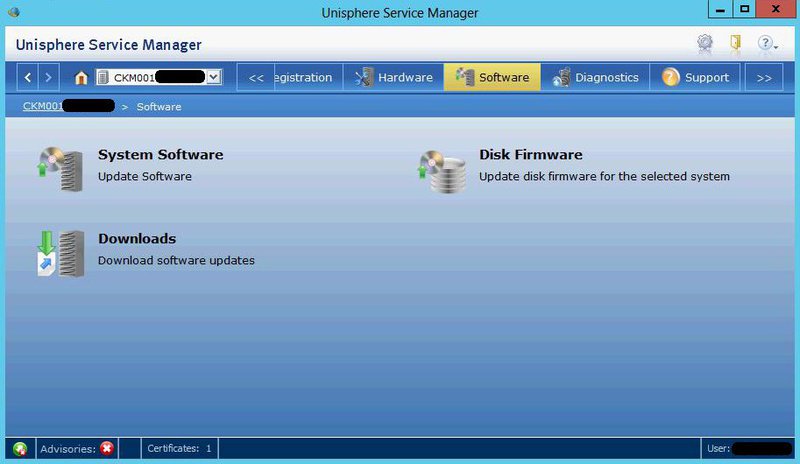
EMC Unisphere Service Manager
(UnisphereServiceManager-Win-32-x86-en_US-1.2.26.1.0068-1.exe)
Service utility used to change firmware, OS, hardware upgrades, diagnostic collection, etc. In normal operation, it is not is used.
EMC PowerPath
(EMCPower.X64.signed.5.5.b289.exe)
The PowerPath utility is a separate load balancing product between different FCs, it can be used with storage systems of different manufacturers, and generally speaking it is a licensed and paid thing. However, for connections to EMC Clarion and EMC VNX systems, the manufacturer permits use without a license. To do this, during installation, indicate that "Yes", we have Only Clarion arrays connected to this host. I used version 5.5 without a patch. There is a patch on the site, and in the documentation there are mentions about version 5.7. Structurally, the shelf contains two blocks, each of which sends information about the assigned logical drives to the host. Thus, in Computer Manager, you will see two sets of storage disks, one of which is connected, and the second throws an error (and not surprisingly, because the disks are already taken). PowerPath automatically processes all FC and hides an extra set of disks. Everything will work without it, but it’s better to do it beautifully and correctly.

The utility supports three operating modes:
Active-active - FC work simultaneously with load balancing.
Active-passive - one FC is active, and the rest are in reserve, and are connected when the active fails. Only one FC works at any given time.
ALUA -it is a protocol for choosing a preferred path to data hosted on controllers with different priorities, for example, one of two is more preferable as an access path than the other. So using the ALUA protocol (if the OS knows how to use it) from several paths, one is selected that is more advantageous for accessing this piece of data (for example, LUN). If the controller, priority for this data, is unavailable, then access will go through the controller, which has a "second top" priority, and so on. Nevertheless, both of them are active, although at this particular point in time, mainly one is used for a specific LUN (this is in contrast to Active-Passive). (c) track
It is this mode that supports our device, unlike the previous two, with which only older models can work.
So, all the software is installed, and now you can do the shelf directly.
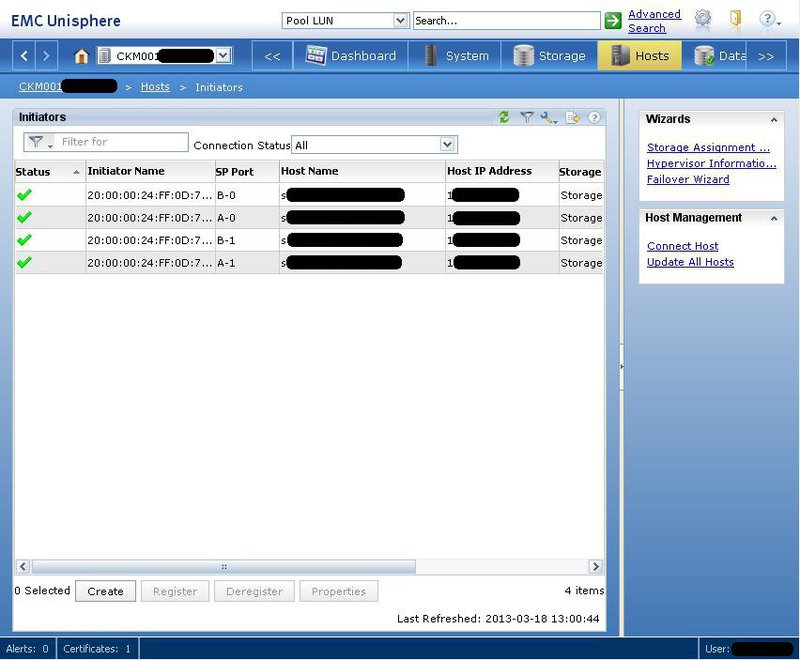
We are connected to the web interface, and we go to the tab Hosts> Host List . Since we have already registered, in this tab we see our servers. The Hosts> Initiators tab lists initiators that link servers to storage units. You can deregister the initiator and instead manually create a new one by selecting the server name from the existing ones or specifying a new one. Will work. Now all initiators in the list are presented with yellow warning triangles - because they are not connected anywhere yet. On the Settings> Network> Edit network settings tab, reconfigure the IP addresses to your network.
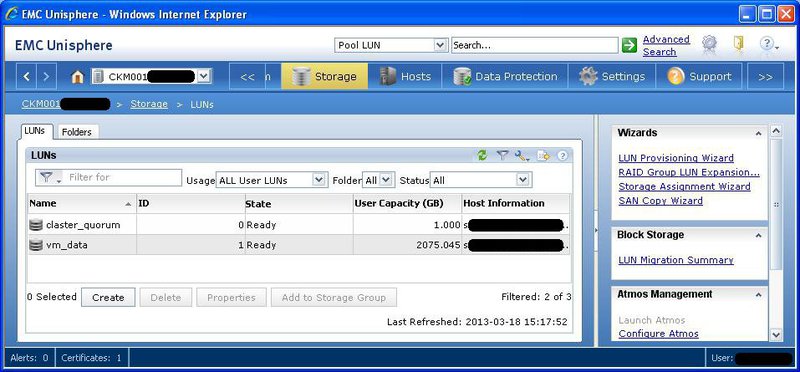
Since our system is being prepared for a cluster, we will create two LUNs - a 1 GB quorum, and data LUNs for the rest of the space. First, prepare the pool for the placement of these LUNs. On the Storage> Storage Pools tab, select the raid type and the total pool size. There is also a feature here - the system does not know how to create raids on an arbitrary number of hard drives. Instead, you can select one of the predefined templates.

So, 10 disks in raid5 do not mean a 9 + 1 scheme at all. And mean (4 + 1) + (4 + 1), with a corresponding drop in the total capacity. And raid5 on 8 disks means a combination of (4 + 1) + (2 + 1). Well, if this data raid simply contains file data, and if it is application data, we have unpredictable performance problems. Given that initially I can count on 10 disks (15 minus 4 under the operating system and minus 1 HotSpare), I have to choose between raid5 for 10 disks, and raid6 for 8 disks plus two in the mirror. For reasons of disk capacity, it was decided to stop at raid5. So - indicate the type of raid, indicate the number of disks allocated for it, the name of the new pool - and OK.
Now Storage> Luns . Specify the name of the pool on which the newly created LUN will be placed, its name and size.
And finally, on the Hosts> Storage Groops tab, create a new storage group, linking the LUNs and hosts together:
Create , then Connect LUNs , then Connect Hosts . Storage groups, in fact, map one or more LUNs to one or more hosts. Please note that you can connect several hosts to one LUN only if they are future members of the cluster. Otherwise, the hosts will corrupt each other's data due to inconsistent write to disk.

Now you can go to the Hosts> Initiators tab and admire the green checkmarks opposite all the initiators, indicating a correct connection.
On this, the configuration of the disk shelf can be considered complete. On each host, we go to Disk Management and translate our new drives online without assigning a letter. We format it in NTFS, raise the cluster, and hook the disks to it. You can work. I raised the cluster on Windows Server 2012, the differences in the process from Server 2008 are cosmetic. But, if anyone is interested, I can describe.
Phew That seems to be “all that I wanted to say about the Vietnam War” (c)
PS Many thanks to the litweg and track habrayusers for interesting and useful additions.
The VNX 5100 disk shelf is an entry-level storage system, structurally consists of the actual disk array and SPS (Stanby Power Supply) module. The array occupies 3 units, and can contain 15 3.5-inch drives (my version), or 25 2.5-inch ones. The first four disks are occupied by the operating system, and it is not recommended to use them in operation. SPS-module occupies 1 unit, contains built-in batteries, can hold two disk arrays. Its main task is to turn off the shelf correctly complete all disk operations and write the contents of the cache to disks. Nothing more. This is not just a rake, but a children's rake. With corresponding consequences in case of attack. Despite its own battery, the system does not make the slightest attempt to pose as a UPS, and in the event of a power failure it calmly lays down.
The system is packed with a soul, the weight in the package is just over 90 kg, so it’s better to invite muscular friends to “skid the body”. And if on the way to the server room there are steep stairs and narrow doors, then friends will be especially grateful for the pleasure.
The device can be sold with or without bundled software. Anyway, if you did not find any installation disks in the box - do not be discouraged. This is normal.
We will not dwell on the installation in the rack, everything is going without problems. The only thing - pay attention to the power cords that come with the kit. Maybe I was so lucky with the shelves, maybe with rack-mounted uninterruptible power supplies, but the cords from the kit are sitting in the UPS connectors quite freely. Of my three shelves, one set of cords had to be almost completely replaced with UPS cords, otherwise they would simply fall out.
Before proceeding with the setup, register on the manufacturer's website emc.com and pump out the necessary software. On the networks, they recommend downloading the VNX Installation Toolbox installation package , which contains almost everything you need, but I would advise taking the necessary utilities in bulk. Firstly, not all necessary utilities are included in the toolbox, and secondly, they are created by the installerInstallAnywere , which does not work correctly under Windows Server 2012. You will need the latest versions of the following utilities (they are already pinched by the InstallAware installer , which works fine):
- EMC PowerPath
- EMC Unisphere Storage System Initialization
- EMC Unisphere Server Utility
- EMC Unisphere VNX Client
- EMC Unisphere Server
- EMC Unisphere Service Manager
Before installing on the hosts, we perform all the necessary actions - FC connection, network setup, factory to the domain, etc. For some utilities to work, Java is required, so we install it too. At the time of setup, I advise you to pay off the internal interfaces on all nodes of the future cluster, otherwise the shelf during registration can pick them up, and not external ones. Not that it was critical, it will work this way and that way, but all of a sudden, sometime in a future regiment, you will want to communicate over the network with your hosts. Next, I will describe each utility, indicating its version. This is not necessarily the latest version at the moment, but this version is guaranteed to work for me.
EMC Unisphere Storage System Initialization
(UnisphereInitTool-Win-32-x86-en_US-1.2.25.1.0163-1.exe)
This utility initializes your shelf. Before installing it, connect the host interface and the control interfaces of the disk shelf to the same subnet, on the same physical switch. Turn on the shelf. It starts quite slowly, so there is time for a cup of coffee. We install, run the utility, it scans the subnet and shows all the found storage systems with an indication of their serial number. Please note that while the utility is running, you need to turn off the firewall, otherwise the search will fail. By the number we determine the desired one, initialize it, and set the IP addresses on the control interfaces. Unfortunately, on this point I have only theoretical knowledge, from the manuals, since my pieces of iron came from the supplier already initialized, with addresses on interfaces of the form 1.1.1.1. So I just made sure that the device was initialized, but detected its ip.
EMC Unisphere Server Utility
(UnisphereServerUtil-Win-32-x86-en_US-1.2.25.1.0163-1.exe)
The utility registers the host on the disk shelf, allowing it to be assigned logical drives in the future. If the iSCSI initiator is not running, then it starts. If necessary, registration can be done by hand, from the web interface - it will work. But it’s more correct to do it automatically. After starting, select Register this server with all connected storage system.
EMC Unisphere Server
(UnisphereServer-Win-32-x86-en_US-1.2.25.1.0156-1.exe)
EMC Unisphere VNX Client
(UnisphereClient-Win-32-x86-en_US-1.2.25.1.0156-1.exe)
Provides access to the shelf management web interface. The client part asks for the address of the shelf, and connects to it, the server side provides the same thing on the host IP address. Powered by Java. For the server part to work correctly, configure the firewall permissions. You can connect to the same shelf interface by simply entering the shelf ip address in the browser. Please note that the first time you connect, you need to create an administrator account.
EMC Unisphere Service Manager
(UnisphereServiceManager-Win-32-x86-en_US-1.2.26.1.0068-1.exe)
Service utility used to change firmware, OS, hardware upgrades, diagnostic collection, etc. In normal operation, it is not is used.
EMC PowerPath
(EMCPower.X64.signed.5.5.b289.exe)
The PowerPath utility is a separate load balancing product between different FCs, it can be used with storage systems of different manufacturers, and generally speaking it is a licensed and paid thing. However, for connections to EMC Clarion and EMC VNX systems, the manufacturer permits use without a license. To do this, during installation, indicate that "Yes", we have Only Clarion arrays connected to this host. I used version 5.5 without a patch. There is a patch on the site, and in the documentation there are mentions about version 5.7. Structurally, the shelf contains two blocks, each of which sends information about the assigned logical drives to the host. Thus, in Computer Manager, you will see two sets of storage disks, one of which is connected, and the second throws an error (and not surprisingly, because the disks are already taken). PowerPath automatically processes all FC and hides an extra set of disks. Everything will work without it, but it’s better to do it beautifully and correctly.
The utility supports three operating modes:
Active-active - FC work simultaneously with load balancing.
Active-passive - one FC is active, and the rest are in reserve, and are connected when the active fails. Only one FC works at any given time.
ALUA -it is a protocol for choosing a preferred path to data hosted on controllers with different priorities, for example, one of two is more preferable as an access path than the other. So using the ALUA protocol (if the OS knows how to use it) from several paths, one is selected that is more advantageous for accessing this piece of data (for example, LUN). If the controller, priority for this data, is unavailable, then access will go through the controller, which has a "second top" priority, and so on. Nevertheless, both of them are active, although at this particular point in time, mainly one is used for a specific LUN (this is in contrast to Active-Passive). (c) track
It is this mode that supports our device, unlike the previous two, with which only older models can work.
So, all the software is installed, and now you can do the shelf directly.
We are connected to the web interface, and we go to the tab Hosts> Host List . Since we have already registered, in this tab we see our servers. The Hosts> Initiators tab lists initiators that link servers to storage units. You can deregister the initiator and instead manually create a new one by selecting the server name from the existing ones or specifying a new one. Will work. Now all initiators in the list are presented with yellow warning triangles - because they are not connected anywhere yet. On the Settings> Network> Edit network settings tab, reconfigure the IP addresses to your network.
Since our system is being prepared for a cluster, we will create two LUNs - a 1 GB quorum, and data LUNs for the rest of the space. First, prepare the pool for the placement of these LUNs. On the Storage> Storage Pools tab, select the raid type and the total pool size. There is also a feature here - the system does not know how to create raids on an arbitrary number of hard drives. Instead, you can select one of the predefined templates.
So, 10 disks in raid5 do not mean a 9 + 1 scheme at all. And mean (4 + 1) + (4 + 1), with a corresponding drop in the total capacity. And raid5 on 8 disks means a combination of (4 + 1) + (2 + 1). Well, if this data raid simply contains file data, and if it is application data, we have unpredictable performance problems. Given that initially I can count on 10 disks (15 minus 4 under the operating system and minus 1 HotSpare), I have to choose between raid5 for 10 disks, and raid6 for 8 disks plus two in the mirror. For reasons of disk capacity, it was decided to stop at raid5. So - indicate the type of raid, indicate the number of disks allocated for it, the name of the new pool - and OK.
Now Storage> Luns . Specify the name of the pool on which the newly created LUN will be placed, its name and size.
And finally, on the Hosts> Storage Groops tab, create a new storage group, linking the LUNs and hosts together:
Create , then Connect LUNs , then Connect Hosts . Storage groups, in fact, map one or more LUNs to one or more hosts. Please note that you can connect several hosts to one LUN only if they are future members of the cluster. Otherwise, the hosts will corrupt each other's data due to inconsistent write to disk.
Now you can go to the Hosts> Initiators tab and admire the green checkmarks opposite all the initiators, indicating a correct connection.
On this, the configuration of the disk shelf can be considered complete. On each host, we go to Disk Management and translate our new drives online without assigning a letter. We format it in NTFS, raise the cluster, and hook the disks to it. You can work. I raised the cluster on Windows Server 2012, the differences in the process from Server 2008 are cosmetic. But, if anyone is interested, I can describe.
Phew That seems to be “all that I wanted to say about the Vietnam War” (c)
PS Many thanks to the litweg and track habrayusers for interesting and useful additions.