Understand Render Props with an example
Hi, Habr! I present to you the translation of the article “Learn Render Props by Example” .

Honestly, I hadn’t previously presented situations in which React render props can be applied until I saw a practical example., therefore, let's go! Or you can read TLDR;
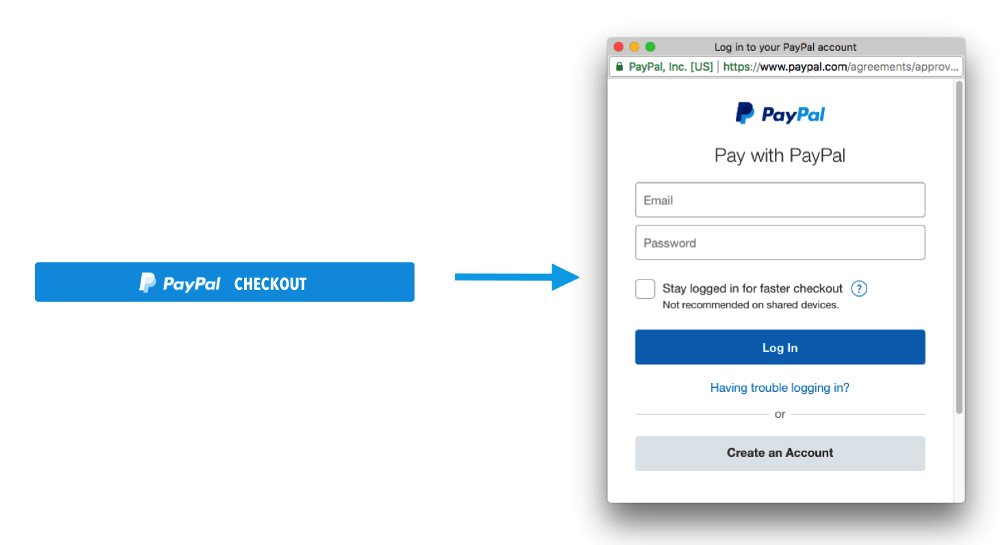
Situation:
We are instructed to create a button that opens the PayPal window:
We open our editor and create the PayPalLauncher component:
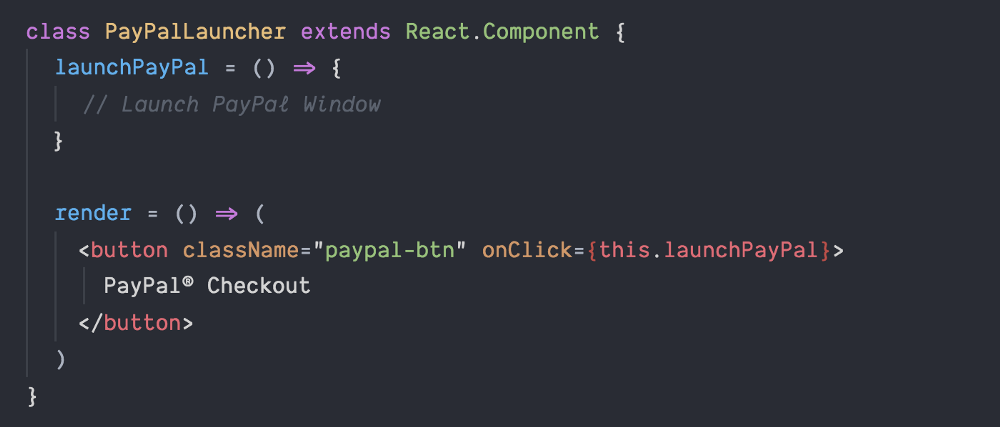
PayPalLauncher may contain a copy of PayPal, with additional logic, so it would be nice to wrap it (PayPal) into the component.
But what if you need to use additional PayPal items? For example:

Now we have two buttons and an orange link that should open the PayPal window. Let's look at several ways to implement this.
Option 1 - Logic in render ()
Initially, you may be tempted to write code inside PayPalLauncher:
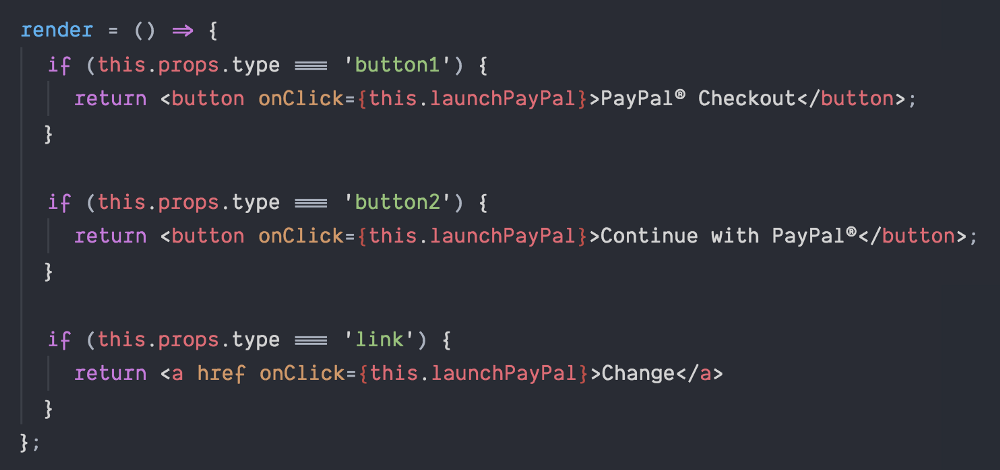
Here we pass a prop, called type, to determine which element of PayPal to render. Lots of logic to express several visual changes. This still does not give us the ability to easily draw any component as needed. What if there is a way to separate logic from presentation?
Option 2 - Nesting
Nesting helps us write more understandable JSX.

Now we have a clear separation between logic (PayPalLauncher) and presentation (PayPalButton). This allows us to display any component as an element of PayPal (PayPal trigger). And it reads well! But how do we transfer the props between PayPalLauncher and PayPalButton? Let's see how it looks in PayPalLauncher:
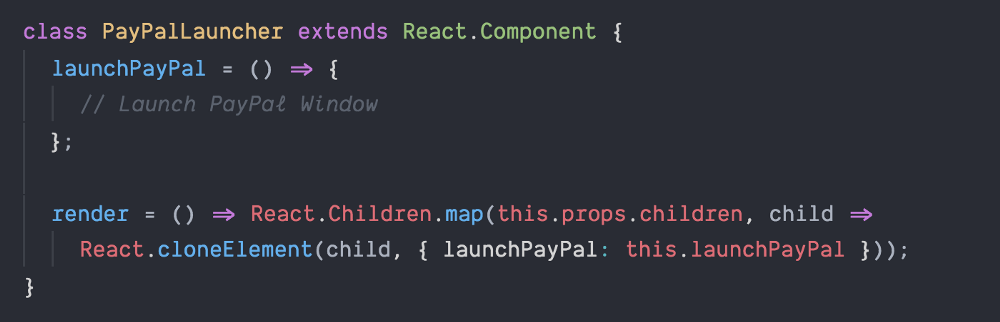
What's going on here?! We clone children and give prop to launchPayPal implicitly, for every child. This means that every child you put into PayPalLauncher must accept prop launchPayPal. Although nesting gives us a more understandable JSX, this method is not ideal, especially if we are trying to create reusable components with common interfaces.
Option 3 - Render Props
Render Props is a method of transferring props from parent to child using a function or closure. Let's see what it looks like:

Instead of treating props.children as a node, we create a closure and select the arguments to pass to the child nodes. In this case, we use an instance method of the class launchPayPal.
When we implement this, the resulting version will look like this:
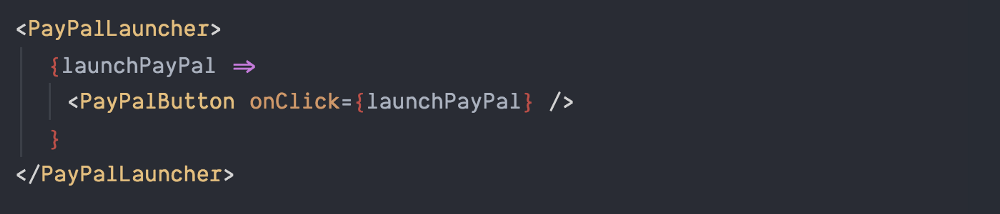
What does it mean? Instead of elements, we pass the function as a child to PayPalLauncher. Because of this, we can easily pass launchPayPal to the onClick handler of the PayPalButton component. Now we can render any component we need, and put the parent launchPayPal into any child handler.
A little more: The
unexpected advantage of using render props is that this approach allows you to pass launchPayPal to the Page, and allows us to add more functionality. For example, suppose you want to register a user and confirm the form before launching the PayPal window:

Since launchPayPal is rendered via render props on the Page, we can easily add additional context-sensitive functionality using feature composition. Here we keep the difference between Page and PayPalLauncher and use pipe to improve readability.
Summary
What do we get when using render props?
Are you also worried about the performance of your React applications? Jobs are open!
* Remember that render props is a pattern and can be implemented in several ways - only you have to choose what to use with your case.
Honestly, I hadn’t previously presented situations in which React render props can be applied until I saw a practical example., therefore, let's go! Or you can read TLDR;
Situation:
We are instructed to create a button that opens the PayPal window:
We open our editor and create the PayPalLauncher component:
PayPalLauncher may contain a copy of PayPal, with additional logic, so it would be nice to wrap it (PayPal) into the component.
But what if you need to use additional PayPal items? For example:
Now we have two buttons and an orange link that should open the PayPal window. Let's look at several ways to implement this.
Option 1 - Logic in render ()
Initially, you may be tempted to write code inside PayPalLauncher:
Here we pass a prop, called type, to determine which element of PayPal to render. Lots of logic to express several visual changes. This still does not give us the ability to easily draw any component as needed. What if there is a way to separate logic from presentation?
Option 2 - Nesting
Nesting helps us write more understandable JSX.
Now we have a clear separation between logic (PayPalLauncher) and presentation (PayPalButton). This allows us to display any component as an element of PayPal (PayPal trigger). And it reads well! But how do we transfer the props between PayPalLauncher and PayPalButton? Let's see how it looks in PayPalLauncher:
What's going on here?! We clone children and give prop to launchPayPal implicitly, for every child. This means that every child you put into PayPalLauncher must accept prop launchPayPal. Although nesting gives us a more understandable JSX, this method is not ideal, especially if we are trying to create reusable components with common interfaces.
Option 3 - Render Props
Render Props is a method of transferring props from parent to child using a function or closure. Let's see what it looks like:
Instead of treating props.children as a node, we create a closure and select the arguments to pass to the child nodes. In this case, we use an instance method of the class launchPayPal.
When we implement this, the resulting version will look like this:
What does it mean? Instead of elements, we pass the function as a child to PayPalLauncher. Because of this, we can easily pass launchPayPal to the onClick handler of the PayPalButton component. Now we can render any component we need, and put the parent launchPayPal into any child handler.
A little more: The
unexpected advantage of using render props is that this approach allows you to pass launchPayPal to the Page, and allows us to add more functionality. For example, suppose you want to register a user and confirm the form before launching the PayPal window:
Since launchPayPal is rendered via render props on the Page, we can easily add additional context-sensitive functionality using feature composition. Here we keep the difference between Page and PayPalLauncher and use pipe to improve readability.
Summary
What do we get when using render props?
- Reuse of logic - separating the display from the logic, we do not need to adjust the logic for each component or visual presentation.
- Clean and well readable JSX.
- The structure and functional component of our React applications is improved.
Are you also worried about the performance of your React applications? Jobs are open!
* Remember that render props is a pattern and can be implemented in several ways - only you have to choose what to use with your case.