Calculator of the late 70's - Electronics B3-18A
While re-reading the Old Iron hub , I stumbled upon a review of a warm tube phone and remembered that I had a similar device somewhere. I immediately wanted to get my phone, wipe it with alcohol and put it on my desktop (the one from the chipboard) as a working museum exhibit. And at the same time check whether the local PBX has completely refused pulse dialing.
But since the phone remained in another city, I postponed my intentions indefinitely, and, of course, forgot about it. And at Christmas, by the will of fate, I finally ended up in the glorious city of Vladimir, where this wonderful phone lies. In the process of his search among a huge number of old things, the Soviet B3-18A Electronics microcalculator was found, which, undoubtedly, is of much greater interest.

The image is taken from the cover of the journal “Science and Life” (No. 10, 1976).
I would like to tell the Khabrasociety about it.
The B3-18A Electronics microcalculator is a modification of the B3-18 Electronics calculator, which has been produced since 1976, and is basically no different from the B3-18. Even the price of the B3-18A calculator was the same as the B3-18 model, and in 1976 amounted to as much as 220 rubles. I would like to recall that the salary of an engineer without work experience at that time was 120 rubles. per month, and this calculator was far from affordable for everyone.

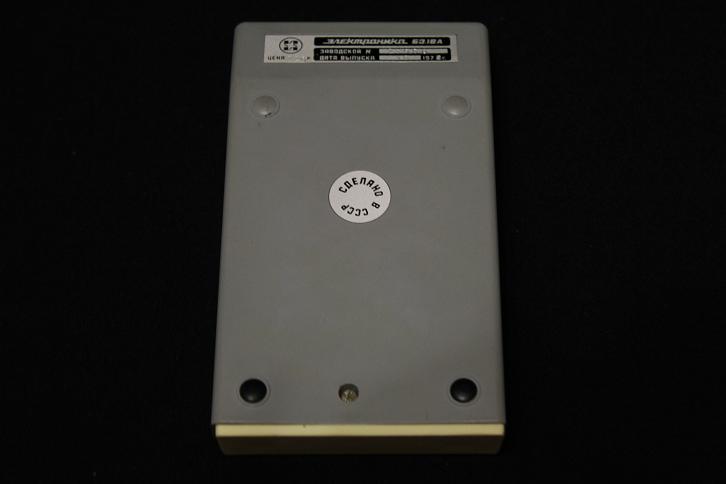
However, it should be noted that by the end of 1980, the price of the calculator decreased significantly, and my copy was purchased for only 95 rubles, as evidenced by the corresponding entry in the warranty card and the sales receipt.
To make the calculator cheaper and more accessible, another modification was released, called the B3-25A. Its main difference from the more expensive model was only the lack of a prefix function key F, with which the B3-18A model could be raised to any power within eight digits in two steps, calculate reciprocal values, calculate logarithms and antilogarithms, trigonometric functions.

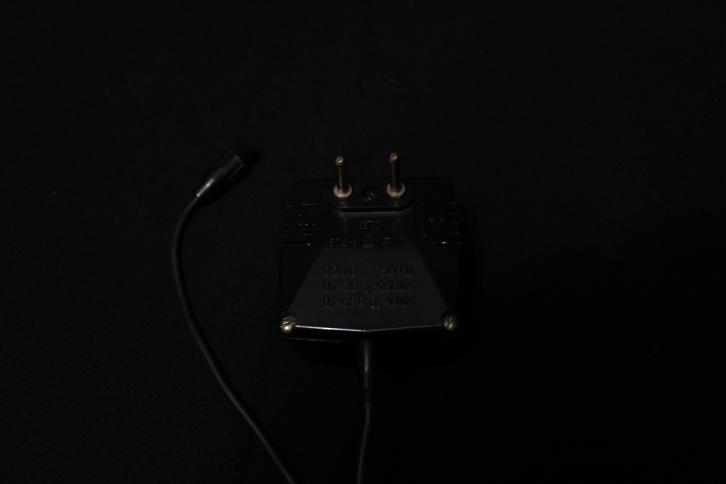
The complete set of my calculator Electronics B3-18A turned out to be as follows: the device itself, a leather case, a BP2-3 power supply, an instruction manual and a circuit diagram. Unfortunately, the packaging (box) and passport of the power supply were lost, but this is not surprising, since more than thirty years have passed since the purchase of the calculator.
Based on the fact that the B3-18A microcalculator is no different from the B3-18 model, some of the material for the review on Habré was found in the article “Fantastic Electronics” (author - R. Svoren), published in the 10th issue of the journal Science and Life for 1976 year. But the lion's share of information on the technical characteristics and the principle of operation of the calculator turned out, as it is not strange, in the instruction manual of the calculator. And the circuit diagram included in the kit is so detailed that it not only makes it easy to repair a failed calculator, but also solders your own. It is a pity that such circuits are not attached to modern electronics.
GENERAL INFORMATION
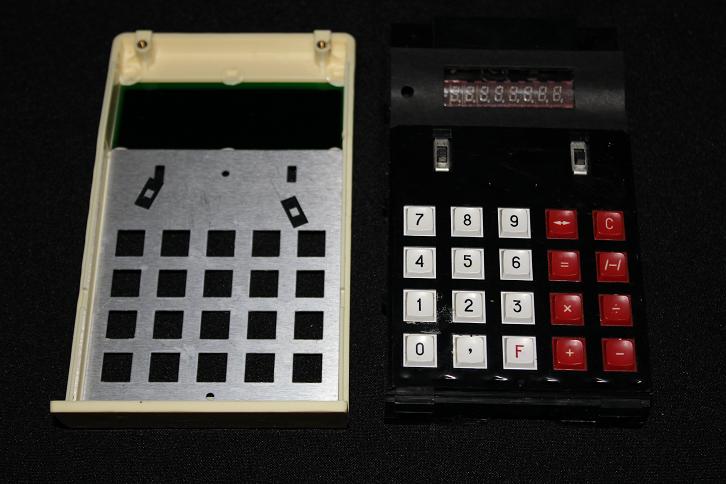
The "B3-18A Electronics" microcalculator is designed for engineering calculations and allows you to perform four arithmetic operations, as well as square and extract the square root, in two steps, to any degree within eight digits, calculate the reciprocal values, calculate the logarithms and antilogarithms, and also trigonometric functions for any real numbers.
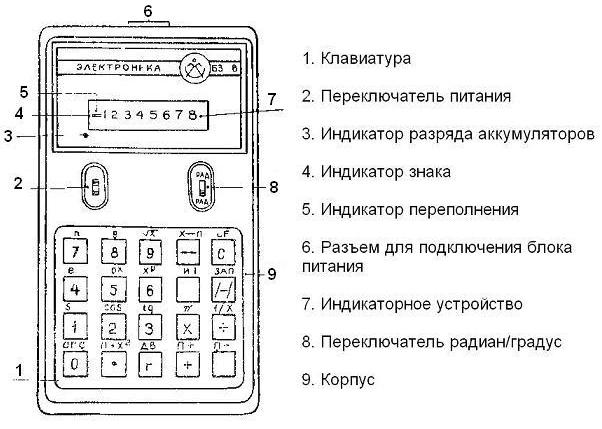
Data and commands are entered into the calculator using the keyboard. Input data and calculation results are controlled visually using a 9-bit vacuum luminescent display.
A characteristic feature of the B3-18A Electronics calculator is the presence of a combined function key (“F”) that allows you to use each key to perform two operations. Also, an indication of the sign of the number and overflow of the discharge grid of the calculator is provided.

For storing data and accumulating results, the microcalculator has a memory register (RP), and for storing intermediate calculation results - a working register (PP).
The microcalculator can operate from a built-in battery of D-0.55S batteries (4 pcs.) Or a BP2-3 power supply unit. The batteries are charged from the power supply.

To feel how extraordinary a miracle of scientific and technological progress this calculator seemed to people in 1976, I quote from the article “Fantastic Electronics” of the journal Science and Life:
“This calculator went over the Rubicon of arithmetic, his mathematical education stepped into trigonometry and algebra. "Electronics BZ-18" can instantly square and extract the square root, in two steps to raise to any degree within eight digits, calculate the inverse values, calculate the logarithms and antilogarithms (decimal and natural), trigonometric functions. All this is not a memory access, not a reproduction of reference data. So, for example, to calculate the sine, the calculator, according to its internal program, performs dozens of arithmetic operations using the well-known Taylor series expansion.
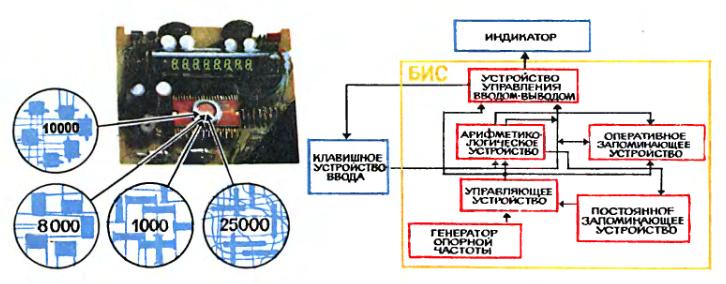
Image taken from the journal “Science and Life” (No. 10, 1976)
“Electronics BZ-18” contains approximately 10 thousand transistors, 8 thousand resistors, 1 thousand capacitors and 25 thousand connecting conductors. For comparison, we note that there are about 100 elements in a transistor receiver, and about a thousand in a TV. All these transistors, resistors, capacitors and conductors are located on a thin silicon wafer measuring 5 X 5.2 mm. Think about it - fifty televisions in one cell of an arithmetic notebook. Fantasy! ”
SPECIFICATIONS
INTERNAL DEVICE
In order to penetrate the BZ-18A Electronics microcalculator, you need to unscrew only one screw. My calculator was never opened (even to replace the batteries), so I had to damage the factory seal in the form of a substance similar to plasticine.
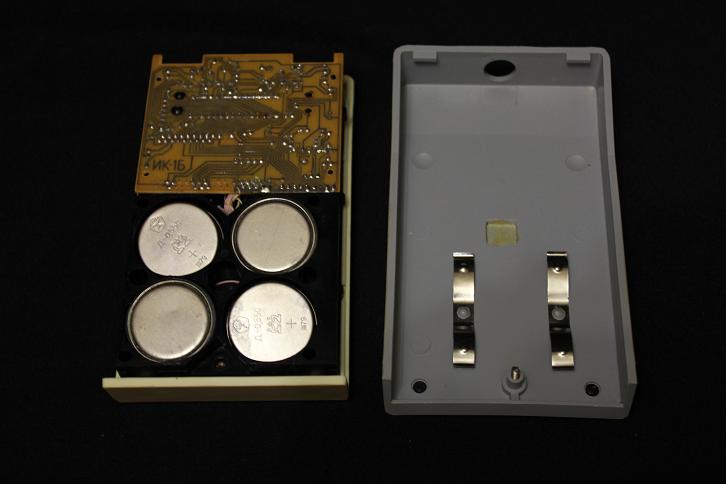
We open the lid, we get four battery cells D-0.55S.
Batteries
In the photograph, batteries have a quite presentable appearance, as they were previously cleaned of oxides and leaked electrolyte. On the positive contact of the battery, you can see the year of manufacture and two men holding in their hands something like a star.
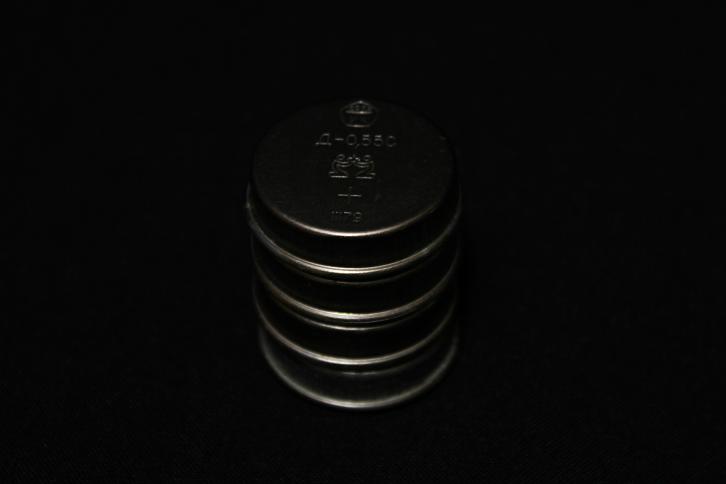
Yes, you were not mistaken, batteries have been in use for over 30 years.
The D-0.55S elements are alkaline nickel-cadmium batteries, and I immediately had a desire to revive them to life.
On the Internet, a shamanic method was found that seemed to help restore similar batteries. The essence of this method is as follows: the D-0.55S battery cells are placed in a refrigerator for two days, then boiled in water from a tap for 30 minutes, dried and charged first with alternating and then direct current (ATTENTION! Do not try to repeat this at home) .
I did not have much hope of success, but I decided to follow the advice of the shaman, and repeated the specified procedure at home. True, he did not charge with alternating current. As a result, the batteries became much cleaner, but after 12 hours of charging (with their own power supply, inside the calculator) they did not want to work. Not really upset, I continued to clean the batteries from oxides with an eraser and a cleaning agent for LCD monitors. Having returned the battery cells to their rightful place, I played with the calculator for another two days, feeding it from the mains, until I accidentally discovered that ... The
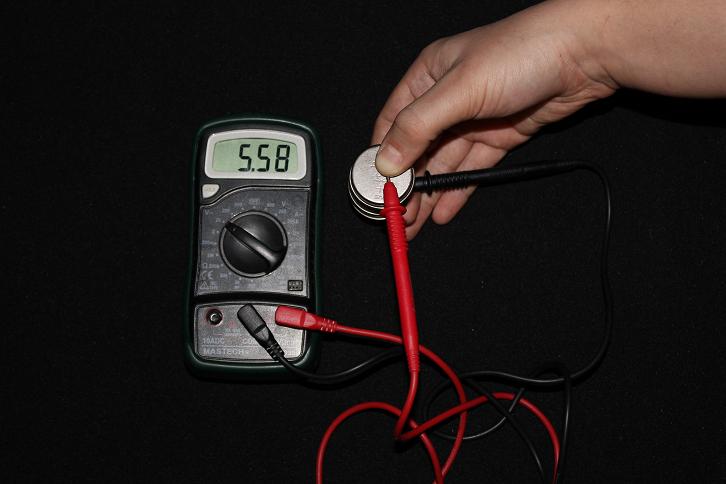
batteries began to gain charge. Amazing!
The battery capacity, of course, decreased, and, instead of the prescribed 3 hours of operation of the calculator from an autonomous power source, it only works for about forty minutes. But still…
Printed circuit board The

printed circuit board, on which all the electronic components of the microcalculator are located, is fixed in the housing using four plastic pins. In order to remove the board from the case, just pull it up.
Almost immediately, the K145IP7P chip and the IV-21 indicator are striking.
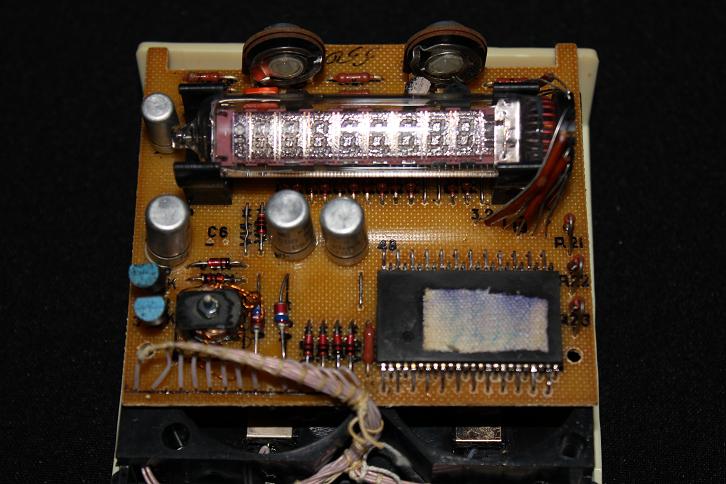
Capacitors, constant and variable resistors, several pairs of diodes and other discrete electronic components occupy only a small part of the total area of the printed circuit board.
Housing elements
Having removed the printed circuit board, you can see two switches, a green glass and a power connector. The keyboard is not separable, so it’s quite difficult to clean the contacts if they are dirty and bounce.
Now you can collect the calculator, and put it on the shelf as an existing exhibit.
But since the phone remained in another city, I postponed my intentions indefinitely, and, of course, forgot about it. And at Christmas, by the will of fate, I finally ended up in the glorious city of Vladimir, where this wonderful phone lies. In the process of his search among a huge number of old things, the Soviet B3-18A Electronics microcalculator was found, which, undoubtedly, is of much greater interest.
The image is taken from the cover of the journal “Science and Life” (No. 10, 1976).
I would like to tell the Khabrasociety about it.
The B3-18A Electronics microcalculator is a modification of the B3-18 Electronics calculator, which has been produced since 1976, and is basically no different from the B3-18. Even the price of the B3-18A calculator was the same as the B3-18 model, and in 1976 amounted to as much as 220 rubles. I would like to recall that the salary of an engineer without work experience at that time was 120 rubles. per month, and this calculator was far from affordable for everyone.
However, it should be noted that by the end of 1980, the price of the calculator decreased significantly, and my copy was purchased for only 95 rubles, as evidenced by the corresponding entry in the warranty card and the sales receipt.
To make the calculator cheaper and more accessible, another modification was released, called the B3-25A. Its main difference from the more expensive model was only the lack of a prefix function key F, with which the B3-18A model could be raised to any power within eight digits in two steps, calculate reciprocal values, calculate logarithms and antilogarithms, trigonometric functions.
The complete set of my calculator Electronics B3-18A turned out to be as follows: the device itself, a leather case, a BP2-3 power supply, an instruction manual and a circuit diagram. Unfortunately, the packaging (box) and passport of the power supply were lost, but this is not surprising, since more than thirty years have passed since the purchase of the calculator.
Based on the fact that the B3-18A microcalculator is no different from the B3-18 model, some of the material for the review on Habré was found in the article “Fantastic Electronics” (author - R. Svoren), published in the 10th issue of the journal Science and Life for 1976 year. But the lion's share of information on the technical characteristics and the principle of operation of the calculator turned out, as it is not strange, in the instruction manual of the calculator. And the circuit diagram included in the kit is so detailed that it not only makes it easy to repair a failed calculator, but also solders your own. It is a pity that such circuits are not attached to modern electronics.
GENERAL INFORMATION
The "B3-18A Electronics" microcalculator is designed for engineering calculations and allows you to perform four arithmetic operations, as well as square and extract the square root, in two steps, to any degree within eight digits, calculate the reciprocal values, calculate the logarithms and antilogarithms, and also trigonometric functions for any real numbers.
Data and commands are entered into the calculator using the keyboard. Input data and calculation results are controlled visually using a 9-bit vacuum luminescent display.
A characteristic feature of the B3-18A Electronics calculator is the presence of a combined function key (“F”) that allows you to use each key to perform two operations. Also, an indication of the sign of the number and overflow of the discharge grid of the calculator is provided.
For storing data and accumulating results, the microcalculator has a memory register (RP), and for storing intermediate calculation results - a working register (PP).
The microcalculator can operate from a built-in battery of D-0.55S batteries (4 pcs.) Or a BP2-3 power supply unit. The batteries are charged from the power supply.
To feel how extraordinary a miracle of scientific and technological progress this calculator seemed to people in 1976, I quote from the article “Fantastic Electronics” of the journal Science and Life:
“This calculator went over the Rubicon of arithmetic, his mathematical education stepped into trigonometry and algebra. "Electronics BZ-18" can instantly square and extract the square root, in two steps to raise to any degree within eight digits, calculate the inverse values, calculate the logarithms and antilogarithms (decimal and natural), trigonometric functions. All this is not a memory access, not a reproduction of reference data. So, for example, to calculate the sine, the calculator, according to its internal program, performs dozens of arithmetic operations using the well-known Taylor series expansion.
Image taken from the journal “Science and Life” (No. 10, 1976)
“Electronics BZ-18” contains approximately 10 thousand transistors, 8 thousand resistors, 1 thousand capacitors and 25 thousand connecting conductors. For comparison, we note that there are about 100 elements in a transistor receiver, and about a thousand in a TV. All these transistors, resistors, capacitors and conductors are located on a thin silicon wafer measuring 5 X 5.2 mm. Think about it - fifty televisions in one cell of an arithmetic notebook. Fantasy! ”
SPECIFICATIONS
- Control chip (processor) - K145IP7P;
- The display is vacuum, luminescent, contains 8 numerical digits (IV-21 indicator);
- Keyboard - 20 keys, 2 switches (power and units of measure angles deg / rad);
- Power supply - from batteries of type D-0.55S (4 pcs) or from an external power supply unit BP2-3;
INTERNAL DEVICE
In order to penetrate the BZ-18A Electronics microcalculator, you need to unscrew only one screw. My calculator was never opened (even to replace the batteries), so I had to damage the factory seal in the form of a substance similar to plasticine.
We open the lid, we get four battery cells D-0.55S.
Batteries
In the photograph, batteries have a quite presentable appearance, as they were previously cleaned of oxides and leaked electrolyte. On the positive contact of the battery, you can see the year of manufacture and two men holding in their hands something like a star.
Yes, you were not mistaken, batteries have been in use for over 30 years.
The D-0.55S elements are alkaline nickel-cadmium batteries, and I immediately had a desire to revive them to life.
On the Internet, a shamanic method was found that seemed to help restore similar batteries. The essence of this method is as follows: the D-0.55S battery cells are placed in a refrigerator for two days, then boiled in water from a tap for 30 minutes, dried and charged first with alternating and then direct current (ATTENTION! Do not try to repeat this at home) .
I did not have much hope of success, but I decided to follow the advice of the shaman, and repeated the specified procedure at home. True, he did not charge with alternating current. As a result, the batteries became much cleaner, but after 12 hours of charging (with their own power supply, inside the calculator) they did not want to work. Not really upset, I continued to clean the batteries from oxides with an eraser and a cleaning agent for LCD monitors. Having returned the battery cells to their rightful place, I played with the calculator for another two days, feeding it from the mains, until I accidentally discovered that ... The
batteries began to gain charge. Amazing!
The battery capacity, of course, decreased, and, instead of the prescribed 3 hours of operation of the calculator from an autonomous power source, it only works for about forty minutes. But still…
Printed circuit board The
printed circuit board, on which all the electronic components of the microcalculator are located, is fixed in the housing using four plastic pins. In order to remove the board from the case, just pull it up.
Almost immediately, the K145IP7P chip and the IV-21 indicator are striking.
Capacitors, constant and variable resistors, several pairs of diodes and other discrete electronic components occupy only a small part of the total area of the printed circuit board.
Housing elements
Having removed the printed circuit board, you can see two switches, a green glass and a power connector. The keyboard is not separable, so it’s quite difficult to clean the contacts if they are dirty and bounce.
Now you can collect the calculator, and put it on the shelf as an existing exhibit.