Editing .heic images without losing colors
The problem of loss of natural color rendition when converting images from heic format to jpg and png formats is considered, the solution method in Photoshop is described.

The HEIF image format , which is referred to on Apple devices as heic , is currently gaining popularity . Compared with the format jpeg it allows for an equal file size to achieve better quality. However, when converting this format to JPEG, there is a loss of color. The insidiousness lies in the fact that during a cursory review, users may not notice a slight discrepancy in color reproduction and put a much paler photo on the Internet than it looked on an iPhone screen. To prevent this from happening, you should adjust the color profiles in Photoshop after the conversion.
In Windows, to look at or, especially, to process images of this format is not easy. Even Photoshop CC 2018 does not support working with heic , so you should convert the image into one of the popular formats using various online services or special programs. I used the free iMazing HEIC Converter program for this . It allows you to save the original images in the formats .jpg (c setting the level of compression) and png.
However, it was not without surprises. It turned out that when converting the output jpeg-image has the color profile Display P3 , and not the usual sRGBused in most monitors and LCD displays of mobile devices. If we want to get an image without loss of compression in png format, then the color profile will not be attached to the image at all; in this case, the numerical values of the colors of the pixels will be recorded exactly in Display P3, and the display of such a picture on the Internet (in the sRGB profile) will lead to color distortions. In this case the colors will appear less saturated.
1. Convert an image from HEIC to JPEG to iMazing HEIC Converter
2. Open the resulting jpeg-image in Photoshop
Immediately we see a warning color management system. If the desired color profile is selected by default in the Photoshop workbench (for placing photos on the Internet with iPhone, preference should be given to sRGB IEC1966-2.1), select the second option (Convert document colors to workspace).

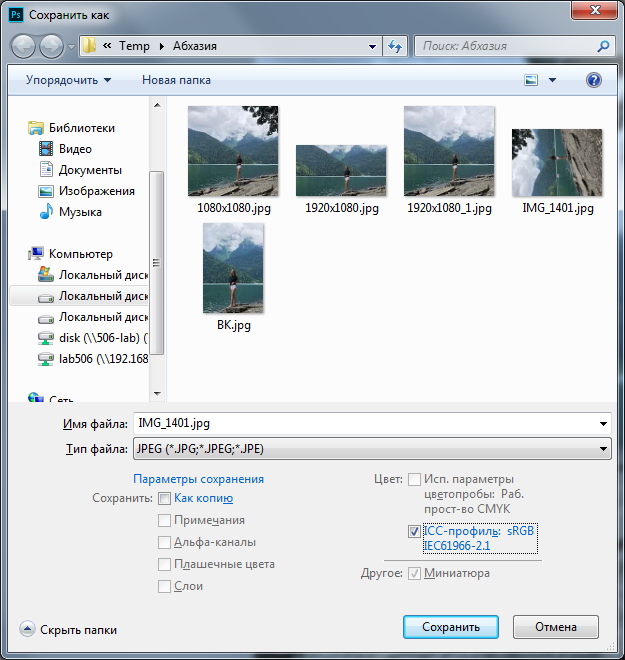
3. Save the image.
When saving, do not forget to tick the "ICC-profile: sRGB IEC1966-2.1".
If we want to get an image without loss of compression, we should convert it into png format.
1. Convert an image from HEIC to PNG to iMazing HEIC Converter
2. Open the resulting png-image in Photoshop.
The color profile is not attached to images in png format, so there are no warnings of the color management system in this case and Photoshop tries to display the pixels in sRGB for Display P3.
3. Assign the original color profile.
We somehow know in which profile the pixel values are recorded. Leaving the color values intact, assign an Image P3 color profile: Edit / Assign Profile / Image P3 / OK /.
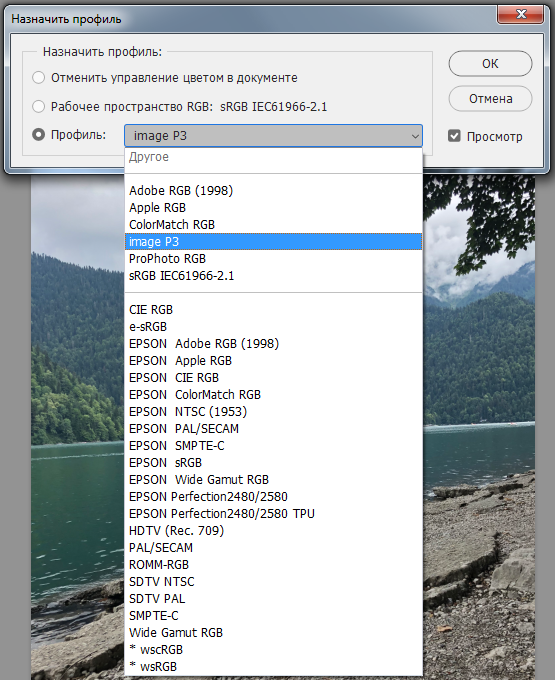
At this stage, we see that the image has restored the same saturation, while the pixel values have remained unchanged. These same values have become differently displayed.
4. Convert the color profile
Edit / Convert to Profile / Slave. simple RGB - sRGB IEC1966-2.1 / OK /

5. Save in any format.
For a visual demonstration of the need to restore the colors after converting from heic, the image below shows a fragment of the image, which combines images with the restoration of the original colors (bottom) and immediately after the conversion without correction (top).

Description of the problem
The HEIF image format , which is referred to on Apple devices as heic , is currently gaining popularity . Compared with the format jpeg it allows for an equal file size to achieve better quality. However, when converting this format to JPEG, there is a loss of color. The insidiousness lies in the fact that during a cursory review, users may not notice a slight discrepancy in color reproduction and put a much paler photo on the Internet than it looked on an iPhone screen. To prevent this from happening, you should adjust the color profiles in Photoshop after the conversion.
In Windows, to look at or, especially, to process images of this format is not easy. Even Photoshop CC 2018 does not support working with heic , so you should convert the image into one of the popular formats using various online services or special programs. I used the free iMazing HEIC Converter program for this . It allows you to save the original images in the formats .jpg (c setting the level of compression) and png.
However, it was not without surprises. It turned out that when converting the output jpeg-image has the color profile Display P3 , and not the usual sRGBused in most monitors and LCD displays of mobile devices. If we want to get an image without loss of compression in png format, then the color profile will not be attached to the image at all; in this case, the numerical values of the colors of the pixels will be recorded exactly in Display P3, and the display of such a picture on the Internet (in the sRGB profile) will lead to color distortions. In this case the colors will appear less saturated.
From HEIC to JPEG
1. Convert an image from HEIC to JPEG to iMazing HEIC Converter
Simple interface iMazing HEIC Converter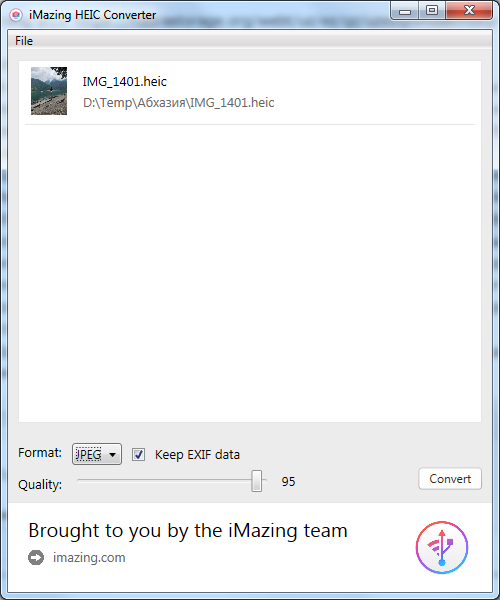
2. Open the resulting jpeg-image in Photoshop
Immediately we see a warning color management system. If the desired color profile is selected by default in the Photoshop workbench (for placing photos on the Internet with iPhone, preference should be given to sRGB IEC1966-2.1), select the second option (Convert document colors to workspace).
Alternative method
If a different working color profile is selected by default, then select the first option (Use embedded profile instead of working profile), and then click Edit / Convert to profile /, set “sRGB IEC1966-2.1”, click “OK”. Screenshots are attached below.
What do these options mean?
Использовать встроенный профиль (вместо рабочего) — численные значения цветов пикселей останутся нетронутыми, но Photoshop будет отображать цвета в соответствии с исходным цветовым пространством Display P3. В фотошопе фотография будет выглядеть правильно, как это и было изначально на iPhone, но после сохранения большинство программ будут отображать картинку неестественно, так как эти программы будут пытаться отобразить значения пространства Display P3 в обычном sRGB.
Преобразовать цвета документа в рабочее пространство — значения цветов пикселей пересчитываются таким образом, чтобы в выбранном рабочем пространстве картинка выглядела так же, как в исходном рабочем пространстве с исходными значениями цветов пикселей.
Не использовать встроенный профиль (не управлять цветом) — значения пикселей не будут изменены, кроме того, удалится информация об используемом профиле. После этого все программы, даже сам Photoshop, будут действовать по принципу: «Информации о цветовом профиле нет, значит следует отображать в стандартном цветовом профиле (sRGB)».
3. Save the image.
When saving, do not forget to tick the "ICC-profile: sRGB IEC1966-2.1".
From HEIC to PNG
If we want to get an image without loss of compression, we should convert it into png format.
1. Convert an image from HEIC to PNG to iMazing HEIC Converter
2. Open the resulting png-image in Photoshop.
The color profile is not attached to images in png format, so there are no warnings of the color management system in this case and Photoshop tries to display the pixels in sRGB for Display P3.
3. Assign the original color profile.
We somehow know in which profile the pixel values are recorded. Leaving the color values intact, assign an Image P3 color profile: Edit / Assign Profile / Image P3 / OK /.
At this stage, we see that the image has restored the same saturation, while the pixel values have remained unchanged. These same values have become differently displayed.
4. Convert the color profile
Edit / Convert to Profile / Slave. simple RGB - sRGB IEC1966-2.1 / OK /
5. Save in any format.
Result
For a visual demonstration of the need to restore the colors after converting from heic, the image below shows a fragment of the image, which combines images with the restoration of the original colors (bottom) and immediately after the conversion without correction (top).