Install New Active Directory Infrastructure on Windows Azure
- Tutorial
In this article, I will talk about deploying a new Windows Azure Active Directory service and attaching new virtual machines. Before you begin the deployment of Active Directory, you must:
• Configure Virtual Networking , including the Affinity Group .
• Create a storage account.
• Install Windows PowerShell .
1. Launch Windows Azure PowerShell , and run the following command:
2. Next, connect the appropriate modules:
3. You need to download the .publishsettings file of your Windows Azure subscription in order to save yourself from the initial settings during subsequent launches:
4. Next, start Windows Azure PowerShell ISE :
5. Paste the following script into Windows Azure PowerShell ISE , and edit the script for your subscription: the path to PublishSettingsFile , SubscriptionName , StorageAccount , etc.
6. Make sure that the script is working correctly, you can - by viewing the progress on the Windows Azure
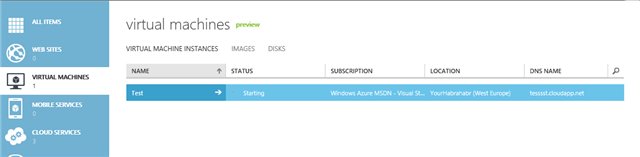
portal : Windows Azure Management Portal
7. Next, you must attach the Empty Disk to the previously created virtual machine :
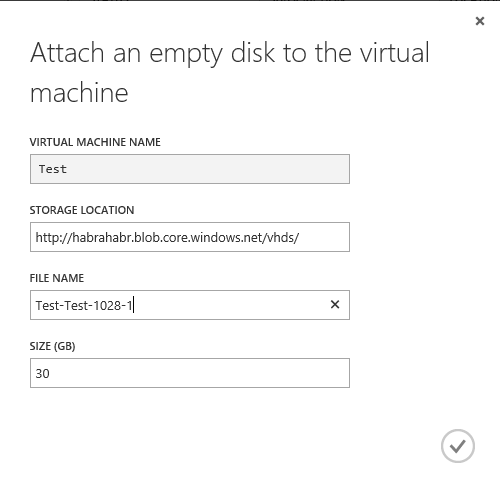
Attaching an empty disk
8. To connect to the virtual machine, click Connect and download the .rdp profile to make a remote connection.
Disk initialization
1. Connect to the virtual machine using the previously downloaded .rdp remote connection profile .
2. After connecting, run the IPConfig command to obtain an IP address.
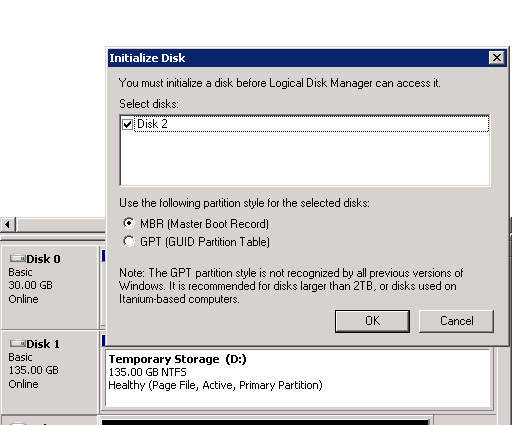
3. Open Computer Management to initialize the previously attached drive.
4. Launch the Active Directory Domain Services Installation Wizard , using the DCPromo command .

Adding an AD DS Role
5. Select Create a domain in a new forest .
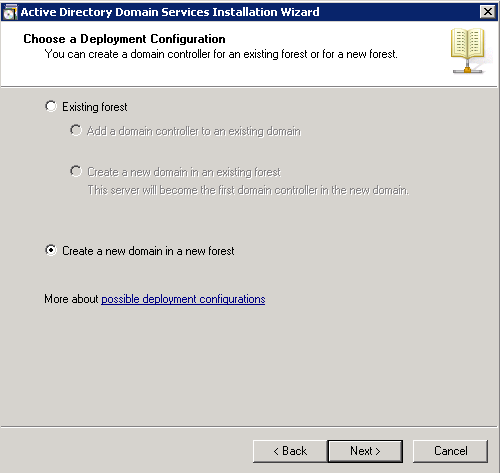
Creating AD DS
6. Name the Forest Root Domain and specify the functional level, like Windows Server 2008 R2. To create a DNS server, leave the standard choice.
7. Since when using Windows Azure virtual machines, an IP address is assigned only while this virtual machine is running, click Yes, the computer will use an IP address automatically assigned by a DCHP server (not recommended).
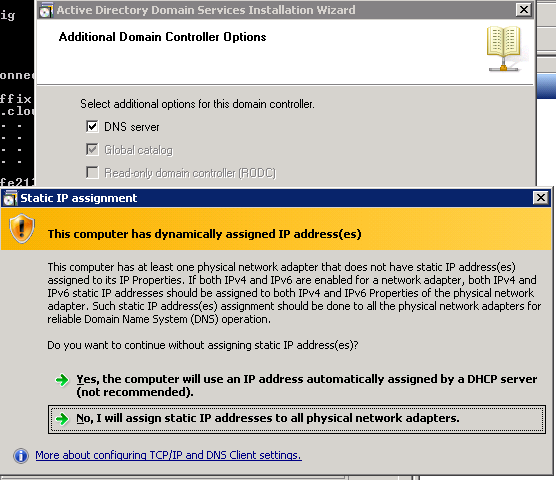
Using an automatically assigned IP address
8. At the end, it remains to determine the location of the Databases, Log files and SYSVOL folders on the previously created disk.
This section shows an example of how you can automatically deploy new virtual machines to the created domain.
1. Open in Windows Azure PowerShell Administrator mode.
2. Configure DNS for the new virtual machine. To do this, you will need a virtual machine created earlier and configured for Active Directory.
3. Next, you need to configure the virtual machine so that it automatically enters the AD domain at the deployment stage.
In this post, I looked at the process of creating a new Active Directory domain in Windows Azure IaaS, partly using Windows Azure PowerShell.
• Configure Virtual Networking , including the Affinity Group .
• Create a storage account.
• Install Windows PowerShell .
Creation of the first Virtual Machines.
1. Launch Windows Azure PowerShell , and run the following command:
Set-ExecutionPolicy RemoteSigned 2. Next, connect the appropriate modules:
Import-Module 'C:\Program Files (x86)\Microsoft SDKs\Windows Azure\PowerShell\Azure\Azure.psd1'3. You need to download the .publishsettings file of your Windows Azure subscription in order to save yourself from the initial settings during subsequent launches:
Get-AzurePublishSettingsFile4. Next, start Windows Azure PowerShell ISE :
powershell ise5. Paste the following script into Windows Azure PowerShell ISE , and edit the script for your subscription: the path to PublishSettingsFile , SubscriptionName , StorageAccount , etc.
Import-Module "C:\Program Files (x86)\Microsoft SDKs\Windows Azure\PowerShell\Azure\Azure.psd1"
Import-AzurePublishSettingsFile 'E:\PowerShell\ MyAccount.publishsettings'
Set-AzureSubscription -SubscriptionName MSDN -CurrentStorageAccount Test
Select-AzureSubscription -SubscriptionName MSDN
$myDNS = New-AzureDNS -Name 'myDNS' -IPAddress '127.0.0.1'
$vmname = 'Test'
$image = 'MSFT__Win2K8R2SP1-Datacenter-201207.01-en.us-30GB.vhd'
$service = 'YourHabrahabr'
$AG = 'Habrahabr'
$vnet = 'HabrahabrVM'
#Конфигурирование VM's
$MyDC = New-AzureVMConfig -name $vmname -InstanceSize 'Small' -ImageName $image |
    Add-AzureProvisioningConfig -Windows -Password 'Pa$w0rd!' |
        Set-AzureSubnet -SubnetNames 'BackEnd'
New-AzureVM -ServiceName $service -AffinityGroup $AG -VMs $MyDC -DnsSettings $myDNS -VNetName $vnet
6. Make sure that the script is working correctly, you can - by viewing the progress on the Windows Azure
portal : Windows Azure Management Portal
7. Next, you must attach the Empty Disk to the previously created virtual machine :
Attaching an empty disk
8. To connect to the virtual machine, click Connect and download the .rdp profile to make a remote connection.
Disk initialization
Deploy a domain controller.
1. Connect to the virtual machine using the previously downloaded .rdp remote connection profile .
2. After connecting, run the IPConfig command to obtain an IP address.
3. Open Computer Management to initialize the previously attached drive.
4. Launch the Active Directory Domain Services Installation Wizard , using the DCPromo command .
Adding an AD DS Role
5. Select Create a domain in a new forest .
Creating AD DS
6. Name the Forest Root Domain and specify the functional level, like Windows Server 2008 R2. To create a DNS server, leave the standard choice.
7. Since when using Windows Azure virtual machines, an IP address is assigned only while this virtual machine is running, click Yes, the computer will use an IP address automatically assigned by a DCHP server (not recommended).
Using an automatically assigned IP address
8. At the end, it remains to determine the location of the Databases, Log files and SYSVOL folders on the previously created disk.
Deploy new virtual machines and join a domain from PowerShell
This section shows an example of how you can automatically deploy new virtual machines to the created domain.
1. Open in Windows Azure PowerShell Administrator mode.
2. Configure DNS for the new virtual machine. To do this, you will need a virtual machine created earlier and configured for Active Directory.
$advmIP = '[IP-ADDRESS]'
$advmName = '[AD-NAME]'
# IP-адрес контроллера домена
$dns1 = New-AzureDns -Name $advmName -IPAddress $advmIP
3. Next, you need to configure the virtual machine so that it automatically enters the AD domain at the deployment stage.
$vmName = 'adtest'
$adminPassword = '[PASSWORD]'
$domainPassword = '[PASSWORD]'
$domainUser = 'administrator'
$FQDomainName = 'testHabrAD.com'
$subNet = 'AppSubnet'
# Настройка VM для автоматического входа в домен
$advm1 = New-AzureVMConfig -Name $vmName -InstanceSize Small -ImageName $imgName |
            Add-AzureProvisioningConfig -WindowsDomain -Password $adminPassword `
            -Domain ' testHabrAD' -DomainPassword $domainPassword `
            -DomainUserName $domainUser -JoinDomain $FQDomainName |
     Set-AzureSubnet -SubnetNames $subNet
Conclusion
In this post, I looked at the process of creating a new Active Directory domain in Windows Azure IaaS, partly using Windows Azure PowerShell.