Office 365 sync with AD DS, using AD FS 2.0 to create Single Sign-On
Good afternoon, I would like to share with you the acquired knowledge in this area.
This article is unlikely to be useful to experienced administrators or engineers, you can figure it all out with the help ofGoogle bing and patience, but it happens that the deadlines are running out, the topic is not interesting or some other circumstances interfere with the workflow. In addition, I have no way to take screenshots of everything and everything, because in part they will be stuck from the web, but the installation process for most components comes down to poking a button further to the point of insanity.
Server for DirSync'A (Microsoft utility for synchronizing AD DS and Office 365), Windows Server 2003 or higher, domain member, not a domain controller, NET Framework 3.0 or 3.5 and Powershell
AD DS 2003 mixed \ native mode or higher, from the same forest. The enterprise administrator account in the domain. It is used only to create MSOL_AD_Sync, login \ password is not saved anywhere in DirSync'e. The account is granted the rights to read and synchronize changes in AD DS.
Administrator account for Office 365, domain verified in Office 365 . The domain name may not coincide with the verified domain, in this case you just need to add the UPN domain suffixand bind users to this suffix.
Certificate for publishing AD FS (for testing any, even self-signed one)
Note : DirSync works on ports 80 and 443, does not know how to log in to proxy servers, it will need to make a separate “hole” in the proxy server. To synchronize more than 50,000 users, you will need to install a full SQL server.
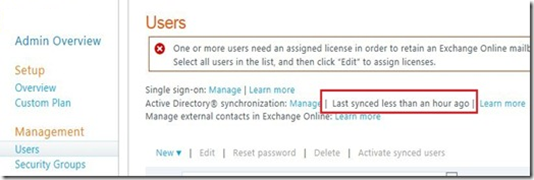
1. Go to the Office 365 portal, in the users section.
2. We are looking for “Active Directory Synchronization” and click the “Set up” button
3. In the window that opens, under item number 3, turn on synchronization by clicking on “Activate”
4. In step 4, download DirSync.
We download AD FS 2.0, install, we need exactly AD FS Server, not AD FS Server Proxy. After installing AD FS 2.0, go to IIS and bind the AD FS site to port 443 and the certificate.
Note : It is recommended to remove the binding to port 80 and enable “Require SSL” in the site settings. All this is done intuitively through the IIS Management interface.
Next, go to the AD FS 2.0 Management Console and launch the AD FS 2.0 Server Configuration Wizard or C: \ Program Files \ Active Directory Federation Services 2.0 \ FsConfigWizard.exe. Actually further, further, further, further ... It is necessary to install a farm , a service account for AD FS is desirable, the minimum additional permissions necessary for its operation are the “write” right to OU “Program Data”.
You can check by clicking on the link _https: //adfs_server_name/adfs/ls/idpinitiatedsignon.aspx
Now a little “magic”
C: \ Program Files \ Microsoft Online Directory Sync \ SYNCBUS \ Synchronization Service \ UIShell \ miisclient.exe along this path lies a hidden GUI for DirSync (in fact, it is just a normal Fim Synchronization Service). If your knowledge is enough, you can “play around” with the settings, but changing the settings through the GUI is not supported by Microsoft, if something needs to be changed, Microsoft offers to go through the “Configuration wizard” again. If you are not allowed into the DirSync GUI, you just need to log in, your account has been added to the Fim Synch Service group.
Forced synchronization can be done through the DirSync GUI or through powershell:
1. Run the command
2. cd C: \ Program Files \ Microsoft Online Directory Sync
3.. \ DirSyncConfigShell.psc1
4. In the new Start-OnlineCoexistenceSync window,
you can view the results through Event Log and / or on the Office 365 portal.
For a test run, you can choose which OUs will be synchronized. To do this, go to the GUI, double-click in the SourceAD management agent, in the "Connect to Active Directory forest" section, click on "Containers" and select the necessary containers. If you have several domains, then select the desired domain from the list and click "Containers". Repeat with each domain.
Note : If you do not do this, all accounts from all OUs will “leave” Office 365. Including service accounts and built-in accounts.
We make the domain federated:
1. $ cred = Get-Credential - in the window that appears, drive in the login / password of the administrative Office 365 account
. 2. Connect-MsolService –Credential $ cred - connect to Office 365.
3. Set-MsolADFSContext –Computer- an optional step, needed only if you are running powershell not from the computer on which AD FS Server is installed.
4. Convert-MSOLDomainToFederated - domainname- you need to specify the name of the "root" domain, if we say you need to convert office365.domain.com, you should have verified the domains office365.domain.com and domain.com. But when converting a domain, you need to specify domain.com, not office365.domain.com. The domain and all subdomains are converted.
Note : After this operation, users will NOT be able to use Office 365 if the AD FS - Office 365 bundle is not configured or is not configured correctly, as the domain has already become federated.
5. Update-MSOLFederatedDomain –domainname
If everything is done correctly by going to the Office 365 login page, you will see that the password field is no longer available.

1. Block high-bit characters and verify normalization in the properties of the https protocol should be turned off.
2. Link Translation must be turned off.
3. In the settings of the rule should be checked "request appear to come from the ISA server computer '"
4. In the settings of the listener, you must add the certificate that you imported into IIS when installing AD FS.
Once published, you can test your work through the Office 365 portal or outlook.com . Great site for SSO Troubleshoot.
Note: In order for users to work, they need to assign licenses; for a test user, the license can be assigned “by hand”. You can use powershell to bulk add licenses to users .
The result is a working infrastructure where users can log in to Office 365 using their mailbox and password from the “computer”. All passwords are stored in your AD DS. Passwords are not synchronized (AD FS is needed for this). All user information changes are made to your native AD DS and are automatically replicated to Office 365.
I hope the article is useful to someone.
The experience was gained as a “side” when working with FIM 2010, it is a pity that we do not have a community around this program, I plan to write about FIM in the future.
This article is unlikely to be useful to experienced administrators or engineers, you can figure it all out with the help of
The risks
Zero, synchronization is one-way, in case the bosses didn’t like it \ nothing worked \ didn’t allocate money \ everything broke - we stop DirSync and AD FS, delete DirSync, delete the MSOL_AD_Sync account in AD DS, delete the synchronized accounts from Office 365. If the mail has moved you can set up forwarding back.Minimum Infrastructure Requirements
Server for AD FS, Windows Server 2008 or higher, domain member, not a domain controllerServer for DirSync'A (Microsoft utility for synchronizing AD DS and Office 365), Windows Server 2003 or higher, domain member, not a domain controller, NET Framework 3.0 or 3.5 and Powershell
AD DS 2003 mixed \ native mode or higher, from the same forest. The enterprise administrator account in the domain. It is used only to create MSOL_AD_Sync, login \ password is not saved anywhere in DirSync'e. The account is granted the rights to read and synchronize changes in AD DS.
Administrator account for Office 365, domain verified in Office 365 . The domain name may not coincide with the verified domain, in this case you just need to add the UPN domain suffixand bind users to this suffix.
Certificate for publishing AD FS (for testing any, even self-signed one)
Note : DirSync works on ports 80 and 443, does not know how to log in to proxy servers, it will need to make a separate “hole” in the proxy server. To synchronize more than 50,000 users, you will need to install a full SQL server.
Office 365
First you need to activate synchronization with AD DS, this step is convenient to be done first, since turning on synchronization will take up to 24 hours (in practice, less), this time is more than enough to configure and prepare the other components involved in synchronization.1. Go to the Office 365 portal, in the users section.
2. We are looking for “Active Directory Synchronization” and click the “Set up” button
3. In the window that opens, under item number 3, turn on synchronization by clicking on “Activate”
4. In step 4, download DirSync.
AD FS
Before installing AD FS, you must import or generate a domain or self-signed certificate that will be used to publish AD FS to IIS.We download AD FS 2.0, install, we need exactly AD FS Server, not AD FS Server Proxy. After installing AD FS 2.0, go to IIS and bind the AD FS site to port 443 and the certificate.
Note : It is recommended to remove the binding to port 80 and enable “Require SSL” in the site settings. All this is done intuitively through the IIS Management interface.
Next, go to the AD FS 2.0 Management Console and launch the AD FS 2.0 Server Configuration Wizard or C: \ Program Files \ Active Directory Federation Services 2.0 \ FsConfigWizard.exe. Actually further, further, further, further ... It is necessary to install a farm , a service account for AD FS is desirable, the minimum additional permissions necessary for its operation are the “write” right to OU “Program Data”.
You can check by clicking on the link _https: //adfs_server_name/adfs/ls/idpinitiatedsignon.aspx
Install DirSync
The process is very simple, further-further-further-complete. After installation, the configuration wizard will open. Again, it’s quite trivial, on the second point you need to specify the Office 365 administrator account (synchronization with AD DS should be enabled at this point), on the third point you need to specify the administrator account for the administrator. In the fourth paragraph you will be asked to include “Rich Coexistance”, but I will not consider it in the framework of this article. After installation, you can uncheck "Synchronize directories now", this will allow you to not synchronize now, but synchronization is performed on a schedule every 3 hours.Now a little “magic”
C: \ Program Files \ Microsoft Online Directory Sync \ SYNCBUS \ Synchronization Service \ UIShell \ miisclient.exe along this path lies a hidden GUI for DirSync (in fact, it is just a normal Fim Synchronization Service). If your knowledge is enough, you can “play around” with the settings, but changing the settings through the GUI is not supported by Microsoft, if something needs to be changed, Microsoft offers to go through the “Configuration wizard” again. If you are not allowed into the DirSync GUI, you just need to log in, your account has been added to the Fim Synch Service group.
Forced synchronization can be done through the DirSync GUI or through powershell:
1. Run the command
2. cd C: \ Program Files \ Microsoft Online Directory Sync
3.. \ DirSyncConfigShell.psc1
4. In the new Start-OnlineCoexistenceSync window,
you can view the results through Event Log and / or on the Office 365 portal.
For a test run, you can choose which OUs will be synchronized. To do this, go to the GUI, double-click in the SourceAD management agent, in the "Connect to Active Directory forest" section, click on "Containers" and select the necessary containers. If you have several domains, then select the desired domain from the list and click "Containers". Repeat with each domain.
Note : If you do not do this, all accounts from all OUs will “leave” Office 365. Including service accounts and built-in accounts.
AD FS 2.0 bundle - Office 365
Download and install the Sign-in Assistant and powershell module for working with Office 365 on the AD FS server. A new shortcut will appear in the start menu and on the desktop, powershell for working with Office 365 (you can use the “regular” powershell after making import-module MSOnline ).We make the domain federated:
1. $ cred = Get-Credential - in the window that appears, drive in the login / password of the administrative Office 365 account
. 2. Connect-MsolService –Credential $ cred - connect to Office 365.
3. Set-MsolADFSContext –Computer
4. Convert-MSOLDomainToFederated - domainname
Note : After this operation, users will NOT be able to use Office 365 if the AD FS - Office 365 bundle is not configured or is not configured correctly, as the domain has already become federated.
5. Update-MSOLFederatedDomain –domainname
If everything is done correctly by going to the Office 365 login page, you will see that the password field is no longer available.
Publish AD FS Server Using ISA or TMG
It is published as a regular web site, but there are a couple of nuances:1. Block high-bit characters and verify normalization in the properties of the https protocol should be turned off.
2. Link Translation must be turned off.
3. In the settings of the rule should be checked "request appear to come from the ISA server computer '"
4. In the settings of the listener, you must add the certificate that you imported into IIS when installing AD FS.
Once published, you can test your work through the Office 365 portal or outlook.com . Great site for SSO Troubleshoot.
Note: In order for users to work, they need to assign licenses; for a test user, the license can be assigned “by hand”. You can use powershell to bulk add licenses to users .
Summary
The result is a working infrastructure where users can log in to Office 365 using their mailbox and password from the “computer”. All passwords are stored in your AD DS. Passwords are not synchronized (AD FS is needed for this). All user information changes are made to your native AD DS and are automatically replicated to Office 365.
I hope the article is useful to someone.
The experience was gained as a “side” when working with FIM 2010, it is a pity that we do not have a community around this program, I plan to write about FIM in the future.