Hack to support buttons Android-headset under Windows
- Transfer
I listen to music on my smartphone almost every day and use the control buttons on my headset. But I always didn’t like one thing. I come home, continuing to listen, the headset connects to the home PC - and suddenly the buttons stop working.
Of course, I googled the solution to this problem. Unfortunately, on Windows, this great feature is not very supported. A couple of minutes of the search gave only muddy mentions on Stack Overflow about sound cards and reports from some people that everything was working fine on their laptops.
It did not frighten me - and I decided to accept the problem as an interesting challenge: is it possible to create some program to activate the control buttons if there is no hardware support for them at all? The answer is yes, you can. And here's how to do it in half an hour.
The first thing to understand is how the headset buttons work. A quick search on the Internet found this specification from the Android documentation. There is a diagram.
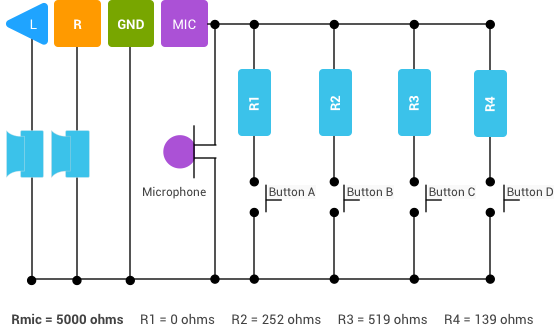
As you can see, when you press the button on the headset, the circuit closes on one of the resistors. Particularly noteworthy is the A (Play / Pause / Hook) button with an impedance of 0 ohms, i.e. the microphone is closed. If we are able to detect the short circuit of the microphone, then we can determine by pressing the Play / Pause button.
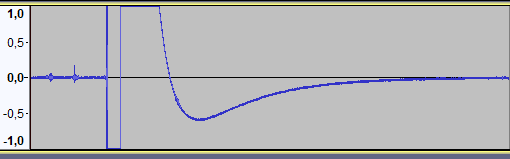
Before starting to program, I would like to check the rationality of our reasoning in principle. That is, the fact that the signal from the microphone can be determined by pressing the Play / Pause button. Fortunately, for this you simply record the sound on the computer and look at the result. I started Audacity, pressed the Play / Pause button while recording - and received such a signal.
Bingo
As you can see, pressing a button is obviously reflected in the shape of the signal: a sudden drop to −1 followed by a sudden transition to 1 and a gradual decrease to 0. Intuitively, according to the specification, I would assume that the signal will jump to 1 and stay there until the button is released. but in reality it looks different. Nevertheless, such a picture is still easy to detect if you capture the audio stream from a microphone.
Knowing the way how to detect pressing buttons on the headset, you can think about the main goal: how to control the player on the desktop using the buttons on the headset.
The first step is detecting a button click. To do this, you need to capture the audio stream from the microphone and detect the distinct signature that we saw earlier. For simplicity, we implement the solution in Python. After another small search on the Internet, I found a package called sounddevice, which allows you to abstract from the most difficult part - the real audio capture from the microphone.
A little bit of coding gives us the following:
This code continuously produces the average of each batch of samples. We set the sampling rate to 1000, which is terribly small for sound processing (usually 44100 is used), but in reality we don’t need more accuracy. The block size determines how many samples in the buffer initiate the callback. Again, we set very low values. A block size of 100 and a sampling rate of 1000 actually means triggering 10 times per second, where with each call only 100 samples are processed.
Now we capture the audio stream and we can implement a real mechanism for detecting a button click. Recall that the signal jumps to 1 whenever you press. This suggests the easiest way to detect: if N consecutive blocks of signal values are higher than 0.9, that is, pressing.
We implement the algorithm in our function:
In fact, we launched an internal counter, how many processed blocks meet the threshold requirement, which was simply set to 0.9, providing for the inevitable sample noise. If the block does not meet the requirement, the counter is reset - and we start again. The variable
Now it remains to replace the comment “The button was pressed!” In real code to control the sound reproduction in Windows. Let's google again to figure out how to do it: it turns out you can control playback by simulating keystrokes with the corresponding virtual key codes .
It turned out that it is very easy to simulate keystrokes using the pywin32 package , which is just a Python shell for Windows API. Putting it all together, we can create the following function:
And we did it! Accessing the function
Tests have shown that the code works surprisingly well. The only difference between the functionality on Android and Windows is a slight delay when you press a button, but you can live with it.

And that's what happened
Python script consists of 51 lines that activate the buttons of the Android headset in Windows. The final source code for this project is on Github .
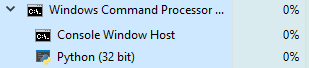
After happy use of the program for several hours, I noticed a serious problem: the

program uses almost 30% of the CPU! Obviously, this is unacceptable after long work, something needs to be done. Looking at the code, I realized that the main thread is in the idle state in the main loop, although nothing happens there. The most logical solution is to just put the thread to sleep forever: since the callback is automatically called, we still do not need a cycle.
I also did not want to run the Python script manually after each computer startup. Fortunately, Python for Windows comes with a useful utility pythonw.exe, which starts the daemon process without a connected terminal. We place a shortcut to this process in the Microsoft \ Windows \ Start Menu \ Programs \ Startup directory , specifying our script as the first argument - then the application automatically starts and runs silently in the background.
Of course, I googled the solution to this problem. Unfortunately, on Windows, this great feature is not very supported. A couple of minutes of the search gave only muddy mentions on Stack Overflow about sound cards and reports from some people that everything was working fine on their laptops.
It did not frighten me - and I decided to accept the problem as an interesting challenge: is it possible to create some program to activate the control buttons if there is no hardware support for them at all? The answer is yes, you can. And here's how to do it in half an hour.
How Android Headset Buttons Work
The first thing to understand is how the headset buttons work. A quick search on the Internet found this specification from the Android documentation. There is a diagram.
As you can see, when you press the button on the headset, the circuit closes on one of the resistors. Particularly noteworthy is the A (Play / Pause / Hook) button with an impedance of 0 ohms, i.e. the microphone is closed. If we are able to detect the short circuit of the microphone, then we can determine by pressing the Play / Pause button.
Hypothesis testing
Before starting to program, I would like to check the rationality of our reasoning in principle. That is, the fact that the signal from the microphone can be determined by pressing the Play / Pause button. Fortunately, for this you simply record the sound on the computer and look at the result. I started Audacity, pressed the Play / Pause button while recording - and received such a signal.
Bingo
As you can see, pressing a button is obviously reflected in the shape of the signal: a sudden drop to −1 followed by a sudden transition to 1 and a gradual decrease to 0. Intuitively, according to the specification, I would assume that the signal will jump to 1 and stay there until the button is released. but in reality it looks different. Nevertheless, such a picture is still easy to detect if you capture the audio stream from a microphone.
Capture sound using Python
Knowing the way how to detect pressing buttons on the headset, you can think about the main goal: how to control the player on the desktop using the buttons on the headset.
The first step is detecting a button click. To do this, you need to capture the audio stream from the microphone and detect the distinct signature that we saw earlier. For simplicity, we implement the solution in Python. After another small search on the Internet, I found a package called sounddevice, which allows you to abstract from the most difficult part - the real audio capture from the microphone.
A little bit of coding gives us the following:
import sounddevice as sd
SAMPLE_RATE = 1000# Sample rate for our input stream
BLOCK_SIZE = 100# Number of samples before we trigger a processing callbackclassHeadsetButtonController:defprocess_frames(self, indata, frames, time, status):
        mean = sum([y for x in indata[:] for y in x])/len(indata[:])
        print(mean)
    def__init__(self):
        self.stream = sd.InputStream(
            samplerate=SAMPLE_RATE,
            blocksize=BLOCK_SIZE,
            channels=1,
            callback=self.process_frames
        )
        self.stream.start()
if __name__ == '__main__':
    controller = HeadsetButtonController()
    whileTrue:
        pass
This code continuously produces the average of each batch of samples. We set the sampling rate to 1000, which is terribly small for sound processing (usually 44100 is used), but in reality we don’t need more accuracy. The block size determines how many samples in the buffer initiate the callback. Again, we set very low values. A block size of 100 and a sampling rate of 1000 actually means triggering 10 times per second, where with each call only 100 samples are processed.
Definition of pressing a button: probably too easy
Now we capture the audio stream and we can implement a real mechanism for detecting a button click. Recall that the signal jumps to 1 whenever you press. This suggests the easiest way to detect: if N consecutive blocks of signal values are higher than 0.9, that is, pressing.
We implement the algorithm in our function:
import sounddevice as sd
SAMPLE_RATE = 1000# Sample rate for our input stream
BLOCK_SIZE = 100# Number of samples before we trigger a processing callback
PRESS_SECONDS = 0.2# Number of seconds button should be held to register press
PRESS_SAMPLE_THRESHOLD = 0.9# Signal amplitude to register as a button press
BLOCKS_TO_PRESS = (SAMPLE_RATE/BLOCK_SIZE) * PRESS_SECONDS
...
defprocess_frames(self, indata, frames, time, status):
    mean = sum([y for x in indata[:] for y in x])/len(indata[:])
    if mean < PRESS_SAMPLE_THRESHOLD:
        self.times_pressed += 1if self.times_pressed > BLOCKS_TO_PRESS andnot self.is_held:
            # The button was pressed!
            self.is_held = Trueelse:
        self.is_held = False
        self.times_pressed = 0
...
In fact, we launched an internal counter, how many processed blocks meet the threshold requirement, which was simply set to 0.9, providing for the inevitable sample noise. If the block does not meet the requirement, the counter is reset - and we start again. The variable
is_heldtracks the triggerings so as not to register them repeatedly if the button is not released.Playback Control in Windows
Now it remains to replace the comment “The button was pressed!” In real code to control the sound reproduction in Windows. Let's google again to figure out how to do it: it turns out you can control playback by simulating keystrokes with the corresponding virtual key codes .
It turned out that it is very easy to simulate keystrokes using the pywin32 package , which is just a Python shell for Windows API. Putting it all together, we can create the following function:
import win32api
import win32con
VK_MEDIA_PLAY_PAUSE = 0xB3deftoggle_play():
    win32api.keybd_event(VK_MEDIA_PLAY_PAUSE, 0, 0, 0)
And we did it! Accessing the function
toggle_playin the code where the “The button was pressed!” Comment was used allows you to control any media player in Windows using the buttons on the Android headset. Tests have shown that the code works surprisingly well. The only difference between the functionality on Android and Windows is a slight delay when you press a button, but you can live with it.
And that's what happened
Python script consists of 51 lines that activate the buttons of the Android headset in Windows. The final source code for this project is on Github .
Wait, that's not all!
After happy use of the program for several hours, I noticed a serious problem: the
program uses almost 30% of the CPU! Obviously, this is unacceptable after long work, something needs to be done. Looking at the code, I realized that the main thread is in the idle state in the main loop, although nothing happens there. The most logical solution is to just put the thread to sleep forever: since the callback is automatically called, we still do not need a cycle.
from time import sleep
if __name__ == '__main__':
    controller = HeadsetButtonController()
    whileTrue:
        sleep(10)
I also did not want to run the Python script manually after each computer startup. Fortunately, Python for Windows comes with a useful utility pythonw.exe, which starts the daemon process without a connected terminal. We place a shortcut to this process in the Microsoft \ Windows \ Start Menu \ Programs \ Startup directory , specifying our script as the first argument - then the application automatically starts and runs silently in the background.