Kubernetes clusters in the VPC service

We added the ability to conveniently launch Kubernetes in the Virtual Private Cloud service in the early beta testing mode.
This functionality will be useful for users who need convenient management of a large number of applications running as containers. Kubernetes offers tools for scaling, self-healing, load balancing for containers running inside the cluster.
Since the Virtual Private Cloud service is based on OpenStack, we use one of its components - OpenStack Magnum . It allows you to quickly create private Kubernetes clusters with the required number of nodes.
Currently, any user of our service can create several independent clusters in their project. As the cluster nodes, virtual machines will be used, the configuration of which can be selected and changed.
In this article, we will talk about the main objects of the Kubernetes cluster and use the examples to look at the process of creating a cluster using OpenStack Magnum.
Creating and managing a Kubernetes cluster
Currently, Kubernetes cluster creation is possible only via console utilities or the OpenStack API in the ru-1a and ru-1b availability zones (St. Petersburg).
To get started, you will need:
- Create a new or use an existing VPC project ;
- Create a user with an SSH key ;
- Add a user to the created project on the project management page ;
- Go to the project and get the access file on the Access tab ;
- Install the openstack console client with the python-magnumclient library ;
- Install the kubectl console client .
To install the openstack console client, you can use the instruction by reference , however, it is worth bearing in mind that this client will also need to install the python-magnumclient library to support the creation of Kubernetes clusters.
A complete set of commands for installing an openstack client with the required plugin for the Ubuntu / Debian family of operating systems:
$ sudo apt update
$ sudo apt -y install curl python-pip python-dev python3-dev git libxml2-dev libxslt1-dev python-openssl python3-openssl python-pyasn1 libffi-dev libssl-dev build-essential
$ sudo pip install -UI pbr setuptools pytz
$ sudo pip install -UI git+https://github.com/openstack/python-openstackclient
$ sudo pip install -UI git+https://github.com/openstack/python-magnumclient
A complete set of commands for installing an openstack client with the required plug-in for Fedora / CentOS operating systems:
$ sudo yum -y install python-pip gcc libffi-devel python-devel libxslt-devel openssl-devel git libffi-devel
$ sudo pip install -UI pbr setuptools pytz
$ sudo pip install -UI git+https://github.com/openstack/python-openstackclient
$ sudo pip install -UI git+https://github.com/openstack/python-magnumclient
To manage Kubernetes objects, you need the kubectl console client . Installation methods for various operating systems are described in the official documentation .
To create a cluster, you need to create or use existing ones:
- Cluster template ( cluster template );
- Parameter set for CPU and RAM virtual machines ( flavor ).
You can create a cluster template and flavor yourself, or use public pre-created templates.
You will also need to decide on the availability zone, the type of disks for your cluster and the number of nodes. It is worth considering that we do not yet support the possibility of creating one cluster in several zones. You can choose any type of network drive (fast, universal or basic).
More information about the types of disks can be found in our knowledge base .
The number of nodes can be different for master and minion roles. On the nodes that perform the master role, the cluster control elements will be launched - controller-manager , scheduler , api . On the other nodah services will be launched kubelet , kube-proxy and all application containers. More information about the components running on the nodes of the cluster can be found in the official documentation .
To access SSH nodes using SSH, you will need to use an SSH key created earlier. In the example commands, a key named ssh-test will be used .
We will use the public cluster template and flavor, fast disk type, and ru-1b availability zone .
In our cluster 2 master nodes and 3 minion nodes will initially be running.
To check the specified parameters, we use the openstackclient commands and the downloaded access file ( rc.sh ):
# Запуск файла с доступом к проекту для установки требуемых параметров.
$ source rc.sh
# Конфигурация серверов, которую мы будем использовать для всех нод кластера
$ openstack flavor show BL1.2-4096 -c ram -c vcpus
+-------+-------+
| Field | Value |
+-------+-------+
| ram   | 4096  |
| vcpus | 2     |
+-------+-------+
# Быстрый тип диска в зоне доступности ru-1b
$ openstack volume type show fast.ru-1b -c name
+-------+------------+
| Field | Value      |
+-------+------------+
| name  | fast.ru-1b |
+-------+------------+
# Доступные шаблоны кластеров Kubernetes
$ openstack coe cluster template list -c name
+---------------------------------------+
| name                                  |
+---------------------------------------+
| kubernetes-nofloatingips-ru-1b-v1.9.3 |
| kubernetes-nofloatingips-ru-1b-v1.9.6 |
| kubernetes-nofloatingips-ru-1b-v1.9.9 |
| kubernetes-floatingips-ru-1b-v1.9.3   |
| kubernetes-floatingips-ru-1b-v1.9.6   |
| kubernetes-floatingips-ru-1b-v1.9.9   |
| kubernetes-nofloatingips-ru-1a-v1.9.3 |
| kubernetes-nofloatingips-ru-1a-v1.9.6 |
| kubernetes-nofloatingips-ru-1a-v1.9.9 |
| kubernetes-floatingips-ru-1a-v1.9.3   |
| kubernetes-floatingips-ru-1a-v1.9.6   |
| kubernetes-floatingips-ru-1a-v1.9.9   |
+---------------------------------------+
For example, we will select the second cluster template, publicly accessible floating addresses for each of the nodes will not be created from it. We do not need them.
# Создание кластера Kubernetes с именем test-cluster
# В качестве keypair используется имя ключа, созданного ранее
$ openstack coe cluster create \
  --cluster-template kubernetes-nofloatingips-ru-1b-v1.9.9 \
  --master-count 2 \
  --node-count 3 \
  --keypair ssh-test \
  --master-flavor BL1.2-4096 \
  --flavor BL1.2-4096 \
  test-cluster
Please note that we have selected the same configuration for different nodes (master-flavor and flavor parameters), you can choose different configuration sets depending on the cluster requirements. Their change is possible after its creation.
It is also worth considering that when creating a cluster with several master nodes, a load balancer will be automatically created to access the Kubernetes API.
In a few minutes, the Kubernetes cluster will appear in your project. In the project control panel, you will see new virtual machines, disks, and network objects.
You can check the status of your cluster through openstackclient:
openstack coe cluster list -c name -c status
+--------------+--------------------+
| name         | status             |
+--------------+--------------------+
| test-cluster | CREATE_IN_PROGRESS |
+--------------+--------------------+
After the cluster enters the CREATE_COMPLETE state, you can manage its objects through the kubectl utility by downloading the configuration file using the following commands:
$ mkdir -p ~/test-cluster
$ openstack coe cluster config test-cluster --dir ~/test-cluster
After that, you can work with the cluster using the kubectl utility:
$ export KUBECONFIG=~/test-cluster/config
$ kubectl get pods --all-namespaces -o=custom-columns=NAME:.metadata.name,STATUS:.status.phase
NAME                                               STATUS
coredns-785dcf9c58-6gnfp                           Running
heapster-6846cdc674-rm4k6                          Running
kube-dns-autoscaler-6b94f7bbf8-x5clt               Running
kubernetes-dashboard-747575c864-wlg6p              Running
monitoring-grafana-84b4596dd7-zf5rx                Running
monitoring-influxdb-c8486fc95-bqqb6                Running
node-exporter-test-cluster-robvp4cvwpt7-minion-0   Running
If necessary, you can increase or decrease the number of minion nodes in the cluster through the openstackclient, passing a new node_count value:
$ openstack coe cluster update test-cluster replace node_count=4The main objects of the Kubernetes cluster
Pods
Despite the fact that Kubernetes manages a set of containers, the basic entity that Kubernetes manages is not a container, but a Pod .
A pod is a set of the Linux kernel namespace and network stack settings that allow you to assemble a set of containers into a single entity.
Most often, one container with the application is launched inside one separate Pod.
If necessary, you can run several containers inside one Pod-a, this can be useful when you need to provide access from one container to another via the localhost network interface, or for some other reason run multiple containers on the same host.
All containers running on the same Pod will have the same hostname, IP address, routing table, and disks.
It is worth noting that when scaling the number of copies of your application inside Kubernetes, it is necessary to increase the number of Pods, not the number of containers in one particular Pod.
Read more in the official documentation Pods .
For example, create the simplest Pod with Nginx using the description in the yaml format:
# nginx-basic.yaml
apiVersion: v1
kind: Pod
metadata:
  name: nginx
spec:
  containers:
  - name: nginx
    image: library/nginx:1.14-alpine
    ports:
    - containerPort: 80
To create a Pod, we can use the kubectl utility .
We have added all the examples presented in the article to our Github group , so you can not create files on your computer, but use the url of the file from the public repository :
$ kubectl create \
  -f https://raw.githubusercontent.com/selectel/kubernetes-examples/master/pods/nginx-basic.yaml
After creation, we can request complete information about the status of the Pod, using the command kubectl describe:
$ kubectl describe pod nginx
Name:         nginx
Namespace:    default
Node:         test-cluster-nd5c5y6lsfxb-minion-0/10.0.0.5
Start Time:   Sun, 17 Jun 2018 12:29:03 +0000
Labels:       <none>
Annotations:  <none>
Status:       Running
IP:           10.100.88.9
Containers:
  nginx:
    Container ID:   docker://6ca6383b66686c05c61c1f690737110e0f8994eda393f44a7ebfbbf2b2026267
    Image:          library/nginx:1.14-alpine
    Image ID:       docker-pullable://docker.io/nginx@sha256:944b79ca7dbe456ce72e73e70816c1990e39967c8f010349a388c00b77ec519c
    Port:           80/TCP
    Host Port:      0/TCP
    State:          Running
      Started:      Sun, 17 Jun 2018 12:29:16 +0000
    Ready:          True
    Restart Count:  0
    Environment:    <none>
    Mounts:
      /var/run/secrets/kubernetes.io/serviceaccount from default-token-rp5ls (ro)
Conditions:
  Type           Status
  Initialized    True
  Ready          True
  PodScheduled   True
Volumes:
  default-token-rp5ls:
    Type:        Secret (a volume populated by a Secret)
    SecretName:  default-token-rp5ls
    Optional:    false
QoS Class:       BestEffort
Node-Selectors:  <none>
Tolerations:     <none>
Events:
  Type       Reason         Age   From                     Message
   ----          ------             ----     ----                           -------
  Normal  Scheduled     52s   default-scheduler   Successfully assigned nginx to test-cluster-nd5c5y6lsfxb-minion-0
  Normal  SuccessfulMountVolume  51s   kubelet, test-cluster-nd5c5y6lsfxb-minion-0  MountVolume.SetUp succeeded for volume "default-token-rp5ls"
  Normal  Pulling          50s   kubelet, test-cluster-nd5c5y6lsfxb-minion-0  pulling image "library/nginx:1.14-alpine"
  Normal  Pulled           39s   kubelet, test-cluster-nd5c5y6lsfxb-minion-0  Successfully pulled image "library/nginx:1.14-alpine"
  Normal  Created        39s   kubelet, test-cluster-nd5c5y6lsfxb-minion-0  Created container
  Normal  Started         39s   kubelet, test-cluster-nd5c5y6lsfxb-minion-0  Started container
As you can see, Pod started up on a node named test-cluster-nd5c5y6lsfxb-minion-0 and got the internal IP address 10.100.88.9.
From the Events section you can see the main launch events - selecting the node for launching and downloading an image.
We can get to the Pod and check the status of the processes inside the container:
$ kubectl exec -it nginx sh
ps aux
PID   USER     TIME   COMMAND
  1       root       0:00     nginx: master process nginx -g daemon off;
  7      nginx      0:00     nginx: worker process
 20      root       0:00     sh
 24      root       0:00     ps aux
exit
It should be borne in mind that the IP address 10.100.88.9 will not be available to other applications inside and outside the Kubernetes cluster, access to the running Nginx will be possible only from within the Pod itself:
$ ping -c 1 10.100.88.9
PING 10.100.88.9 (10.100.88.9): 56 data bytes
--- 10.100.88.9 ping statistics ---
1 packets transmitted, 0 packets received, 100% packet loss
$ kubectl exec nginx -- ping -c1 10.100.88.9
PING 10.100.88.9 (10.100.88.9): 56 data bytes
64 bytes from 10.100.88.9: seq=0 ttl=64 time=0.075 ms
--- 10.100.88.9 ping statistics ---
1 packets transmitted, 1 packets received, 0% packet loss
round-trip min/avg/max = 0.075/0.075/0.075 ms
In addition to the fact that the specified IP address is accessible only from the container, it is also not permanent. This means that if this Pod is recreated, then it can get another IP address.
To solve these problems, you can use an object called Service.
Services
Service allows you to assign permanent IP addresses for Pods, provide them with access from external networks and balance requests between Pods.
More information about the Service can be found in the official documentation .
For example, we need to delete the running Pod:
$ kubectl delete pod nginxAdd to the description of the Pod-a label (Label), which is required for Service:
# nginx-labeled.yaml
apiVersion: v1
kind: Pod
metadata:
  name: nginx
  labels:
    app: webservice
spec:
  containers:
  - name: nginx
    image: library/nginx:1.14-alpine
    ports:
    - containerPort: 80
We also need a description of the Service:
# nginx-nodeport.yaml
apiVersion: v1
kind: Service
metadata:
  name: nginx-nodeport
  labels:
    app: webservice
spec:
  type: NodePort
  ports:
  - port: 80
    nodePort: 30001
    protocol: TCP
  selector:
    app: webservice
Create a Pod and Service:
$ kubectl create \
  -f https://raw.githubusercontent.com/selectel/kubernetes-examples/master/pods/nginx-labeled.yaml \
  -f https://raw.githubusercontent.com/selectel/kubernetes-examples/master/services/nginx-nodeport.yaml
Since the created Service has the NodePort type, the port 30001 we specified on all network interfaces will be opened on all nodes of the cluster.
This means that if we add an external IP address to any node, we can get access to the running Pod from Nginx from the external network.
In order not to use the external addresses of the cluster nodes to access the Service, we can use the LoadBalancer type instead of NodePort.
We will need a new description of the service:
# nginx-loadbalancer.yaml
apiVersion: v1
kind: Service
metadata:
  name: nginx-loadbalancer
  labels:
    app: webservice
spec:
  type: LoadBalancer
  ports:
  - port: 80
    protocol: TCP
  selector:
    app: webservice
Delete the current service and apply the new description:
$ kubectl delete service nginx-service
$ kubectl create \
  -f https://raw.githubusercontent.com/selectel/kubernetes-examples/master/services/nginx-loadbalancer.yaml
After starting the service, Nginx will be available on TCP port 80 from the external network, without the need to assign and use external addresses for the nodes of the cluster. Service with type LoadBalancer will automatically allocate a new external address to your VPC project and start using it.
You can get information about the selected external address with kubectl:
$ kubectl get service nginx-service -o=custom-columns=IP:status.loadBalancer.ingress[0].ip
IP
xxx.xxx.xxx.xxx
In our examples, only one Nginx Pod was launched. To scale the application to more Pods, we can use Deployment.
Deployments
Deployment is the essence of the Kubernetes cluster, which allows scaling pods and conveniently updating or rolling back versions for a large number of pods.
You can also use the ReplicaSet object instead of Deployment, but we will not touch it in our examples.
Learn more about Deployment in the official documentation .
We will need to remove the Pod again (we do not need to delete the Service):
$ kubectl delete pod nginxAdd the following Deployment description:
# nginx-1.14.yaml
apiVersion: apps/v1
kind: Deployment
metadata:
  name: nginx-deployment
spec:
  replicas: 10
  selector:
    matchLabels:
      app: webservice
 minReadySeconds: 10
 strategy:
    type: RollingUpdate
    rollingUpdate:
      maxUnavailable: 1
      maxSurge: 1
 template:
    metadata:
      labels:
        app: webservice
   spec:
      containers:
      - name: nginx
        image: library/nginx:1.14-alpine
        ports:
        - containerPort: 80
Create the specified Deployment:
$ kubectl create -f \
  https://raw.githubusercontent.com/selectel/kubernetes-examples/master/deployments/nginx-1.14.yaml
We chose the value 10 for the replicas parameter, so 10 Pods with the Nginx application will be created in our cluster:
$ kubectl get pods --selector app=webservice
NAME                                READY     STATUS    RESTARTS   AGE
nginx-deployment-54bfdc4489-42rrb   1/1       Running   0          4m
nginx-deployment-54bfdc4489-5lvtc   1/1       Running   0          4m
nginx-deployment-54bfdc4489-g7rk2   1/1       Running   0          4m
nginx-deployment-54bfdc4489-h5rxp   1/1       Running   0          4m
nginx-deployment-54bfdc4489-l9l2d   1/1       Running   0          4m
nginx-deployment-54bfdc4489-pjpvg   1/1       Running   0          4m
nginx-deployment-54bfdc4489-q8dnp   1/1       Running   0          4m
nginx-deployment-54bfdc4489-s4wzf   1/1       Running   0          4m
nginx-deployment-54bfdc4489-tfxf9   1/1       Running   0          4m
nginx-deployment-54bfdc4489-xjzb5   1/1       Running   0          4m
You can access the running application from the external network using the Service created in the previous section. Service will automatically balance requests from the external network between 10 instances of Nginx.
If necessary, we can update the version of Nginx. Update the Deployment description by changing the image version from 1.14-alpine to 1.15-alpine:
# nginx-1.15.yaml
apiVersion: apps/v1
kind: Deployment
metadata:
  name: nginx-deployment
spec:
  replicas: 10
  selector:
    matchLabels:
      app: webservice
 minReadySeconds: 10
 strategy:
    type: RollingUpdate
    rollingUpdate:
      maxUnavailable: 1
      maxSurge: 1
 template:
    metadata:
      labels:
        app: webservice
   spec:
      containers:
      - name: nginx
        image: library/nginx:1.15-alpine # <-- changed
        ports:
        - containerPort: 80
To start the process of updating Pods, use the kubectl command. Pay attention to the argument --record, it will be useful to us for the subsequent convenient rollback of the Nginx version:
$ kubectl apply -f \
  https://raw.githubusercontent.com/selectel/kubernetes-examples/master/deployments/nginx-1.15.yaml \
  --record
You can follow the update process with the following command:
$ kubectl rollout status deployment nginx-deployment
Waiting for rollout to finish: 4 out of 10 new replicas have been updated...
Kubernetes will wait 10 seconds after successfully updating one Pod, as we have specified a value of 10 for the minReadySeconds parameter in the Deployment description.
After the update is completed, all Deployment Pods will become active:
$ kubectl get deployment --selector app=webservice
NAME               DESIRED   CURRENT   UP-TO-DATE   AVAILABLE   AGE
nginx-deployment   10        10        10           10          23m
We can roll back the version of the application if something went wrong. To do this, we need to select the desired Deployment revision:
$ kubectl rollout history deployment nginx-deployment
deployments "nginx-deployment"
REVISION  CHANGE-CAUSE
1         <none>
2         kubectl apply --filename=https://raw.githubusercontent.com/selectel/kubernetes-examples/master/deployments/nginx-1.15.yaml --record=true
There are 2 revisions in the command output - the first is the initial creation of the Deployment, the second is the update. Since we used the --record argument when updating, we see the command that created the second Deployment revision.
To roll back the version, use the following command:
$ kubectl rollout undo deployment nginx-deployment --to-revision=1Similarly with the update, we can follow the rollback version with the help of the command:
$ kubectl rollout status deployment nginx-deployment
Waiting for rollout to finish: 6 out of 10 new replicas have been updated…
In all our examples, we used containers without permanent data storage. In the next section, we will fix this.
Data storage
By default, all container data running inside Pods is ephemeral and the drops of Pods will be lost.
You can use the PersistentVolumeClaim object to launch Pods with persistent data storage.
Creating such an object in a cluster is very simple - just add its description, similar to how we created the Pod, Service or Deployment in the previous sections.
More information can be found in the official documentation .
Example description of PersistentVolumeClaim creating a 10GB disk:
apiVersion: v1
kind: PersistentVolumeClaim
metadata:
  name: my-pv-claim
spec:
  accessModes:
    - ReadWriteOnce
  resources:
    requests:
      storage: 10Gi
We can connect it as a disk to our Pod, updating the description of the Pod c Nginx, created earlier:
# nginx-with-volume.yaml
apiVersion: v1
kind: Pod
metadata:
 name: nginx
spec:
  containers:
  - name: nginx
    image: library/nginx:1.14-alpine
    ports:
    - containerPort: 80
    volumeMounts:
      - mountPath: "/var/www/html"
        name: data
  volumes:
    - name: data
      persistentVolumeClaim:
        claimName: my-pv-claim
However, in order for a disk to be created, you will need to specify the properties of the disk being created in the form of a StorageClass. In the “Virtual Private Cloud” service, you can use network drives of fast, universal and basic types as a permanent data store for Kubernetes Pods.
For example, to create a StorageClass that allows using fast disks in the ru-1b availability zone, you need the following description:
# fast.ru-1b.yaml
kind: StorageClass
apiVersion: storage.k8s.io/v1
metadata:
  name: fast.ru-1b
  annotations:
    storageclass.beta.kubernetes.io/is-default-class: "true"
provisioner: kubernetes.io/cinder
parameters:
  type: fast.ru-1b
  availability: ru-1b
Before creating the specified objects, remove the Deployment created earlier:
$ kubectl delete deployment nginx-deploymentFirst of all, create a StorageClass, so it will become the default class, and subsequently created PersistentVolumeClaim will use it:
$ kubectl create -f \
https://raw.githubusercontent.com/selectel/kubernetes-examples/master/storageclasses/fast.ru-1b.yaml
Create PersistentVolumeClaim and Pod:
$ kubectl create \
-f https://raw.githubusercontent.com/selectel/kubernetes-examples/master/persistentvolumeclaims/my-pv-claim.yaml \
-f https://raw.githubusercontent.com/selectel/kubernetes-examples/master/pods/nginx-with-volume.yaml
After that, a disk will be automatically created in your project, which will be connected to one of the minion-node of the cluster. When it falls, the disk will be automatically switched to another node.
We can see the disk inside the container with Nginx:
$ kubectl exec -it nginx sh
mount | grep "/var/www/html"
/dev/sdc on /var/www/html type ext4 (rw,seclabel,relatime,data=ordered)
exit
You can connect the drive to Deployment. The relevant example can be found in the official documentation .
Kubernetes control panel
You can use Kubernetes’s built-in dashboard to view the status of cluster objects and their management.
To access all the features of the panel, you will need to create an account with the administrator role in your cluster.
For this we need an account description:
# admin-user.yaml
apiVersion: v1
kind: ServiceAccount
metadata:
  name: admin-user
  namespace: kube-system
And a description of the role:
# cluster-admin.yaml
apiVersion: rbac.authorization.k8s.io/v1
kind: ClusterRoleBinding
metadata:
  name: admin-user
roleRef:
  apiGroup: rbac.authorization.k8s.io
  kind: ClusterRole
  name: cluster-admin
subjects:
- kind: ServiceAccount
  name: admin-user
  namespace: kube-system
Create the specified objects:
$ kubectl create \
  -f https://raw.githubusercontent.com/selectel/kubernetes-examples/master/accounts/admin-user.yaml \
  -f https://raw.githubusercontent.com/selectel/kubernetes-examples/master/clusterrolebindings/cluster-admin.yaml
Next you need to know the value of the generated token for this account.
To do this, find the corresponding Secret object in the cluster:
$ kubectl get secret --namespace=kube-system | grep "admin-user-token"
admin-user-token-bkfhb                   kubernetes.io/service-account-token   3         22m
And see the value of the token in the Secret found with the name admin-user-token-bkfhb:
$ kubectl describe secret admin-user-token-bkfhb --namespace=kube-system | grep "token:"
token:      XXXXXX...
In response, you will receive the value of the token, save it, it will be useful to us later.
The details of the delimitation of access to Kubernetes objects can be found in the official documentation .
In the event that you created a cluster from a public template, there already exist Pod and Service in it, which ensures the operation of the panel:
$ kubectl get svc kubernetes-dashboard --namespace=kube-system                                                                                                                                                              206ms  Tue Jun 19 14:35:19 2018
NAME                               TYPE        CLUSTER-IP       EXTERNAL-IP   PORT(S)   AGE
kubernetes-dashboard   ClusterIP   10.254.122.245      <none>              443/TCP     2d
$ kubectl get pod --namespace=kube-system --selector k8s-app=kubernetes-dashboard                                                                                                                                                   119ms  Tue Jun 19 14:36:48 2018
NAME                                                       READY     STATUS    RESTARTS   AGE
kubernetes-dashboard-747575c864-jpxvt   1/1          Running             0            2d
Since Service is of type ClusterIP, it will be available only from within the cluster itself.
You can access the panel from your work computer with a cluster configuration file using the kubectl command:
$ kubectl proxy
Starting to serve on 127.0.0.1:8001
Check the operation of the proxy by opening the specified address in the browser:
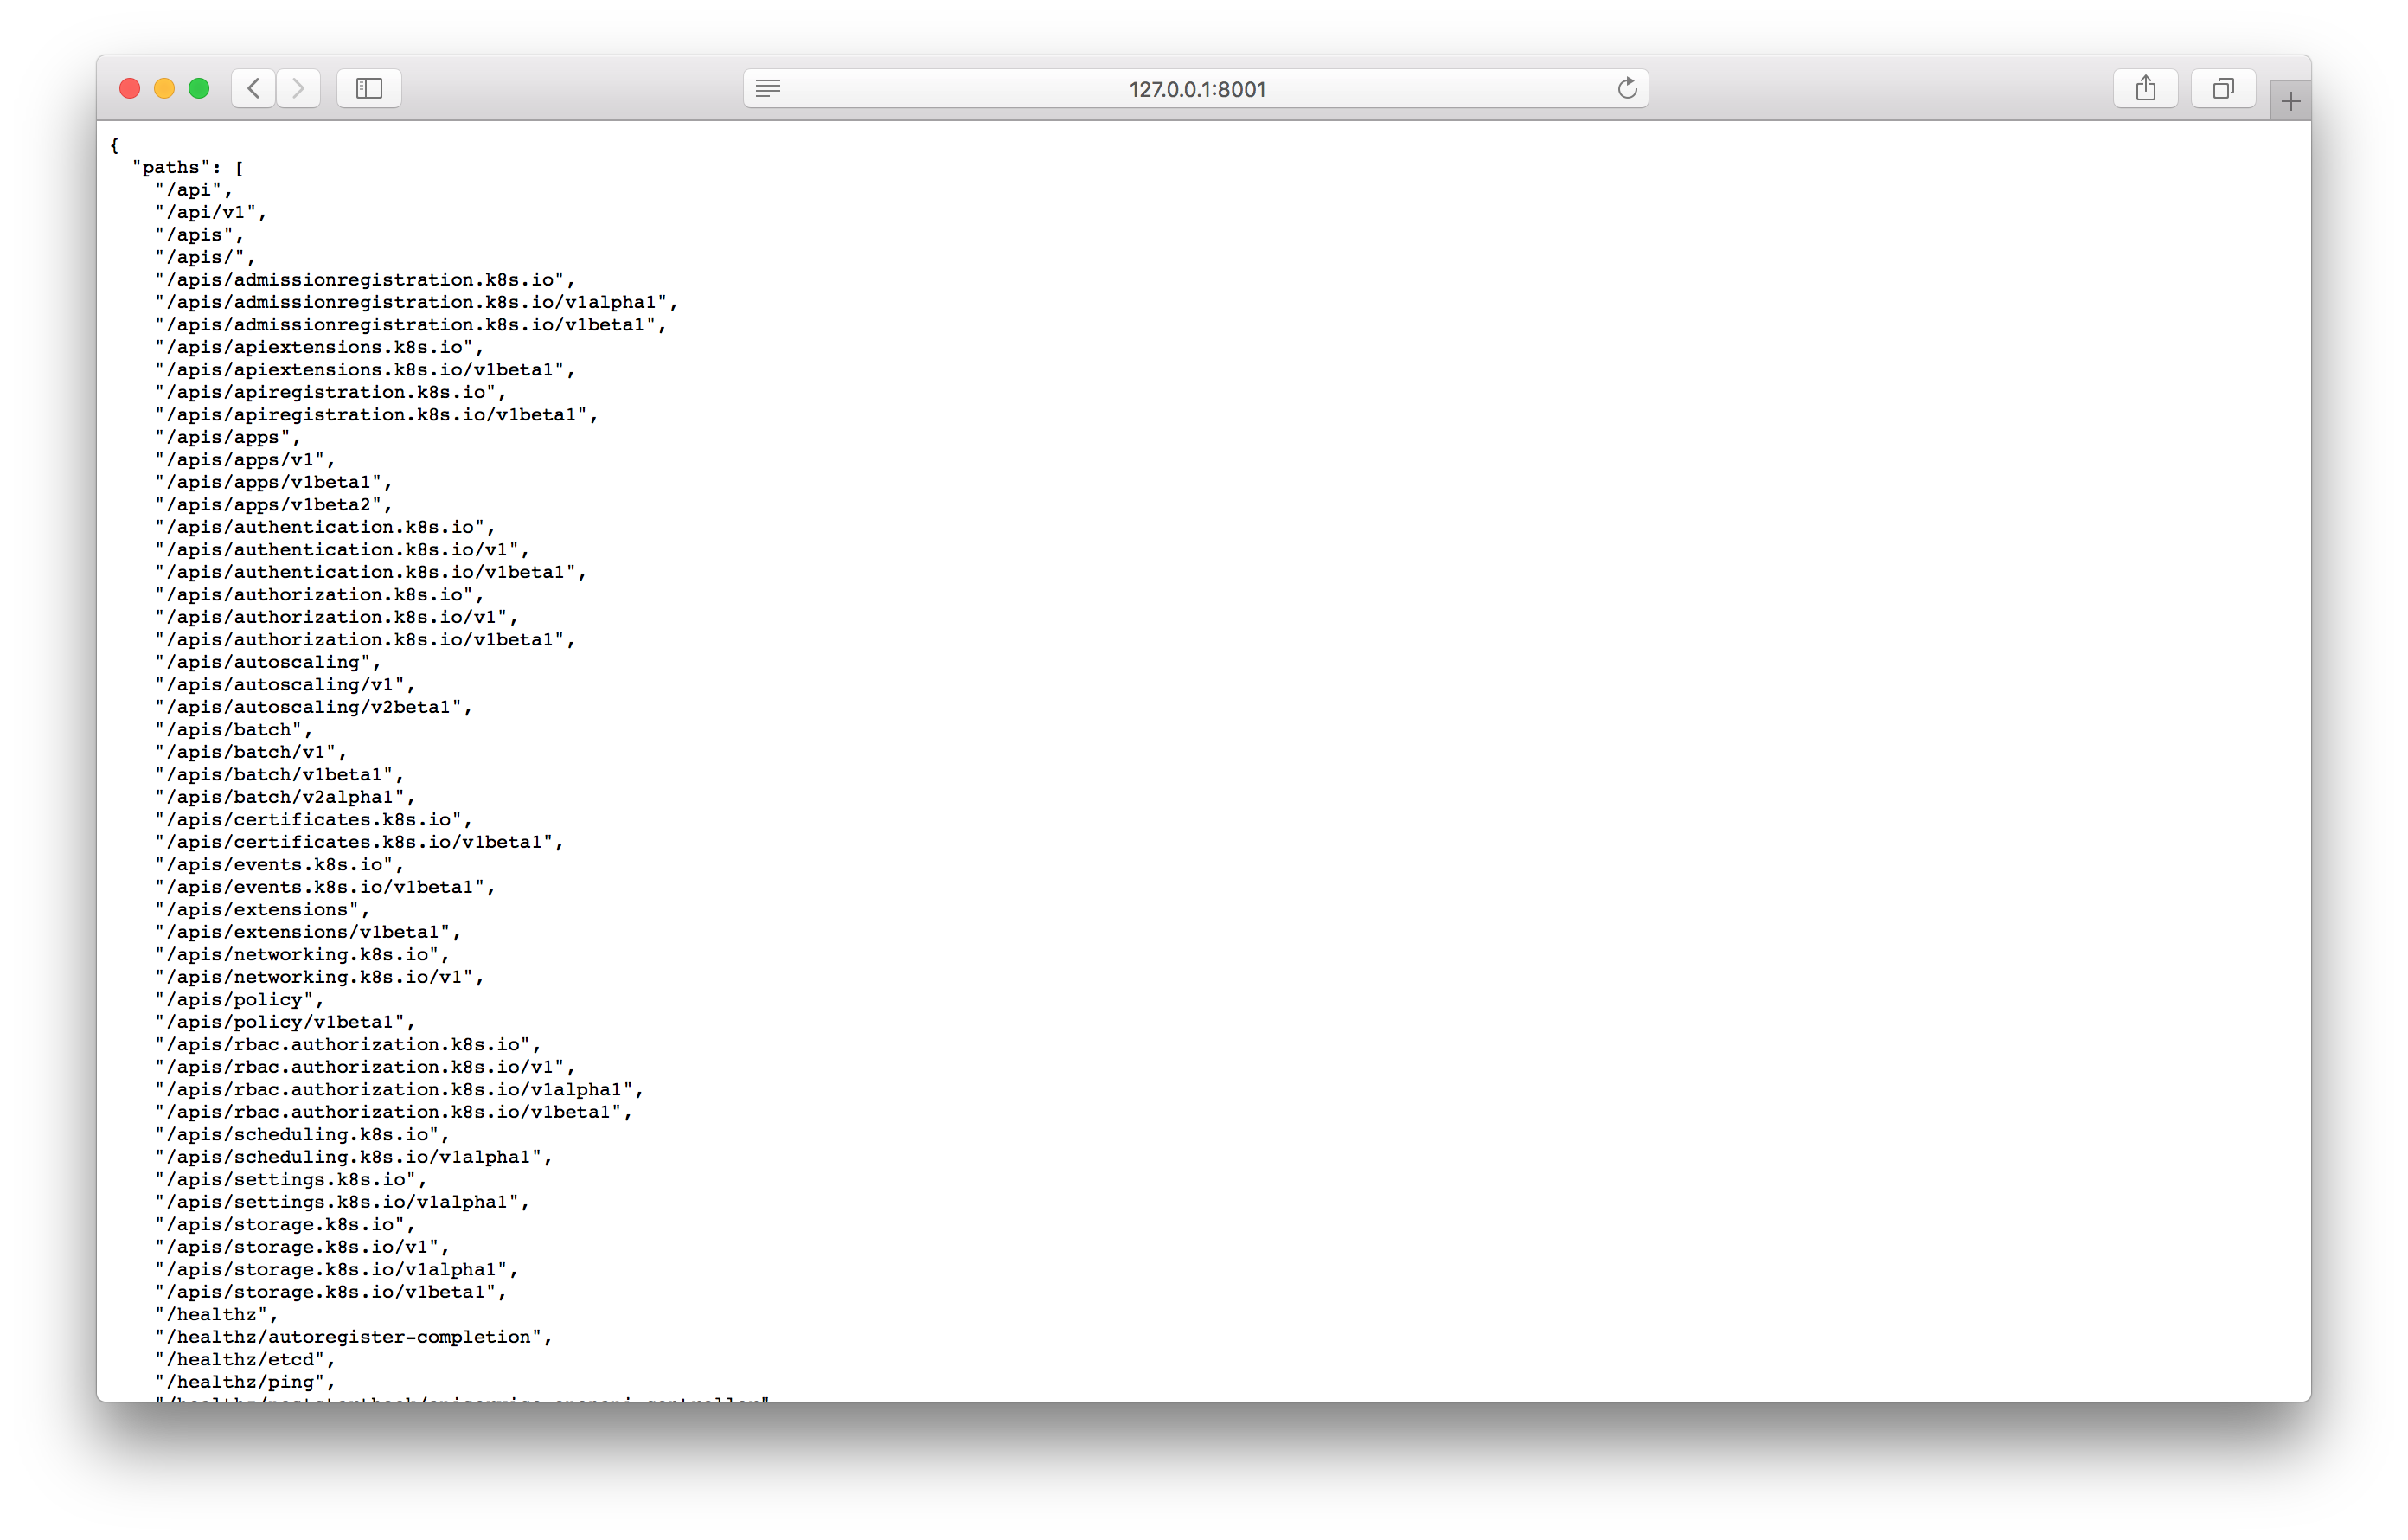
If you see the answer similar to the screenshot, you can go to the control panel screen using the following address:
http://127.0.0.1:8001/api/v1/namespaces/kube-system/services/https:kubernetes-dashboard:/proxy/ Going over it, you should see the login screen in the panel:
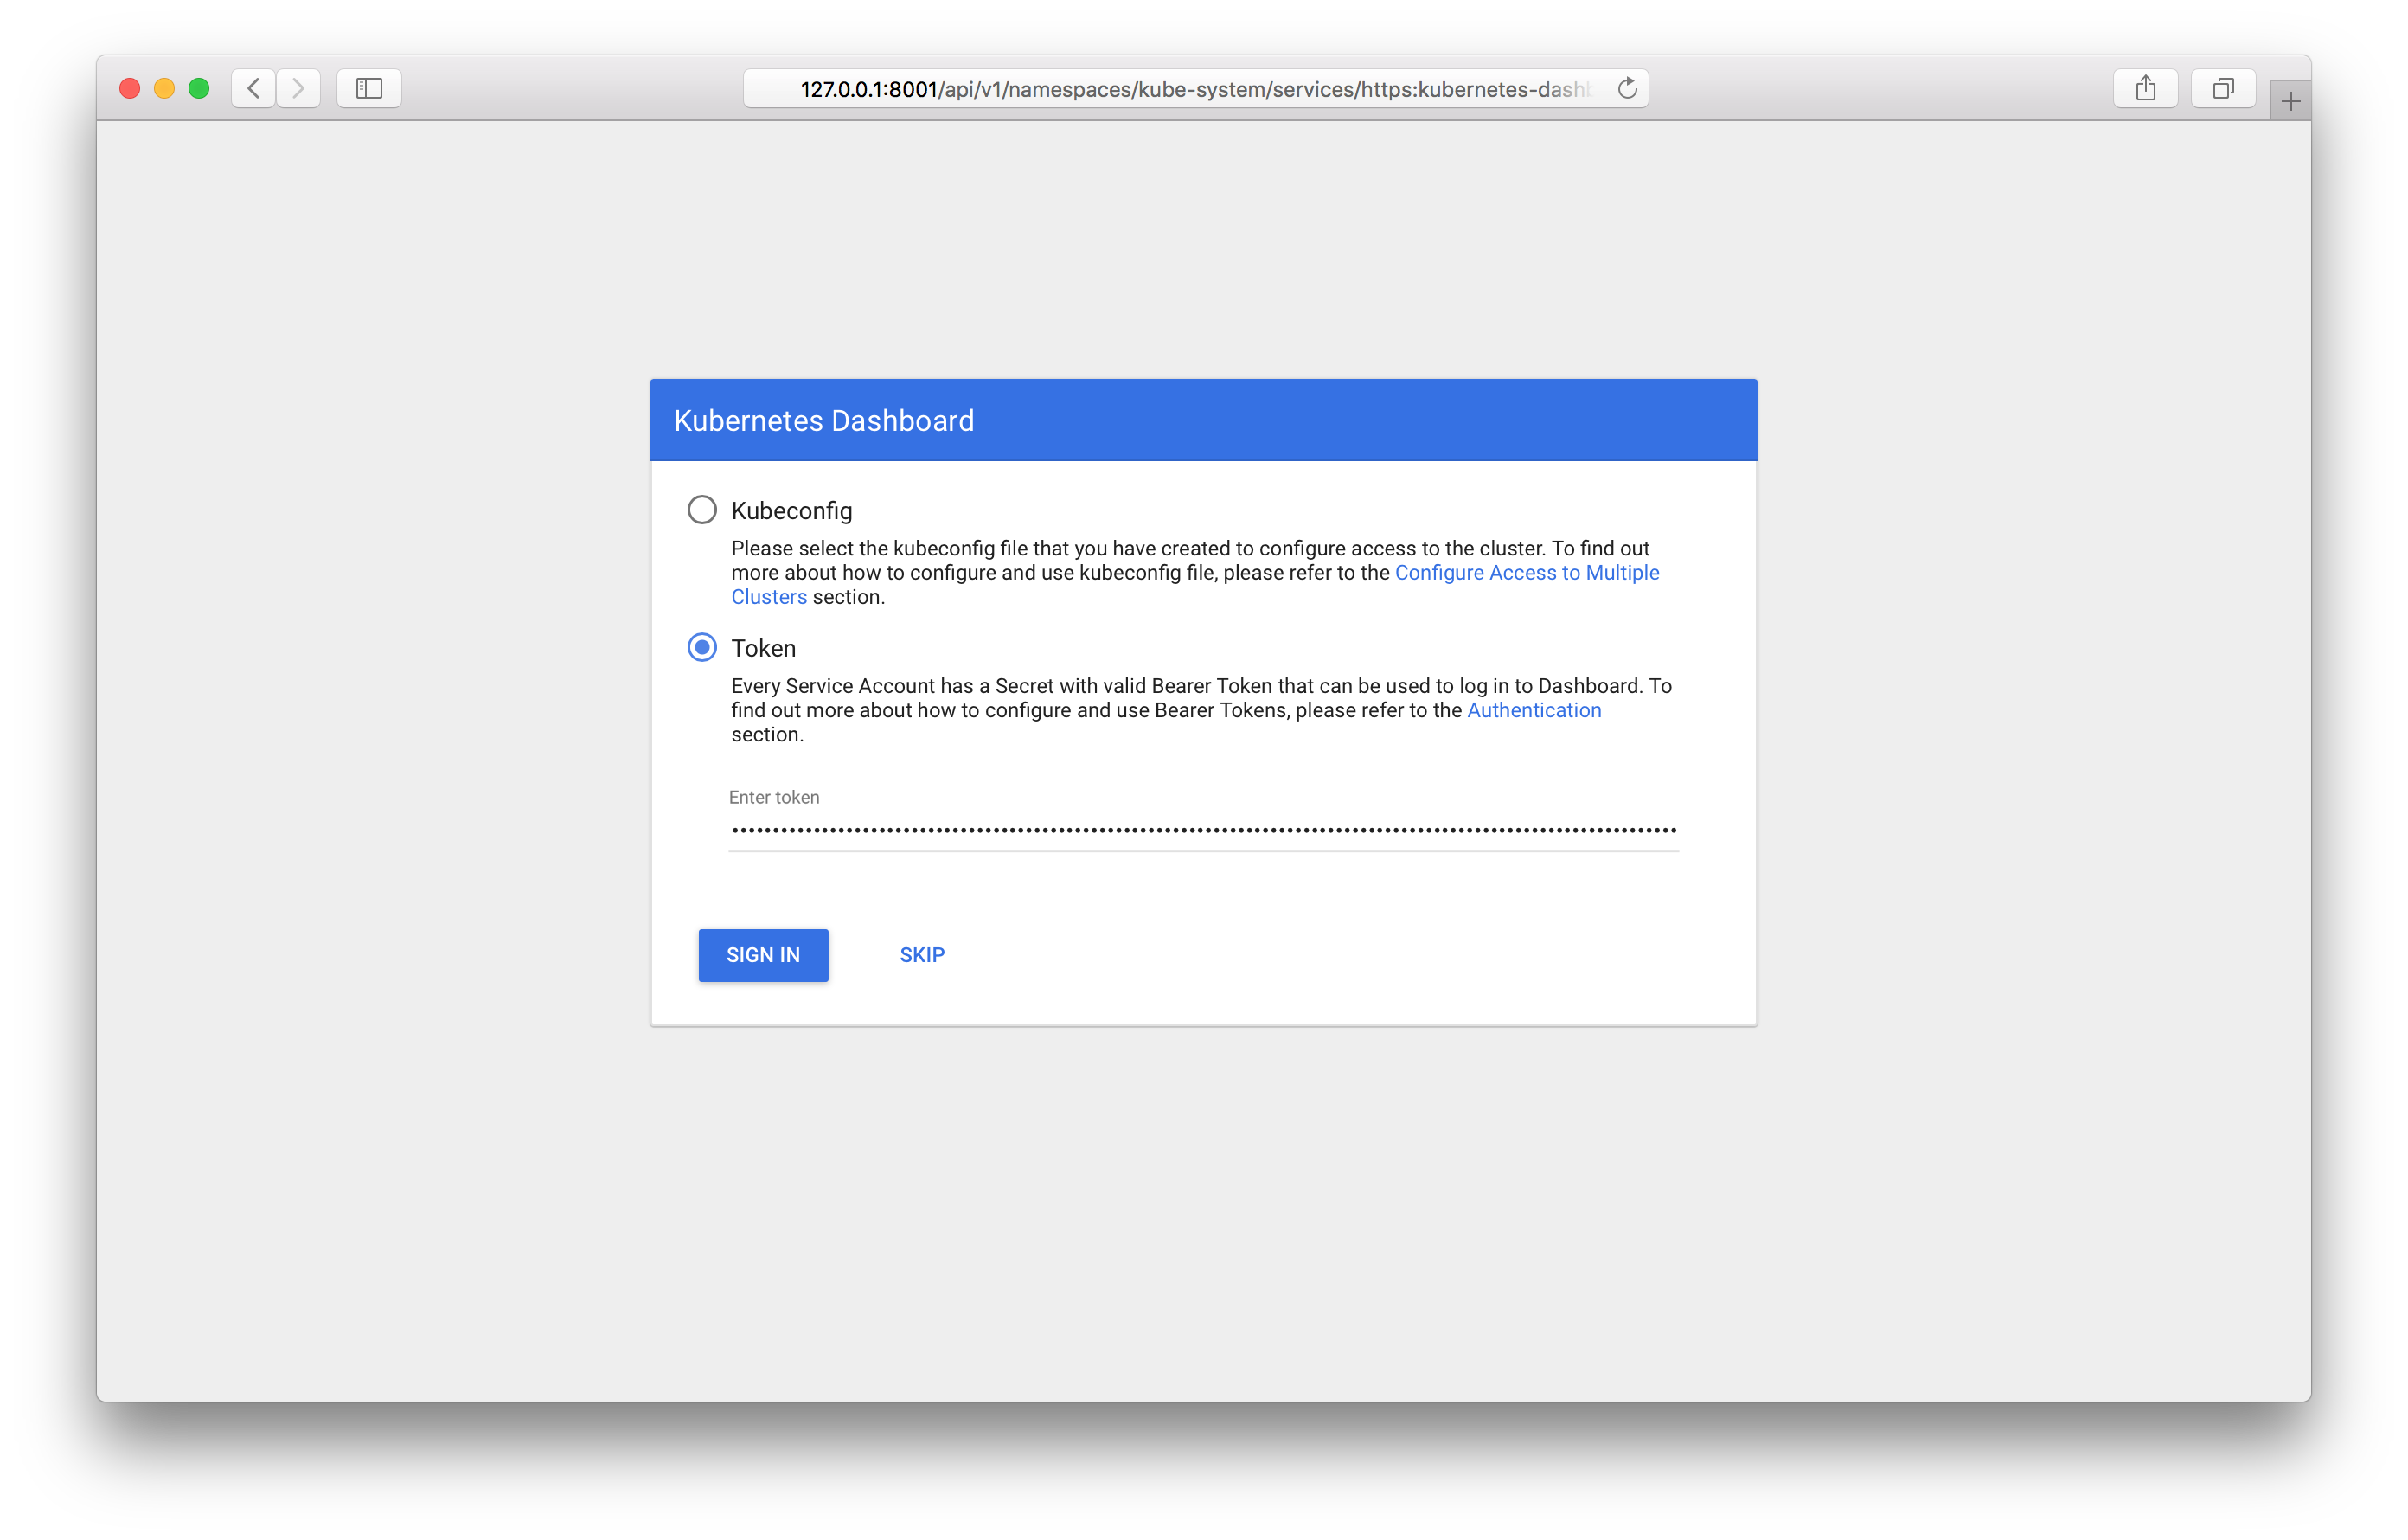
You will need to specify the token received earlier. After logging in, you can use the control panel:
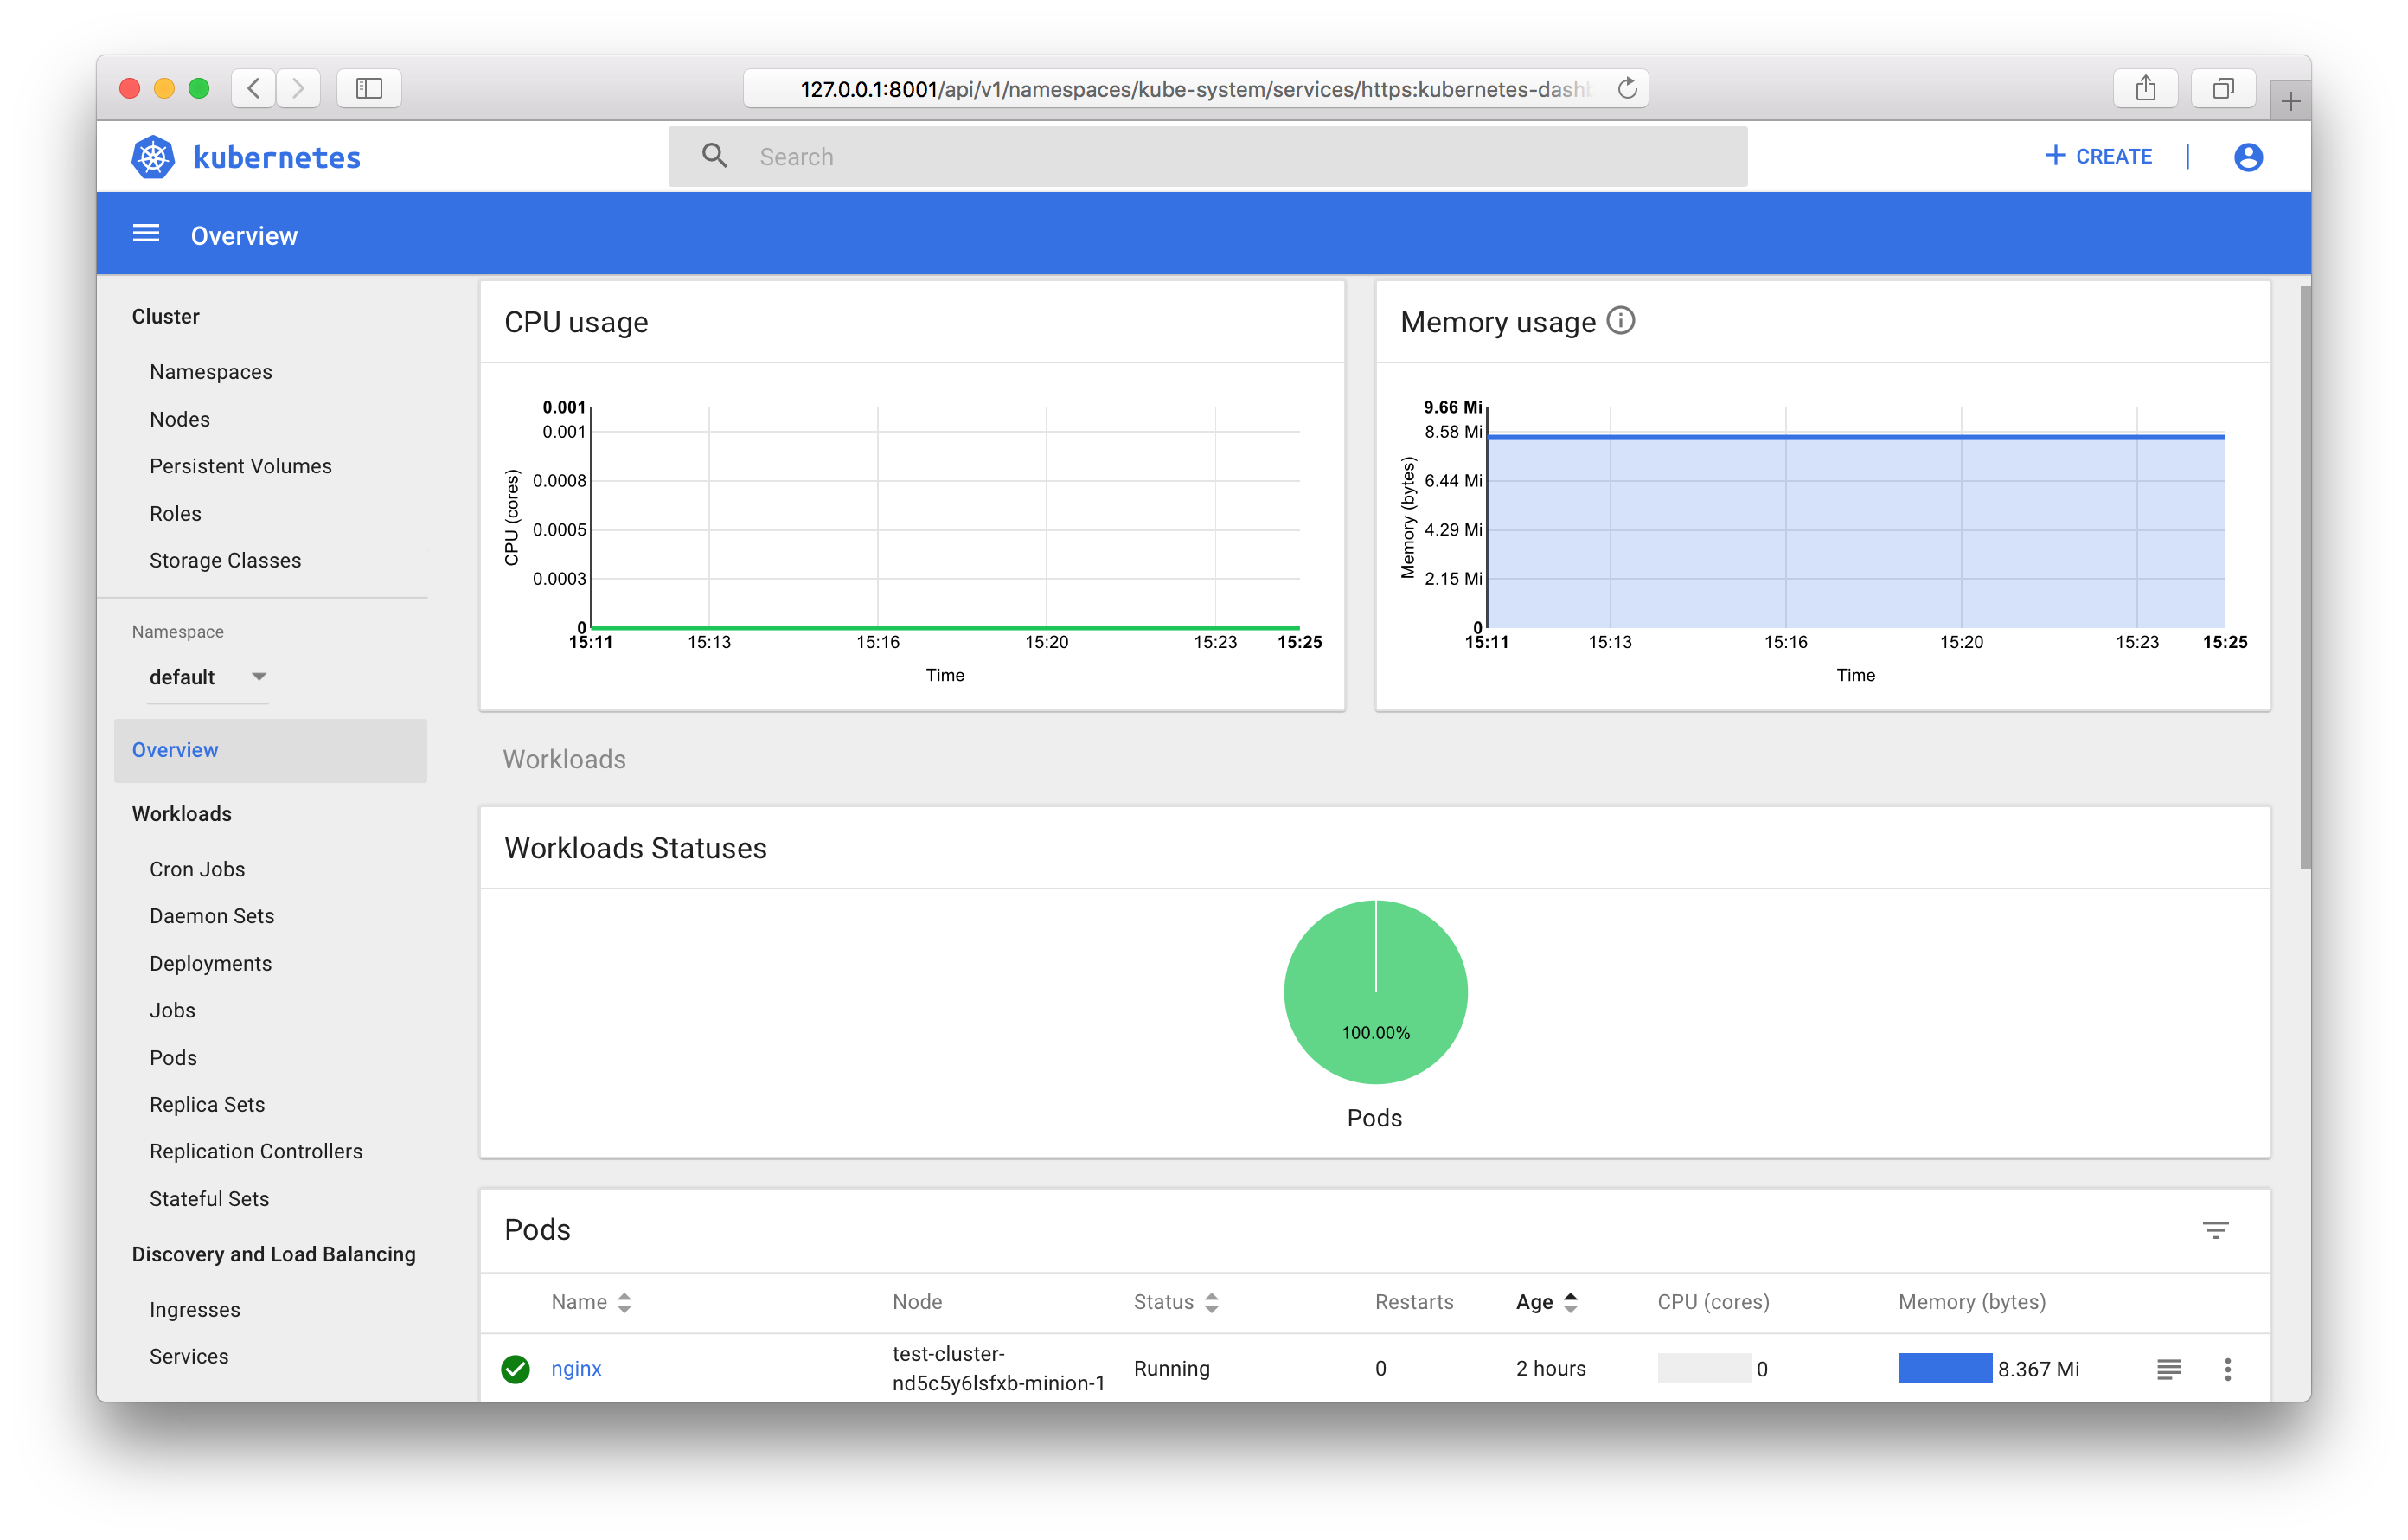
All the features of the control panel can be found in the official documentation .
Monitoring Kubernetes objects
In the case of using a public cluster template, you will automatically run the components for collecting and displaying metrics - Prometheus and Grafana.
Similar to the control panel, ClusterIP is set as the Service type, it can only be accessed from within the cluster or through the kubectl proxy. You can access Grafana from your work computer at the following address:
http://127.0.0.1:8001/api/v1/proxy/namespaces/kube-system/services/monitoring-grafana:80
Conclusion
In this article, we looked at the most frequently used Kubernetes objects and looked at examples of starting and managing a cluster using OpenStack Magnum.
In the near future, it will be possible to use the latest Kubernetes releases, and cluster management will be available through the control panel .
We will be glad if you use our service in test mode and provide feedback.