How to test hypotheses and make money on Swift with the help of split tests
Hello! My name is Sasha Zimin, I work as an iOS developer in the London office of Badoo . In Badoo, there is a very close interaction with product managers, and I have adopted the habit of testing all the hypotheses that I have regarding the product. So, I started writing split tests for my projects.
The framework discussed in this article was written for two purposes. First, to avoid possible errors, because there is a better lack of data in the analytics system than incorrect data (or, in general, data that can be misinterpreted and broken wood). Secondly, to simplify the implementation of each subsequent test. But let's begin, perhaps, with what split tests are.
Nowadays there are millions of applications that solve most user needs, so every day it becomes more and more difficult to create new competitive products. This led to the fact that many companies and start-ups first conduct various studies and experiments to find out which functions make their product better, and which ones can be dispensed with.
One of the main tools for conducting such experiments is split testing (or A / B testing). In this article I will tell how it can be implemented on Swift.
All project demonstration materials are available here . If you already have an idea about A / B testing, then you can go directly to the code .
Brief introduction to split testing
Split testing, or A / B testing (this term is not always correct, because you may have more than two groups of participants) is a way to check different versions of a product for different groups of users in order to understand which version is better. You can read about it in “ Wikipedia ” or, for example, in this article with real examples.
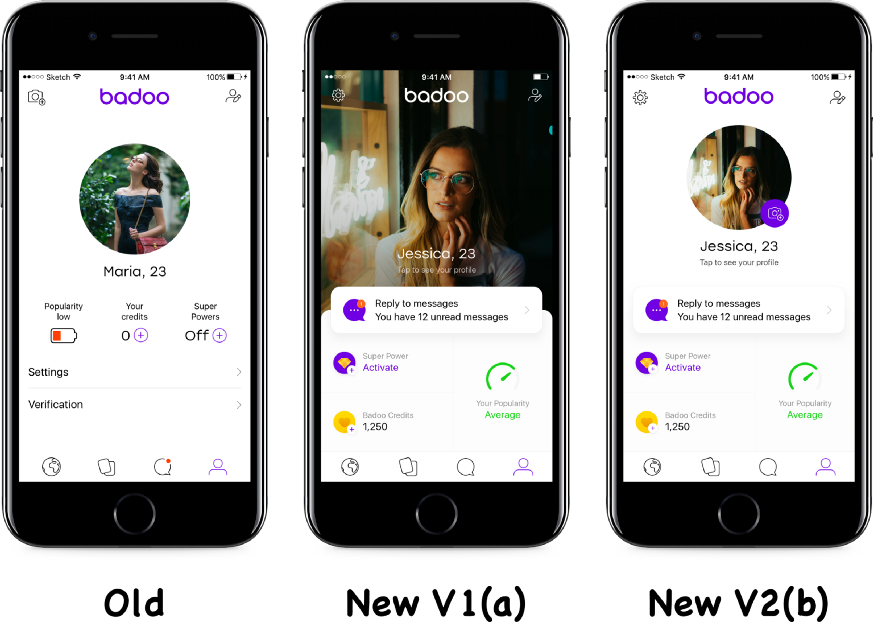
In Badoo, we perform many split tests at the same time. For example, once we decided that the user profile page in our application looks outdated, and also wanted to improve user interaction with some banners. Therefore, we launched a split test with three groups:
- Old profile
- New profile, version 1
- New profile, version 2
As you can see, we had three options, more like A / B / C testing (and that is why we prefer to use the term "split testing").
So different users saw their profiles:
In the Product Manager console, we had four user groups that were randomly generated and had the same size:
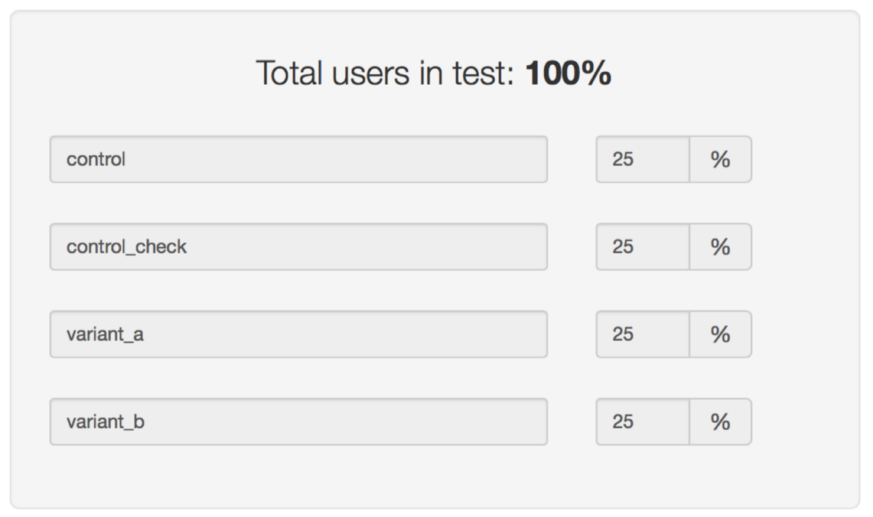
Perhaps you ask why we have control and control_check (if control_check is a copy of control logic)? The answer is very simple: any change affects many indicators, so we can never be absolutely sure that a change is the result of a split test, and not other actions.
If you think that some indicators have changed because of the split test, then you should double check that they are the same inside the control and control_check groups.
As you can see, user opinions may differ, but empirical evidence is clear evidence. The product management team analyzes the results and understands why one option is better than the other.
Split Testing and Swift
Goals:
- Create a library for the client part (without using the server).
- Save the selected user option in the permanent storage after it has been randomly generated.
- Send reports on the selected options for each split test to the analytics service.
- Make the most of Swift.
PS The use of such a library for split-testing of the client part has its advantages and disadvantages. The main advantage is that you do not need to have a server infrastructure or a dedicated server. And the disadvantage is that if something goes wrong during the experiment, you will not be able to roll back without downloading the new version in the App Store.
A few words about the implementation:
- When conducting an experiment, the option for the user is chosen randomly according to an equally probable principle.
- Split testing service can use:
- Any data store (for example, UserDefaults, Realm, SQLite, or Core Data) as a dependency and store in it the value assigned to the user (the value of his variant).
- Any analytics service (for example, Amplitude or Facebook Analytics) as a dependency and send the current version at the moment when the user encounters a split test.
Here is a diagram of the future classes:
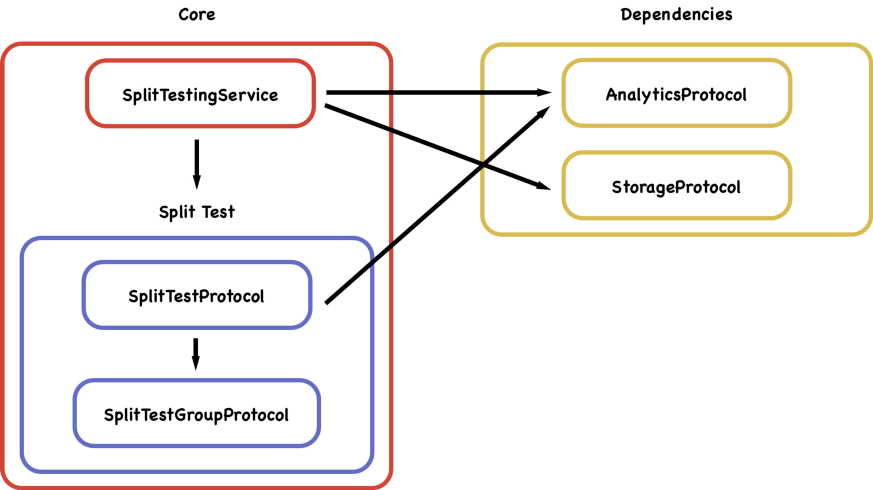
All split tests will be presented using SplitTestProtocol , and each of them will have several options (groups), which will be presented in the SplitTestGroupProtocol .
The split test should be able to inform the analyst of the current version, so it will have an AnalyticsProtocol as a dependency .
The SplitTestingService will save, generate variants and manage all the split tests. It is he who downloads the current version of the user from the storage, which is determined by the StorageProtocol , and also passes the AnalyticsProtocol to the SplitTestProtocol .
Let's start writing code with AnalyticsProtocol and StorageProtocol dependencies :
protocolAnalyticsServiceProtocol{
    funcsetOnce(value: String, for key: String)
}
protocolStorageServiceProtocol{
    funcsave(string: String?, for key: String)
    funcgetString(for key: String) -> String?
}
The role of analytics is to record events once. For example, to fix that user A is in the blue group in the split-test process button_color , when he sees the screen with this button.
The storage role is to save a specific option for the current user (after the SplitTestingService generated this option) and its subsequent reading each time the program accesses this split test.
So, let's look at the SplitTestGroupProtocol , which characterizes the set of options for a particular split test:
protocolSplitTestGroupProtocol: RawRepresentablewhereRawValue == String{
    staticvar testGroups: [Self] { get }
}
Since RawRepresentable where RawValue is a string, you can easily create a variant from a string or convert it back to a string, which is very convenient for working with analytics and storage. Also, SplitTestGroupProtocol contains an array of testGroups, in which the composition of the current variants can be specified (this array will also be used to randomly generate from the available variants).
This is the basis for the SplitTestProtocol split test itself :
protocolSplitTestProtocol{
    associatedtypeGroupType: SplitTestGroupProtocol
    staticvar identifier: String { get }
    var currentGroup: GroupType { get }
    var analytics: AnalyticsServiceProtocol { get }
    init(currentGroup: GroupType, analytics: AnalyticsServiceProtocol)
}
extensionSplitTestProtocol{
    funchitSplitTest() {
        self.analytics.setOnce(value: self.currentGroup.rawValue, for: Self.analyticsKey)
    }
    staticvar analyticsKey: String {
        return"split_test-\(self.identifier)"
    }
    staticvar dataBaseKey: String {
        return"split_test_database-\(self.identifier)"
    }
}
In SplitTestProtocol contains:
- The GroupType type , which implements the SplitTestGroupProtocol protocol to represent the type that defines a set of options.
- String identifier for analytics and storage keys.
- The currentGroup variable to write to a specific instance of SplitTestProtocol .
- The analytics dependency for the hitSplitTest method .
- And the hitSplitTest method , which informs the analyst that the user has seen the result of the split test.
The hitSplitTest method allows you to make sure that users are not only in a certain variant, but also saw the test result. Marking a user who has not visited the shopping section as “saw_red_button_on_purcahse_screen” will distort the results.
Now we have everything ready for SplitTestingService :
protocolSplitTestingServiceProtocol{
    funcfetchSplitTest<Value: SplitTestProtocol>(_ splitTestType: Value.Type) -> Value
}
classSplitTestingService: SplitTestingServiceProtocol{
    privatelet analyticsService: AnalyticsServiceProtocol
    privatelet storage: StorageServiceProtocol
    init(analyticsService: AnalyticsServiceProtocol, storage: StorageServiceProtocol) {
        self.analyticsService = analyticsService
        self.storage = storage
    }
    funcfetchSplitTest<Value: SplitTestProtocol>(_ splitTestType: Value.Type) -> Value {
        iflet value = self.getGroup(splitTestType) {
            returnValue(currentGroup: value, analytics: self.analyticsService)
        }
        let randomGroup = self.randomGroup(Value.self)
        self.saveGroup(splitTestType, group: randomGroup)
        returnValue(currentGroup: randomGroup, analytics: self.analyticsService)
    }
    privatefuncsaveGroup<Value: SplitTestProtocol>(_ splitTestType: Value.Type, group: Value.GroupType) {
        self.storage.save(string: group.rawValue, for: Value.dataBaseKey)
    }
    privatefuncgetGroup<Value: SplitTestProtocol>(_ splitTestType: Value.Type) -> Value.GroupType? {
        guardlet stringValue = self.storage.getString(for: Value.dataBaseKey) else {
            returnnil
        }
        returnValue.GroupType(rawValue: stringValue)
    }
    privatefuncrandomGroup<Value: SplitTestProtocol>(_ splitTestType: Value.Type) -> Value.GroupType {
        letcount = Value.GroupType.testGroups.count
        let random = Int.random(lower: 0, count - 1)
        returnValue.GroupType.testGroups[random]
    }
}
PS In this class, we use the Int.random function, taken from
here , but in Swift 4.2 it is already built in by default.
This class contains one public method fetchSplitTest and three private methods: saveGroup , getGroup , randomGroup .
The randomGroup method generates a random variant for the selected split test, while getGroup and saveGroup allow you to save or load a variant for a specific split test for the current user.
The main and public function of this class is fetchSplitTest: it tries to return the current version from the persistent storage and, if it fails, generates and stores the random option before returning it.
Now we are ready to create our first split test:
finalclassButtonColorSplitTest: SplitTestProtocol{
    staticvar identifier: String = "button_color"
    var currentGroup: ButtonColorSplitTest.Group
    var analytics: AnalyticsServiceProtocol
    init(currentGroup: ButtonColorSplitTest.Group, analytics: AnalyticsServiceProtocol) {
        self.currentGroup = currentGroup
        self.analytics = analytics
    }
    typealiasGroupType = Group
    enumGroup: String, SplitTestGroupProtocol{
        case red = "red"
        case blue = "blue"
        case darkGray = "dark_gray"
        staticvar testGroups: [ButtonColorSplitTest.Group] = [.red, .blue, .darkGray]
    }
}
extensionButtonColorSplitTest.Group{
    var color: UIColor {
        switchself {
        case .blue:
            return .blue
        case .red:
            return .red
        case .darkGray:
            return .darkGray
        }
    }
}
It looks impressive, but do not worry: as soon as you implement the SplitTestProtocol as a separate class, the compiler will ask you to implement all the necessary properties.
The important part here is the enum Group type . You should put all your groups into it (in our example it is red, blue and darkGray), and define the string values here to ensure the correct transfer to the analytics.
We also have the ButtonColorSplitTest.Group extension , which allows you to use the full potential of Swift. Now let's create the objects for the AnalyticsProtocol and StorageProtocol :
extensionUserDefaults: StorageServiceProtocol{
    funcsave(string: String?, for key: String) {
        self.set(string, forKey: key)
    }
    funcgetString(for key: String) -> String? {
        returnself.object(forKey: key) as? String
    }
}
For the StorageProtocol, we will use the UserDefaults class, because it is easy to implement, but in your projects you can work with any other persistent storage (for example, I chose Keychain for myself, since it keeps the group as the user even after deletion).
In this example, I’ll create a class of fictitious analytics, but you can use real analytics in your project. For example, you can use the service Amplitude .
// Dummy class for example, use something real, like AmplitudeclassAnalytics{
    funclogOnce(property: NSObject, for key: String) {
        let storageKey = "example.\(key)"
        ifUserDefaults.standard.object(forKey: storageKey) == nil {
            print("Log once value: \(property) for key: \(key)")
            UserDefaults.standard.set("", forKey: storageKey) // String because of simulator bug
        }
    }
}
extensionAnalytics: AnalyticsServiceProtocol{
    funcsetOnce(value: String, for key: String) {
        self.logOnce(property: value asNSObject, for: key)
    }
}
Now we are ready to use our split test:
let splitTestingService = SplitTestingService(analyticsService: Analytics(),
                                                       storage: UserDefaults.standard)
let buttonSplitTest = splitTestingService.fetchSplitTest(ButtonColorSplitTest.self)
self.button.backgroundColor = buttonSplitTest.currentGroup.color
buttonSplitTest.hitSplitTest()
Simply create your own copy, extract the split test and use it. Generalizations allow you to call up.
buttonSplitTest.currentGroup.color.When you first use, you can see something like ( Log once value ) : split_test-button_color for key: dark_gray , and if you do not delete the application from the device, the button will be the same every time it starts.
The process of implementing such a library takes some time, but after that, each new split test inside your project will be created in a couple of minutes.
Here is an example of using the engine in a real application: in analytics, we segmented users according to the complexity factor and the probability of buying game currency.

People who have never come across this coefficient of difficulty (none) probably do not play at all and do not buy anything in games (which is logical), which is why it is important to send the result (the generated version) of split testing to the server at the moment when users really face your test.
Without the complexity factor, only 2% of users bought game currency. With a small purchase rate already made 3%. And with a high coefficient of difficulty, 4% of players bought currency. This means that you can continue to increase the coefficient and observe the numbers. :)
If you are interested in analyzing the results with maximum accuracy, I advise you to use this tool .
Thanks to the wonderful team that helped me in the work on this article (especially Igor , Kelly and Jairo ).
The entire demo project is available at this link .