Using the RS485 interface and saving foot
Once I needed to connect more than two controllers together, and even do it at a fairly decent distance. In the process of googling, the choice fell on the ModBus protocol in implementation over the RS485 interface. ModBus descriptions are ubiquitous, and are not considered in this article. Let us dwell in more detail on the RS485 interface.
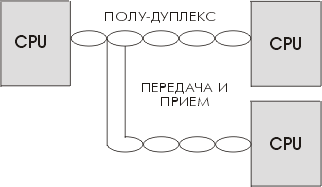
Twisted pair is most commonly used to transfer data between devices. One pair of data goes in both directions, but not simultaneously, but in turn. All devices with which it is necessary to communicate, "sit down" on the line in parallel. The interface uses differential inputs / outputs. Here are the main points ...
What can we get from using this interface? From the pros:
- Ability to transmit over long distances;
- The transmission medium is quite noiseproof;
- Easy to add devices to existing lines;
- Transmission at high speed ...
Of the minuses - you need to think through an arbitration policy. To think over the protocol so that either there are no situations when two devices try to transfer data at the same time, or ways out of such situations. I took the first, simpler path. I chose the option of communication between Single Master controllers (one controller is a master and either sends information to any other, or requests information from the device). The
classic scheme of connecting the controller to the RS485 network looks like this:

It uses the MAX485 chip (ad485, st485 or similar). Leg 1 - received data, leg 4 - data for transmission to the line, and 2 and 3 (combined in the figure) to turn on the receiver or transmitter. When combined by changing the level, we change the direction of data transfer (to us - from us). I intentionally do not write about which of the levels the receiver turns on and which transmitter, because here I myself caught a rake with my forehead.
Everything is correctly drawn in the picture above - here the receiver turns on with a low signal level, and the transmitter turns on high. I somehow did not pay attention to it and decided to "improve" the scheme in this way:

The jamb was discovered after the board was wired and the device was assembled: in standby mode, the logical “1” is constantly “on duty” at the TxD output, and “zeros” appear during data transfer. Thus, the receiver is turned off all the time and the transmitter is turned on.
I came up with two options for overcoming this situation:
1. Software. Instead of using a hardware serial port, use a software one in which all data would be inverted at the output. Plus - it’s obvious: there is no need to re-manufacture boards (and I had five of them).
2. Hardware. Place an inverter between the output of the controller and the input of the converter. The pluses are also obvious: no need to write your own serial port emulation curves.
There was also a third option - to return to the original, "not optimized" scheme - but it would immediately entail changes in the board and changes in the program - therefore it was immediately discarded. I created the difficulties myself - I myself will overcome.
I’ll get ahead of myself - I didn’t rewrite anything and did not breed new boards. They say the truth - laziness is the engine of progress. I assembled the inverter on one transistor, well, in terms of experiment, right on the cut track.
It turned out scary, but it worked!
Final circuit:
In order to preserve the color of the finish from the smd transistor and two output resistances, the circuit is drawn in paint.
It looked lively as sloppy and scary, but after three layers of varnish ...
In general, I still save one foot of the microcontroller in the same way, although the circuit has undergone several changes and I began to plant landing sites in advance.
This is part of the circuit. A resistor was added to keep the transistor open when there is no control from the foot of the controller. (If you remove the controller from the panel, this will not interfere with the communication of other devices).
And by the way, that, the very first system, the third year, how it works, will soon be coming.
Twisted pair is most commonly used to transfer data between devices. One pair of data goes in both directions, but not simultaneously, but in turn. All devices with which it is necessary to communicate, "sit down" on the line in parallel. The interface uses differential inputs / outputs. Here are the main points ...
What can we get from using this interface? From the pros:
- Ability to transmit over long distances;
- The transmission medium is quite noiseproof;
- Easy to add devices to existing lines;
- Transmission at high speed ...
Of the minuses - you need to think through an arbitration policy. To think over the protocol so that either there are no situations when two devices try to transfer data at the same time, or ways out of such situations. I took the first, simpler path. I chose the option of communication between Single Master controllers (one controller is a master and either sends information to any other, or requests information from the device). The
classic scheme of connecting the controller to the RS485 network looks like this:
It uses the MAX485 chip (ad485, st485 or similar). Leg 1 - received data, leg 4 - data for transmission to the line, and 2 and 3 (combined in the figure) to turn on the receiver or transmitter. When combined by changing the level, we change the direction of data transfer (to us - from us). I intentionally do not write about which of the levels the receiver turns on and which transmitter, because here I myself caught a rake with my forehead.
Everything is correctly drawn in the picture above - here the receiver turns on with a low signal level, and the transmitter turns on high. I somehow did not pay attention to it and decided to "improve" the scheme in this way:
The jamb was discovered after the board was wired and the device was assembled: in standby mode, the logical “1” is constantly “on duty” at the TxD output, and “zeros” appear during data transfer. Thus, the receiver is turned off all the time and the transmitter is turned on.
I came up with two options for overcoming this situation:
1. Software. Instead of using a hardware serial port, use a software one in which all data would be inverted at the output. Plus - it’s obvious: there is no need to re-manufacture boards (and I had five of them).
2. Hardware. Place an inverter between the output of the controller and the input of the converter. The pluses are also obvious: no need to write your own serial port emulation curves.
There was also a third option - to return to the original, "not optimized" scheme - but it would immediately entail changes in the board and changes in the program - therefore it was immediately discarded. I created the difficulties myself - I myself will overcome.
I’ll get ahead of myself - I didn’t rewrite anything and did not breed new boards. They say the truth - laziness is the engine of progress. I assembled the inverter on one transistor, well, in terms of experiment, right on the cut track.
It turned out scary, but it worked!
Final circuit:
In order to preserve the color of the finish from the smd transistor and two output resistances, the circuit is drawn in paint.
It looked lively as sloppy and scary, but after three layers of varnish ...
In general, I still save one foot of the microcontroller in the same way, although the circuit has undergone several changes and I began to plant landing sites in advance.
This is part of the circuit. A resistor was added to keep the transistor open when there is no control from the foot of the controller. (If you remove the controller from the panel, this will not interfere with the communication of other devices).
And by the way, that, the very first system, the third year, how it works, will soon be coming.