Automatic architecture control in Visual Studio
- Tutorial

You don’t know, but I recognized myself in this picture. Indeed, you must admit, when the application architecture is being designed, everything is beautiful, logical and in line with the best world practices. But in the process of working, faced with the limitations imposed by architecture, we often think: “Here I’ll violate a bit, it will save me an hour of development time. Well, then, as the time goes, I’ll fix it. ” But, for some reason, this time never comes. In my opinion, the only way to force yourself, as a programmer, to follow the developed architecture is to teach the development environment all the deviations and crutches to show as compilation errors. In this case, if the code is bad, it will be fixed immediately, but if the architecture is outdated, then it will be fixed. Those. in the code repository there will always be code corresponding to the planned architecture.
A few words about what will be a tackle:
1. A small preamble.
2. Restoration of architecture according to the existing project.
3. Configuring Visual Studio and TFS for automatic architecture control.
Under the cut a lot of pictures and the desire to try everything described.
So, the promised preamble. Almost a year ago, Dmitry Andreev ( dmandreev ) already published an article on this topic. I read this article with great pleasure, and, in fact, it was she who prompted me to address the issue of using Layer Diagram in the application development process. By the way, having read to this place, have you already followed the link and read what Dmitry wrote? No, well then, let’s wait, I’ll wait for you, and then let's move on. I'm waiting.
Ok, now that you and I have a common understanding of the Layer Diagram, you can end with the preamble and move on to practical work.
Preparing a demo project
To demonstrate the work with the Layer Diagram, I will take a project a little closer to reality than Dmitry considered. Let us have a data access layer (I will use the Entity Framework) and, in fact, a client application layer in which there will also be a layered structure (MVVM). At the client level, the model will be taken from the first layer, but the View and ViewModel layers will be spread over several assemblies.
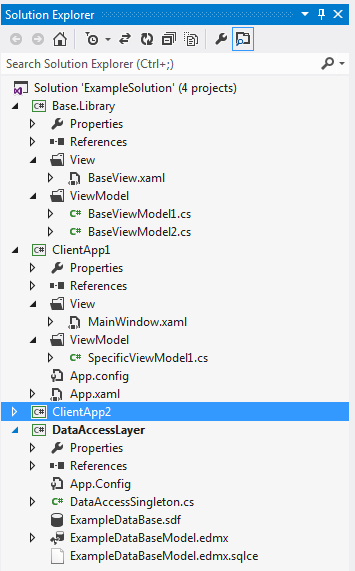
So, these four projects look after creation:

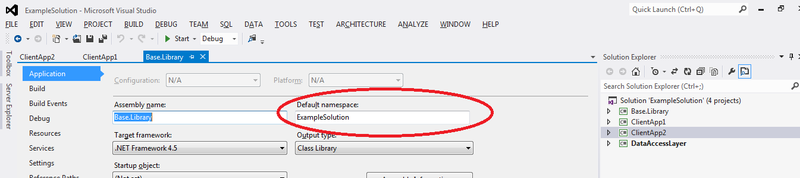
I think everything changes the default Namespace for created assemblies? Well, in this example, for 3 client assemblies I will replace Default Namespace:
Add a database and Entity Model to the DAL project. In client projects, create the View and ViewModel folders. Add test components and classes to them:
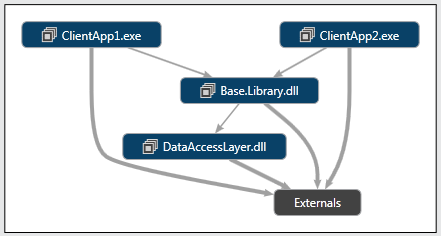
By adding links between projects, calls between created components and classes, you can get a dependency graph of approximately the following type:
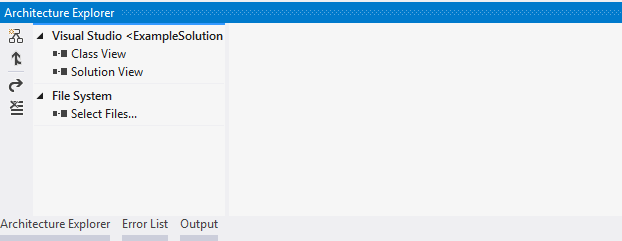
If layering is at the assembly level, then due to the ban on cyclic links between assemblies (otherwise it is impossible to determine the construction order), only the problem of “circulation through the layer” (which is exactly what is considered in Dmitry’s article). If in the project, as in this case, the layers are spread over several assemblies, and within the same assembly there are representatives of different layers, dragging projects / files from Solution Explorer into the Layer Diagram is not effective. And then Architecture Explorer comes to the rescue, which is called from the main menu: Architecture -> Windows -> Architecture Explorer. Immediately after opening it will look like:
Frankly, when I read about this tool for the first time, I immediately fell in love with it. Such capabilities for dependency analysis that are just breathtaking. And although you can write a lot and enthusiastically about it, since it does not allow you to automatically control the architecture, more about it another time about it.
Recovering layer diagrams from solution artifacts
Once the scene is ready, we release the actors. We add a model project to the solution, add the Layer Diagram to it:
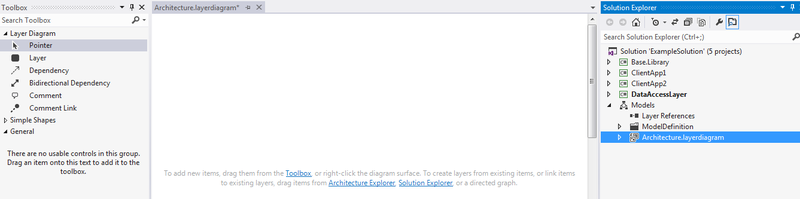
Yes, here we can drag layers from the Toolbox, draw dependencies, then transfer classes from client projects for a long time and persistently to these layers. And all this only so that the very next day, when the developer adds a new class, about which we do not know, and he is not attached to the layers, and therefore the check will stop working. To avoid this, we will come in handy Architecture Explorer.

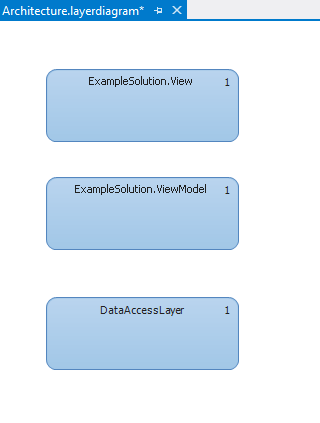
Please note that all ViewModel classes are in the same namespace (well, let them be 3-5 in the real project), and now we can add not the classes, but the whole namespace to the layer diagram. Select them and, without creating any layers, drag them to our Layer Diagram:
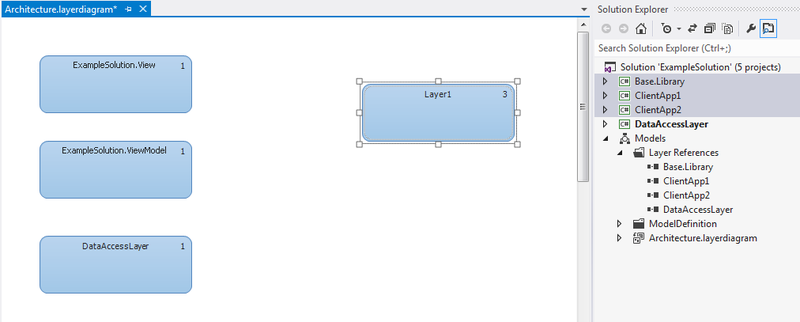
By the way, we can use the drag and drop functionality of projects from Solution Explorer. With the Shift, select ClientApp1, ClientApp2 and Base.Library in it, grab it with the left mouse button and drag it to an empty spot in the Layer Diagram:
Rename the new layer to Presentation, select two layers (View and View Model) and drag them into the Presentation layer:

Almost everything is ready, only the connections are missing. In order to generate them, just call the context menu on the Layer Diagram and select the Generate Dependencies item:

Now, our layer chart has a finished look:
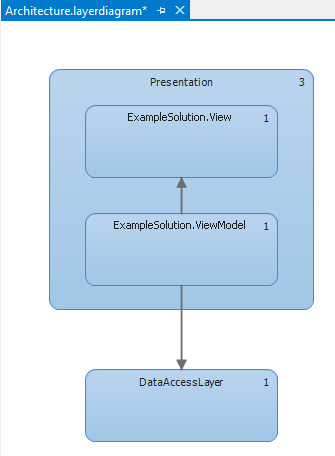
If you have a question about the arrow from ViewModel to View, then look at the views on this topic, or maybe take part in the discussion, you can on the MSDN forum .
Automatic architecture control
Well, the last moment, how to make the layer diagram automatically, at each build, check that the code matches the architecture? Actually quite simple. For demonstration, in ClientApp1, I’ll add a component to the View folder that will directly access the data access layer:

Launch builds and see: Build succeeded. In order for the builds to fall due to architecture errors, it is necessary to open the model properties from Solution Explorer (through the context menu or select and press F4) and enable the architecture check:

Once again, we start building and see that we have architecture errors:

Double-click by mistake, immediately drive to the place where the crutch is clogged.
Of course, dependency checking leads to an increase in compilation time, so you can build two solutions, one that developers work with (not include the Modeling Project), and the second, with the same set of projects and the Modeling Project, for automatic builds in Team Foundation Server. In this case, the construction is faster at workplaces, and the architecture is monitored on the server, and by construction errors, bugs can be generated immediately.
Before proceeding to the conclusions, a small remark. Everything described in this article works in both Visual Studio 2010 and Visual Studio 2012. The only thing required is a version of Ultimate or Premium. If you do not have a license for the corresponding versions of Visual Studio 2010, then Release Candidate version of Visual Studio 2012 Ultimate can be downloaded here .
findings
1. Layer Diagram is a toolkit that you should at least be aware of and begin to apply in new projects
2. Automatic architecture verification will reduce the number of “crutches” in a hurry or if you don’t know it
3. Proper naming of namespaces and application of Architecture Explorer can significantly reduce the time to restore the architecture of
Ps. If in this article I forgot to talk about something, then I ask you not to swear at me very much and read the primary sources: Visualization of existing code .