Option random access to the settings and records of the car registrar from anywhere on the Internet
Car DVRs have long been one of the required attributes for any motorist. Personally, I can conclude without a shadow of exaggeration that I cannot feel safe driving without such a simple gadget. Of course, over the past 10 years, progress has seriously progressed: today there are already quite a few manufacturers who produce decent models, and we, the drivers, already have something to choose from.
I chose the Neoline G-Tech X53 recorder for several reasons:
Then, as is often the case, the appetite came while eating. After installing the recorder in the car, I appreciated its convenience, got into the taste, and I wanted to have access to its records not only next to the machine, where its WiFi signal is caught, but everywhere else . Well, or at least at home, for a start.
Of course, in nature, there are models of registrars who, upon command, merge records into the cloud, but they bind the user to this cloud and force them to pay for it, which is not my option. In addition, my Wishlist was well superimposed on the plans for installing a router with a modem in the WiFi machine, so the task looked quite doable.
True, it quickly became clear that the registrar does not have a documented API and it can only be accessed with the help of a native smartphone application. The application, in turn, turned out to be very capricious - it works only when the phone is connected to the recorder's WiFi.

That is, I had to understand what the application wants from WiFi, and make it to “see” the recorder, located in a completely different place, with the decision of all the related technical snag - in general, everything I like.
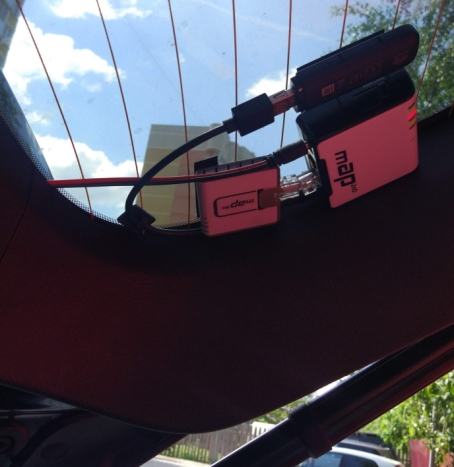
I used Mikrotik RBmAP2nD (mAP) with a Huawei e3372h modem as a router that distributes Internet over WiFi in the car (if you know other budget options that can be used to implement the configurations described below - write in the comments). Since the registrar can only distribute its WiFi and cannot connect to an existing AP, we had to configure the AP-Client, which should connect to it. And then it quickly became clear that the work of Mikrotik as an AP and AP-Client at the same time (on the slave interface) leads to an unstable WiFi distribution, so it was decided to pair up with the main router another one - Mikrotik RBmAPL-2nD (mAP lite).
For a start, I forced the application to work with the registrar via a completely different WiFi network running in the same machine. Along the way, I was able to answer questions about how the application identifies the registrar’s network and how it can be fooled. Also along the way, we managed to achieve even greater convenience - now, in order to work with the recorder in the car, it is not necessary to switch to its WiFi, which does not have Internet access.
I will not describe in detail dozens of experiments during which I came to a working solution, I will simply describe this solution. So, what is needed for the application to recognize the logger's WiFi:
The rest is not important. I haven't tried much else, but I know for sure that:
So, what's the bottom line?
This is not to change, but we want to learn how to distribute the application and the recorder. So you need to assign the address 192.168.100.1 to the router distributing WiFi, and in order to solve any problems with traffic routing, you need to enter the docking subnet and add a little network magic. For example:
Description:
How does the connection:
A thoughtful reader already has a question: for what kind of traffic should a redirection be made? Starting with “all traffic except ssh” and turning on logging, I realized that it was enough to redirect the tcp ports 7777, 7778 and 7779 . Nothing else is needed for the registrar application.
Having learned to deceive the application, I removed the most difficult obstacle to the main goal - the organization of access to records from any point on the Internet. But in order for the application running on the phone at this “any point” to connect with the registrar, all of the above mentioned conditions must be fulfilled for its “deception”, and this imposes some restrictions. However, at the same address records are needed especially often - this is at home. Here we will begin with a home router.
At home, as you probably already guessed, I also have a Mikrotik. The external router has a “white” ip-address, and I took advantage of this to create an L2TP tunnel between the car and home routers and organize another docking subnet between them. Another router has been added to the scheme I described above, and now it looks like this:
Description:
How does the connection:
Routers and modem consume little, but enough to drain the car battery to zero in 3-4 days. Therefore it is better to include them on demand. And so that it fits into the concept of “access at an arbitrary point in time”, I took advantage of the fact that the Starline A96 alarm system installed in my car has, among other things, a GSM module, programmed the inclusion of an additional channel by a command from the console or a smartphone application and powered the mAP router with additional channel, and mAP lite - via PoE from the first. I will not talk about it here in detail, it’s all easy to google, but if you're interested, write in the comments.
Having done all this, I got the opportunity not only to copy the recorder records while sitting at home, but also to watch pictures from cameras in real time. And all this regardless of where the car is located, the main thing is that its router has a connection to the Internet. Isn't that great?
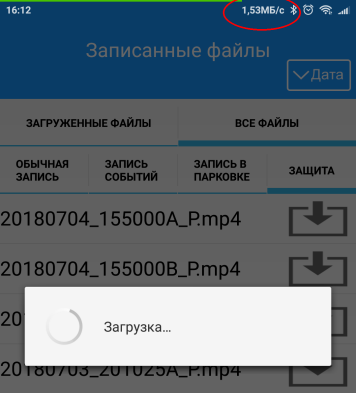
And it was also a pleasant bonus that I received a higher speed of copying videos, rather than sitting in the car: 1.2-1.5 mb / s versus 1 mb / s. I do not know why.
Honestly, I don’t think that it would occur to anyone to do exactly what is described. In any case, there will be some adaptation of the solution to what is already there. But if you really need it - below you will find the nat rules, on which 99% of what was discussed above is implemented.
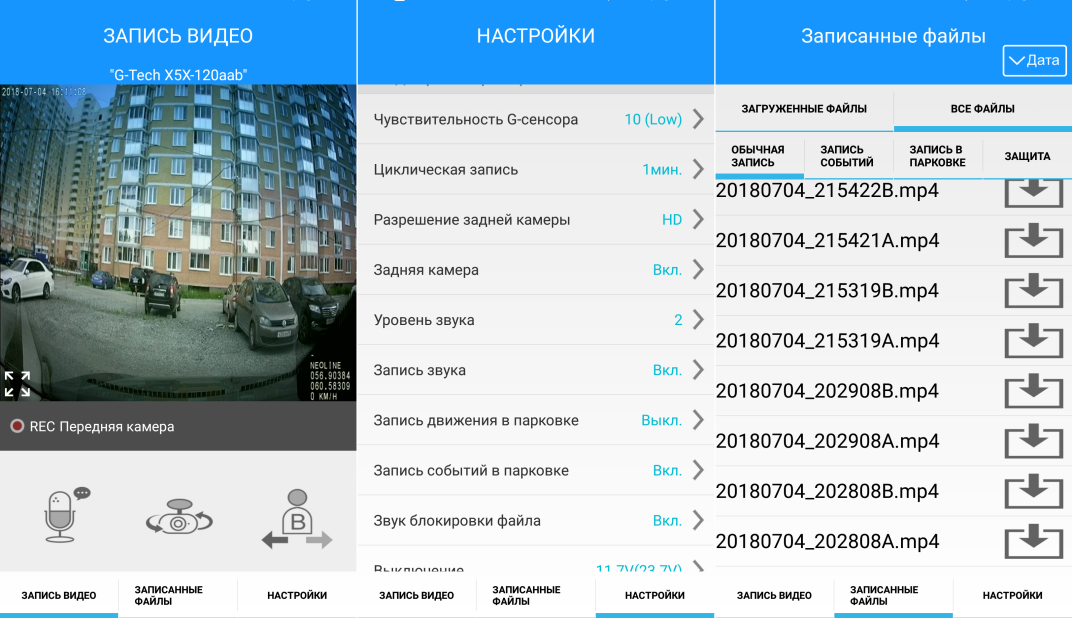
I chose the Neoline G-Tech X53 recorder for several reasons:
- it is equipped with two cameras, one of which gives a real FullHD picture,
- it is designed specifically for covert installation,
- it is fully controlled via WiFi via an application on a smartphone, which is important in the context of this article, and among other things, it allows for a truly secretive installation without the need to periodically climb or pull a block (for example, to copy a recording from a flash drive).
Then, as is often the case, the appetite came while eating. After installing the recorder in the car, I appreciated its convenience, got into the taste, and I wanted to have access to its records not only next to the machine, where its WiFi signal is caught, but everywhere else . Well, or at least at home, for a start.
Of course, in nature, there are models of registrars who, upon command, merge records into the cloud, but they bind the user to this cloud and force them to pay for it, which is not my option. In addition, my Wishlist was well superimposed on the plans for installing a router with a modem in the WiFi machine, so the task looked quite doable.
True, it quickly became clear that the registrar does not have a documented API and it can only be accessed with the help of a native smartphone application. The application, in turn, turned out to be very capricious - it works only when the phone is connected to the recorder's WiFi.
That is, I had to understand what the application wants from WiFi, and make it to “see” the recorder, located in a completely different place, with the decision of all the related technical snag - in general, everything I like.
I used Mikrotik RBmAP2nD (mAP) with a Huawei e3372h modem as a router that distributes Internet over WiFi in the car (if you know other budget options that can be used to implement the configurations described below - write in the comments). Since the registrar can only distribute its WiFi and cannot connect to an existing AP, we had to configure the AP-Client, which should connect to it. And then it quickly became clear that the work of Mikrotik as an AP and AP-Client at the same time (on the slave interface) leads to an unstable WiFi distribution, so it was decided to pair up with the main router another one - Mikrotik RBmAPL-2nD (mAP lite).
Cheating application
For a start, I forced the application to work with the registrar via a completely different WiFi network running in the same machine. Along the way, I was able to answer questions about how the application identifies the registrar’s network and how it can be fooled. Also along the way, we managed to achieve even greater convenience - now, in order to work with the recorder in the car, it is not necessary to switch to its WiFi, which does not have Internet access.
I will not describe in detail dozens of experiments during which I came to a working solution, I will simply describe this solution. So, what is needed for the application to recognize the logger's WiFi:
- The SSID should have the form " G-Tech X5X-120 ... ", where instead of the last points there are arbitrary numbers (small letters) in hexadecimal notation. For example, I installed " G-Tech X5X-120aaa " and so on. Perhaps, instead of "120" you can also put something of your own, I have not tried.
- The client's address must be obtained via DHCP, must be located on the 192.168.100.0/24 subnet, the server (registrar) address = 192.168.100.1.
The rest is not important. I haven't tried much else, but I know for sure that:
- The MAC address of the AP and the server do not matter.
- If there are areas with reduced MTU (for example, tunnels) along the traffic path, the connection works fine.
- The TCP Window is wide enough so that the download of records does not slow down when pinging, even under 300ms or more.
So, what's the bottom line?
- The application wants to have an address on the network 192.168.100.0/24 and connect to the address 192.168.100.1.
- The registrar's address is also 192.168.100.1 and he wants the client to be on the 192.168.100.0/24 network (he simply does not have any routes to others).
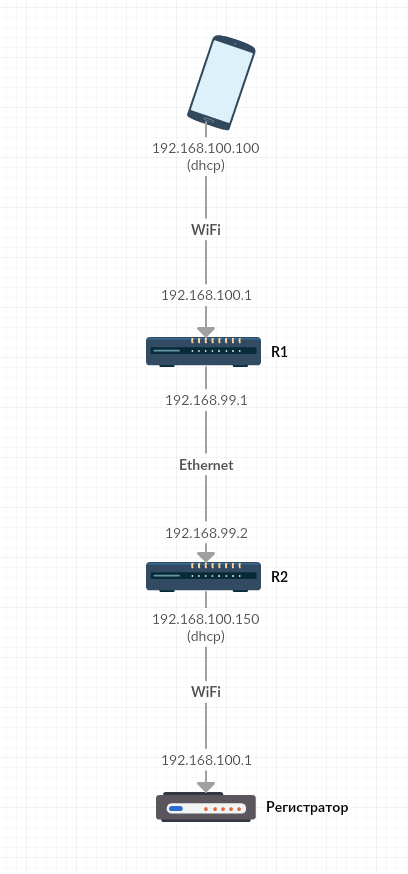
This is not to change, but we want to learn how to distribute the application and the recorder. So you need to assign the address 192.168.100.1 to the router distributing WiFi, and in order to solve any problems with traffic routing, you need to enter the docking subnet and add a little network magic. For example:
Description:
- The application runs on a smartphone that is connected to the router R1. The smartphone receives the address via DHCP, in our example it is 192.168.100.100.
- The R1 IP address on the WiFi interface is 192.168.100.1 (as the application wants), on the Ethernet interface it is 192.168.99.1 (this is a docking subnet).
- The R2 IP address on the Ethernet interface is 192.168.99.2, on the WiFi interface it is obtained via DHCP from the registrar, in our example it is 192.168.100.150.
- Each router performs a DNAT at the entrance and a SNAT at the output, so the packets on each subnet have source and destination addresses that match the addresses of the border routers of this network.
How does the connection:
- The application makes sure that it is connected to the registrar's WiFi, and initiates a connection with the address 192.168.100.1, assuming that this is the address of the registrar.
- R1 accepts the connection request, performing on the incoming interface DNAT with substitution of the destination address on 192.168.99.2, and on the outgoing interface - SNAT with substitution of the source address on 192.168.99.1.
- R2 accepts the connection request by executing DNAT on the incoming interface with substitution of the destination address on 192.168.100.1, and on the outgoing interface - masquerade with substitution of the source address for the address obtained by DHCP from the registrar.
- The registrar accepts and processes the connection request that came from the address that it previously issued via DHCP. As required.
A thoughtful reader already has a question: for what kind of traffic should a redirection be made? Starting with “all traffic except ssh” and turning on logging, I realized that it was enough to redirect the tcp ports 7777, 7778 and 7779 . Nothing else is needed for the registrar application.
We pass traffic over the Internet
Having learned to deceive the application, I removed the most difficult obstacle to the main goal - the organization of access to records from any point on the Internet. But in order for the application running on the phone at this “any point” to connect with the registrar, all of the above mentioned conditions must be fulfilled for its “deception”, and this imposes some restrictions. However, at the same address records are needed especially often - this is at home. Here we will begin with a home router.
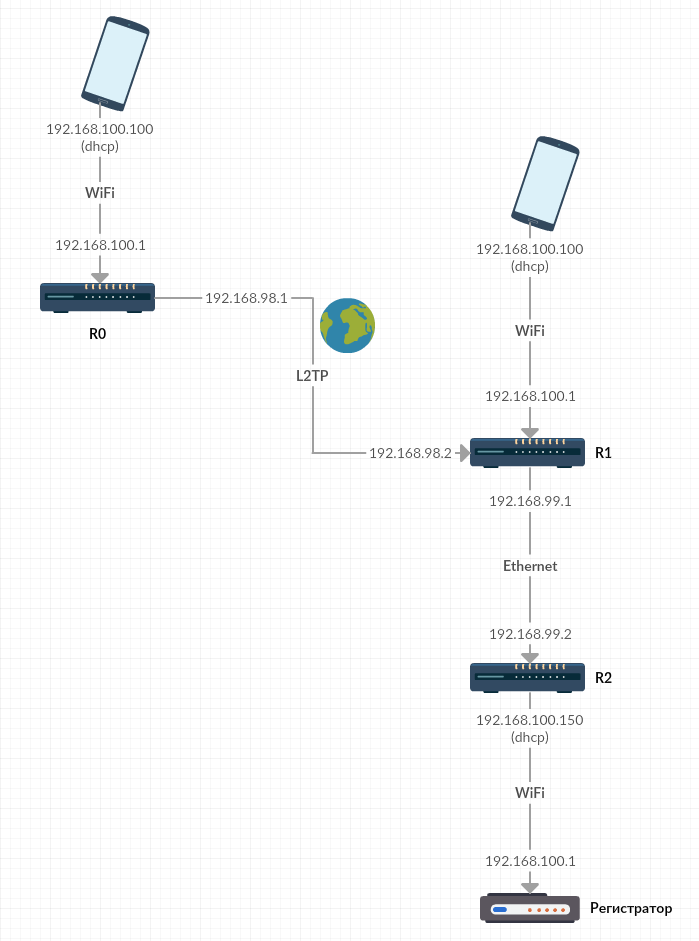
At home, as you probably already guessed, I also have a Mikrotik. The external router has a “white” ip-address, and I took advantage of this to create an L2TP tunnel between the car and home routers and organize another docking subnet between them. Another router has been added to the scheme I described above, and now it looks like this:
Description:
- The application runs on a smartphone that is connected to the home router R0. The smartphone receives the address via DHCP, in our example it is 192.168.100.100.
- The R0 IP address on the WiFi interface is 192.168.100.1 (as the application wants), on the L2TP interface - 192.168.98.1 (docking subnet 0).
- The IP address of R1 on the L2TP interface is 192.168.98.2, on the Ethernet interface is 192.168.99.1 (docking subnet 1).
- The R2 IP address on the Ethernet interface is 192.168.99.2, on the WiFi interface it is obtained via DHCP from the registrar, in our example it is 192.168.100.150.
- Each router performs a DNAT at the entrance and a SNAT at the output, so the packets on each subnet have source and destination addresses that match the addresses of the border routers of this network.
How does the connection:
- The application makes sure that it is connected to the registrar's WiFi, and initiates a connection with the address 192.168.100.1, assuming that this is the address of the registrar.
- R0 accepts the connection request by executing DNAT on the incoming interface with substitution of the destination address on 192.168.98.2, and on the outgoing interface - SNAT with substitution of the source address on 192.168.98.1.
- R1 accepts the connection request, performing on the incoming interface DNAT with substitution of the destination address on 192.168.99.2, and on the outgoing interface - SNAT with substitution of the source address on 192.168.99.1.
- R2 accepts the connection request by executing DNAT on the incoming interface with substitution of the destination address on 192.168.100.1, and on the outgoing interface - masquerade with substitution of the source address for the address obtained by DHCP from the registrar.
- The registrar accepts and processes the connection request that came from the address that it previously issued via DHCP. As required.
Ps.
With paragraph 2, you can do a little easier if you do DNAT immediately to 99, not 98 subnet, and add a route to 99 subnet via R1. But I just describe the general idea and one of the examples of its implementation, and there are many ways to integrate all this into an existing network.
And where do we get food?
Routers and modem consume little, but enough to drain the car battery to zero in 3-4 days. Therefore it is better to include them on demand. And so that it fits into the concept of “access at an arbitrary point in time”, I took advantage of the fact that the Starline A96 alarm system installed in my car has, among other things, a GSM module, programmed the inclusion of an additional channel by a command from the console or a smartphone application and powered the mAP router with additional channel, and mAP lite - via PoE from the first. I will not talk about it here in detail, it’s all easy to google, but if you're interested, write in the comments.
Results
Having done all this, I got the opportunity not only to copy the recorder records while sitting at home, but also to watch pictures from cameras in real time. And all this regardless of where the car is located, the main thing is that its router has a connection to the Internet. Isn't that great?
And it was also a pleasant bonus that I received a higher speed of copying videos, rather than sitting in the car: 1.2-1.5 mb / s versus 1 mb / s. I do not know why.
And configs will be?
Honestly, I don’t think that it would occur to anyone to do exactly what is described. In any case, there will be some adaptation of the solution to what is already there. But if you really need it - below you will find the nat rules, on which 99% of what was discussed above is implemented.
R0
/ip firewall nat
add action=src-nat chain=srcnat comment=AVR out-interface=l2tp-auto src-address=192.168.100.0/24to-addresses=192.168.98.1addaction=dst-nat chain=dstnat comment=AVR dst-address=192.168.100.1 dst-port=7777,7778,7779in-interface=wlan1 protocol=tcp to-addresses=192.168.98.2
R1
/ip firewall nat
add action=masquerade chain=srcnat comment=AVR out-interface=l2tp-autoaddaction=masquerade chain=srcnat comment=AVR out-interface=ether2
addaction=masquerade chain=srcnat comment=AVR out-interface=wlan1
addaction=dst-nat chain=dstnat comment=AVR dst-port=7777,7778,7779in-interface=l2tp-auto protocol=tcp to-addresses=192.168.99.2addaction=dst-nat chain=dstnat comment=AVR dst-port=7777,7778,7779in-interface=wlan1 protocol=tcp to-addresses=192.168.99.2
R2
/ip firewall nat
add action=dst-nat chain=dstnat comment=AVR dst-address=192.168.99.2 dst-port=7777,7778,7779in-interface=ether1 protocol=tcp to-addresses=192.168.100.1addaction=masquerade chain=srcnat comment=AVR out-interface=wlan1