Using a synthesizer as a computer keyboard
Recently, an idea occurred to me: is it possible, by connecting a synthesizer to a computer, to type text on it? I tried to implement this, and I succeeded. My program reads keystrokes on a synthesizer and emulates keystrokes on a regular keyboard. In this article I will tell you how to implement this. We will write under Linux on C ++ using Qt.
So, there is a laptop with Linux and a Yamaha DGX-200 synthesizer. We connect the synthesizer through the USB-connector to the laptop and see that the device is recognized: A
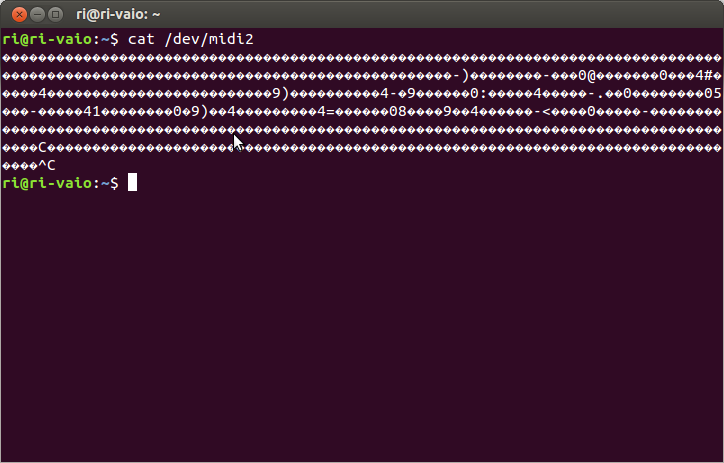
constant stream of questions is coming from the device, among which other symbols appear when pressing the keys of the synthesizer. By the way, an interesting fact: if you write this output to a file, and then read from the file and write it back to / dev / midi2, then the synthesizer through its columns will play those notes that were pressed during recording, but without pauses.
The next task is to parse this thread. After a long Google search, I decided to use the portmidi library . The documentation for it is rather scarce, I did not find working examples at all. Well, now there will be one more example. We get a list of devices:
I got the following result:
For further work with the device, we need to know only the id, which is indicated at the beginning of the line. Device 3 suits us - the input (input = 1) stream from our synthesizer. Open the desired stream:
After that, we periodically read the data. I used a Qt slot with periodic timer calls, but normal while (true) and sleep will do.
To explain what these magic numbers are, I’ll tell you how MIDI commands work.
Each message (aka MIDI command) consists of three integers, which are called status, data1, data2 in portmidi. A table with possible statuses can be found here . We are only interested in status 144 - a change in the state of a note on the first channel. In this case, the note number is transmitted to data1, and its volume to data2. For example, when you press the “up” key of the first octave on the synthesizer, the command comes 144 60 95 , and when you release - 144 60 0 .
The volume varies from 0 to 127 and depends on the strength of the hit on the key. Theoretically, you can display uppercase letters instead of lowercase letters when the user hits the keyboard hard. Well, a note number is just a serial number, the correspondence of notes to numbers can be seen in this picture:
I decided to designate the note as “3C” or “3C #”, where 3 is the octave number (and the octave begins with “la”, it’s easier), C is the note designation (“before”), and a sharp is added if necessary. Here's how it is implemented:
If the user presses a chord (several notes at the same time), then several messages arrive almost immediately. We can programmatically track this situation and distinguish single presses from chords. In my program, various chords can be mapped to different letters. To get the notation of the chord, connect the plus notation of the keys included in it: "3C # + 3E + 3G #". When the user presses a note or chord, the program searches the layout for a string that matches this notation and emulates pressing the corresponding key. When the key on the synthesizer is released, the release of the key is emulated. Modifiers (Shift, Ctrl, etc.) here are no different from other keys. All combinations work as expected.
Hooray, we can determine when notes are pressed and released. Now we will learn to emulate keystrokes on the keyboard. We will use the solution that I found on Stack Overflow .
I added the use of the XStringToKeysym function to emulate a key by its name, which we will take from the configuration file. A list of valid keys can be found in the header file /usr/include/X11/keysymdef.h.
The layout will be stored in the layout.ini file of the following form:
The last task left is to come up with a layout. A simple option - each letter on the key - was inconvenient. There are enough keys, but back to back, besides, you often have to move your hands because of the large dimensions of the synthesizer. Fortunately, we can use keyboard shortcuts, and it’s much more convenient to press them on the synthesizer than on a computer keyboard.
Let's try to fit on 26 keys (from A to G #) 26 Latin letters. The choice of letters for the seven white keys is obvious - these are letters from A to G, which are generally accepted notation for the corresponding notes. Then I wrote out the remaining letters in order of decreasing frequency of use and tried to compose a word from the letters closer to the top of the list. I got the word HINTS, and I gave these letters five black keys. For the remaining keys, I alphabetically assigned large and small thirds within the same octave. There are still a bunch of options for placing other letters (for example, Russian).
The remaining keys also found a place on the keyboard. I got this layout: I
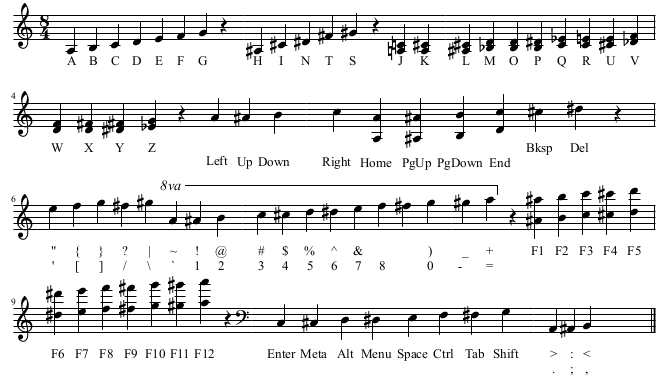
used the MuseScore music editor.
The video attached to the post demonstrates the set of the Hello world program and its compilation using a synthesizer instead of a keyboard.
The program code is posted on Github .
Reading data from a synthesizer
So, there is a laptop with Linux and a Yamaha DGX-200 synthesizer. We connect the synthesizer through the USB-connector to the laptop and see that the device is recognized: A
constant stream of questions is coming from the device, among which other symbols appear when pressing the keys of the synthesizer. By the way, an interesting fact: if you write this output to a file, and then read from the file and write it back to / dev / midi2, then the synthesizer through its columns will play those notes that were pressed during recording, but without pauses.
The next task is to parse this thread. After a long Google search, I decided to use the portmidi library . The documentation for it is rather scarce, I did not find working examples at all. Well, now there will be one more example. We get a list of devices:
int count = Pm_CountDevices();
for(int i = 0; i < count; i++) {
  const PmDeviceInfo* info = Pm_GetDeviceInfo(i);
  qDebug() << i << ": " << info->name
           <<  " input: " << info->input
           << " output: " << info->output;
}
I got the following result:
0: Midi Through Port-0 input: 0 output: 1
1: Midi Through Port-0 input: 1 output: 0
2: YAMAHA Portable G MIDI 1 input: 0 output: 1
3: YAMAHA Portable G MIDI 1 input: 1 output: 0
For further work with the device, we need to know only the id, which is indicated at the beginning of the line. Device 3 suits us - the input (input = 1) stream from our synthesizer. Open the desired stream:
PortMidiStream* stream = 0;
PmError e = Pm_OpenInput(&stream, good_id, 0, 100, 0, 0);
if (e != pmNoError) {
  qWarning() << "Can't open input, error: " << e << endl;
  return 2;
}
After that, we periodically read the data. I used a Qt slot with periodic timer calls, but normal while (true) and sleep will do.
PmEvent event; // структура, в которую будут записаны пришедшие данные
int c = Pm_Read(stream, &event, 1); // читаем одно сообщение из устройства
if (c > 0 && Pm_MessageStatus(event.message) == 144) {
  unsigned int note = Pm_MessageData1(event.message),
               volume = Pm_MessageData2(event.message);
  // дальнейшая обработка note и volume
}
To explain what these magic numbers are, I’ll tell you how MIDI commands work.
MIDI commands
Each message (aka MIDI command) consists of three integers, which are called status, data1, data2 in portmidi. A table with possible statuses can be found here . We are only interested in status 144 - a change in the state of a note on the first channel. In this case, the note number is transmitted to data1, and its volume to data2. For example, when you press the “up” key of the first octave on the synthesizer, the command comes 144 60 95 , and when you release - 144 60 0 .
The volume varies from 0 to 127 and depends on the strength of the hit on the key. Theoretically, you can display uppercase letters instead of lowercase letters when the user hits the keyboard hard. Well, a note number is just a serial number, the correspondence of notes to numbers can be seen in this picture:
Marking notes and chords
I decided to designate the note as “3C” or “3C #”, where 3 is the octave number (and the octave begins with “la”, it’s easier), C is the note designation (“before”), and a sharp is added if necessary. Here's how it is implemented:
class Note {
public:
  Note(int midi_number);
  QString to_string() const;
  int tone, octave;
};
Note::Note(int midi_number) {
  int n = midi_number - 21;
  octave = n / 12;
  tone = (n - octave * 12);
}
QString Note::to_string() const {
  return QObject::tr("%1%2").arg(octave).arg(
    tone == 0?  "A":
    tone == 1?  "A#":
    tone == 2?  "B":
    tone == 3?  "C":
    tone == 4?  "C#":
    tone == 5?  "D":
    tone == 6?  "D#":
    tone == 7?  "E":
    tone == 8?  "F":
    tone == 9?  "F#":
    tone == 10? "G":
    tone == 11? "G#": "??"
  );
}
If the user presses a chord (several notes at the same time), then several messages arrive almost immediately. We can programmatically track this situation and distinguish single presses from chords. In my program, various chords can be mapped to different letters. To get the notation of the chord, connect the plus notation of the keys included in it: "3C # + 3E + 3G #". When the user presses a note or chord, the program searches the layout for a string that matches this notation and emulates pressing the corresponding key. When the key on the synthesizer is released, the release of the key is emulated. Modifiers (Shift, Ctrl, etc.) here are no different from other keys. All combinations work as expected.
Key Emulation
Hooray, we can determine when notes are pressed and released. Now we will learn to emulate keystrokes on the keyboard. We will use the solution that I found on Stack Overflow .
#include
#include
#include
Display* display = XOpenDisplay(0);
void emulate_key(QString key, bool pressed) {
  KeySym sym = XStringToKeysym(key.toAscii());
  if (sym == NoSymbol) {
    qWarning() << "Failed to emulate key: " << key;
    return;
  }
  XTestFakeKeyEvent(display, XKeysymToKeycode(display, sym), pressed, 0);
  XFlush(display);
}
I added the use of the XStringToKeysym function to emulate a key by its name, which we will take from the configuration file. A list of valid keys can be found in the header file /usr/include/X11/keysymdef.h.
The layout will be stored in the layout.ini file of the following form:
; letters
X = 3C#+3G#
Y = 3D#+3G#
Z = 3E+3G#
; navigation
Space     = 2E
Return    = 1A+2A
BackSpace = 4C#
Delete    = 4D#
Left      = 4A
Right     = 4C
Layout
The last task left is to come up with a layout. A simple option - each letter on the key - was inconvenient. There are enough keys, but back to back, besides, you often have to move your hands because of the large dimensions of the synthesizer. Fortunately, we can use keyboard shortcuts, and it’s much more convenient to press them on the synthesizer than on a computer keyboard.
Let's try to fit on 26 keys (from A to G #) 26 Latin letters. The choice of letters for the seven white keys is obvious - these are letters from A to G, which are generally accepted notation for the corresponding notes. Then I wrote out the remaining letters in order of decreasing frequency of use and tried to compose a word from the letters closer to the top of the list. I got the word HINTS, and I gave these letters five black keys. For the remaining keys, I alphabetically assigned large and small thirds within the same octave. There are still a bunch of options for placing other letters (for example, Russian).
The remaining keys also found a place on the keyboard. I got this layout: I
used the MuseScore music editor.
The video attached to the post demonstrates the set of the Hello world program and its compilation using a synthesizer instead of a keyboard.
The program code is posted on Github .