How to build IIoT architecture do it yourself
Over the past year we have designed (and continue to support) several IIoT projects. You may have heard about IIoT, but just in case, we will try to explain as simply as possible what it is and why it is interesting for developers, architects and administrators of high-load solutions.

IoT - the Internet of things - means controlling devices designed to perform simple household tasks (open the garage door when a car pulls up, turn on the light by a motion sensor or on command, monitor the room temperature), then under IIoT - the industrial Internet of things - usually mean “digitization” of data from industries, on the basis of which expert analysis can be carried out, often with the help of machine learning.
For example, you can collect and analyze data from rotor motors in order to learn about breakdowns in time and save on repairs. Replacing a completely broken turbine is much more expensive than repairs made on time. Another example is coal mining. Analysis of data on the composition of air in mines allows you to respond in time to the excess of permissible values. This helps prevent life-threatening situations for miners.
The data flow - from sensors in the fields, from industrial machines, from gas sensors - enters aggregating hubs and, further, into the data processing and analysis platform.
We want to talk about how this architecture looks, how you can simply collect and analyze data, and dwell on the specifics of individual applications. We will rely on translations of English-language articles and our own design experience. This article is translated , with our explanations and additions.
In the first article, we will try to create a IIoT architecture, into which we will later transmit data from the sensors, and then transfer them to a system that provides processing, analysis, machine learning and monitoring of incoming data.
Created architecture
Often, industrial IoT does not have direct access to sensors and control systems, so a gateway is used to connect the OT (operational technology) and IT (information technology) levels.
Thus, the IIoT architecture typically includes: end devices, gateways, regional hubs, and finally, information processing and storage systems.
The architecture created should provide the ability to:
- Collect sensor data from the gateway
- Transfer data to the cloud or data center
- Automatically update gateway configurations
- Maintain secure transmission and processing of large amounts of data
On the image: the architecture of the created system and software, which we will use to build it at each level.
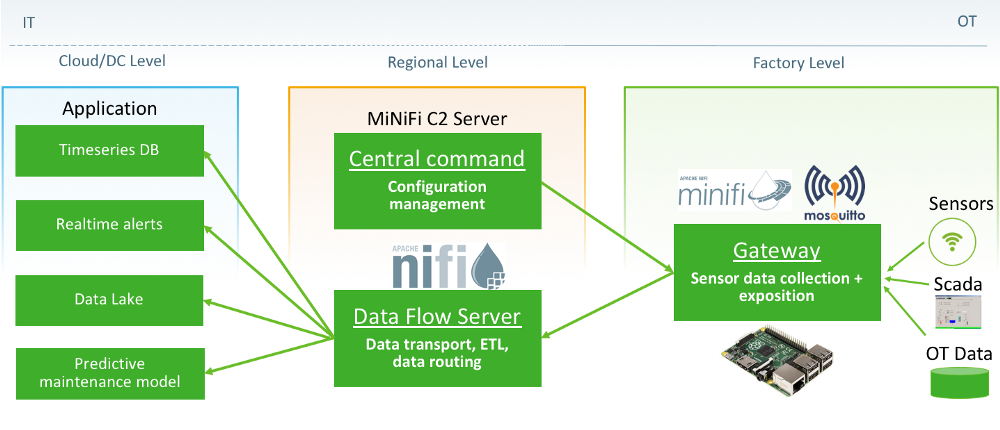
Sensors collect data and send it to the gateway using a variety of wired and wireless protocols (Serial, RS-485, MODBUS, CAN bus, OPC UA, BLE, WiFi, etc.). In our example, we will keep in mind that the data comes to the gateway via WiFi.
We will use Raspberry Pi as the gateway, where the Mosquitto broker and the MiNiFi agent will be launched. Mosquitto is an open source, lightweight message broker that we will use to further transmit data from sensors using the MQTT protocol. MQTT adds a minimum overhead and is therefore convenient for use in IoT when the hardware resources of the end devices are limited (for example, telephones and microcontrollers are used).
MiNiFi the Apache - subproject the Apache Nifi - a lightweight agent that implements the basic functionality of Apache NiFi, specially designed to collect data on end-devices.
MiNiFi is compact, uses minimal resources and allows you to centrally manage all agents. It easily connects to NiFi using Site-To-Site (S2S), which allows you to build complete data flow control - scalable, secure and giving a clear view of all stages of information transfer.
In our system, MiNiFi will subscribe to all the topics of the Mosquitto broker and will forward every message to NiFi set at the regional level. You can also use it to connect to the SCADA system or any other source of OT data.
At the regional level, there are two components:
Apache NiFi is a powerful data flow management system that supports over 200 connectors. The graphical interface allows you to quickly and easily design data flows.
NiFi does not sacrifice power for the sake of simplicity. It is a highly scalable distributed system with guaranteed delivery, backpressure (the ability to store data until it is uploaded by other, slower systems) and load balancing. This functionality makes NiFi an excellent tool for IoT applications, which often work in an unstable network environment.
In our system, NiFi is a data collection center that redirects them to various systems and applications (HDFS, HBase, Kafka, S3, etc.).
MiNiFi C2 Server (MiNiFi Command & Control) is another Apache NiFi subproject that is still in development. Its role is to be a central point of the configuration of hundreds and thousands of MiNiFi agents located in production in the field (various halls, factories, territories). The C2 server manages the MiNiFi stream configurations (in C2 terminology, versioned class of applications) and publishes them via the Rest API. MiNiFi agents can connect to this API with a given frequency to update their own configuration.
So let's start creating our prototype.
Domain Name Naming Agreement
To further configure the various systems that need to address each other, let's agree on the names of the domain names that we will use in the configurations.
#сервер с Apache NiFi который занимается потоковой обработкой данных
192.168.0.20 nifi.iot.local
#сервер с Apache MiNiFi C2 который занимается распространением конфигураций MiNiFi
192.168.0.20 minifi-c2.iot.local
#raspberry pi, собирающий данные на производстве с Apache MiNiFi и MQTT брокером
192.168.0.68 iot-hub-1.iot.local
Preparing Raspberry Pi: MQTT and MiNiFi
To install the MQTT Mosquitto broker and the MiNiFi agent, run the following commands on your Raspberry Pi.
By default, MiNiFi contains a minimal set of data handlers. You can add additional handlers from the NiFI bundle by adding a NAR archive (NiFi archive) to the library directory.
The last command we add is the NAR MQTT handler.
sudo apt-get update
#install and run Mosquitto broker on default port 1883
sudo apt-get install mosquitto
mosquitto
#install and prepare MiNiFi agent
wget http://apache.crihan.fr/dist/nifi/minifi/0.4.0/minifi-0.4.0-bin.tar.gz
tar -xvf minifi-0.4.0-bin.tar.gz
cd minifi-0.4.0
#add mqtt processor
wget https://github.com/ahadjidj-hw/NiFi/raw/master/nifi-mqtt-nar-1.5.0.nar -P ./lib/
Now let's install the MiNiFi C2 configuration management server on the server that will be available with Raspberry Pi
Installing and configuring MiNiFi C2 server.
Install the MiNiFi C2 server on a public server that will be available with MiNiFi agents. You can use the hierarchical placement of C2 servers for complex network infrastructures, as described below. Run the following command to install the C2 server:
wget http://apache.crihan.fr/dist/nifi/minifi/0.4.0/minifi-c2-0.4.0-bin.tar.gz
tar -xvf minifi-c2-0.4.0-bin.tar.gz
cd minifi-c2-0.4.0- The C2 server will publish the configuration organized by classes. C2 supports pluggable “configuration providers”:
- The CacheConfigurationProvider, which updates the configuration based on the configuration specified in the file system or S3
- The DelegatingConfigurationProvider, which delegates to another C2 server to create hierarchical structures for C2 servers.
- The NiFiRestConfigurationProvider, which removes templates from Apache NiFi servers through their REST API.
Configure the C2 server to use NiFi as a configuration provider. Edit the ./conf/minifi-c2-context.xml file, uncomment the xml block
<beanclass="org.apache.nifi.minifi.c2.provider.nifi.rest.NiFiRestConfigurationProvider">and write the address of the NiFi server ( http: //nifi.iot.local: 8080 )
<constructor-arg><value>http://nifi.iot.local:8080/nifi-api</value></constructor-arg>Further configuration of the MiNiFi on the Raspberry Pi
By default, to add handlers and their configurations, you need to edit the config ./conf/config.yml. You can also write the configuration manually or create it using the Apache NiFi GUI and then export the configuration as a template. A template is an XML file that needs to be converted to a YML MiNiFi configuration file using the MiNiFi toolkit. Here is an example of a configuration file that monitors the file on the device and sends each new line to NiFi using the S2S protocol.
For our project, we will not use manual configuration. After all, if there are a lot of MiNiFi agents, it will be difficult to manually stop, edit the config.yml and reboot the agent every time the configuration changes.
MiNiFi uses Change Ingestor, through which the agent learns about new possible configurations. Change Ingestor is a plug-in, and there are three ChangeIngestor that are nominally supported by MiNiFi.
- FileChangeIngestor
- RestChangeIngestor
- PullHttpChangeIngestor
We will use PullHttpChangeIngestor to periodically access the C2 server and download the new configuration. To configure this Ingestor, you must edit the ./conf/bootstrap.conf file, uncomment the appropriate lines, and set the following settings:
nifi.minifi.notifier.ingestors=org.apache.nifi.minifi.bootstrap.configuration.ingestors.PullHttpChangeIngestor
# Hostname on which to pull configurations from
nifi.minifi.notifier.ingestors.pull.http.hostname=minifi-c2.iot.local
# Port on which to pull configurations from
nifi.minifi.notifier.ingestors.pull.http.port=10080
# Path to pull configurations from
nifi.minifi.notifier.ingestors.pull.http.path=/c2/config
# Query string to pull configurations with
nifi.minifi.notifier.ingestors.pull.http.query=class=iot-minifi-raspberry-agent
# Period on which to pull configurations from, defaults to 5 minutes if commented out
nifi.minifi.notifier.ingestors.pull.http.period.ms=60000
With this configuration, each MiNiFi agent will access the C2 server via the REST API protocol at http: //minifi-c2.iot.local: 10080 / c2 / config every minute and request a new configuration for the iot-minifi-raspberry-agent class
Important moment: 1 minute frequency is set for demonstration only. In a production environment, you most likely will not have to update agents with such frequency.
Before starting the agent, let's move to the management level and configure the MiNiFi C2 server and the Apache NiFi itself.
Installation and configuration of NiFi server
Install the NiFi server available from the C2 server and start it.
wget http://apache.crihan.fr/dist/nifi/1.6.0/nifi-1.6.0-bin.tar.gz
tar -xvf nifi-1.6.0-bin.tar.gz
cd nifi-1.6.0
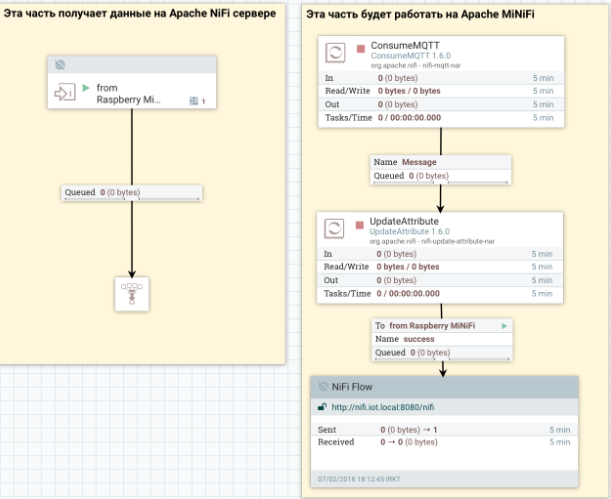
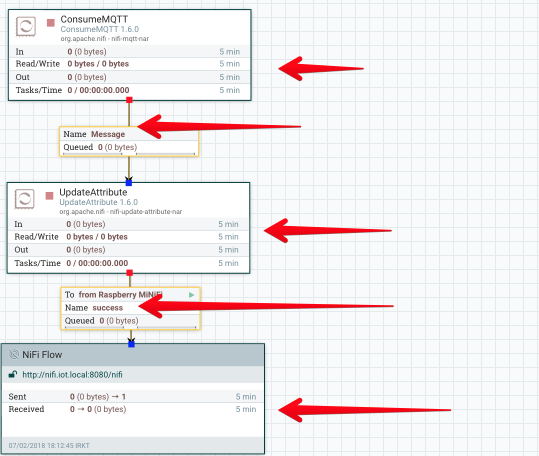
./bin/nifi.sh startConnect to the NiFi interface at http: // nifi-dev: 8080 / nifi / and create a flow that will run on the MiNiFi agents, but before that add the Input Port (added by clicking the Input Port button in the menu) in the root layer and name it from Raspberry MiNiFi. This is where NiFi will receive stream files from MiNiFi.
Add Funnel and link Input Port to Funnel - in later articles we'll touch on data processing on the Apache NiFi side.
Add the Processor consumeMQTT to subscribe to the Mosquitto broker and sign it on all iot / sensors / * topics, note that tcp: // raspberrypi: 1883 is equivalent to tcp: // localhost: 1883, since this stream will be launched on Raspberry Pi

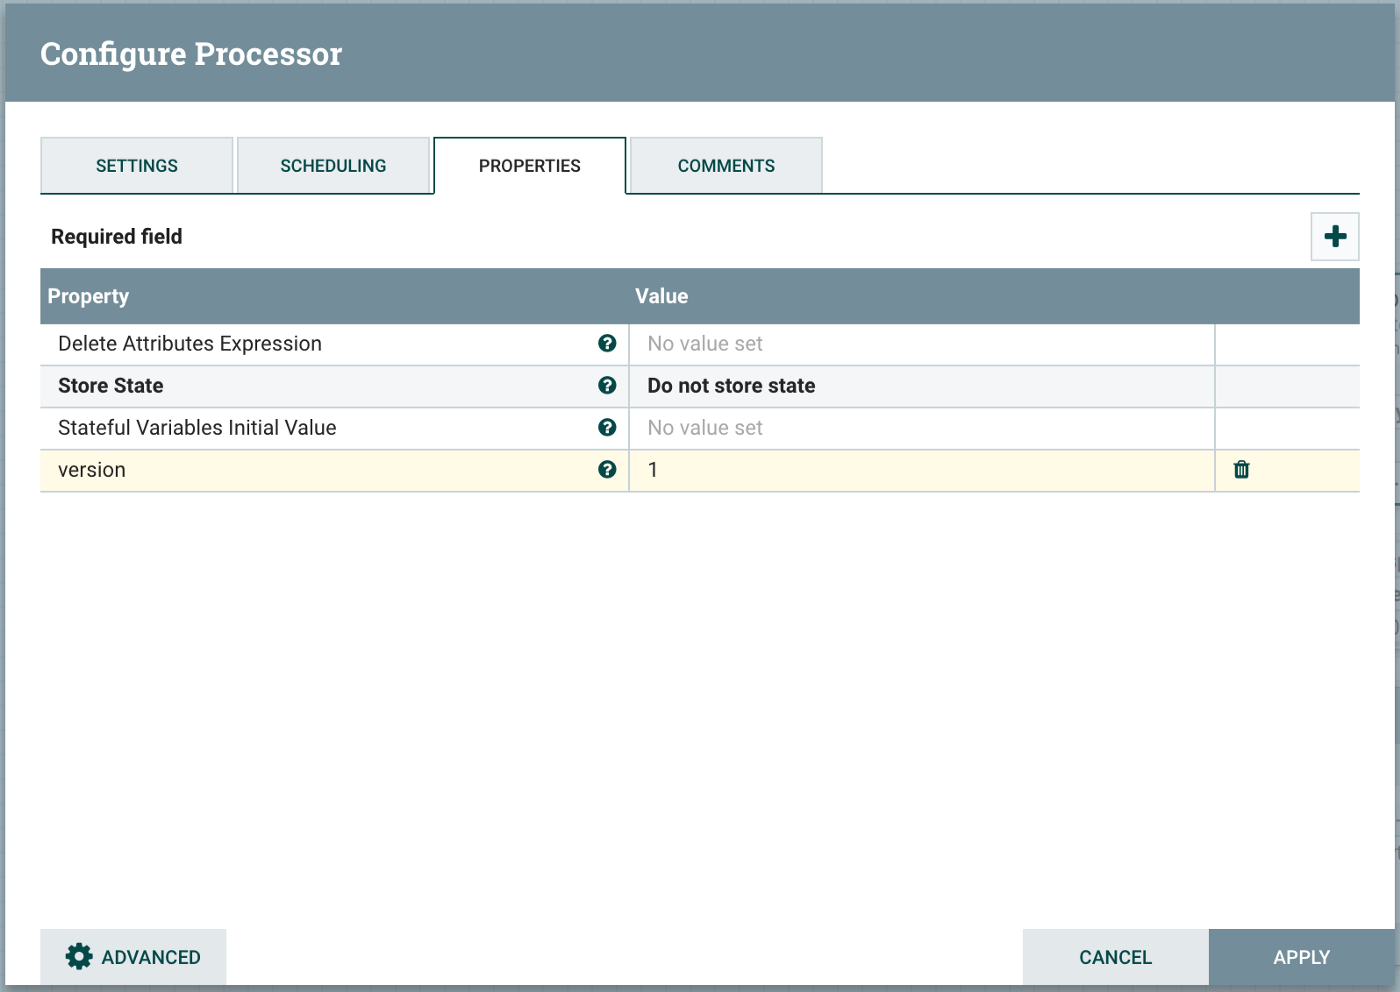
Use the Processor UpdateAttribute to add the “version” attribute which we will use to notify the system of the reconfiguration. You can add any additional attributes: timestamp, location, agent name, etc.
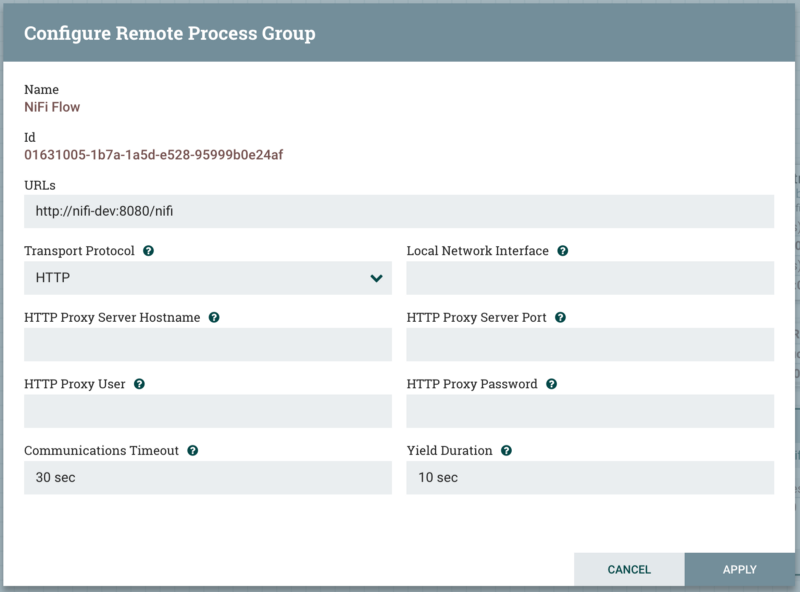
Finally, add a Remote Process Group (RPG) to send received events to NiFi. Connect all these three processes.
Your stream should now look like the screenshot below. The left thread will run on Apache NiFi itself, and will receive data from Apache MiNiFi. The right stream will not run under Apache Nifi, created for prototyping and configuration purposes, and will run on Raspberry Pi.
Save the right stream as a template with the name “iot-minifi-raspberry-agent.v1”. The naming principle is extremely important here. We must use the same name as the class name used in the MiNiFi configuration.
It is very important - you need to select not only the components to be saved, but also the connections between them.
Placing and running the application
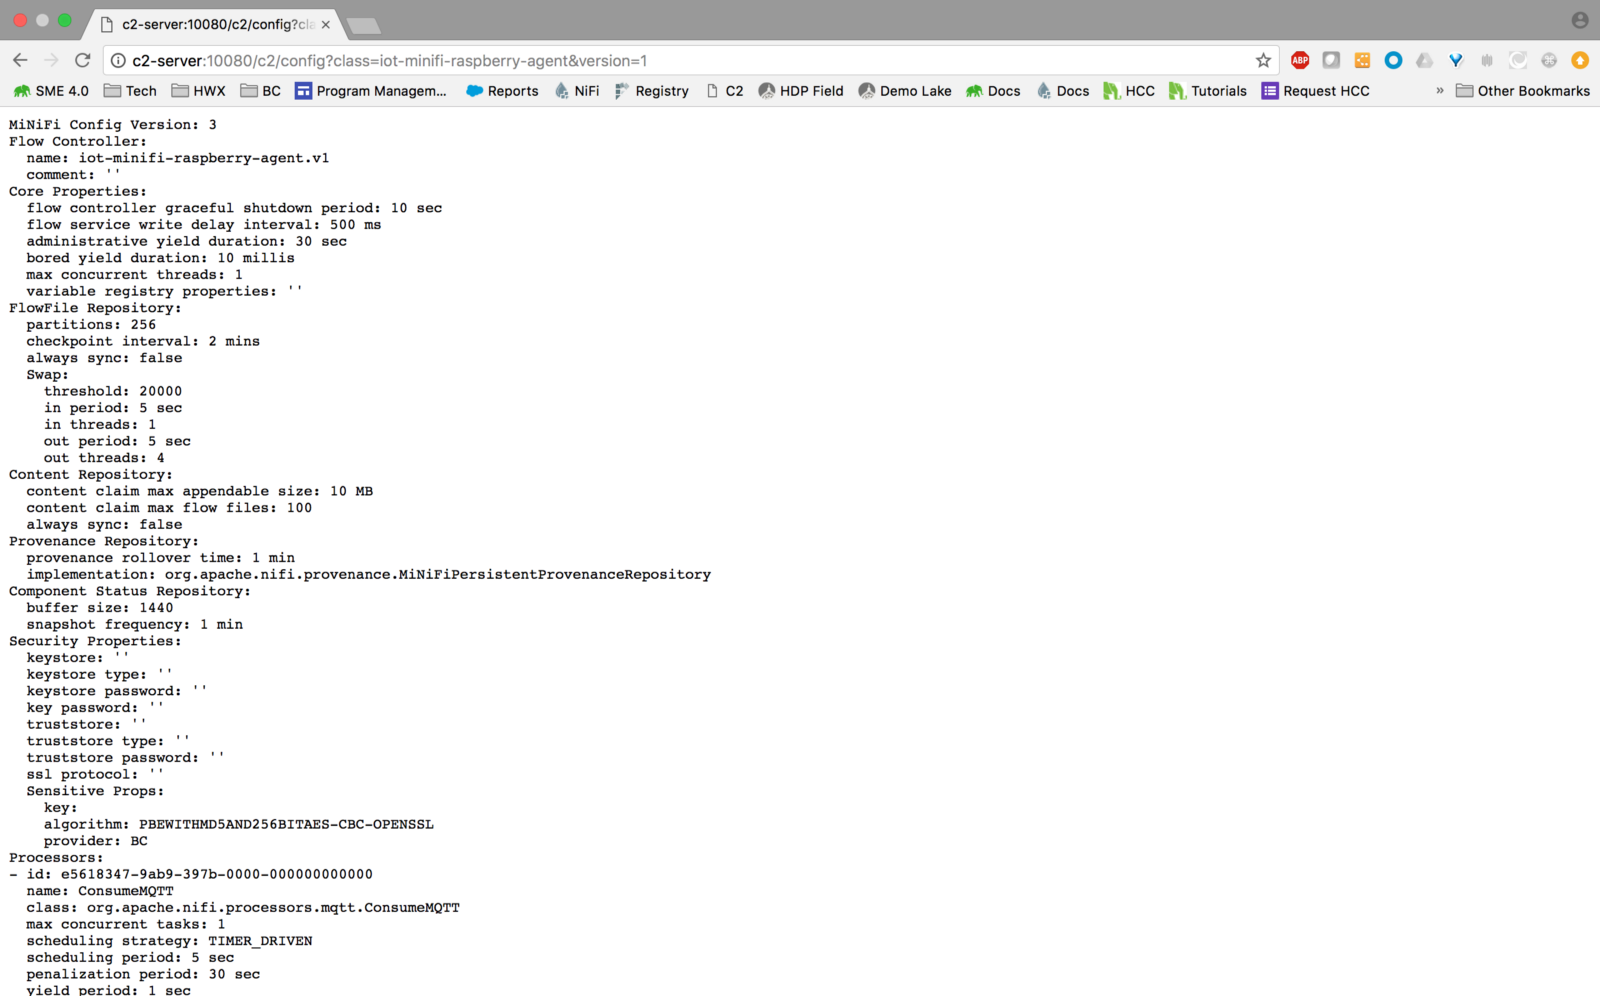
Before launching the MiNiFi agents on the Raspberry Pi, let's verify that the C2 server is properly configured. Open the URL in your browser: http: // c2-server: 10080 / c2 / config? Class = iot-minifi-raspberry-agent & version = 1 C2 Server must respond with a file containing the configuration of the template that we built in YML format.
If instead of configuration, the server issues a Java Exception, then you encounter a problem in the C2 server mentioned here:
https://github.com/apache/nifi-minifi/pull/126#issuecomment-388856304
You will need to either install version 0.3.0, or remove the javax.ws.rs-api-2.1.jar file from the lib folder of the C2-server directory.
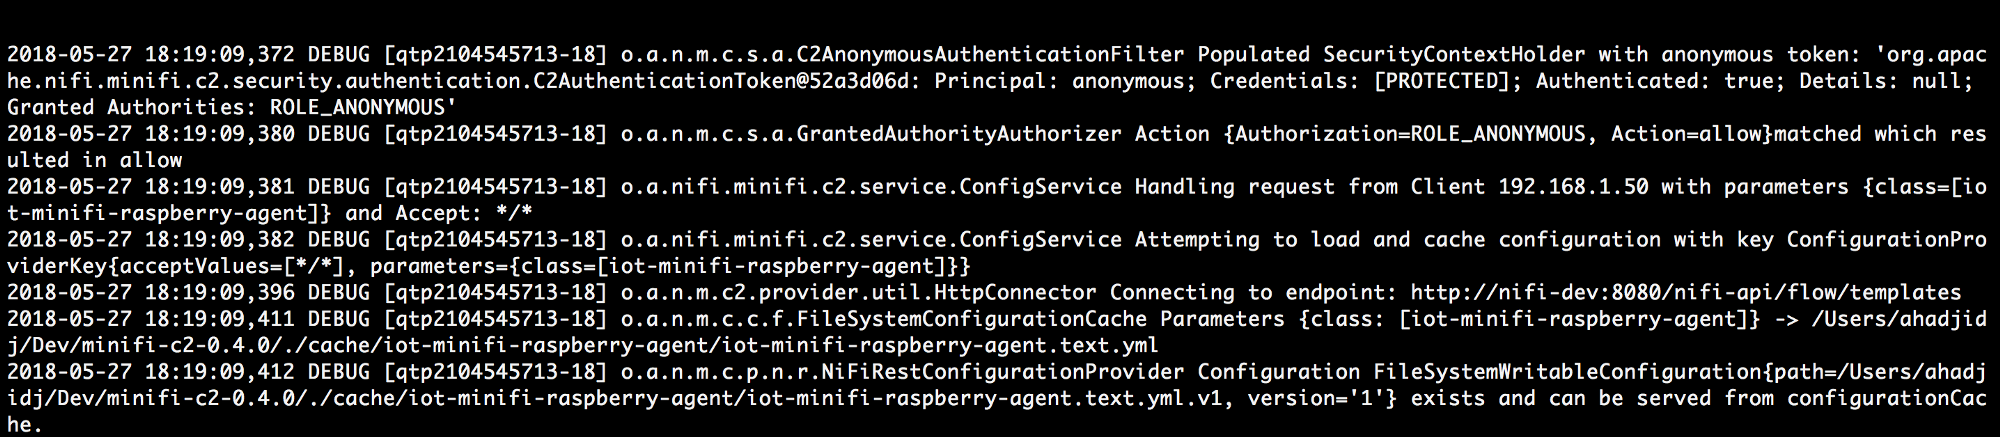
If you look at the C2 server logs, you can see that the server accepted the request with the parameters {class = [iot-minifi-raspberry-agent], version = [1]}

Now that the connection between the individual components of the architecture (MQTT, MiNiFi, NiFi, and C2) is established, launch the MiNiFi agent on the Raspberry Pi using the command:
./bin/minifi.sh startAfter a few seconds, you should see the C2 server logs. Host 192.168.1.50 (in our case, this is the IP address of the Raspberry Pi device) requested the C2 server to provide the latest version of the “iot-minifi-raspberry-agent” class. Compared to our previous request, which we did in the browser, you can note that MiNiFi did not indicate the version. If you open the configuration of the MiNiFi agent in ./conf/config.yml - you will see the same configuration that we received in the browser by specifying the request with our hands.
MQTT shows that the MiNiFi agent connected to the broker and subscribed to iot / sensors / # topics

Transmission Control
Great, now let's do it so that our sensors start generating data and publish it to the MQTT. MiNiFi will begin to upload information and send to NiFi, as shown in the screenshot below.
Important: In order for the Apache NiFi component to start working, you must click the Play button.
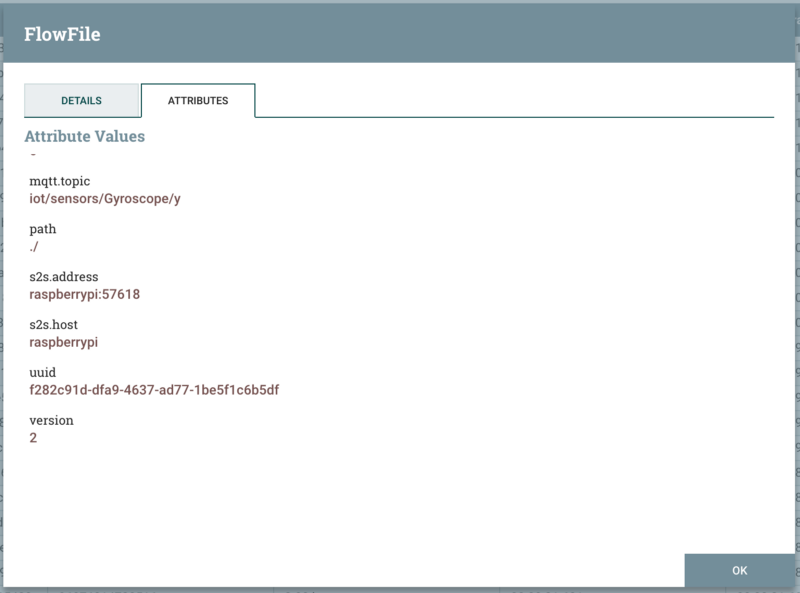
Now, let's take a look at one of these messages inside NiFi. Information comes from the sensor “iot / sensors / LightIntensity / z”, application version - 1
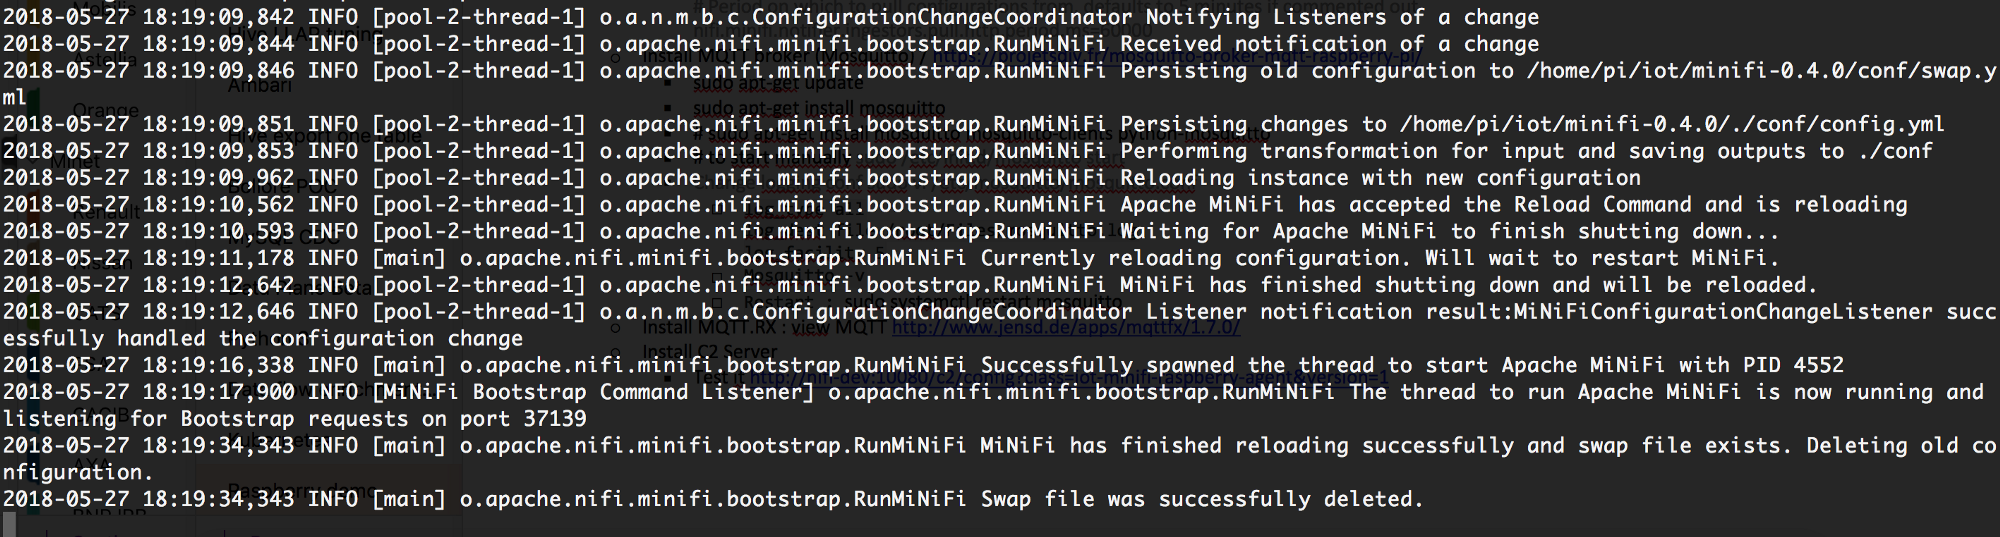
MiNiFi configuration update
Now that our infrastructure is working, and the data is going to our “data center,” let's secure the new MiNiFi configuration. Go to the Apache NiFi interface and edit the updateAttribute handler. Change the “version” attribute to 2 instead of 1 and save the new template “iot-minifi-raspberry-agent.v2”. That's all. The new configuration will be automatically reset.
You can look at the C2 server logs and see that the new version of V2 was detected, the server did not find it in its cache and loaded it.

Then MiNiFi detects a new configuration, reserves the previous configuration, unloads a new one and restarts:
In the next article we will talk about how we assembled the sensors and incorporated them into our architecture. And after that we will tell about data analysis.