The Tale of wx.Python
Hello Habrhab!
In this article I would like to tell, formulate my thoughts about such a wonderful library as wxPython . Under the cut you will find a little theory, description of forms, analysis of form properties, various controls and everything related to wxPython.
Welcome to wxPython .
Some theory-introduction.
1. wxPython in action (Russian) - the Russian version of the book (I can’t say anything about its quality and origin, because I prefer the original, but actually it is wxPython in action (English) - here it costs $ 54 in paper form (electronic I hope you will find it yourself.) The general opinion is that the book is excellent. Everything is described in detail and written. Of course, many points are not detailed, and some things are best seen in the documentation , but in general, all the examples are true, working. Book great for beginners
2. wxPython 2.8 Application Development Cookbook. I did not even try to find this book in the Russian version, because most likely it is not there. This book contains “recipes” for writing GUI forms, which are often not trivial and not easy to parse (although there are attempts to figure out each line in the book. Reading is pretty easy.
3. python.su is an excellent forum with a good database of topics on various topics. Do not consider it an advertisement, but it’s really good, it’s a pity it hasn’t been working stably lately
4. habrahabr.ru - and here a fiasco awaited me. At that moment when I was watching, there were no articles on this library. flashed a small article of the basics (those in the book are written in ne O page). Actually I had already conceived the idea of writing this article.
Looking ahead, I want to immediately advise several tools that I found after a long time working with the library.
1. wxPythom demos and the docs . This is the best example of any controls and forms written using the wxpython library. There you will find examples of various forms and controls, lists, trees and their various combinations. The source codes of all these examples are not rich in comments, so it’s even good that I found it later, when I understood what was happening, it greatly facilitated the understanding of what was happening.
2. wxformbuilder- application-constructor of forms and controls for wxPython (and not only). I found this application when I wrote about 30 forms with my hands. Those. everything was written with his hands, from the size of the form, to the use of various types of sizers and their properties. Then I could just save time, because I knew what and where, how and why. This application does not have the full functionality of the entire library, and this is understandable, wx is a complex and very voluminous library, the complete writing of the library constructor will take a huge amount of time, and there is no special need for this. Throwing and making forms using this application is not worth it at once, then you will not catch 30% of the entire library’s functionality and your interface will be limited to three buttons and two events.
Before you begin to delve into the different types of windows and their properties, you need to learn a few points, without which it will be difficult to understand what and how it should be:
1. All elements must be in the sizer. Sizer ( wx.Sizer ) is a certain invisible form element, which indicates the location of all components of the form.
2. The hierarchy is as follows: A form ( wx.Frame ) contains a sizer, a container panel ( wx.Panel ) is added to the sizer, another sizer is added to the panel, and all form elements are added to this sizer.
3. It is incorrect to add a component to the panel without adding it to the sizer (and wxFormBuilder will not allow you to do this).
4. The properties of all controls may not be fully prescribed. Suppose, if the size of the text input field is not important for you, then it will automatically be built as standard.
There are several types of forms in wx:
wx.Dialog - a dialog box.
wx.Frame - the usual form representing a window with standard functionality (minimize ( wx.ICONIZE ), maximize ( wx.MAXIMIZE ), close ( wx.Close )).
The usual representation of wx.Frame in code:
This line of code initializes the form and draws it using the entered properties. By the way:
He will also draw a form, and all the properties of the form will be standard.
self and parent are two required parameters of any form.
Let us examine the initialization of the form:
self means belonging to the class, parent - the parent of this window. id - each element, the window has its own id to access or assign an action, event to the element. You can not bother with this and set -1 or wx.ID_ANY - which formalizes any id (Each element must have its own unique id, which can be used to call or to assign actions to the element; if this is not required, then you can set id wx.ID_ANY value, which is actually -1.). title- window title, pos - form location at x and y coordinates on the screen, size - size of the form in pixels, style - window style. You can see all sorts of styles in the documentation. I
’ll note a few: wx.CAPTION - displays the top bar with a title, but without a system menu; wx.STAY_ON_TOP - stay on top of windows of other applications, I want to note one detail: if several windows have this style, the window that will be higher in the parent hierarchy in the application will remain on the "top"; wx.SYSTEM_MENU - the “close” button appears on the top bar, but it is not active;
Differences of Dialog from Framethe following:
1. Dialog modal window, ie until you complete the actions in this window, the user will not be able to go to any other window opened by
this application.
2. Dialog window already contains a panel, therefore, only a sizer is needed for the dialog box and all elements must already be placed on this sizer.
3. The dialog box can do without additional events on the buttons (more on that later).
The abundance of various controls that the library possesses is amazing. It has everything from buttons to a notebook with tabs (there are several types of them).
It is pointless to talk about everything here, it will drag on for several months, so we will briefly go over several elements, explaining the moments that are standard for almost all controls and elements.
The simplest elements are shown in the following piece of code:
Initialization of a window of type wx.Frame , as you can see, all properties are present. Some of them are given to standard values. It is worth paying attention to the layout of styles. We get a window with the upper bar, and the system menu as an inactive Close button. Also, the window will always be active ( wx.STAY_ON_TOP ). Sizer ad. Type Sizer wx.BoxSizer - this box. All edements line up one after another either horizontally or vertically (the argument passed to the sizer is responsible for this, in this case wx.HORIZONTAL ). Notebook ad (tabbed panel). First, he was given a name: self.regexps_notebookso that you can form to it from any class method. Next is the declaration of the wx.Notebook component with properties . An announcement of the panel that fits on the laptop. Note that the panel placed on the laptop will be the platform for all tabs. Also, placing the panel as a laptop tab does not require a separate sizer (this contradicts the fact that all elements must be in sizers, i.e. this is an exception to this rule)
Announcement of the second sizer. The minimum size of the sizer. Add a new checkbox component. Add it to the self.dq_params_tab panel , i.e. on the laptop tab.
An important point. Adding the created checkbox to the sizer, this one that is on the panel (tab). Additions have the following structure: sizer2 - the created sizer, Add - we call the Add item method, and the arguments to the Add method : what we add ( self.use_param_checkbox , wx.ALL - this is a display parameter, in this case the element will be shown in full size, 0 (this is the element's proportionality and 5 (this is the element's border size) Next is the declaration of a drop-down list with values. Actually self.params_quality_choices is a list of values. Next, the wx.Choice element itself which too omeschaetsya tab.
Here we have an additional option. wx.EXPAND - this means that the added element will be stretched in width, depending on its size. Adding a text field to enter wx.TextCtrl . There is an additional validator option here . This will be discussed in another code.
Came to an interesting point. After adding all the elements to the sizer ( sizer2 ), which is on the panel ( self.dq_params_tab ), it is necessary to "expand" the sizer to the entire area of the panel and fix the sizer to the panel.
Adding a listbox ( wx.ListBox ). Options wx.LB_HSCROLL | wx.LB_SINGLE talk about the presence of a horizontal scroll and that only one item in the list can be selected. Creation of a grid. Further everything in the comments is described.
The indentation syntax is a little obscure, since the strings are long. This is the syntax of the library.
Similar constructs and arrangement of elements are missing in the code, but if we run the full code of the entire module, we will see the following (if anyone is interested in the complete code, write):
1st tab

2nd tab

3rd tab.
Having examined some of the simplest elements, we will move on to more complex things.
The control sheet is a universal element and we see it very often in various applications.
Now we will analyze the code for constructing a control sheet for random data.
Declaring the class as an argument, we pass the listmix 'a component to sort the data in columns. Next is the initialization of leaf control in which all the most secret happens.
We pass in it the name of the columns ( columns ) and rows ( rows ). The length of the list with rows should equal the length of the list with the name of the columns. We call the list control self.list and assign properties to it.
Regarding the properties: wx.LC_REPORT style - list control in the form of column names at the top, all data under the columns, like a table, some kind of similarity. The rest of the styles are therefore understandable based on the translation from English.
Further, a slightly cunning data generation algorithm. This does not have a special relationship with wx, so I will not describe it in detail. But the point is
that the data for the control sheet should be of the following form:
rows = {1 :( "data0", "data0.1", "data0.2"), 2 :( "data1", "data1.0" , “Data1.1”, “data1.2”), ...}
The above algorithm converts random data to this form.
We set the size of the control sheet, the size of the column and the event bindim (more on this later). The following is not quite a working piece of code, since
self.itemDataMap should be equal to the given data as shown above, at the moment the data is immediately entered into the list control, without sorting.
Right-clicking on a line with data displays us the serial number of this line. The OnColClick method will give us the column serial number. And when a row with data is
selected , we will write to the self.data variable a list with the data that we selected (just such here, the getColumnText method is used , using it we pull the data from each column.

An example of a built-in control sheet.
Now, let's move on to the integral part of any application - the menu.
Menubar ad. Menu bar is a bar where all menu items with drop-down lists are located. = wx.Menu self.BD () - the creation of a menu item, then add
menu items in self.BD . Let's analyze in more detail:
wx.MenuItem ( in which menu we add the menu item, id, name \ hotkey, the help text displayed in the status line (if any), type of menu item )
After the name, \ t (tab character) is followed by a hotkey, by clicking on which the menu item is called if it is active. It is not necessary to process this event additionally.
Types of menu items can be different:
wx.ITEM_RADIO - the menu item in the video of the radio button, wx.ITEM_CHECK - in the form of a checkbox.
Next, we add several menu items according to the same scheme.
Creation of a status line. And we present one of the menu items as inactive. The True argument will make it active . We also add text to the status bar immediately upon initialization of the class.
And here is the menu.
Any element, any form is affected by the user. Using the wxPython library, you can describe absolutely any action of the user, and not only the user, but also the program.
Let's start with the rules for declaring events. We have a button:
And we want the program to add 2 + 2 by pressing the button:
The OnOk method will work at the click of a button. Actually this is the whole point of events. The differences are only in wx.EVT_BUTTON (in the event being processed) and the element on which we hang this event (in our case, this is the self.ok_btn button.
Event No. 1 will be triggered by pressing the corresponding menu item, and event No. 2 when a form is idle (user inactivity) appears.
Any text field needs to be verified by the user in order to protect it from expected errors. To do this, wx offers validators - self-written checks. They are self-written, because there are no built-in checks, each validator must be described.
Here is an example with explanations:
We create a class with the argument of which we give wx.PyValidator which says that this class is a validator.
The OnChar method is described by the self.Bind event (wx.EVT_CHAR, self.OnChar) , and will be executed when characters are entered from the keyboard. With the key = event.GetKeyCode () command, we catch the code for each click, and the built-in chr () function translates the code symbol into the usual representation of the pressed key. string.digits contains a list of numbers from 0 to 9, also in the string class there are almost all the characters that are entered from the keyboard, up to hexdigits (unfortunately there is even asciicharacters, but the Russian language, as far as I understand, is not included there).
The method of the Validate .
tc = self.GetWindow () defines the window where the text field is located, val the entered value, then the verification cycle. This validator will not allow the user to press a single key except numbers, periods and backspace. Speaking of backspace, wx describes all the keys, wx.WXK_Numpad0 for example, but backspace is not there, there is everything from F1 to Numlock, so I had to track the key values.
After writing the validator, you need to define a text field and point it to the validator that matches it.
That’s all. The article turned out to be very voluminous and a bit messy. That's because if you start describing ALL the properties and events that can be bound, say, to wx.ListCtrl, then the article will turn out even more than this. If you liked the article and it makes sense to continue, then I’ll start writing the next one, revealing other elements and features of the library, for example wx.aui - this is an advanced notebook with tabs, there is where it will unfold.
Thanks for attention.
ADDITION:
Code
class regexps (wx.Frame):
def __init __ (self, main, schema, table, connection):
wx.Frame .__ init__ (self, parent = None, id = wx.ID_ANY, ...)
can be rewritten more beautifully via super:
class regexps (wx.Frame):
def __init __ (self, main, schema, table, connection):
super (regexps, self) .__ init__ (parent = None, id = wx.ID_ANY, ...)
by Jenyay
In this article I would like to tell, formulate my thoughts about such a wonderful library as wxPython . Under the cut you will find a little theory, description of forms, analysis of form properties, various controls and everything related to wxPython.
Welcome to wxPython .
the initial data
Some theory-introduction.
1. wxPython in action (Russian) - the Russian version of the book (I can’t say anything about its quality and origin, because I prefer the original, but actually it is wxPython in action (English) - here it costs $ 54 in paper form (electronic I hope you will find it yourself.) The general opinion is that the book is excellent. Everything is described in detail and written. Of course, many points are not detailed, and some things are best seen in the documentation , but in general, all the examples are true, working. Book great for beginners
2. wxPython 2.8 Application Development Cookbook. I did not even try to find this book in the Russian version, because most likely it is not there. This book contains “recipes” for writing GUI forms, which are often not trivial and not easy to parse (although there are attempts to figure out each line in the book. Reading is pretty easy.
3. python.su is an excellent forum with a good database of topics on various topics. Do not consider it an advertisement, but it’s really good, it’s a pity it hasn’t been working stably lately
4. habrahabr.ru - and here a fiasco awaited me. At that moment when I was watching, there were no articles on this library. flashed a small article of the basics (those in the book are written in ne O page). Actually I had already conceived the idea of writing this article.
Looking ahead, I want to immediately advise several tools that I found after a long time working with the library.
1. wxPythom demos and the docs . This is the best example of any controls and forms written using the wxpython library. There you will find examples of various forms and controls, lists, trees and their various combinations. The source codes of all these examples are not rich in comments, so it’s even good that I found it later, when I understood what was happening, it greatly facilitated the understanding of what was happening.
2. wxformbuilder- application-constructor of forms and controls for wxPython (and not only). I found this application when I wrote about 30 forms with my hands. Those. everything was written with his hands, from the size of the form, to the use of various types of sizers and their properties. Then I could just save time, because I knew what and where, how and why. This application does not have the full functionality of the entire library, and this is understandable, wx is a complex and very voluminous library, the complete writing of the library constructor will take a huge amount of time, and there is no special need for this. Throwing and making forms using this application is not worth it at once, then you will not catch 30% of the entire library’s functionality and your interface will be limited to three buttons and two events.
introduction
Before you begin to delve into the different types of windows and their properties, you need to learn a few points, without which it will be difficult to understand what and how it should be:
1. All elements must be in the sizer. Sizer ( wx.Sizer ) is a certain invisible form element, which indicates the location of all components of the form.
2. The hierarchy is as follows: A form ( wx.Frame ) contains a sizer, a container panel ( wx.Panel ) is added to the sizer, another sizer is added to the panel, and all form elements are added to this sizer.
3. It is incorrect to add a component to the panel without adding it to the sizer (and wxFormBuilder will not allow you to do this).
4. The properties of all controls may not be fully prescribed. Suppose, if the size of the text input field is not important for you, then it will automatically be built as standard.
basic elements
There are several types of forms in wx:
wx.Dialog - a dialog box.
wx.Frame - the usual form representing a window with standard functionality (minimize ( wx.ICONIZE ), maximize ( wx.MAXIMIZE ), close ( wx.Close )).
The usual representation of wx.Frame in code:
wx.Frame.__init__ ( self, parent=None, id = wx.ID_ANY, title = u"NameWindow", pos = wx.DefaultPosition, size = wx.Size( int,int ), style = wx.CAPTION )
This line of code initializes the form and draws it using the entered properties. By the way:
wx.Frame.__init__ (self, parent = None)
He will also draw a form, and all the properties of the form will be standard.
self and parent are two required parameters of any form.
Let us examine the initialization of the form:
self means belonging to the class, parent - the parent of this window. id - each element, the window has its own id to access or assign an action, event to the element. You can not bother with this and set -1 or wx.ID_ANY - which formalizes any id (Each element must have its own unique id, which can be used to call or to assign actions to the element; if this is not required, then you can set id wx.ID_ANY value, which is actually -1.). title- window title, pos - form location at x and y coordinates on the screen, size - size of the form in pixels, style - window style. You can see all sorts of styles in the documentation. I
’ll note a few: wx.CAPTION - displays the top bar with a title, but without a system menu; wx.STAY_ON_TOP - stay on top of windows of other applications, I want to note one detail: if several windows have this style, the window that will be higher in the parent hierarchy in the application will remain on the "top"; wx.SYSTEM_MENU - the “close” button appears on the top bar, but it is not active;
Differences of Dialog from Framethe following:
1. Dialog modal window, ie until you complete the actions in this window, the user will not be able to go to any other window opened by
this application.
2. Dialog window already contains a panel, therefore, only a sizer is needed for the dialog box and all elements must already be placed on this sizer.
3. The dialog box can do without additional events on the buttons (more on that later).
The abundance of various controls that the library possesses is amazing. It has everything from buttons to a notebook with tabs (there are several types of them).
It is pointless to talk about everything here, it will drag on for several months, so we will briefly go over several elements, explaining the moments that are standard for almost all controls and elements.
The simplest elements are shown in the following piece of code:
class regexps ( wx.Frame ):
    def __init__( self, main, schema, table, connection ):
		wx.Frame.__init__ ( self, parent=None, id = wx.ID_ANY, title = u"Data Quality -- Выбор и отладка регулярных выражений",
                            pos = wx.DefaultPosition, size = wx.Size( 510,477 ), style = wx.CAPTION|wx.STAY_ON_TOP|wx.TAB_TRAVERSAL )
        sizer1 = wx.BoxSizer( wx.HORIZONTAL )
        self.regexps_notebook = wx.Notebook( self, wx.ID_ANY, wx.DefaultPosition, wx.DefaultSize, 0 )
        self.dq_params_tab = wx.Panel( self.regexps_notebook, wx.ID_ANY, wx.DefaultPosition, wx.DefaultSize, wx.TAB_TRAVERSAL )
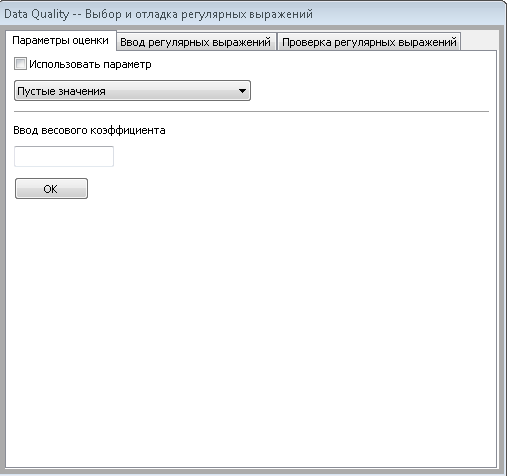
Initialization of a window of type wx.Frame , as you can see, all properties are present. Some of them are given to standard values. It is worth paying attention to the layout of styles. We get a window with the upper bar, and the system menu as an inactive Close button. Also, the window will always be active ( wx.STAY_ON_TOP ). Sizer ad. Type Sizer wx.BoxSizer - this box. All edements line up one after another either horizontally or vertically (the argument passed to the sizer is responsible for this, in this case wx.HORIZONTAL ). Notebook ad (tabbed panel). First, he was given a name: self.regexps_notebookso that you can form to it from any class method. Next is the declaration of the wx.Notebook component with properties . An announcement of the panel that fits on the laptop. Note that the panel placed on the laptop will be the platform for all tabs. Also, placing the panel as a laptop tab does not require a separate sizer (this contradicts the fact that all elements must be in sizers, i.e. this is an exception to this rule)
        sizer2 = wx.BoxSizer( wx.VERTICAL )
        self.use_param_checkbox = wx.CheckBox( self.dq_params_tab, wx.ID_ANY, u"Использовать параметр", wx.DefaultPosition,
                                               wx.DefaultSize, 0 )
Announcement of the second sizer. The minimum size of the sizer. Add a new checkbox component. Add it to the self.dq_params_tab panel , i.e. on the laptop tab.
        sizer2.Add( self.use_param_checkbox, 0, wx.ALL, 5 )
        self.params_quality_choices = [1,2,3,4,5,6,7,8,9,10]
        self.params_choice_pull = wx.Choice( self.dq_params_tab, wx.ID_ANY, wx.DefaultPosition, wx.DefaultSize,
                                             self.params_quality_choices, 0 )
		# Обозначение индекс варианта, который будет выбран изначально после инициализации элемента wx.Choice.
        self.params_choice_pull.SetSelection( 0 )
		# Добавлени на вкладку статической линии.
        self.static_line = wx.StaticLine( self.dq_params_tab, wx.ID_ANY, wx.DefaultPosition, wx.DefaultSize, wx.LI_HORIZONTAL )
An important point. Adding the created checkbox to the sizer, this one that is on the panel (tab). Additions have the following structure: sizer2 - the created sizer, Add - we call the Add item method, and the arguments to the Add method : what we add ( self.use_param_checkbox , wx.ALL - this is a display parameter, in this case the element will be shown in full size, 0 (this is the element's proportionality and 5 (this is the element's border size) Next is the declaration of a drop-down list with values. Actually self.params_quality_choices is a list of values. Next, the wx.Choice element itself which too omeschaetsya tab.
        sizer2.Add( self.static_line, 0, wx.EXPAND |wx.ALL, 5 )
        self.static_text = wx.StaticText( self.dq_params_tab, wx.ID_ANY, u"Ввод весового коэффициента", wx.DefaultPosition,
                                          wx.DefaultSize, 0 )
        sizer2.Add( self.static_text, 0, wx.ALL, 5 )
        self.weights_txt = wx.TextCtrl( self.dq_params_tab, validator = WeightsValidator() )
        sizer2.Add( self.weights_txt, 0, wx.ALL, 5 )
Here we have an additional option. wx.EXPAND - this means that the added element will be stretched in width, depending on its size. Adding a text field to enter wx.TextCtrl . There is an additional validator option here . This will be discussed in another code.
        self.dq_params_tab.SetSizer( sizer2 )
        self.dq_params_tab.Layout()
        sizer2.Fit( self.dq_params_tab )
		# Добавление вкладки на панель.
        self.regexps_notebook.AddPage( self.dq_params_tab, u"Параметры оценки", False )
        self.regexps_tab = wx.Panel( self.regexps_notebook, wx.ID_ANY, wx.DefaultPosition, wx.DefaultSize, wx.TAB_TRAVERSAL )
        sizer3 = wx.BoxSizer( wx.VERTICAL )
Came to an interesting point. After adding all the elements to the sizer ( sizer2 ), which is on the panel ( self.dq_params_tab ), it is necessary to "expand" the sizer to the entire area of the panel and fix the sizer to the panel.
		regexps_listboxChoices = []
        self.regexps_listbox = wx.ListBox( self.regexps_tab, wx.ID_ANY, wx.DefaultPosition, wx.DefaultSize,
                                           regexps_listboxChoices, wx.LB_HSCROLL|wx.LB_SINGLE )
		# Объявление грида (wx.grid.Grid). Это каркас таблицы, как в mysql, oracle, sqlite and etc. В опциях указан размер, и наличие скроллов.
        self.check_grid = wx.grid.Grid( self.check_sql_tab, wx.ID_ANY, wx.DefaultPosition, wx.Size(480,407), wx.HSCROLL|wx.VSCROLL )
		# Создание непосредственно грида, количества колонок и строк.
        # Grid
        self.check_grid.CreateGrid( 5, 5 )
		# Задание свойств грида.
        self.check_grid.EnableEditing( False )
        self.check_grid.EnableGridLines( True )
        self.check_grid.EnableDragGridSize( False )
        self.check_grid.SetMargins( 0, 0 )
		# Задание свойств колонок
        # Columns
        self.check_grid.EnableDragColMove( False )
        self.check_grid.EnableDragColSize( False )
        self.check_grid.SetColLabelSize( 20 )
        self.check_grid.SetColLabelAlignment( wx.ALIGN_CENTRE, wx.ALIGN_CENTRE )
		# Свойства строк.
        # Rows
        self.check_grid.AutoSizeRows( True )
        self.check_grid.EnableDragRowSize( True )
        self.check_grid.SetRowLabelSize( 40 )
        self.check_grid.SetRowLabelAlignment( wx.ALIGN_CENTRE, wx.ALIGN_CENTRE )
Adding a listbox ( wx.ListBox ). Options wx.LB_HSCROLL | wx.LB_SINGLE talk about the presence of a horizontal scroll and that only one item in the list can be selected. Creation of a grid. Further everything in the comments is described.
The indentation syntax is a little obscure, since the strings are long. This is the syntax of the library.
Similar constructs and arrangement of elements are missing in the code, but if we run the full code of the entire module, we will see the following (if anyone is interested in the complete code, write):
1st tab
2nd tab
3rd tab.
building list control
Having examined some of the simplest elements, we will move on to more complex things.
The control sheet is a universal element and we see it very often in various applications.
Now we will analyze the code for constructing a control sheet for random data.
class main_stat(listmix.ColumnSorterMixin):
    def __init__( self, rows, columns ):
        data = []
		self.columns = columns
		self.rows = rows
        self.list = wx.ListCtrl(self.main.panelMainStat, 0,
                                 style=wx.LC_REPORT | wx.BORDER_NONE | wx.LC_EDIT_LABELS | wx.LC_SORT_ASCENDING | wx.LC_SINGLE_SEL)
Declaring the class as an argument, we pass the listmix 'a component to sort the data in columns. Next is the initialization of leaf control in which all the most secret happens.
We pass in it the name of the columns ( columns ) and rows ( rows ). The length of the list with rows should equal the length of the list with the name of the columns. We call the list control self.list and assign properties to it.
Regarding the properties: wx.LC_REPORT style - list control in the form of column names at the top, all data under the columns, like a table, some kind of similarity. The rest of the styles are therefore understandable based on the translation from English.
        for col, text in enumerate(self.columns):
            self.list.InsertColumn(col, text)
        for item in rows:
            info = '%s:(%s)' % (col, item)
            data.append(info)
            index = self.list.InsertStringItem(sys.maxint, item[0])
            for col, text in enumerate(item[1:]):
                self.list.SetStringItem(index, col+1, text)
Further, a slightly cunning data generation algorithm. This does not have a special relationship with wx, so I will not describe it in detail. But the point is
that the data for the control sheet should be of the following form:
rows = {1 :( "data0", "data0.1", "data0.2"), 2 :( "data1", "data1.0" , “Data1.1”, “data1.2”), ...}
The above algorithm converts random data to this form.
        self.list.SetSize((900, 200))
        self.list.SetColumnWidth(0, 120)
        self.list.Bind(wx.EVT_LIST_COL_CLICK, self.OnColClick, self.list)
        self.list.Bind(wx.EVT_COMMAND_RIGHT_CLICK, self.OnRightClick)
        self.list.Bind(wx.EVT_LIST_ITEM_SELECTED, self.OnItemSelected)
        self.itemDataMap = data
        listmix.ColumnSorterMixin.__init__(self, 3)
We set the size of the control sheet, the size of the column and the event bindim (more on this later). The following is not quite a working piece of code, since
self.itemDataMap should be equal to the given data as shown above, at the moment the data is immediately entered into the list control, without sorting.
    def getColumnText(self, index, col):
        item = self.list.GetItem(index, col)
        return item.GetText()
    def OnRightClick(self, event):
        index = self.list.GetFirstSelected()
		print index
    def OnColClick(self, event):
        print ("OnColClick: %d\n" % event.GetColumn())
        event.Skip()
    def OnItemSelected(self, event):
        self.currentItem = event.m_itemIndex
        self.data = (self.getColumnText(self.currentItem, 1),
                            self.getColumnText(self.currentItem, 2),
                            self.getColumnText(self.currentItem, 3),
                            self.getColumnText(self.currentItem, 4))( True )
Right-clicking on a line with data displays us the serial number of this line. The OnColClick method will give us the column serial number. And when a row with data is
selected , we will write to the self.data variable a list with the data that we selected (just such here, the getColumnText method is used , using it we pull the data from each column.
An example of a built-in control sheet.
menu
Now, let's move on to the integral part of any application - the menu.
self.menubar = wx.MenuBar( 0 )
self.BD = wx.Menu()
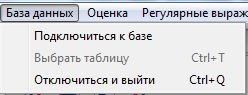
self.m_menuItem1 = wx.MenuItem( self.BD, 1, u"Подключиться к базе", u'Выполнить подключение к базе данных', wx.ITEM_NORMAL )
self.BD.AppendItem(self.m_menuItem1, )
self.m_menuItem2 = wx.MenuItem( self.BD, 2, u"Выбрать таблицу\tCtrl+T", u'Выбрать схему и таблицу для оценки качества данных', wx.ITEM_NORMAL )
self.BD.AppendItem( self.m_menuItem2 )
self.m_menuItem3 = wx.MenuItem( self.BD, 3, u"Отключиться и выйти\tCtrl+Q", u'Отключиться от базы данных в выйти из приложения', wx.ITEM_NORMAL )
self.BD.AppendItem( self.m_menuItem3 )
Menubar ad. Menu bar is a bar where all menu items with drop-down lists are located. = wx.Menu self.BD () - the creation of a menu item, then add
menu items in self.BD . Let's analyze in more detail:
self.m_menuItem1 = wx.MenuItem( self.BD, 1, u"Подключиться к базе", u'Выполнить подключение к базе данных', wx.ITEM_NORMAL )
wx.MenuItem ( in which menu we add the menu item, id, name \ hotkey, the help text displayed in the status line (if any), type of menu item )
After the name, \ t (tab character) is followed by a hotkey, by clicking on which the menu item is called if it is active. It is not necessary to process this event additionally.
Types of menu items can be different:
wx.ITEM_RADIO - the menu item in the video of the radio button, wx.ITEM_CHECK - in the form of a checkbox.
Next, we add several menu items according to the same scheme.
        self.statusbar = self.CreateStatusBar( 1, wx.ST_SIZEGRIP, wx.ID_ANY )
		self.BD.Enable(2, False)
		self.statusbar.SetStatusText(u'Это статусная строка, здесь будет информацию о текущем состоянии программы, а также подсказки по ходу работы с программой.')
Creation of a status line. And we present one of the menu items as inactive. The True argument will make it active . We also add text to the status bar immediately upon initialization of the class.
And here is the menu.
event-driven environment
Any element, any form is affected by the user. Using the wxPython library, you can describe absolutely any action of the user, and not only the user, but also the program.
Let's start with the rules for declaring events. We have a button:
self.ok_btn = wx.Button( self.m_panel5, wx.ID_ANY, u"OK", wx.DefaultPosition, wx.DefaultSize, 0 )
And we want the program to add 2 + 2 by pressing the button:
self.ok_btn.Bind( wx.EVT_BUTTON, self.OnOk )
# есть еще альтернативный синтаксис
# self.Bind( wx.EVT_BUTTON, self.OnOk, self.ok_btn )
def OnOk(self, event):
      a = 2+2
      print a
The OnOk method will work at the click of a button. Actually this is the whole point of events. The differences are only in wx.EVT_BUTTON (in the event being processed) and the element on which we hang this event (in our case, this is the self.ok_btn button.
# 1
self.Bind(wx.EVT_MENU, self.About, id=10)
# 2
self.Bind( wx.EVT_IDLE, self.OnInit )
Event No. 1 will be triggered by pressing the corresponding menu item, and event No. 2 when a form is idle (user inactivity) appears.
validators
Any text field needs to be verified by the user in order to protect it from expected errors. To do this, wx offers validators - self-written checks. They are self-written, because there are no built-in checks, each validator must be described.
Here is an example with explanations:
class Numbers(wx.PyValidator):
    def __init__(self):
        wx.PyValidator.__init__(self)
        self.Bind(wx.EVT_CHAR, self.OnChar)
    def Clone(self):
        return Numbers()
    def Validate(self, win):
        tc = self.GetWindow()
        val = tc.GetValue()
        for x in val:
            if x not in string.digits:
                return False
        return True
    def OnChar(self, event):
        key = event.GetKeyCode()
        try:
            # 8 это код клавиши backspace
            if chr(key) in string.digits or chr(key) == '.' or key == 8:
                event.Skip()
            else:
                return False
        except ValueError, info:
            print chr(key)
            print info
        return
We create a class with the argument of which we give wx.PyValidator which says that this class is a validator.
The OnChar method is described by the self.Bind event (wx.EVT_CHAR, self.OnChar) , and will be executed when characters are entered from the keyboard. With the key = event.GetKeyCode () command, we catch the code for each click, and the built-in chr () function translates the code symbol into the usual representation of the pressed key. string.digits contains a list of numbers from 0 to 9, also in the string class there are almost all the characters that are entered from the keyboard, up to hexdigits (unfortunately there is even asciicharacters, but the Russian language, as far as I understand, is not included there).
The method of the Validate .
tc = self.GetWindow () defines the window where the text field is located, val the entered value, then the verification cycle. This validator will not allow the user to press a single key except numbers, periods and backspace. Speaking of backspace, wx describes all the keys, wx.WXK_Numpad0 for example, but backspace is not there, there is everything from F1 to Numlock, so I had to track the key values.
After writing the validator, you need to define a text field and point it to the validator that matches it.
self.ip_ctrl = wx.TextCtrl( self.m_panel5, wx.ID_ANY, wx.EmptyString, wx.DefaultPosition, wx.Size( 190,-1 ), 0, Numbers() )
That’s all. The article turned out to be very voluminous and a bit messy. That's because if you start describing ALL the properties and events that can be bound, say, to wx.ListCtrl, then the article will turn out even more than this. If you liked the article and it makes sense to continue, then I’ll start writing the next one, revealing other elements and features of the library, for example wx.aui - this is an advanced notebook with tabs, there is where it will unfold.
Thanks for attention.
ADDITION:
Code
class regexps (wx.Frame):
def __init __ (self, main, schema, table, connection):
wx.Frame .__ init__ (self, parent = None, id = wx.ID_ANY, ...)
can be rewritten more beautifully via super:
class regexps (wx.Frame):
def __init __ (self, main, schema, table, connection):
super (regexps, self) .__ init__ (parent = None, id = wx.ID_ANY, ...)
by Jenyay