Synchronous and asynchronous downloading of images from the network with subsequent processing
- Tutorial
Good luck to all!
Today I want to talk about one of the methods of synchronous and asynchronous image downloading from the network. So that the article is not boring, we will try to process the uploaded images in some way using Qt.
To upload images, we will use
There is a great QGraphicsEffect class with subclasses. But we will not work with them in the framework of this article, reconcile! And I will even explain why. For example, in Qt 4.8.0, these effects lead to an application crash in Mac OS X 10.7. +, And in Qt 4.7.4 they do not work at all in the same system. I don’t know how it happened, but I put a bug in the Qt bug tracker .
So, we will create our own class for image processing. He will be able to do the following:
I note right away that the full code of the test project can be downloaded on the github, the link at the end of the article.
To begin with, we decide what we want. And we want this: we call a certain method of a certain class, pass the URL of the picture into it, as well as to which object to pass the resulting image to and in which method. And when the image is loaded, our class should call the desired method of the desired object and pass the downloaded image into it. And all this is asynchronous. That sounds good?
To the cause! We create a class
Actually, our class will be able to load pictures both synchronously and asynchronously. So there is a choice.
Usage example:
A little clarification about the insurmountable private class.this horror - to store all requests, in order to know which picture to which object should be delivered after loading.
Now the most interesting thing is the implementation of the functions of a private class (the class , you guessed it, only redirects calls to its private class).
We will now analyze these functions. In the constructor, we create
For a synchronous download, we execute the request and run the Event Loop, which will be completed at the end of the download. At the same time, we are still checking the redirect and its fixation, so that the user can enter any links to pictures, including those passed through link shorteners.
Well, when we got our picture, we start
With asynchronous loading, everything is trickier. We save the request (more precisely, the response link), the target object and its method in our terrible
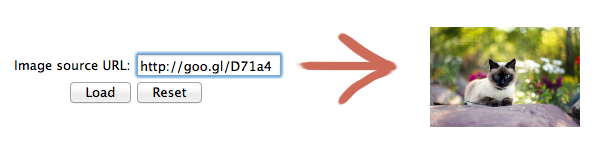
Well, you can make a simple form into which you can drive the URL, click on the button and get the image from the network. Synchronously or asynchronously. And rejoice.
But we will go further, and the resulting image will change.
We create another class (I have it again static, although for no reason at all), let's call it
It will allow us to get something like this (see the test project at the end of the article):
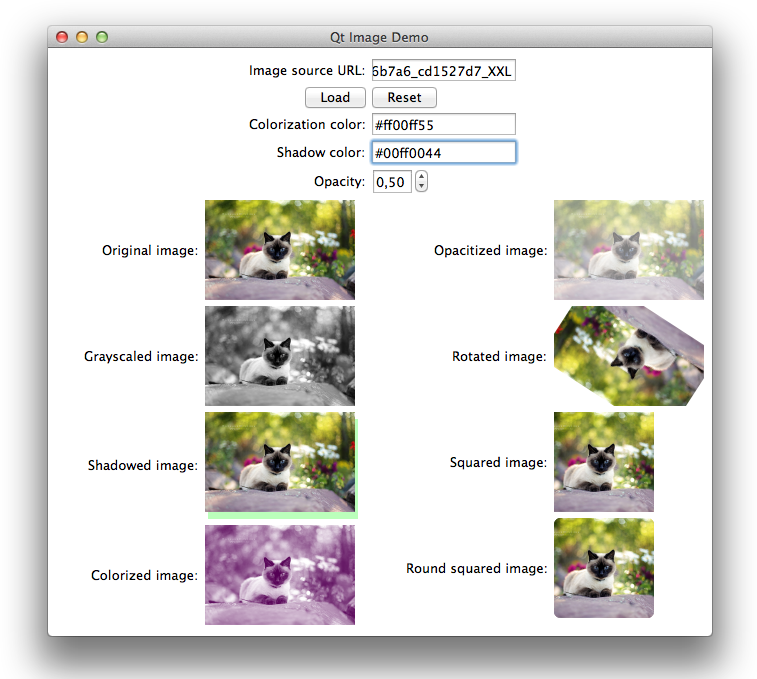
Let's go in order. The first method is the least interesting, it just normalizes the image size to the maximum side. The third method is also not very interesting - it makes the image square (adjusting the size and cropping the excess). I will not even include their source code in the article.
Further interesting enough will go.

I even found two ways to do this, but I have not bothered to test both for speed. So I bring two to choose from.
The first way is to convert the image to QImage :: Format_Indexed8 format, which means translating the image into an indexable 8-bit color. To do this, create a “color map” of 256 elements - from white to black.
The second method is based on direct work with image bits. We go through all the pixels and set them to gray.
The second method, in my opinion, should work faster, since no additional image is created. In addition, it is also suitable for images with transparency, which is also very good. That is why it is he who is used in the finale.

Here the algorithm is quite interesting. My first thought was to create a mask and crop the image on it. But after long unsuccessful attempts to draw this mask correctly using QPainter :: draw [Ellipse | Arc | RoundedRect | Path], I abandoned this idea. For some reason, this approach gives a good result only for some fillet radii. In addition, the result may be different in different operating systems, which also does not honor this method. This, apparently, is due to the inability to do antialiasing for the bitmask - it should have only two colors, black and white. The new method laughs at these problems, and gives an additional bun in the form of a smooth fillet with anti-aliasing.
The essence is almost the same as masking the picture. Create a rounded black square (with antialiasing), and then draw the original image with the composition mode on top of it

Now let's try to add a shadow to the image. Moreover, taking into account transparency. The resulting picture, of course, may have dimensions different from the original ones.
Here we first create a shadow image using artful drawing with different composition modes, and then draw it and the original image on top. With the necessary shifts, of course.

To achieve the effect of colorization, there are many different methods. I chose one, in my opinion, the most successful.
Here we simply draw the original image in shades of gray (we already know how), and then overlay the rectangle of the desired color in Screen composition mode. And do not forget about the alpha channel.

Now let's make our picture transparent. It is very simple - done with help

We will rotate around the center. The implementation of rotation around an arbitrary point will leave the readers as homework. Everything here is also extremely simple - the main thing is not to forget about smooth transformations.
That's it, now you can write a test program (or download mine from GitHub 'a) and enjoy the results!
As a bonus, I will give a small function for more convenient reading of color from a string value. Qt for some reason does not understand the color in the format
At the same time, all standard colors (such
PS: For those who doubt whether it is worth exploring the example code on the github, I will leave a couple of lines here. Firstly, the code in the article is a bit simplified - some useful checks and stuff have been removed. Secondly, the full example uses the receipt and storage / use of cookies upon request. Thirdly, there are additional functions for drawing a picture consisting of nine parts (nine-part image), which can simplify the manual rendering of buttons, input fields and other similar things. So the buns are provided!
PPS:If someone knows more successful algorithms for performing all the tasks considered, welcome to express them in the comments! The same applies to other methods of image processing - I read about them with pleasure.
Today I want to talk about one of the methods of synchronous and asynchronous image downloading from the network. So that the article is not boring, we will try to process the uploaded images in some way using Qt.
How will we upload?
To upload images, we will use
QNetworkAccessManagerand QEventLoop, as well as a few meta objects. We will upload via HTTP the image in any format from the supported Qt. Well, we’ll still be processing redirects.How will we process it?
There is a great QGraphicsEffect class with subclasses. But we will not work with them in the framework of this article, reconcile! And I will even explain why. For example, in Qt 4.8.0, these effects lead to an application crash in Mac OS X 10.7. +, And in Qt 4.7.4 they do not work at all in the same system. I don’t know how it happened, but I put a bug in the Qt bug tracker .
So, we will create our own class for image processing. He will be able to do the following:
- Convert grayscale image
- Colorize (how can I say this in Russian?)
- Add shadow
- Change transparency
- Rotate around the center
- Squared
- Square with corner rounding
- As a bonus, learn how to read custom colors in the #RRGGBBAA format
I note right away that the full code of the test project can be downloaded on the github, the link at the end of the article.
So loading the image
To begin with, we decide what we want. And we want this: we call a certain method of a certain class, pass the URL of the picture into it, as well as to which object to pass the resulting image to and in which method. And when the image is loaded, our class should call the desired method of the desired object and pass the downloaded image into it. And all this is asynchronous. That sounds good?
To the cause! We create a class
Networking(I made it static, but this does not play a big role), and create a class NetworkingPrivate- for the present work.// networking.h
class Networking
{
public:
static QImage httpGetImage(const QUrl& src);
static void httpGetImageAsync(const QUrl& src, QObject * receiver, const char * slot);
private:
static NetworkingPrivate * networkingPrivate;
static void init();
}
// networking_p.h
class NetworkingPrivate : public QObject
{
Q_OBJECT
public:
NetworkingPrivate();
~NetworkingPrivate();
QImage httpGetImage(const QUrl& src) const;
void httpGetImageAsync(const QUrl& src, QObject * receiver, const char * slot);
public slots:
void onFinished(QNetworkReply* reply);
private:
QNetworkAccessManager * nam;
QEventLoop * loop;
QMap > > requests;
};
Actually, our class will be able to load pictures both synchronously and asynchronously. So there is a choice.
Usage example:
// myclass.h
class MyClass: public QObject
{
    // ...
public slots:
    void loadImage(const QString & urlString);
    void onImageReady(const QUrl& url, const QImage & image);
}
// myclass.cpp
void MyClass::loadImage(const QString & urlString)
{
    Networking::httpGetImageAsync(QUrl(urlString), this, "onImageRead");
}
A little clarification about the insurmountable private class.
QNetworkAccessManagerwe need to send http-requests QEventLoop- to wait for a response in case of synchronous requests, and QMap > > requests NetworkingNetworkingPrivate::NetworkingPrivate()
{
nam = new QNetworkAccessManager();
loop = new QEventLoop();
connect(nam, SIGNAL(finished(QNetworkReply*)), loop, SLOT(quit()));
connect(nam, SIGNAL(finished(QNetworkReply*)), SLOT(onFinished(QNetworkReply*)));
}
NetworkingPrivate::~NetworkingPrivate()
{
nam->deleteLater();
loop->deleteLater();
}
QImage NetworkingPrivate::httpGetImage(const QUrl& src) const
{
QNetworkRequest request;
request.setUrl(src);
QNetworkReply * reply = nam->get(request);
loop->exec();
QVariant redirectedUrl = reply->attribute(QNetworkRequest::RedirectionTargetAttribute);
QUrl redirectedTo = redirectedUrl.toUrl();
if (redirectedTo.isValid())
{
// guard from infinite redirect loop
if (redirectedTo != reply->request().url())
{
return httpGetImage(redirectedTo);
}
else
{
qWarning() << "[NetworkingPrivate] Infinite redirect loop at " + redirectedTo.toString();
return QImage();
}
}
else
{
QImage img;
QImageReader reader(reply);
if (reply->error() == QNetworkReply::NoError)
reader.read(&img);
else
qWarning() << QString("[NetworkingPrivate] Reply error: %1").arg(reply->error());
reply->deleteLater();
return img;
}
}
void NetworkingPrivate::httpGetImageAsync(const QUrl& src, QObject * receiver, const char * slot)
{
QNetworkRequest request;
request.setUrl(src);
QPair > obj;
obj.first = receiver;
obj.second.first = src;
obj.second.second = slot;
QNetworkReply * reply = nam->get(request);
requests.insert(reply, obj);
}
void NetworkingPrivate::onFinished(QNetworkReply* reply)
{
if (requests.contains(reply))
{
QPair > obj = requests.value(reply);
QVariant redirectedUrl = reply->attribute(QNetworkRequest::RedirectionTargetAttribute);
QUrl redirectedTo = redirectedUrl.toUrl();
if (redirectedTo.isValid())
{
// guard from infinite redirect loop
if (redirectedTo != reply->request().url())
{
httpGetImageAsync(redirectedTo, obj.first, obj.second.second);
}
else
{
qWarning() << "[NetworkingPrivate] Infinite redirect loop at " + redirectedTo.toString();
}
}
else
{
QImage img;
QImageReader reader(reply);
if (reply->error() == QNetworkReply::NoError)
reader.read(&img);
else
qWarning() << QString("[NetworkingPrivate] Reply error: %1").arg(reply->error());
if (obj.first && obj.second.second)
QMetaObject::invokeMethod(obj.first, obj.second.second, Qt::DirectConnection, Q_ARG(QUrl, obj.second.first), Q_ARG(QImage, img));
}
requests.remove(reply);
reply->deleteLater();
}
}
We will now analyze these functions. In the constructor, we create
QEventLoop, QNetworkAccessManagerand connect the signal to a query completion QEventLoop::quit()and our method onFinished. For a synchronous download, we execute the request and run the Event Loop, which will be completed at the end of the download. At the same time, we are still checking the redirect and its fixation, so that the user can enter any links to pictures, including those passed through link shorteners.
Well, when we got our picture, we start
QImageReaderand read the data in the final one QImage, which we return. With asynchronous loading, everything is trickier. We save the request (more precisely, the response link), the target object and its method in our terrible
QMap, then run the request. And at the end of the request, we do everything the same as with the synchronous request (checking for a redirect, its cyclicity and reading the picture), but we QImagepass it on to the target object using QMetaObject::invokeMethod. As parameters - request URL and picture. Well, you can make a simple form into which you can drive the URL, click on the button and get the image from the network. Synchronously or asynchronously. And rejoice.
But we will go further, and the resulting image will change.
Image Processing Class
We create another class (I have it again static, although for no reason at all), let's call it
ImageManager. And we will have the following methods in it:class ImageManager
{
public:
static QImage normallyResized(const QImage & image, int maximumSideSize);
static QImage grayscaled(const QImage & image);
static QImage squared(const QImage & image, int size);
static QImage roundSquared(const QImage & image, int size, int radius);
static QImage addShadow(const QImage & image, QColor color, QPoint offset, bool canResize = false);
static QImage colorized(const QImage & image, QColor color);
static QImage opacitized(const QImage & image, double opacity = 0.5);
static QImage addSpace(const QImage & image, int left, int top, int right, int bottom);
static QImage rotatedImage(const QImage & image, qreal angle);
static QColor resolveColor(const QString & name);
};
It will allow us to get something like this (see the test project at the end of the article):
Let's go in order. The first method is the least interesting, it just normalizes the image size to the maximum side. The third method is also not very interesting - it makes the image square (adjusting the size and cropping the excess). I will not even include their source code in the article.
Further interesting enough will go.
Grayscale.
I even found two ways to do this, but I have not bothered to test both for speed. So I bring two to choose from.
The first way is to convert the image to QImage :: Format_Indexed8 format, which means translating the image into an indexable 8-bit color. To do this, create a “color map” of 256 elements - from white to black.
QImage gray(image.size(), QImage::Format_ARGB32);
gray.fill(Qt::transparent);
static QVector monoTable;
if (monoTable.isEmpty())
{
	for (int i = 0; i <= 255; i++)
		monoTable.append(qRgb(i, i, i));
}
QPainter p(&gray);
p.drawImage(0, 0, image.convertToFormat(QImage::Format_Indexed8, monoTable));
p.end();
return gray;
The second method is based on direct work with image bits. We go through all the pixels and set them to gray.
QImage img = image;
if (!image.isNull())
{
	int pixels = img.width() * img.height();
	if (pixels*(int)sizeof(QRgb) <= img.byteCount())
	{
		QRgb *data = (QRgb *)img.bits();
		for (int i = 0; i < pixels; i++)
		{
			int val = qGray(data[i]);
			data[i] = qRgba(val, val, val, qAlpha(data[i]));
		}
	}
}
return img;
The second method, in my opinion, should work faster, since no additional image is created. In addition, it is also suitable for images with transparency, which is also very good. That is why it is he who is used in the finale.
Rounding corners
Here the algorithm is quite interesting. My first thought was to create a mask and crop the image on it. But after long unsuccessful attempts to draw this mask correctly using QPainter :: draw [Ellipse | Arc | RoundedRect | Path], I abandoned this idea. For some reason, this approach gives a good result only for some fillet radii. In addition, the result may be different in different operating systems, which also does not honor this method. This, apparently, is due to the inability to do antialiasing for the bitmask - it should have only two colors, black and white. The new method laughs at these problems, and gives an additional bun in the form of a smooth fillet with anti-aliasing.
QImage shapeImg(QSize(size, size), QImage::Format_ARGB32_Premultiplied);
shapeImg.fill(Qt::transparent);
QPainter sp(&shapeImg);
sp.setRenderHint(QPainter::Antialiasing);
sp.setPen(QPen(Qt::color1));
sp.setBrush(QBrush(Qt::color1));
sp.drawRoundedRect(QRect(0, 0, size, size), radius + 1, radius + 1);
sp.end();
QImage roundSquaredImage(size, size, QImage::Format_ARGB32_Premultiplied);
roundSquaredImage.fill(Qt::transparent);
QPainter p(&roundSquaredImage);
p.drawImage(0, 0, shapeImg);
p.setCompositionMode(QPainter::CompositionMode_SourceIn);
p.drawImage(0, 0, squared(image, size));
p.end();
return roundSquaredImage;
The essence is almost the same as masking the picture. Create a rounded black square (with antialiasing), and then draw the original image with the composition mode on top of it
QPainter::CompositionMode_SourceIn. Simple and tasteful, as they say.Add shadow
Now let's try to add a shadow to the image. Moreover, taking into account transparency. The resulting picture, of course, may have dimensions different from the original ones.
QSize shadowedSize = image.size();
if (canResize)
{
	shadowedSize += QSize(qAbs(offset.x()), qAbs(offset.y()));
}
QImage shadowed(shadowedSize, QImage::Format_ARGB32_Premultiplied);
shadowed.fill(Qt::transparent);
QPainter p(&shadowed);
QImage shadowImage(image.size(), QImage::Format_ARGB32_Premultiplied);
shadowImage.fill(Qt::transparent);
QPainter tmpPainter(&shadowImage);
tmpPainter.setCompositionMode(QPainter::CompositionMode_Source);
tmpPainter.drawPixmap(QPoint(0, 0), QPixmap::fromImage(image));
tmpPainter.setCompositionMode(QPainter::CompositionMode_SourceIn);
tmpPainter.fillRect(shadowImage.rect(), color);
tmpPainter.end();
QPoint shadowOffset = offset;
if (canResize)
{
	if (offset.x() < 0)
		shadowOffset.setX(0);
	if (offset.y() < 0)
		shadowOffset.setY(0);
}
p.drawImage(shadowOffset, shadowImage);
QPoint originalOffset(0, 0);
if (canResize)
{
	if (offset.x() < 0)
		originalOffset.setX(qAbs(offset.x()));
	if (offset.y() < 0)
		originalOffset.setY(qAbs(offset.y()));
}
p.drawPixmap(originalOffset, QPixmap::fromImage(image));
p.end();
return shadowed;
Here we first create a shadow image using artful drawing with different composition modes, and then draw it and the original image on top. With the necessary shifts, of course.
Colorization
To achieve the effect of colorization, there are many different methods. I chose one, in my opinion, the most successful.
QImage resultImage(image.size(), QImage::Format_ARGB32_Premultiplied);
resultImage.fill(Qt::transparent);
QPainter painter(&resultImage);
painter.drawImage(0, 0, grayscaled(image));
painter.setCompositionMode(QPainter::CompositionMode_Screen);
painter.fillRect(resultImage.rect(), color);
painter.end();
resultImage.setAlphaChannel(image.alphaChannel());
return resultImage;
Here we simply draw the original image in shades of gray (we already know how), and then overlay the rectangle of the desired color in Screen composition mode. And do not forget about the alpha channel.
Transparency change
Now let's make our picture transparent. It is very simple - done with help
QPainter::setOpacity.QImage resultImage(image.size(), QImage::Format_ARGB32);
resultImage.fill(Qt::transparent);
QPainter painter(&resultImage);
painter.setOpacity(opacity);
painter.drawImage(0, 0, image);
painter.end();
resultImage.setAlphaChannel(image.alphaChannel());
return resultImage;
Rotate the picture
We will rotate around the center. The implementation of rotation around an arbitrary point will leave the readers as homework. Everything here is also extremely simple - the main thing is not to forget about smooth transformations.
QImage rotated(image.size(), QImage::Format_ARGB32_Premultiplied);
rotated.fill(Qt::transparent);
QPainter p(&rotated);
p.setRenderHint(QPainter::Antialiasing);
p.setRenderHint(QPainter::SmoothPixmapTransform);
qreal dx = image.size().width() / 2.0, dy = image.size().height() / 2.0;
p.translate(dx, dy);
p.rotate(angle);
p.translate(-dx, -dy);
p.drawImage(0, 0, image);
p.end();
return rotated;
Grand final
That's it, now you can write a test program (or download mine from GitHub 'a) and enjoy the results!
As a bonus, I will give a small function for more convenient reading of color from a string value. Qt for some reason does not understand the color in the format
#RRGGBBAA, which I made up for with its function:QColor ImageManager::resolveColor(const QString & name)
{
QColor color;
if (QColor::isValidColor(name))
color.setNamedColor(name);
else
{
// trying to parse "#RRGGBBAA" color
if (name.length() == 9)
{
QString solidColor = name.left(7);
if (QColor::isValidColor(solidColor))
{
color.setNamedColor(solidColor);
int alpha = name.right(2).toInt(0, 16);
color.setAlpha(alpha);
}
}
}
if (!color.isValid())
qWarning() << QString("[ImageManager::resolveColor] Can\'t parse color: %1").arg(name);
return color;
}
At the same time, all standard colors (such
whiteas transparent,, #ffa0ee) are just as well understood. PS: For those who doubt whether it is worth exploring the example code on the github, I will leave a couple of lines here. Firstly, the code in the article is a bit simplified - some useful checks and stuff have been removed. Secondly, the full example uses the receipt and storage / use of cookies upon request. Thirdly, there are additional functions for drawing a picture consisting of nine parts (nine-part image), which can simplify the manual rendering of buttons, input fields and other similar things. So the buns are provided!
PPS:If someone knows more successful algorithms for performing all the tasks considered, welcome to express them in the comments! The same applies to other methods of image processing - I read about them with pleasure.