Unusual lens for a conventional camera or how to stop thinking about focus
Almost two centuries of the camera’s existence, it would seem that engineers shouldn’t have a chance to add “something else”. Modern cameras shoot high-quality video, upload photos to the cloud and link geo-tags. We can shoot panoramas and 360 °, watch the stars and slow down time. But progress does not stand still, but rushes into the future, fueled by inquisitive minds.
Technology, which will be discussed today, is not new in its essence. But the way it is implemented definitely deserves attention. It will be about an interesting light-field lens that can be used with any DSLR camera.
The term light-field itself was proposed by the Soviet physicist Gershun in 1936 in his work on the radiometric properties of light.
The light field is a vector function describing the light passing in any direction through a point in space. A ray of light (or rather its direction) for a given point in space can be described by five parameters (the so-called 5D-plenoptic function): x , y , z coordinates and two angles θ and ϕ. By integrating the field vectors obtained from different points of view, we obtain the total illuminance value. And having a full description of light rays in space, we can accurately determine, for example, how an object looks from any point of view.
What is the practical application of the theory of the light field? One of the most interesting directions is the light-field camera (light-field camera). In contrast to the classical cameras that record the intensity of light at points of an object, the camera of the light field also takes into account the direction of the rays emanating from these points. In other words, we capture the "individual" rays of light emanating from the object. And this, in turn, allows you to get the physical coordinates of objects in space and a depth map.
We already know that a camera of this type should fix not only the intensity, but also the direction of the light rays emanating from the object. One of the methods of implementation is the use of an array of lenses in front of an optical sensor. These lenses collect light rays from an object located in a certain part of the scene and focus them on the sensor.
It is important to understand that in this case the main objective lens no longer focuses the image on the sensor. Instead, the rays are projected onto the plane of the lens array (in classical cameras, the sensor is located just in this plane), pass the array of lenses, and only then fall on the sensor, forming a mosaic image of various parts of the scene.

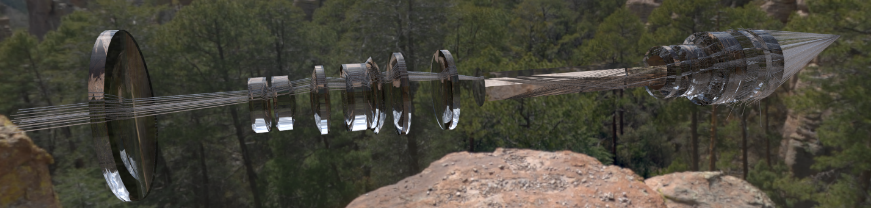
The figure shows a simplified diagram of the operation of such a lens. Thanks to the clever organization of the optical system, in the end we get not one, but many images of an object, and each such image creates a unique representation of the object from its unique angle of view.
However, this scheme has several disadvantages, such as the high cost of manufacture, the complexity of calibration, aperture control and other system parameters. One of the most famous examples of such cameras is the product of Lytro - the camera Lytro Illum (the project seems to be frozen)
Can. The lens, which I want to talk about in this article, does not contain an array of micro-lenses. Instead, a system is used which is a mirror “channel” with a rectangular section (mirror box), where, due to multiple reflection, a so-called kaleidoscopic image is formed, which is fixed by the camera sensor in the usual way.

Developed by a small German company. The lens is in the stage of quite a working prototype, and the principle of its operation is quite simple.
This is how the images obtained by the system look like:

The elements here are mirrored. Such an unusual kaleidoscopic picture is a consequence of the reflection of rays in the “mirror channel”.
And this is how the absolute difference of a pair of recovered elements looks like (bright pixels mean a greater difference of values):

In other words, we have nothing more than a stereo pair. Or rather, stereo-nine (3x3 elements). By changing the geometric parameters of the channel, we can get 5x5 and even larger dimensions, which, however, does not make sense in real life and even hurts.
So, we have a set of pictures that form a kaleidoscopic image. What next?
Here the warm analog optical hardware ends, and the cold digital soft begins.
Regardless of the application, the images must be restored (the entire optical system must be calibrated, and the calibration data obtained should be applied to the pictures). The process is quite tedious, but important, since the various elements of a kaleidoscopic image must necessarily be “matched” with each other (even minor / few pixels / differences of elements can seriously spoil the result and impression). There is a lot of work on calibration, so there’s no point in disclosing details. You just need to remember that calibration is very important for any stereo applications.
Having received “smooth” pictures, we can build a depth map.
This is perhaps the most important and difficult part of the pipeline. The quality of the final application depends on the quality of the depth map. And the quality of the depth map, in turn, depends on the quality of the calibration, the chosen algorithm and the “complexity” of the scene.
But regardless of the algorithm, the task is always the same - to find the corresponding points of the Left and Right images (and in our case + 7 more images) and calculate the distance (disparity) between them. The value of the distance will be the inverse of the depth value for the given pixel.
Why use 9 images if you can get by with two? Obviously, using more images, we have more information about the scene and can partly solve some problems of existing depth map estimation algorithms.
Among the classic problems of such algorithms:
There are many qualitative and not very algorithms for building a depth map. The most promising developments are now in the field of hybrid approaches using classical methods and various machine learning techniques (CNN, DNN). As always, the choice of algorithm is a compromise between speed and quality. Fortunately, in photography we can allow ourselves to retreat from real-time and get a better quality map of the depths.
For our example, the depth map looks something like this:

We got the depth map, what to do with it now? Information about the distance of objects is often useful. One of the most popular applications is post-focus.
Getting past the focus is one of the problems of photographers. Have you noticed that the whole scene was in focus on the original image? This is what post-focusing is based on a depth map:

It should be noted that with this approach we are actually decoupled from the physical properties of the optical system. This allows, for example, to algorithmically create an image with multiple foci. Or programmatically change the depth of the sharply depicted space (Depth of Field).
Post-focusing is at least the main, but still not the only application. In general, this lens can be considered as an array of virtual cameras (9 pieces). Accordingly, it applies to all those applications that you can submit to an array of cameras, for example:
The question of the ultimate cost of this lens is still open, but some physical parameters have already been determined. It is known that the length should not exceed 20 cm, and the mass - 800 grams. Stated that this device will be primarily compatible with cameras Sony, Canon and Nikon.
Such important topics as practical use with viewfinders of standard cameras, restoration of resolution (super-resolution), processing algorithms and integration with graphic editors were left out of the article. I will tell about it next time.
Thank you for attention!
Technology, which will be discussed today, is not new in its essence. But the way it is implemented definitely deserves attention. It will be about an interesting light-field lens that can be used with any DSLR camera.
What is a Ligh-field and what is it eaten with?
The term light-field itself was proposed by the Soviet physicist Gershun in 1936 in his work on the radiometric properties of light.
The light field is a vector function describing the light passing in any direction through a point in space.
A ray of light (or rather its direction) for a given point in space can be described by five parameters (the so-called 5D-plenoptic function): x , y , z coordinates and two angles θ and ϕ. By integrating the field vectors obtained from different points of view, we obtain the total illuminance value. And having a full description of light rays in space, we can accurately determine, for example, how an object looks from any point of view. What is the practical application of the theory of the light field? One of the most interesting directions is the light-field camera (light-field camera). In contrast to the classical cameras that record the intensity of light at points of an object, the camera of the light field also takes into account the direction of the rays emanating from these points. In other words, we capture the "individual" rays of light emanating from the object. And this, in turn, allows you to get the physical coordinates of objects in space and a depth map.
How are the cameras of the light field?
We already know that a camera of this type should fix not only the intensity, but also the direction of the light rays emanating from the object. One of the methods of implementation is the use of an array of lenses in front of an optical sensor. These lenses collect light rays from an object located in a certain part of the scene and focus them on the sensor.
It is important to understand that in this case the main objective lens no longer focuses the image on the sensor. Instead, the rays are projected onto the plane of the lens array (in classical cameras, the sensor is located just in this plane), pass the array of lenses, and only then fall on the sensor, forming a mosaic image of various parts of the scene.
The figure shows a simplified diagram of the operation of such a lens. Thanks to the clever organization of the optical system, in the end we get not one, but many images of an object, and each such image creates a unique representation of the object from its unique angle of view.
However, this scheme has several disadvantages, such as the high cost of manufacture, the complexity of calibration, aperture control and other system parameters. One of the most famous examples of such cameras is the product of Lytro - the camera Lytro Illum (the project seems to be frozen)
Can you make it easier?
Can. The lens, which I want to talk about in this article, does not contain an array of micro-lenses. Instead, a system is used which is a mirror “channel” with a rectangular section (mirror box), where, due to multiple reflection, a so-called kaleidoscopic image is formed, which is fixed by the camera sensor in the usual way.
Developed by a small German company. The lens is in the stage of quite a working prototype, and the principle of its operation is quite simple.
This is how the images obtained by the system look like:
The elements here are mirrored. Such an unusual kaleidoscopic picture is a consequence of the reflection of rays in the “mirror channel”.
And this is how the absolute difference of a pair of recovered elements looks like (bright pixels mean a greater difference of values):
In other words, we have nothing more than a stereo pair. Or rather, stereo-nine (3x3 elements). By changing the geometric parameters of the channel, we can get 5x5 and even larger dimensions, which, however, does not make sense in real life and even hurts.
So, we have a set of pictures that form a kaleidoscopic image. What next?
Here the warm analog optical hardware ends, and the cold digital soft begins.
Calibration
Regardless of the application, the images must be restored (the entire optical system must be calibrated, and the calibration data obtained should be applied to the pictures). The process is quite tedious, but important, since the various elements of a kaleidoscopic image must necessarily be “matched” with each other (even minor / few pixels / differences of elements can seriously spoil the result and impression). There is a lot of work on calibration, so there’s no point in disclosing details. You just need to remember that calibration is very important for any stereo applications.
Depth map
Having received “smooth” pictures, we can build a depth map.
This is perhaps the most important and difficult part of the pipeline. The quality of the final application depends on the quality of the depth map. And the quality of the depth map, in turn, depends on the quality of the calibration, the chosen algorithm and the “complexity” of the scene.
But regardless of the algorithm, the task is always the same - to find the corresponding points of the Left and Right images (and in our case + 7 more images) and calculate the distance (disparity) between them. The value of the distance will be the inverse of the depth value for the given pixel.
Why use 9 images if you can get by with two? Obviously, using more images, we have more information about the scene and can partly solve some problems of existing depth map estimation algorithms.
Among the classic problems of such algorithms:
- Monotone, monochrome surfaces without texture - the algorithm simply has nothing to “catch on” in the search for matches
- Overlapping objects (visible from one corner and invisible from another)
- Shadows and reflections on mirror or glossy surfaces
- Regular structures, such as cells and stripes, create problems, since it is not always clear which cell of image A corresponds to cell of image B.
- The boundaries of the images - the problem is similar to the problem of overlapping objects. On the borders of images, information is inevitably lost from any angle of view.
There are many qualitative and not very algorithms for building a depth map. The most promising developments are now in the field of hybrid approaches using classical methods and various machine learning techniques (CNN, DNN). As always, the choice of algorithm is a compromise between speed and quality. Fortunately, in photography we can allow ourselves to retreat from real-time and get a better quality map of the depths.
For our example, the depth map looks something like this:
Post-focus
We got the depth map, what to do with it now? Information about the distance of objects is often useful. One of the most popular applications is post-focus.
Getting past the focus is one of the problems of photographers. Have you noticed that the whole scene was in focus on the original image? This is what post-focusing is based on a depth map:
It should be noted that with this approach we are actually decoupled from the physical properties of the optical system. This allows, for example, to algorithmically create an image with multiple foci. Or programmatically change the depth of the sharply depicted space (Depth of Field).
Other applications
Post-focusing is at least the main, but still not the only application. In general, this lens can be considered as an array of virtual cameras (9 pieces). Accordingly, it applies to all those applications that you can submit to an array of cameras, for example:
- Polarization filters - each of the 9 image elements has its own polarization filter with a given direction. This allows one image to get 9 images from different polarizations and even create a video series of a smooth change of the polarization direction.
- HDR (High-Dynamic-Range) - the same principle: 9 different light filters + algorithm for the optimal "combination" of brightness
- Perspective change
- Depth-based editing - allows you to apply different filters to different depths. For example, make the background black and white, highlighting the foreground.
- Segmentation - the selection of objects located at a certain distance
- Distance measurement is a ruler for pictures. It works especially well for “shallow” scenes for which disparity is easier to calculate.
- Applications for industry - various ways to assess production quality and monitoring
Conclusion
The question of the ultimate cost of this lens is still open, but some physical parameters have already been determined. It is known that the length should not exceed 20 cm, and the mass - 800 grams. Stated that this device will be primarily compatible with cameras Sony, Canon and Nikon.
Such important topics as practical use with viewfinders of standard cameras, restoration of resolution (super-resolution), processing algorithms and integration with graphic editors were left out of the article. I will tell about it next time.
Thank you for attention!