How I made a snake on LabVIEW
"From nefig do / just for lulz" is dedicated to ...

Snake. The game is old (according to Wikipedia : the middle or even the end of the 1970s), but it is no less interesting, at least as an example of a simple but interesting algorithm for illustrating the possibilities of graphical programming at LabVIEW 2009.
The basis of the game is a two-dimensional array of integers, which will represent the playing field. In this array the snake will be located. When the snake’s head moves into a new field of the array (depending on the direction of the snake’s movement), the lifetime of a particular cell will be added.
Each cycle of the game, the cycle runs through the array, decreasing the values of nonzero cells by one. After that, non-zero cells are filled with color on the screen, and zero cells remain white. Thus, a loop of nonzero cells with a length equal to the lifetime of the first cell will constantly stretch behind a head moving across the field. Thus, the cell’s lifetime determines the length of the snake. And the length can be increased or decreased.
An increase in the length of the snake occurs when a certain “food” is eaten. Food - a point on the playing field, described only by its two coordinates. As soon as it is eaten, that is, the coordinates of the snake’s head coincide with the coordinates of the food, the length of the snake increases by 1, and the food receives a new pair of randomly selected coordinates.
Reducing the length of the snake occurs when biting its own tail. Yes, I understand that this is no longer a snake, but some kind of worm, and that in a classic snake, you should end the game with a gamover, but not the point. This is done just as simply: if at some point the head of a snake enters a cell already occupied by its body, then its dyne decreases by the value recorded at the site of the bite. The remaining tail lies quietly on the field, exhausting its lifetime.
The task is simple and straightforward. We turn now to LabVIEW.
Let's create an element on the form - an array and the simplest of the Boolean indicators “Flat Square Button” from the ClassicBoolean toolbar.
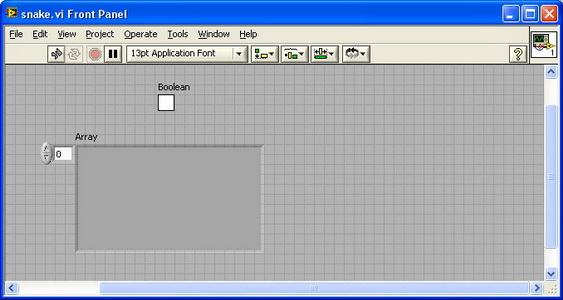
Hide the title of the Boolean indicator and colorize it so that if false, it and its frame would be white, and if true, it would be dark green and light green, respectively. We set the indicator size to 10 x 10 pixels.
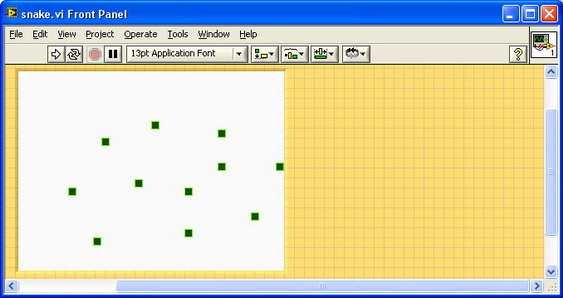
Place the indicator in an array. Let's make the array two-dimensional, and also hide the index indicators of the array and its title. The array itself is growing so that it displays 32 x 24 copies of the indicator.
Paint the shape in nice colors. This item is optional but is my favorite.
After all the manipulations, the playing field with a random set of true and false values looks like this.
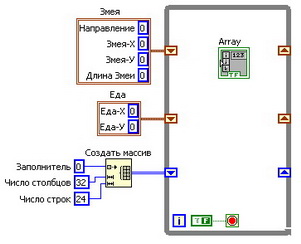
The program will be based on the While loop, terminated by false, that is, never. Inside the loop we place the terminal of our array, and also connect the following variables to the array, which will store the main parameters of the game. These are the coordinates of the head of the snake, the direction of its movement and its length, the coordinates of the food, combined into the corresponding clusters, as well as the integer array mentioned in the first chapter. It all looks like this:
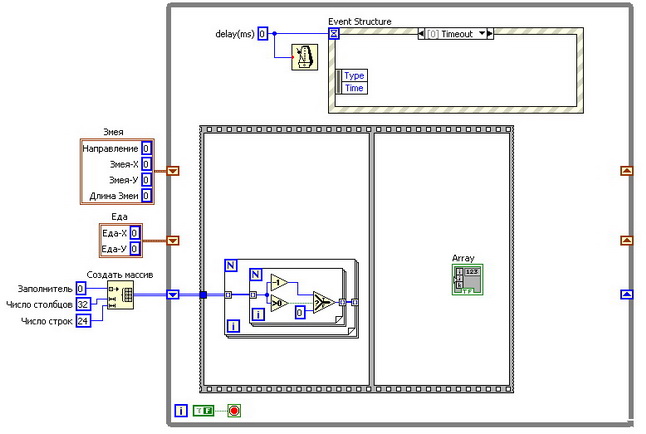
Inside the loop, we add an Event Structure with the help of which we will subsequently capture events for the purpose of processing signals from the keyboard about pressing the control arrows, and a sequential structure, inside which we will step by step arrange the entire processing sequence of each snake step. And the first step will be a run through the entire array with a decrease of all nonzero elements by 1. This is done using two for loops nested in one another.
The next step is to change the coordinates of the head in accordance with the direction of movement and change the length of the snake in case of eating food, or biting off its own tail. Coordinates are changed using Case, a structure to the condition terminal of which a variable direction is connected. Depending on the direction value, one of the tabs of the structure is executed, on which the corresponding coordinate increases or decreases by 1. If at the same time the coordinate goes beyond the maximum or zero, then it is reset to zero, or set to maximum to ensure the so-called "passing through the edge of the screen."
If the new coordinates are pairwise equal with the coordinates of the food (two comparison operators and one And operator), then the length increases by 1, and for food new coordinates are generated using a random number generator (from 0 to 1) and coefficients. Otherwise (the false tab is not shown) all three variables get the same values.
If the element of the array with the coordinates of the new position of the head is not equal to zero, then the value of this element is subtracted from the length of the snake. If the value of the length of the snake becomes less than or equal to zero, then it is assigned a value of 1, since the head of the snake always remains.
Clusters of values gather back to absorb new values. Values that have not changed at this step can not be re-selected - they will remain the same anyway.

In the next step, the snake length is written to the new field as its lifetime, the Boolean array is generated, and its upload to the indicator on the front panel. It is not hard. Do not forget just immediately before unloading to add additional true to the cell with coordinates equal to the coordinates of the meal.

That's all, in fact, a snake, it remains only to tighten the control. For him, we have already determined Event - structure, or, in Russian, the structure of events. This multi-tab structure waits for a specified time interval for the occurrence of one of the events predefined in it, and performs the corresponding tab when it waits (well, or the timeout tab if it does not). Events can be diverse, ranging from mouse clicks on the front panel of the application, and ending with system events. We will be interested in the Key down event of the keyboard.
We move the event structure to the last frame of the sequential structure and insert a conductor containing the Snake cluster into it (since it will be its value that will be changed by pressing the keyboard keys).
Add an event, as an event source (Event Source) select:. And as an event: Key -> Key Down.
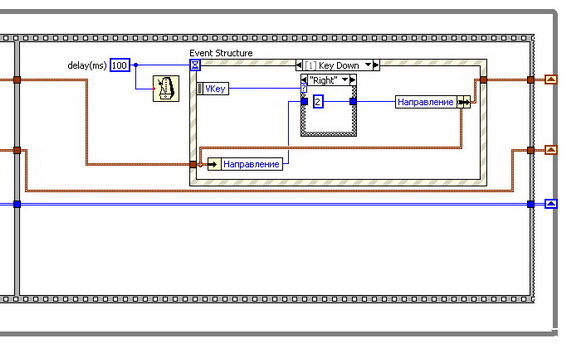
Of the event parameters returned by the structure, we are only interested in the VKey parameter, which contains the code of the key that triggered the event. Add Case - a structure that will return 0 if the left key was pressed, 1 - if down, 2 - to the right, and 3 - up. and if you press any other key, the direction value would remain unchanged. an additional delay is added in order to ensure that the event structure does not shorten the interval between measures.
That's all. You can run and play. Of course, it would be nice to also display the number of points scored on the front panel, the level of difficulty on which the game speed (the amount of delay between measures) depended, and much more, well, anything can be improved ad infinitum and there are no further improvements for illustrative purposes.
For those who want, see the full application diagram here .

Snake. The game is old (according to Wikipedia : the middle or even the end of the 1970s), but it is no less interesting, at least as an example of a simple but interesting algorithm for illustrating the possibilities of graphical programming at LabVIEW 2009.
Actually the algorithm.
The basis of the game is a two-dimensional array of integers, which will represent the playing field. In this array the snake will be located. When the snake’s head moves into a new field of the array (depending on the direction of the snake’s movement), the lifetime of a particular cell will be added.
Each cycle of the game, the cycle runs through the array, decreasing the values of nonzero cells by one. After that, non-zero cells are filled with color on the screen, and zero cells remain white. Thus, a loop of nonzero cells with a length equal to the lifetime of the first cell will constantly stretch behind a head moving across the field. Thus, the cell’s lifetime determines the length of the snake. And the length can be increased or decreased.
An increase in the length of the snake occurs when a certain “food” is eaten. Food - a point on the playing field, described only by its two coordinates. As soon as it is eaten, that is, the coordinates of the snake’s head coincide with the coordinates of the food, the length of the snake increases by 1, and the food receives a new pair of randomly selected coordinates.
Reducing the length of the snake occurs when biting its own tail. Yes, I understand that this is no longer a snake, but some kind of worm, and that in a classic snake, you should end the game with a gamover, but not the point. This is done just as simply: if at some point the head of a snake enters a cell already occupied by its body, then its dyne decreases by the value recorded at the site of the bite. The remaining tail lies quietly on the field, exhausting its lifetime.
The task is simple and straightforward. We turn now to LabVIEW.
Game interface
Let's create an element on the form - an array and the simplest of the Boolean indicators “Flat Square Button” from the ClassicBoolean toolbar.

Hide the title of the Boolean indicator and colorize it so that if false, it and its frame would be white, and if true, it would be dark green and light green, respectively. We set the indicator size to 10 x 10 pixels.
Place the indicator in an array. Let's make the array two-dimensional, and also hide the index indicators of the array and its title. The array itself is growing so that it displays 32 x 24 copies of the indicator.
Paint the shape in nice colors. This item is optional but is my favorite.
After all the manipulations, the playing field with a random set of true and false values looks like this.

The main cycle of the program.
The program will be based on the While loop, terminated by false, that is, never. Inside the loop we place the terminal of our array, and also connect the following variables to the array, which will store the main parameters of the game. These are the coordinates of the head of the snake, the direction of its movement and its length, the coordinates of the food, combined into the corresponding clusters, as well as the integer array mentioned in the first chapter. It all looks like this:

Cycle contents
Inside the loop, we add an Event Structure with the help of which we will subsequently capture events for the purpose of processing signals from the keyboard about pressing the control arrows, and a sequential structure, inside which we will step by step arrange the entire processing sequence of each snake step. And the first step will be a run through the entire array with a decrease of all nonzero elements by 1. This is done using two for loops nested in one another.

The next step is to change the coordinates of the head in accordance with the direction of movement and change the length of the snake in case of eating food, or biting off its own tail. Coordinates are changed using Case, a structure to the condition terminal of which a variable direction is connected. Depending on the direction value, one of the tabs of the structure is executed, on which the corresponding coordinate increases or decreases by 1. If at the same time the coordinate goes beyond the maximum or zero, then it is reset to zero, or set to maximum to ensure the so-called "passing through the edge of the screen."
If the new coordinates are pairwise equal with the coordinates of the food (two comparison operators and one And operator), then the length increases by 1, and for food new coordinates are generated using a random number generator (from 0 to 1) and coefficients. Otherwise (the false tab is not shown) all three variables get the same values.
If the element of the array with the coordinates of the new position of the head is not equal to zero, then the value of this element is subtracted from the length of the snake. If the value of the length of the snake becomes less than or equal to zero, then it is assigned a value of 1, since the head of the snake always remains.
Clusters of values gather back to absorb new values. Values that have not changed at this step can not be re-selected - they will remain the same anyway.

In the next step, the snake length is written to the new field as its lifetime, the Boolean array is generated, and its upload to the indicator on the front panel. It is not hard. Do not forget just immediately before unloading to add additional true to the cell with coordinates equal to the coordinates of the meal.

Control
That's all, in fact, a snake, it remains only to tighten the control. For him, we have already determined Event - structure, or, in Russian, the structure of events. This multi-tab structure waits for a specified time interval for the occurrence of one of the events predefined in it, and performs the corresponding tab when it waits (well, or the timeout tab if it does not). Events can be diverse, ranging from mouse clicks on the front panel of the application, and ending with system events. We will be interested in the Key down event of the keyboard.
We move the event structure to the last frame of the sequential structure and insert a conductor containing the Snake cluster into it (since it will be its value that will be changed by pressing the keyboard keys).
Add an event, as an event source (Event Source) select:. And as an event: Key -> Key Down.
Of the event parameters returned by the structure, we are only interested in the VKey parameter, which contains the code of the key that triggered the event. Add Case - a structure that will return 0 if the left key was pressed, 1 - if down, 2 - to the right, and 3 - up. and if you press any other key, the direction value would remain unchanged. an additional delay is added in order to ensure that the event structure does not shorten the interval between measures.

That's all. You can run and play. Of course, it would be nice to also display the number of points scored on the front panel, the level of difficulty on which the game speed (the amount of delay between measures) depended, and much more, well, anything can be improved ad infinitum and there are no further improvements for illustrative purposes.
For those who want, see the full application diagram here .
