OpenSceneGraph: Manage Windows and Display Modes
- Tutorial

Introduction
We have already said that the osg :: Camera class manages the associated OpenGL graphics context. The graphic context encapsulates information about how and where objects are drawn and which state attributes apply to them. A context is a graphic window, or rather, its client area, or an OpenGL pixel buffer that stores pixel data without transferring it to the frame buffer.
OSG uses the osg :: GraphicsContext class to represent the abstract graphics context, and the osg :: GraphicsWindow class to represent the abstract graphics window. The latter has a getEventQueue () method for managing events from GUI elements. Generally speaking, graphical context is a platform-specific concept, so most of the work on creating a window and associating its context with the OpenGL context, OSG takes over. When you call the createGraphicsContext () method of the osg :: GraphicsContext () class, the required code (and not a little, believe me!) Will be generated by the preprocessor automatically, depending on the platform. All we have to do is pass an osg :: GraphicsContex :: Traits argument to this method, containing a description of which window we want to receive.
1. Class osg :: DisplaySettings
OSG allows the developer to control the global display settings, on the basis of which cameras, viewers and scene elements are rendered. For this purpose, the singleton pattern is used, that is, a unique object containing these settings, implemented in the form of the osg :: DisplaySettings class, which can be accessed from anywhere in the program. Therefore, from our application, we can change these settings at any time.
osg::DisplaySettings *ds = osg::DisplaySettings::instance();
Singleton osg :: DisplaySettings contains settings that are applied to newly created rendering devices, the OpenGL context of the graphics window. You can vary the following parameters:
- setDoubleBuffer () - enable / disable double buffering. Enabled by default.
- setDepthBuffer () - enable / disable depth buffer. By default enabled.
- Set the alpha buffer (alpha buffer), stencil buffer (stencil buffer), accumulation buffer by using methods of the type setMinimumNumAlphaBits (). By default, all parameters are 0.
- Allowing to use anti-aliasing and its depth using the setNumMultiSamples () method. The default is 0.
- Enable stereo mode. Off by default.
Consider the use of this singleton on the example of smoothing
Singleton osg :: DisplaySettings example
main.h
main.cpp
#ifndef MAIN_H#define MAIN_H#include<osgDB/ReadFile>#include<osgViewer/Viewer>#endifmain.cpp
#include"main.h"intmain(int argc, char *argv[]){
    (void) argc; (void) argv;
    osg::DisplaySettings::instance()->setNumMultiSamples(6);
    osg::ref_ptr<osg::Node> model = osgDB::readNodeFile("../data/cessna.osg");
    osgViewer::Viewer viewer;
    viewer.setSceneData(model.get());
    return viewer.run();
}
Only one challenge is important here.
osg::DisplaySettings::instance()->setNumMultiSamples(6);
- setting the smoothing parameter, which can take the values 2, 4 and 6, depending on the graphics device used. Notice how the blade of the screw of the cessna looks without the use of smoothing

and after its application

2. Switch to windowed mode
The osgViewer :: Viewer class can be very quickly reconfigured for display in windowed mode. As you noticed, all our previous examples were displayed in full screen. To switch the viewer to windowed mode, there is the setUpViewInWindow () method, which takes as its parameters the coordinates of the upper left corner of the window, its width and height in pixels
viewer.setUpViewInWindow(50, 50, 800, 600);
Optionally, this method takes the fifth parameter — the number of the screen to which the window should be displayed, in case you have more than one monitor. Surely working with multiple monitors in Windows, you observed that the scene is spreading out to all monitors in full screen mode (this is not observed in Linux).
In addition, in the project settings, you can set the OSG_WINDOW environment variable in such a way

that it will be equivalent to calling setUpViewInWindow (), which in this case can also not be performed.
To explicitly specify the screen to which the viewer should be displayed in full screen mode, you can use the setUpViewOnSingleScreen () method by specifying the screen number as a parameter (default 0).
OSG also supports demo spherical displays. You can use the setUpViewFor3DSphericalDisplay () method to customize the display on this display.
3. Composite Viewer
The osgViewer :: Viewer class manages one view that displays one scene graph. Besides it, there is a class osgViewer :: CompositeViewer which supports several views and several scenes. It has the same run (), frame () and done () methods to control the rendering process, but it allows you to add and remove independent views using the addView () and removeView () methods, as well as get the views from their index using the getView method () The view object is described by the osgViewer :: View class.
The osgViewer :: View class is the base class of the osgViewer :: Viewer class. It allows you to add a root node with scene data, a camera's manipulator and event handlers. The main difference between this class (view) and the viewer class is that it does not allow rendering the scene with run () or frame () calls. A typical script for adding a view looks like this.
osgViewer::CompositeViewer multiviewer;
multiviewer.addView( view );
Composite viewer allows you to display one scene in different angles, displaying these angles in different windows. It also allows you to display independent scenes in different windows. Let's write a simple example of using a composite viewer.
Composite example
main.h
main.cpp
#ifndef MAIN_H#define MAIN_H#include<osgDB/ReadFile>#include<osgViewer/CompositeViewer>#endifmain.cpp
#include"main.h"//------------------------------------------------------------------------------////------------------------------------------------------------------------------
osgViewer::View *createView(int x, int y, int w, int h,
                            osg::Node *scene){
    osg::ref_ptr<osgViewer::View> view = new osgViewer::View;
    view->setSceneData(scene);
    view->setUpViewInWindow(x, y, w, h);
    return view.release();
}
//------------------------------------------------------------------------------////------------------------------------------------------------------------------intmain(int argc, char *argv[]){
    (void) argc; (void) argv;
    osg::ref_ptr<osg::Node> model1 = osgDB::readNodeFile("../data/cessna.osg");
    osg::ref_ptr<osg::Node> model2 = osgDB::readNodeFile("../data/cow.osg");
    osg::ref_ptr<osg::Node> model3 = osgDB::readNodeFile("../data/glider.osg");
    osgViewer::View *view1 = createView(50, 50, 320, 240, model1);
    osgViewer::View *view2 = createView(380, 50, 320, 240, model2);
    osgViewer::View *view3 = createView(185, 330, 320, 240, model3);
    osgViewer::CompositeViewer viewer;
    viewer.addView(view1);
    viewer.addView(view2);
    viewer.addView(view3);
    return viewer.run();
}
Creating a separate view is placed in a function that takes as parameters the position and size of the window, as well as the scene as a pointer to its root node.
osgViewer::View *createView(int x, int y, int w, int h,
                            osg::Node *scene){
    osg::ref_ptr<osgViewer::View> view = new osgViewer::View;
    view->setSceneData(scene);
    view->setUpViewInWindow(x, y, w, h);
    return view.release();
}
Here we create a view managed by a smart pointer to the object osgViewer :: View
osg::ref_ptr<osgViewer::View> view = new osgViewer::View;
set the data of the displayed scene and the windowed display mode in the window with the specified position and size
view->setSceneData(scene);
view->setUpViewInWindow(x, y, w, h);
The view is returned from the function according to the rules for returning smart pointers.
return view.release();
Now in the main program we load three different models.
osgViewer::View *view1 = createView(50, 50, 320, 240, model1);
osgViewer::View *view2 = createView(380, 50, 320, 240, model2);
osgViewer::View *view3 = createView(185, 330, 320, 240, model3);
we create three different types
osgViewer::View *view1 = createView(50, 50, 320, 240, model1);
osgViewer::View *view2 = createView(380, 50, 320, 240, model2);
osgViewer::View *view3 = createView(185, 330, 320, 240, model3);
create a composite viewer and add previously created views to it
osgViewer::CompositeViewer viewer;
viewer.addView(view1);
viewer.addView(view2);
viewer.addView(view3);
and we start rendering in exactly the same way as we did in the case of a single scene.
return viewer.run();
Everything! When you run the program, we get three different windows. The contents of each window can be managed independently. Any of the windows can be closed in the standard way, and exit the entire application by pressing Esc.

3. Class osg :: GraphicsContext :: Traits
The word "traits" in English means "features." So, the above class describes the features of the future window, and contains all the properties for describing the graphic context. It differs from the osg :: DisplaySettings class, which controls the characteristics of all graphics contexts for newly created cameras. The main public properties of this class are listed in the table below.
| Class attribute | Type of | Default value | Description |
|---|---|---|---|
| x | int | 0 | Initial horizontal position of the window |
| y | int | 0 | Initial vertical position of the window |
| width | int | 0 | Window width |
| height | int | 0 | Window height |
| windowName | std :: string | "" | Window title |
| windowDecoration | bool | false | Window title display flag |
| red | unsigned int | eight | The number of bits of red in the OpenGL color buffer |
| green | unsigned int | eight | The number of bits of green in the OpenGL color buffer |
| blue | unsigned int | eight | The number of bits of blue in the OpenGL color buffer |
| alpha | unsigned int | eight | The number of bits in the OpenGL alpha buffer |
| depth | unsigned int | 24 | The number of bits in the OpenGL depth buffer |
| stencil | unsigned int | 0 | The number of bits in the stencil buffer OpenGL |
| doubleBuffer | bool | false | Use double buffer |
| samples | unsigned int | 0 | The number of primitive smoothing |
| quadBufferStereo | bool | false | Use quad stereo buffer (for NVidia hardware) |
| inheritedWindowData | osg :: ref_ptr | Null | The data descriptor associated with the window |
To initialize the object Traits, you must run the following code
osg::ref_ptr<osg::GraphicsContext::Traits> traits = new osg::GraphicsContext::Traits;
traits->x = 50;
traits->y = 100;
...
4. Configure the OSG application window
To create a window with the specified characteristics, you must do the following steps:
- Configure an object of type osg :: GraphicsContext :: Traits
- Create graphic window context
- Associate this graphic context with the camera.
- Make the camera main for the viewer
Traits example
main.h
main.cpp
#ifndef MAIN_H#define MAIN_H#include<osg/GraphicsContext>#include<osgDB/ReadFile>#include<osgViewer/Viewer>#endifmain.cpp
#include"main.h"intmain(int argc, char *argv[]){
    (void) argc; (void) argv;
    osg::ref_ptr<osg::GraphicsContext::Traits> traits = new osg::GraphicsContext::Traits;
    traits->x = 50;
    traits->y = 50;
    traits->width = 800;
    traits->height = 600;
    traits->windowName = "OSG application";
    traits->windowDecoration = true;
    traits->doubleBuffer = true;
    traits->samples = 4;
    osg::ref_ptr<osg::GraphicsContext> gc = osg::GraphicsContext::createGraphicsContext(traits.get());
    osg::ref_ptr<osg::Camera> camera = new osg::Camera;
    camera->setGraphicsContext(gc);
    camera->setViewport( new osg::Viewport(0, 0, traits->width, traits->height) );
    camera->setClearMask(GL_DEPTH_BUFFER_BIT | GL_COLOR_BUFFER_BIT);
    camera->setClearColor( osg::Vec4(0.2f, 0.2f, 0.4f, 1.0f) );
    double aspect = static_cast<double>(traits->width) / static_cast<double>(traits->height);
    camera->setProjectionMatrixAsPerspective(30.0, aspect, 1.0, 1000.0);
    camera->getOrCreateStateSet()->setMode(GL_DEPTH_TEST, osg::StateAttribute::ON);
    osg::ref_ptr<osg::Node> root = osgDB::readNodeFile("../data/cessna.osg");
    osgViewer::Viewer viewer;
    viewer.setCamera(camera.get());
    viewer.setSceneData(root.get());
    return viewer.run();
}
To set the window settings, create an instance of the osg :: GraphicsContext :: Traits class and initialize it with the parameters we need
osg::ref_ptr<osg::GraphicsContext::Traits> traits = new osg::GraphicsContext::Traits;
traits->x = 50;
traits->y = 50;
traits->width = 800;
traits->height = 600;
traits->windowName = "OSG application";
traits->windowDecoration = true;
traits->doubleBuffer = true;
traits->samples = 4;
After that we create a graphic context, passing as a pointer to the traits as settings
osg::ref_ptr<osg::GraphicsContext> gc = osg::GraphicsContext::createGraphicsContext(traits.get());
Create a camera
osg::ref_ptr<osg::Camera> camera = new osg::Camera;
Associate the camera with the created graphics context.
camera->setGraphicsContext(gc);
Adjust the viewport, set the buffer cleaning mask, set the cleaning color
camera->setViewport( new osg::Viewport(0, 0, traits->width, traits->height) );
camera->setClearMask(GL_DEPTH_BUFFER_BIT | GL_COLOR_BUFFER_BIT);
camera->setClearColor( osg::Vec4(0.2f, 0.2f, 0.4f, 1.0f) );
Adjusting the perspective projection matrix
double aspect = static_cast<double>(traits->width) / static_cast<double>(traits->height);
camera->setProjectionMatrixAsPerspective(30.0, aspect, 1.0, 1000.0);
Do not forget to turn on the depth test, for the correct display of faces
camera->getOrCreateStateSet()->setMode(GL_DEPTH_TEST, osg::StateAttribute::ON);
Load model aircraft
osg::ref_ptr<osg::Node> root = osgDB::readNodeFile("../data/cessna.osg");
We configure and launch the viewer, indicating the camera we set up as the main camera
osgViewer::Viewer viewer;
viewer.setCamera(camera.get());
viewer.setSceneData(root.get());
return viewer.run();
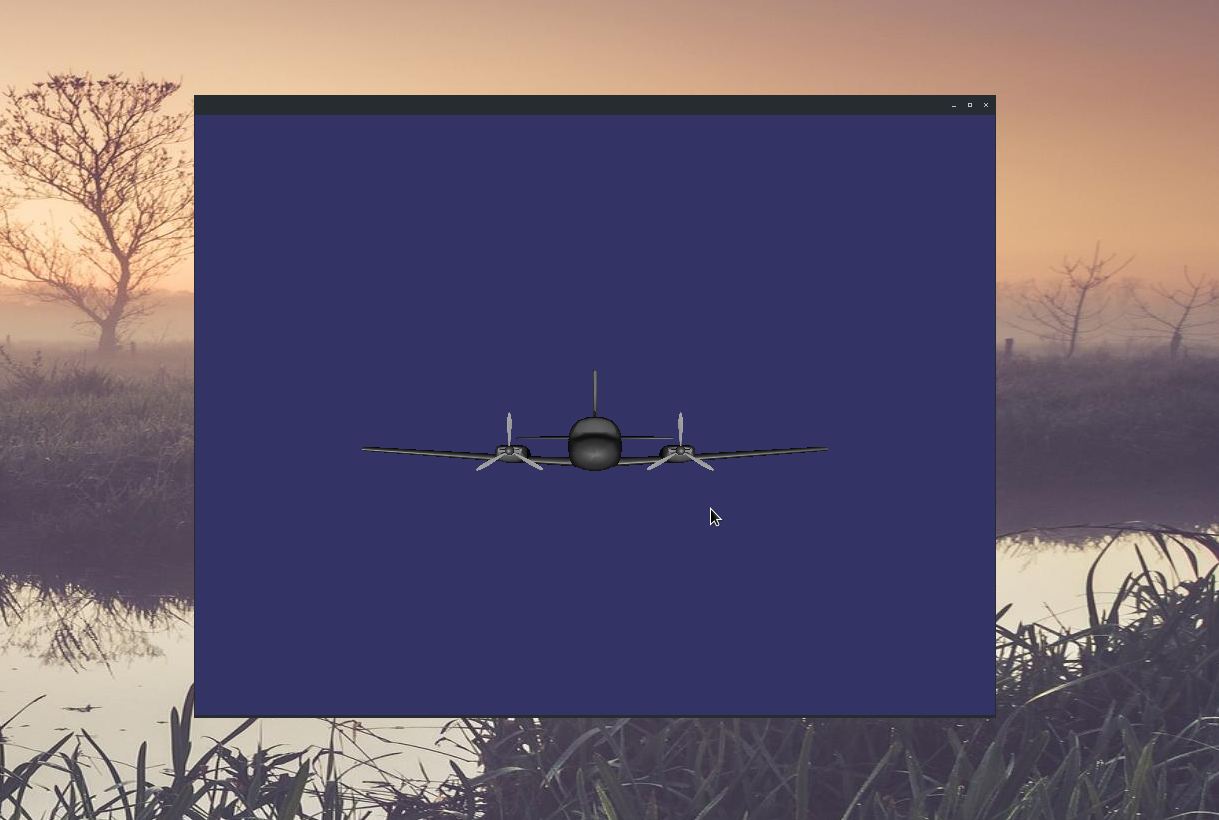
At the output, we have a window with the required parameters.

The window title is not displayed because in the settings of my window manager this function is disabled. If you run the example in Windows or Linux with different settings, the title will be in place.
To be continued...