Evernote Big iOS Update
Our users are not shy about telling us what they are missing, and we are pleased to release an update that should really please a lot of people. So, in the version for iOS appeared support for editing formatted text in iOS. And more joint notebooks. But that is not all. We also added the ability to put a pin code on the entrance to the application, redesigned the note creation screen, completely updated the interface for the iPad and made many other changes. We offer you a look at them.
Download the latest version for iOS
We had to sweat pretty hard to do this, but all the more pleasant now to talk about it. You can enter formatted text in notes (bold, italics, with underlining), highlight an existing one, add links, create headings and make lists. On the iPhone, we had to completely rethink the screen for creating a new note in order to take these possibilities into account.

To create formatted text on the iPhone, click on the new “A” button at the top of the note. The style can be applied both to the new text, and to the existing one - after its selection. Some elements, such as lists or header styles, affect the entire editable line.
On the iPad, formatting buttons are located along the top of the note.
Editing Existing Formatted Text
This update greatly enhances the ability to create and edit text in Evernote for iOS. You can edit any note containing formatted text that was created on your device. You can also edit any note with styles available in iOS. But there are some limitations to be aware of. You won’t be able to directly edit notes that contain more complex formatted notes than what you can do in Evernote for iOS. This can be encountered in cases with copied web content, other fonts and tables.
If you try to edit a note with complex formatting, you will be offered two options: add or simplify. In the first case, you can add at the end of the note. When simplified, Evernote will create an editable version of the note, omitting unnecessary formatting. If you suddenly want to return to the original, you can remove it from the basket.
What about the flags?
We have not yet been able to make them ideal, but we are working on it. Now you need to use the computer version of Evernote to create checkered lists. As usual, you can enable and disable the checkboxes in iOS.
Now you can view on your iPhone or iPad any notebook that other Evernote users have shared with you. You can access shared notebooks as follows:
When you open a collaborative notepad for the first time, Evernote starts loading the headers and snippets of notes. As is the case with your own notes, any entry that you viewed will be saved locally on your device.
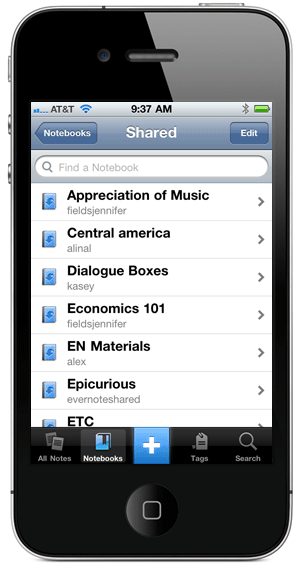
You can’t create or edit notes in collaborative notebooks yet. We are working on it.
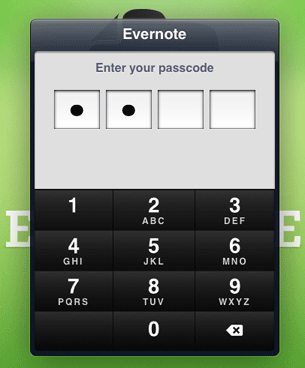
Evernote now allows you to restrict access to the application by requesting a PIN at login. This will help you keep confidential information hidden from prying eyes, or simply prevent accidental deletion of any data by your children, whom you gave to play with the device. The feature is available on both iPhone and iPad. To enable it, go to the Evernote settings, select "Password Protection", and then set your password. A corresponding request will pop up every time you open Evernote.
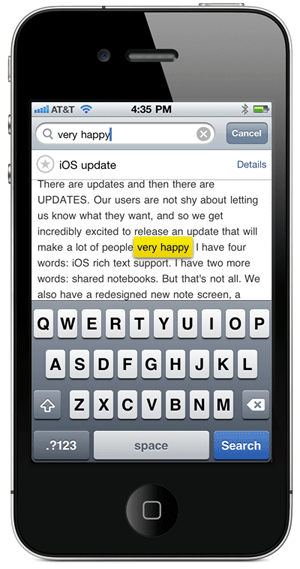
You always had the opportunity to search the entire account. Now we have added the ability to search inside a single note. To do this, open the note and click on the magnifying glass icon. A search string opens, with which you can find keywords inside the note you are viewing.
On both the iPhone and iPad, we have added a new viewing mode. Slides are ideal for viewing images attached to a single note. Just open the note you want to see and click on the picture. It will load in full screen mode. Move it right or left with your finger to view other images inside the note.
Slide View has two additional useful features. While viewing, click on the send icon in the lower left corner, and you will see two options: “Save” and “Copy”. The first will put the image in the photo gallery of the device. The “Copy” button will add a picture to the clipboard, from where you can paste it into other notes and applications.
In addition to all of the above features, the iPad interface has received a number of other major changes.

View All Notes
Several updates have been made to the display screen for all notes. They now appear as easy-to-read snippets, allowing you to immediately get much more information about the contents of the note than before. If you want to increase the size of the fragments and get more details, use the zoom gesture (with two fingers, as in the Maps application). You can change the viewing mode by clicking on the “View Settings” button in the bottom panel.
The new interface also makes it easy to send and delete multiple notes at once. To do this, click on the "Edit" button in the upper left corner. Then mark the notes you want to work with. Finally, click on the mandrel or delete button in the upper right corner of the screen. You can enter the note selection mode by simply pressing and holding one of the notes that you want to select.
Fragments
Notes in the list, presented in fragments, allow you to get more information and view larger thumbnails. This is very convenient when you need to quickly go over notes to find what you need.
It was a pretty serious update. In addition to all of the above, it made many internal changes aimed at improving performance and stability. And many other innovations are already in operation.
Download the latest version for iOS
Download the latest version for iOS
Working with rich text
We had to sweat pretty hard to do this, but all the more pleasant now to talk about it. You can enter formatted text in notes (bold, italics, with underlining), highlight an existing one, add links, create headings and make lists. On the iPhone, we had to completely rethink the screen for creating a new note in order to take these possibilities into account.

To create formatted text on the iPhone, click on the new “A” button at the top of the note. The style can be applied both to the new text, and to the existing one - after its selection. Some elements, such as lists or header styles, affect the entire editable line.
On the iPad, formatting buttons are located along the top of the note.
Editing Existing Formatted Text
This update greatly enhances the ability to create and edit text in Evernote for iOS. You can edit any note containing formatted text that was created on your device. You can also edit any note with styles available in iOS. But there are some limitations to be aware of. You won’t be able to directly edit notes that contain more complex formatted notes than what you can do in Evernote for iOS. This can be encountered in cases with copied web content, other fonts and tables.
If you try to edit a note with complex formatting, you will be offered two options: add or simplify. In the first case, you can add at the end of the note. When simplified, Evernote will create an editable version of the note, omitting unnecessary formatting. If you suddenly want to return to the original, you can remove it from the basket.
What about the flags?
We have not yet been able to make them ideal, but we are working on it. Now you need to use the computer version of Evernote to create checkered lists. As usual, you can enable and disable the checkboxes in iOS.
Shared Notebook Access
Now you can view on your iPhone or iPad any notebook that other Evernote users have shared with you. You can access shared notebooks as follows:
- iPhone and iPod: Click on Notepads in the menu, then on “General Notepads”. Then select the notebook you want to see.
- iPad: Click on the “General” tab on the top panel of the application, and you will see a list of notebooks that you have access to.
When you open a collaborative notepad for the first time, Evernote starts loading the headers and snippets of notes. As is the case with your own notes, any entry that you viewed will be saved locally on your device.

You can’t create or edit notes in collaborative notebooks yet. We are working on it.
New Premium Feature: Lock Evernote with a PIN

Evernote now allows you to restrict access to the application by requesting a PIN at login. This will help you keep confidential information hidden from prying eyes, or simply prevent accidental deletion of any data by your children, whom you gave to play with the device. The feature is available on both iPhone and iPad. To enable it, go to the Evernote settings, select "Password Protection", and then set your password. A corresponding request will pop up every time you open Evernote.
Search inside notes
You always had the opportunity to search the entire account. Now we have added the ability to search inside a single note. To do this, open the note and click on the magnifying glass icon. A search string opens, with which you can find keywords inside the note you are viewing.

Slide view
On both the iPhone and iPad, we have added a new viewing mode. Slides are ideal for viewing images attached to a single note. Just open the note you want to see and click on the picture. It will load in full screen mode. Move it right or left with your finger to view other images inside the note.
Slide View has two additional useful features. While viewing, click on the send icon in the lower left corner, and you will see two options: “Save” and “Copy”. The first will put the image in the photo gallery of the device. The “Copy” button will add a picture to the clipboard, from where you can paste it into other notes and applications.
Redesigned iPad
In addition to all of the above features, the iPad interface has received a number of other major changes.

View All Notes
Several updates have been made to the display screen for all notes. They now appear as easy-to-read snippets, allowing you to immediately get much more information about the contents of the note than before. If you want to increase the size of the fragments and get more details, use the zoom gesture (with two fingers, as in the Maps application). You can change the viewing mode by clicking on the “View Settings” button in the bottom panel.
The new interface also makes it easy to send and delete multiple notes at once. To do this, click on the "Edit" button in the upper left corner. Then mark the notes you want to work with. Finally, click on the mandrel or delete button in the upper right corner of the screen. You can enter the note selection mode by simply pressing and holding one of the notes that you want to select.
Fragments
Notes in the list, presented in fragments, allow you to get more information and view larger thumbnails. This is very convenient when you need to quickly go over notes to find what you need.
To be continued
It was a pretty serious update. In addition to all of the above, it made many internal changes aimed at improving performance and stability. And many other innovations are already in operation.
Download the latest version for iOS
