Orchard CMS Extension: Creating Widgets
- Transfer
This is a continuation of a series of articles on the development of their own sites based on the Orchard CMS content management system. The first articles of this series can be found at the following links:
This article describes the procedure for writing your own widgets through the creation of the content part, which is then transformed into a widget. This article is based on the original article Writing a content part .
Content is a small piece of functionality or user interface that can be added to any type of content in Orchard. Examples of such parts: a route for the ability to access a content item, tags for tagging content items, a menu for the ability to add content items to user menus.
In this part, we will look at the process of creating a new content part from scratch, using the capabilities of the productive scaffolding tool Orchard. Despite the fact that we will consider development through Visual Studio, it is not necessary to have Visual Studio to create content parts, you can use any editor to your taste. In this part of the guide, we will consider creating a content part that will display a map with the ability to configure through latitude and longitude parameters.
Important. Before you start creating a file structure for your module, you need to download and install the Code Generation function in Orchard. You can find more information on this function at this link .
To start creating a new content part with a map, download the Orchard project and open it in Visual Studio.
Type "codegen module Maps / IncludeInSolution: true" at the Orchard command prompt. The “IncludeInSolution” parameter tells Orchard to add a new module project to the Orchard project list.

After executing this command, Visual Studio will ask you to reload the solution in the development environment, agree with this. After that, a new Maps project will appear in the solution, which will contain a set of files added by default so that you can create a new piece of content.
Open the Module.txt file in the root of the project, this file contains some information about your module, such as the name, description, version, author and a set of functions provided by this module. This file also contains additional information, such as dependency information. The module created by default is very simple and contains only one function, without additional dependencies. Edit Module.txt as follows:
Now, let's start creating our content part. In order to start, we need to create a file that will contain a class with a description of the data of our content part. Typically, these classes are located in the “Models” folder. Right-click on the Models folder and select Add -> Class ..., in the window that appears, name the new Maps.cs file.

In Orchard, the content part is represented by the Record class, which contains the data fields stored in the database and the ContentPart class, which uses the Record for storage. Add the MapRecord (ContentPartRecord) and MapPart (ContentPart) classes as shown below:
Now build the project using the Build command, in order to make sure there are no errors.

The next step is to create data migration for our map module. Why do we need a class for data migration? The reason is that simply declaring the Record and Part classes to store data does not actually affect the database. Data migration is the mechanism that tells Orchard how to update the database schema when turning on the map module on a site. Migration can also update the data scheme from the previous version to a new one, but this issue is beyond the scope of this article and we will not touch on it.
In order to create a data migration class, you can use the Orchard code generation function. Run the command "codegen datamigration Maps" on the command line.

Visual Studio will again ask you to reload the solution. After loading, you will find in the project a new class for data migration.
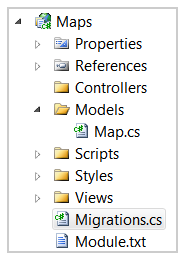
The data migration class added by the command contains a single Create () method that defines the database structure based on the Record classes in the project. Due to the fact that we have only one MapRecord file in the project with two properties of latitude and longitude, the data migration class is very simple. Please note that the Create method is called when the module function is activated, after which the database receives the corresponding update.
A line with the call to AlterPartDefinition has been added so that the part of the content that we created can join any type of content. Note the need to add a string
Now let's add a handler for our content part. An Orchard handler is a class that defines the behavior of the content part, processes events, or manipulates the data model before rendering the part on the web page. Since our map content is very simple, our class will only use IRepositoryas a structure for accessing data. Add the following contents to the Handlers \ MapHandler.cs file:
In addition, we need to add a driver for our content part. An Orchard driver is a class that defines the relationships of shapes to display in each context in which a part can be displayed. For example, when a map is displayed on a page, the Display method determines the name of the template that will be used for display depending on different displayTypes (for example, “details” or “summary”).
In the same way, the “Editor” driver method defines a template for displaying the editor of the content part (in our case, for the map this will be the input of latitude and longitude). Our part will be simple, we will use a figure named Map for both the Display context and the Editor. Add the MapDriver class, as described below:
Now we can use Visual Studio to create views for viewing and editing the content part. First add the Parts and EditorTemplates / Parts folders to the Views folder of the Maps project. Then add the files under the same name Maps.cshtml to each of the Views / EditorTemplates / Parts folders:
and Views / Parts with the following contents:
Both of these templates will subsequently appear as small parts of a large page on the site. Due to the fact that the system needs to know the order and location where parts of the content will be displayed, we need to specify this data in a special placement.info file in the root of the modules folder:
This definition tells the system that the Parts_Map figure (which is displayed using Views / Parts / Maps.cshtml) should be displayed in the Content area, if it exists, at 10 position. In addition, it is indicated that the editor should be displayed in the Primary zone in the second position.
To activate our content part of the map, go to the Modules section in the Orchard admin panel and enable it.
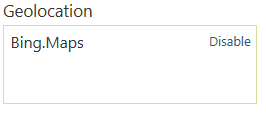
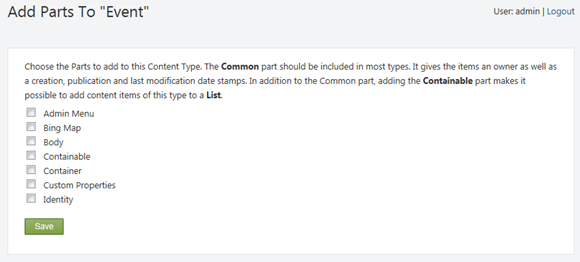
You can test the content part by simply joining any type of content in the system using the “Content Types” section in the Orchard admin panel. Let's add our content part to an existing content type, for example, the Event type that we created in the previous article Orchard CMS Extension: Creating Content Types .
On the Manage Content Types page of the administration panel, click Edit to edit the definition of the content type.

In the list of parts, click Add in order to add the content part we created for the map. The Map part will be displayed in the list of available content parts, select it and click Save.
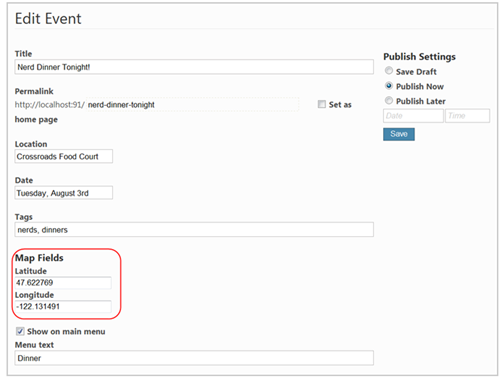
Now, go to the Manage Content section and edit the content item data. Please note that the content part of the Map added its own to the list of parameters: latitude and longitude. Enter the current location coordinates and republish the content item.
Now on the page of your site you can see the map displayed for a specific event.
You can download the finished package with the content part of the Map at this link:Orchard.Module.Maps.1.0.0.nupkg . This package is ready to install and use and contains complete source codes.
In order to get a ready-made widget from the content part, you need to update the database with a description of your widget. To do this, add the method to a special file in the content part of Migrations.cs. The following code shows such a file for the Map content part with the UpdateFrom1 method added:
In this example, the UpdateFrom1 method creates a MapWidget by combining MapPart, WidgetPart, and CommonPart, and then sets the widget's special type (stereotype). WidgetPart and CommonPart objects are built into Orchard. The method returns 2, which means the version number.
Now the content part has been transformed into a widget.
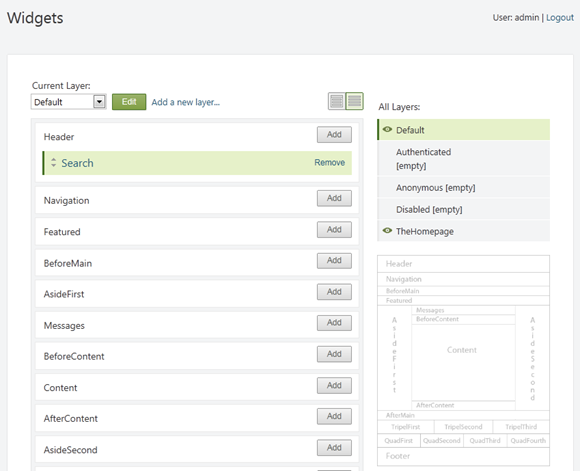
Once you have created the widget, open the administration panel and go to the Widgets tab. Here you can select the layer and zone for the location of your widget.
In this article, we examined one of the options for expanding the functionality of Orchard CMS by creating a content part and transforming it into a widget, which can later be located on any page of the site, on any layer, in any zone.
In the following articles, we will consider widget management issues and the possibility of packing and distributing the widget as a separate module.
- How to create your website from scratch using Orchard CMS. Part 1. Introduction to Orchard CMS
- How to create your website from scratch using Orchard CMS. Part 1. Introduction to Orchard CMS (cont)
- Architecture Orchard CMS. Basic concepts
- Architecture Orchard CMS. Basic concepts. Layout Concepts (cont)
- Architecture Orchard CMS. Basic concepts. Security and Development Concepts (cont 2)
- Orchard CMS Extension: Creating Content Types
This article describes the procedure for writing your own widgets through the creation of the content part, which is then transformed into a widget. This article is based on the original article Writing a content part .
Content creation
Content is a small piece of functionality or user interface that can be added to any type of content in Orchard. Examples of such parts: a route for the ability to access a content item, tags for tagging content items, a menu for the ability to add content items to user menus.
In this part, we will look at the process of creating a new content part from scratch, using the capabilities of the productive scaffolding tool Orchard. Despite the fact that we will consider development through Visual Studio, it is not necessary to have Visual Studio to create content parts, you can use any editor to your taste. In this part of the guide, we will consider creating a content part that will display a map with the ability to configure through latitude and longitude parameters.
Important. Before you start creating a file structure for your module, you need to download and install the Code Generation function in Orchard. You can find more information on this function at this link .
To start creating a new content part with a map, download the Orchard project and open it in Visual Studio.
Type "codegen module Maps / IncludeInSolution: true" at the Orchard command prompt. The “IncludeInSolution” parameter tells Orchard to add a new module project to the Orchard project list.

After executing this command, Visual Studio will ask you to reload the solution in the development environment, agree with this. After that, a new Maps project will appear in the solution, which will contain a set of files added by default so that you can create a new piece of content.
Open the Module.txt file in the root of the project, this file contains some information about your module, such as the name, description, version, author and a set of functions provided by this module. This file also contains additional information, such as dependency information. The module created by default is very simple and contains only one function, without additional dependencies. Edit Module.txt as follows:
Name: Maps
AntiForgery: enabled
Author: The Orchard Team
Website: http://orchardproject.net
Version: 1.0.0
OrchardVersion: 1.0.0
Description: Adds a map image to content items, based on longitude and latitude.
Features:
    Maps:
        Description: Adds a map image to content items, based on longitude and latitude.
        Category: Geolocation
Now, let's start creating our content part. In order to start, we need to create a file that will contain a class with a description of the data of our content part. Typically, these classes are located in the “Models” folder. Right-click on the Models folder and select Add -> Class ..., in the window that appears, name the new Maps.cs file.

In Orchard, the content part is represented by the Record class, which contains the data fields stored in the database and the ContentPart class, which uses the Record for storage. Add the MapRecord (ContentPartRecord) and MapPart (ContentPart) classes as shown below:
using System.ComponentModel.DataAnnotations;
using Orchard.ContentManagement;
using Orchard.ContentManagement.Records;
namespace Maps.Models {
    public class MapRecord: ContentPartRecord {
        public virtual double Latitude {get; set; }
        public virtual double Longitude {get; set; }
    }
    public class MapPart: ContentPart {
        [Required]
        public double Latitude
        {
            get {return Record.Latitude; }
            set {Record.Latitude = value; }
        }
        [Required]
        public double longitude
        {
            get {return Record.Longitude; }
            set {Record.Longitude = value; }
        }
    }
}
Now build the project using the Build command, in order to make sure there are no errors.

The next step is to create data migration for our map module. Why do we need a class for data migration? The reason is that simply declaring the Record and Part classes to store data does not actually affect the database. Data migration is the mechanism that tells Orchard how to update the database schema when turning on the map module on a site. Migration can also update the data scheme from the previous version to a new one, but this issue is beyond the scope of this article and we will not touch on it.
In order to create a data migration class, you can use the Orchard code generation function. Run the command "codegen datamigration Maps" on the command line.

Visual Studio will again ask you to reload the solution. After loading, you will find in the project a new class for data migration.

The data migration class added by the command contains a single Create () method that defines the database structure based on the Record classes in the project. Due to the fact that we have only one MapRecord file in the project with two properties of latitude and longitude, the data migration class is very simple. Please note that the Create method is called when the module function is activated, after which the database receives the corresponding update.
using System;
using System.Collections.Generic;
using System.Data;
using Maps.Models;
using Orchard.ContentManagement.Drivers;
using Orchard.ContentManagement.MetaData;
using Orchard.ContentManagement.MetaData.Builders;
using Orchard.Core.Contents.Extensions;
using Orchard.Data.Migration;
namespace Maps.DataMigrations {
    public class Migrations: DataMigrationImpl {
        public int Create () {
			// Creating table MapRecord
			SchemaBuilder.CreateTable ("MapRecord", table => table
				.ContentPartRecord ()
				.Column ("Latitude", DbType.Double)
				.Column ("Longitude", DbType.Double)
			);
            ContentDefinitionManager.AlterPartDefinition (
                typeof (MapPart) .Name, cfg => cfg.Attachable ());
            return 1;
        }
    }
}
A line with the call to AlterPartDefinition has been added so that the part of the content that we created can join any type of content. Note the need to add a string
using Maps.Models;to connect the assembly. Now let's add a handler for our content part. An Orchard handler is a class that defines the behavior of the content part, processes events, or manipulates the data model before rendering the part on the web page. Since our map content is very simple, our class will only use IRepository
using Maps.Models;
using Orchard.ContentManagement.Handlers;
using Orchard.Data;
namespace Maps.Handlers {
    public class MapHandler: ContentHandler {
        public MapHandler (IRepository repository) {
            Filters.Add (StorageFilter.For (repository));
        }
    }
}
In addition, we need to add a driver for our content part. An Orchard driver is a class that defines the relationships of shapes to display in each context in which a part can be displayed. For example, when a map is displayed on a page, the Display method determines the name of the template that will be used for display depending on different displayTypes (for example, “details” or “summary”).
In the same way, the “Editor” driver method defines a template for displaying the editor of the content part (in our case, for the map this will be the input of latitude and longitude). Our part will be simple, we will use a figure named Map for both the Display context and the Editor. Add the MapDriver class, as described below:
using Maps.Models;
using Orchard.ContentManagement;
using Orchard.ContentManagement.Drivers;
namespace Maps.Drivers {
    public class MapDriver: ContentPartDriver {
        protected override DriverResult Display (
            MapPart part, string displayType, dynamic shapeHelper) {
            return ContentShape ("Parts_Map", () => shapeHelper.Parts_Map (
                Longitude: part.Longitude,
                Latitude: part.Latitude));
        }
        // GET
        protected override DriverResult Editor (
            MapPart part, dynamic shapeHelper) {
            return ContentShape ("Parts_Map_Edit",
                () => shapeHelper.EditorTemplate (
                    TemplateName: "Parts / Map",
                    Model: part,
                    Prefix: Prefix));
        }
        // POST
        protected override DriverResult Editor (
            MapPart part, IUpdateModel updater, dynamic shapeHelper) {
            updater.TryUpdateModel (part, Prefix, null, null);
            return Editor (part, shapeHelper);
        }
    }
}
Now we can use Visual Studio to create views for viewing and editing the content part. First add the Parts and EditorTemplates / Parts folders to the Views folder of the Maps project. Then add the files under the same name Maps.cshtml to each of the Views / EditorTemplates / Parts folders:
@model Maps.Models.MapPart
and Views / Parts with the following contents:
Both of these templates will subsequently appear as small parts of a large page on the site. Due to the fact that the system needs to know the order and location where parts of the content will be displayed, we need to specify this data in a special placement.info file in the root of the modules folder:
This definition tells the system that the Parts_Map figure (which is displayed using Views / Parts / Maps.cshtml) should be displayed in the Content area, if it exists, at 10 position. In addition, it is indicated that the editor should be displayed in the Primary zone in the second position.
To activate our content part of the map, go to the Modules section in the Orchard admin panel and enable it.

You can test the content part by simply joining any type of content in the system using the “Content Types” section in the Orchard admin panel. Let's add our content part to an existing content type, for example, the Event type that we created in the previous article Orchard CMS Extension: Creating Content Types .
On the Manage Content Types page of the administration panel, click Edit to edit the definition of the content type.

In the list of parts, click Add in order to add the content part we created for the map. The Map part will be displayed in the list of available content parts, select it and click Save.

Now, go to the Manage Content section and edit the content item data. Please note that the content part of the Map added its own to the list of parameters: latitude and longitude. Enter the current location coordinates and republish the content item.

Now on the page of your site you can see the map displayed for a specific event.
You can download the finished package with the content part of the Map at this link:Orchard.Module.Maps.1.0.0.nupkg . This package is ready to install and use and contains complete source codes.
Turning the content part into a widget
In order to get a ready-made widget from the content part, you need to update the database with a description of your widget. To do this, add the method to a special file in the content part of Migrations.cs. The following code shows such a file for the Map content part with the UpdateFrom1 method added:
UpdateFromusing System.Data;
using Maps.Models;
using Orchard.ContentManagement.MetaData;
using Orchard.Core.Contents.Extensions;
using Orchard.Data.Migration;
namespace maps
{
public class Migrations: DataMigrationImpl
{
public int Create ()
{
// Creating table MapRecord
SchemaBuilder.CreateTable ("MapRecord", table => table
.ContentPartRecord ()
.Column ("Latitude", DbType.Single)
.Column ("Longitude", DbType.Single)
);
ContentDefinitionManager.AlterPartDefinition (typeof (MapPart) .Name, cfg => cfg
.Attachable ());
return 1;
}
public int UpdateFrom1 ()
{
// Create a new widget content type with our map
ContentDefinitionManager.AlterTypeDefinition ("MapWidget", cfg => cfg
.WithPart ("MapPart")
.WithPart ("WidgetPart")
.WithPart ("CommonPart")
.WithSetting ("Stereotype", "Widget"));
return 2;
}
}
}In this example, the UpdateFrom1 method creates a MapWidget by combining MapPart, WidgetPart, and CommonPart, and then sets the widget's special type (stereotype). WidgetPart and CommonPart objects are built into Orchard. The method returns 2, which means the version number.
Now the content part has been transformed into a widget.
Widget display
Once you have created the widget, open the administration panel and go to the Widgets tab. Here you can select the layer and zone for the location of your widget.

Conclusion
In this article, we examined one of the options for expanding the functionality of Orchard CMS by creating a content part and transforming it into a widget, which can later be located on any page of the site, on any layer, in any zone.
In the following articles, we will consider widget management issues and the possibility of packing and distributing the widget as a separate module.
