Picasa Batch Processing with ImageMagick
 At our office, we use Picasa to process many scans and photos. We have been using Picasa for several years and are very satisfied. However, Picasa does not provide all the functions we need, and some are too difficult to use in our workload. To simplify the task for our employees, I decided to automate some of the processes using two main components: the ImageMagick set of console utilities , and the rather little-known Picasa Button API .
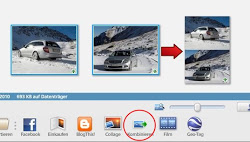
 As an example, I will describe a small application that we use to combine several images into one, with one click directly from the Picasa interface. Having a little understanding with ImageMagick, you can easily modify this code for other tasks.
Part 1: the button in Picasa
First, we need a button in the Picasa interface that will launch our ImageMagick script. To create such a button using the Button API, we take the following steps:
1. We write the PBF file.
PBF is essentially a simple XML file that describes our button. Here is the code for my PBF file:
Although the entire code is enclosed in a buttons container , only one button can be described in a single file.
Pay attention to the GUID in the button / id attribute . For each button you need to generate your own GUID. Also the name of the PBF file includes this GUID, {ca234ae3-6340-40c3-a46b-51a126bb887c} .pbf in my example.
The label and tooltip elements do not require much explanation. The next important element is action ; it describes what happens when you click our button. The Picasa Button API provides several different button functions; we use a simple launch of an executable file that will run a script called stitch.cmdlocated in S: \ Tools \ ( S: \ is the shared folder on the office server). I will explain the script itself later.
2. Draw the icon (optional) .
You can enable your own icon for our button. The icon should be in the PSD file named according to the same scheme with the GUID ( {ca234ae3-6340-40c3-a46b-51a126bb887c} .psd in my example), in one layer. When using the icon, you need to include an additional line in PBF, inside the button element :
3. We pack the button in PBZ.
PBZ is nothing more than a regular ZIP archive containing our PBF (and PSD with an icon, if we use it), with the extension .pbz . This file is the installation package for our button for Picasa, so it should be called meaningfully: Picasa distinguishes installed buttons by the names of their PBZ packages. One PBZ can contain several PBF files for several buttons, with different GUIDs.
Part 2: ImageMagick script
Since ImageMagick provides console utilities for image processing, bat scripts are the easiest way to automate it. Here is the code for my stitch.cmd script , which combines several images vertically into one:
@echo off
cd /D "C:\Program Files\ImageMagick-6.7.1-Q16"
rem --- Output filename
set OUTFOLDER=%~dp1
set OUTFILENAME="%OUTFOLDER%Collage.jpg"
rem --- Imagemagick
for /f "delims=" %%a in ('identify -format "%%[fx:w]" %1') do @set WIDTH=%%a
montage -mode concatenate -resize %WIDTH% -tile 1x %* %OUTFILENAME%
When a script is called by clicking a button from Picasa, the full file names of all selected images are passed to it as arguments.
First, let's go to the folder where our ImageMagick is installed to avoid possible PATH problems. Then we will generate the name of the finished image, taking the full path from the first file (first argument) and adding our own file name.
Now we use a small bat-hack: using the for loop, we consider the output of the command ( identify from the ImageMagick package) to a variable. This gives us the width of the first image. Finally, we call montage and use it to combine all the images into one, passing the command all the image names and the output file name.
Part 3: installation
Setting a button in Picasa is somewhat nontrivial. Picasa does not allow you to install PBZ directly, only through a special URL from a browser. We need to arrange our PBZ so that it is accessible by reference via http: // ; I have a development server installed on my system, so I used it. Here is the link code for setting the button:
InstallOpen the file with the link in any browser and click. Picasa opens and asks which buttons to install (there is only one choice, if there is one button in our PBZ), and how to place them on the button bar. We make a choice and confirm. Done.