DSL D-link D2650u router for non-DSL provider
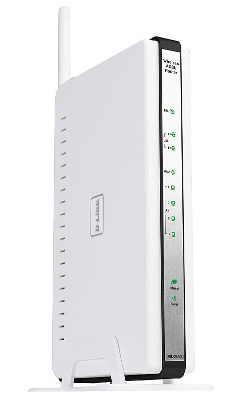 In stock : A D-link DSL2650U router that has a built-in DSL modem, a 4-port switch and one USB input and a non-DSL provider (regular twisted pair and DHCP on the other end of the wire). Revision of the router: D, Board ID: 96358VW2.
 Problem : There is no place to insert a provider twisted pair, since there is no Ethernet WAN port, but just the switch does not work with the provider.
Solution : Reconfigure one of the LAN ports as a WAN.
The article will be in the format of step-by-step instructions on how to solve this problem. Since I spent a lot of time searching and tasting information, I decided to write a post about this in order to systematize and help people solve a similar problem.
Build the firmware
There is nothing similar about the Ethernet WAN port in the standard firmware, so the Internet was examined for the presence of custom firmware. Of the supported ones, OpenWRT was found (DD-WRT does not support), but there is no official support. This means that there are no ready-made assemblies and you need to patch and compile from the source yourself.
The wiki page has a page with a description of the router and a patch for the source. The whole point of the patch is to add a new build platform in the Makefile, while the platform description is already in the trunk version.
- we pull source codes with SVN
svn co svn.openwrt.org/openwrt/branches/backfire backfire - add two lines with our router
after
to the file
# D-Link DSL-2650U

$(call Image/Build/CFE,$(1),96358VW2,6358,DSL2650U)
# D-Link DSL-2740B
$(call Image/Build/CFE,$(1),96358GW,6358,DSL2740B)target/linux/brcm63xx/image/Makefile - we do
make menuconfigto configure the assembly (maybe an optional item, but I did it), and replace the created file.configwith the file from the release:downloads.openwrt.org/backfire/10.03.1-rc5/brcm63xx/config(you need to download the fileconfigand rename it to.config) - After that, just
makewait for the assembly to complete.
bin/brcm63xxwith images for all supported routers will appear . We need a file openwrt-DSL2650U-squashfs-cfe.bin.Flashing the router
The first attempt to feed this file to update the firmware through the web interface of the router failed - the web interface returned a non-informative error stating that this image cannot be flashed.
There was also an attempt to flash through tftp. The principle is simple, that at boot, the bootloader starts the tftp server, and if you catch the moment, you can fill in the firmware. How many times I have not played with rebooting the router, there was no result. You can read here .
At this stage, my hands fell and I reconciled with the purchase of a new router, when I suddenly found on the Internet that there is a firmware mode without checking the correctness of the firmware.
To call this mode, you need to hold down the reset button, turn on / restart the router and hold the (reset) button for 10 seconds. After that, when entering the web interface, the router will offer to download the firmware. Having decided to take a chance (it is possible to make a brick out of a router), load the firmware there, wait two minutes and lo and behold, on our OpenWRT router.
Customization
We have a router with OpenWRT, without a web interface, although the web server is working and shows a void.
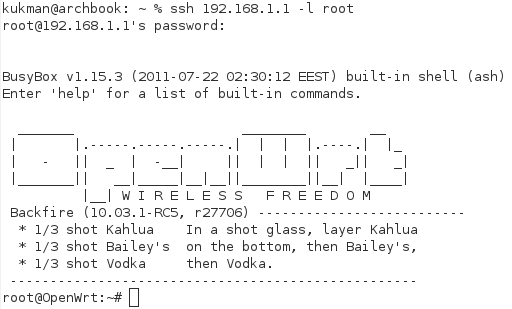
First you need to go to the router through
telnet, and, having executed the command passwd, assign the root password. After that, we can communicate with the router on the ssh: ssh root@192.168.1.1. As it turned out, flashing the router was not the biggest problem, because you still need to smartly configure the network. Break a lot of documentation, we understand what needs to be done through VLAN - virtual networks. It is necessary to break the switch ports into separate subnets, and configure forwarding. Following this wiki page , edit the file
/etc/config/network.Our switch interface coincides with the one assumed in the manual - this is eth1, and we want to move the fourth LAN port to a separate subnet, so we can copy most of the config from the documentation. The only difference is that we do not have an actual WAN port (it is, but not output), so we do not create a separate extranet , but edit the wan section by changing
ifname eth0to ifname eth1.1. The advantage of this change is that everything in the router is initially configured to distribute the Internet from wan to lan . Full config: Restart the network service by executing the command Empirically, it was revealed that port 3
config 'switch' 'eth1'

 option 'enable' '1'

 option 'enable_vlan' '1'

 option 'reset' '1'


config 'switch_vlan'

 option 'vlan' '0'

 option 'device' 'eth1'

 option 'ports' '0 1 2 5t'


config 'switch_vlan'

 option 'vlan' '1'

 option 'device' 'eth1'

 option 'ports' '3 5t'


config 'switch_port'

 option 'port' '3'

 option 'pvid' '1'


config interface loopback

 option ifname lo

 option proto static

 option ipaddr 127.0.0.1

 option netmask 255.0.0.0


config interface lan

 option type bridge

 option ifname eth1.0

 option proto static

 option ipaddr 192.168.1.1

 option netmask 255.255.255.0

 option nat 1


config interface wan

 option ifname eth1.1

 option proto dhcp
/etc/init.d/network restartin the config corresponds to the real first port. Since I was satisfied with this option, I did not try it yet, but I suspect that port 0 will be the real fourth port.
We stick the Internet wire into the first wire, and enjoy the distribution of the Internet. If you need to connect via VPN, firmware and such can.
Finishing touches
To configure Wifi, you need to edit the file
/etc/config/wireless. Wi-Fi setup is described here . The most common web interface is Luci. To install, when the Internet is connected, you need to do: As a result, we have a full-fledged linux on the router, on which you can raise torrent clients, all kinds of caching services, proxies, etc. And since there is a USB connector, you can make a network storage or an Internet rocking chair. The disadvantage of OpenWRT is that we lose the function of the DSL modem, but since the lack of DSL prompted such a solution, this is not critical. Useful links:
opkg update

opkg install luci