Kango - a framework for creating cross-browser extensions
Introduction
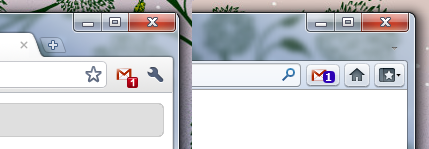
Kango allows you to create extensions for popular browsers using only JavaScript, and the code is the same for all browsers. Currently supported by Chrome, Firefox, Internet Explorer (in the public domain only version with support for Chrome and Firefox) and work is underway on support for Opera and Safari. Below we will consider how to quickly create a simple cross-browser Gmail Checker.What should be the result:

Preparing Your Kango Environment
To get started with Kango, you need to perform a couple of steps:- Install Python version 2.7 ( http://www.python.org/download/ )
- Download from the link and unzip the archive with the framework into any folder.
Create a new project
We create a folder for the project on the disk and run kango.py from the framework folderd:\dev\kango\kango.py createNow you can proceed to writing the code for your extension.
In the future, the name and version of the extension can be installed using the file common \ extension_info.json.
Writing a Gmail Checker
The extension will periodically check the number of unread messages on Gmail and displays this number on a button in the browser.After creating the project, go to the src \ common folder and see that the source template in the main.js file has already been created for us.
Extension Initialization
We subscribe to the UI module readiness event. You need to use it because our extension has visual components, namely a button in the browser.
kango.ui.addEventListener(kango.ui.event.Ready, function() {
    return new MyExtension();
});
Get the number of unread emails
The number of unread messages can be obtained at https://mail.google.com/mail/feed/atom in Atom 0.3 format (for correct operation, the user must be logged in to Gmail in the current browser).
For AJAX requests, the kango.xhr.send method is used .
var details = {
    url: 'https://mail.google.com/mail/feed/atom',
    method: 'GET',
    async: true,
    contentType: 'xml'
};
kango.xhr.send(details, function(data) {
    if(data.status == 200) {
   	 var doc = data.response;
   	 var count = doc.getElementsByTagName('fullcount')[0].childNodes[0].nodeValue;
    }
});
Display the number of messages on the button
Button properties are controlled using the kango.ui.browserButton object ._setUnreadCount: function(count) {
kango.ui.browserButton.setTooltipText('Unread count: ' + count);
kango.ui.browserButton.setIcon('icons/icon16.png');
kango.ui.browserButton.setBadge((count != 0) ? {text: count} : null);
}
Putting it all together
Add a timer that will check the number of new messages and error handling with a given frequency, as a result, you get something like this code:function GmailChecker() {
var self = this;
self.refresh();
kango.ui.browserButton.addEventListener(kango.ui.browserButton.event.Command, function() {
self.refresh();
});
window.setInterval(function(){self.refresh()}, self._refreshTimeout);
}
GmailChecker.prototype = {
_refreshTimeout: 60*1000*15, // 15 minutes
_feedUrl: 'https://mail.google.com/mail/feed/atom',
_setOffline: function() {
kango.ui.browserButton.setTooltipText('Offline');
kango.ui.browserButton.setIcon('icons/icon16_gray.png');
kango.ui.browserButton.setBadge(null);
},
_setUnreadCount: function(count) {
    kango.ui.browserButton.setTooltipText('Unread count: ' + count);
    kango.ui.browserButton.setIcon('icons/icon16.png');
    kango.ui.browserButton.setBadge((count != 0) ? {text: count} : null);
},
refresh: function() {
var details = {
url: this._feedUrl,
method: 'GET',
async: true,
contentType: 'xml'
};
var self = this;
kango.xhr.send(details, function(data) {
if(data.status == 200) {
var doc = data.response;
var count = doc.getElementsByTagName('fullcount')[0].childNodes[0].nodeValue;
self._setUnreadCount(count);
}
else { // something went wrong
self._setOffline();
}
});
}
};
kango.ui.addEventListener(kango.ui.event.Ready, function() {
return new GmailChecker();
});
A total of 50 lines of code for the extension, which will work under all popular browsers.
Icons
In the common / icons folder you need to put PNG icons under the names icon16.png, icon32.png, icon48.png, icon128.png in sizes of 16x16, 32x32, 48x48, 128x128 pixels respectively, as well as the icon16_gray.png icon to display inactive status .Project assembly
To build the project, run kango.py with the build argument and the path to the project folder
d:\dev\kango\kango.py build ./
To build the Chrome extension, you need installed Google Chrome for Windows, or Chromium for Linux.
The output should be gmailchecker_0.1.0.xpi and gmailchecker_0.1.0.crx, which are ready-made extension files. For Chrome, a gmailchecker.pem file will also be generated so that the extension can be updated later.
Further perspectives
Most of the APIs are in the closed beta testing phase and soon a version will be available for public access with the possibility of modifying the contents of the pages (full access to the DOM) and the ability to open pop-up HTML windows by clicking on the button.References
- Complete Sources for the Gmail Checker Example
- Freymovrk itself
- Documentation of the framework's
