DIY quadcopter: Part I
ATTENTION, the article is outdated, but it can still be used for educational purposes.
 As promised, as soon as I fly, I will write a full-fledged post about the assembly of my flying unit. Surely many people have long looked at how a “regular” office worker collects this in 2 hours , I’ll immediately note that I am not a “regular” office worker, so the pilot from me is not very good, but it is important that the quadrocopter flies and responds adequately to control. The first and most important thing - if you decide to collect, do not save and do not think that you are smarter than those who are already flying, just keep in mind that the theory is somewhat at odds with practice.
There are a large number of firmware, ready-made controllers, sensor options, motors, etc. etc. - there is something to choose from, but in the article I will focus only on one option based on Arduino Mega, MegaPirate firmware and relatively cheap sensors.
In order not to torment you,% username%, like this it flies without special settings, calibrations and balancing in inept hands:
And now what do we need for this ...
The most important and minimum that is required to build from scratch (the first in the list is what I used, then what many others use):
Suppose that you already have everything above and that you can start drilling, soldering and twisting.
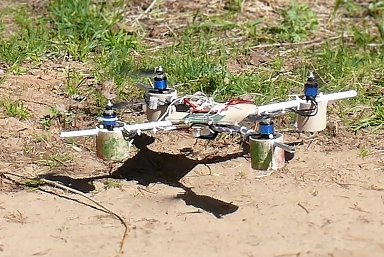
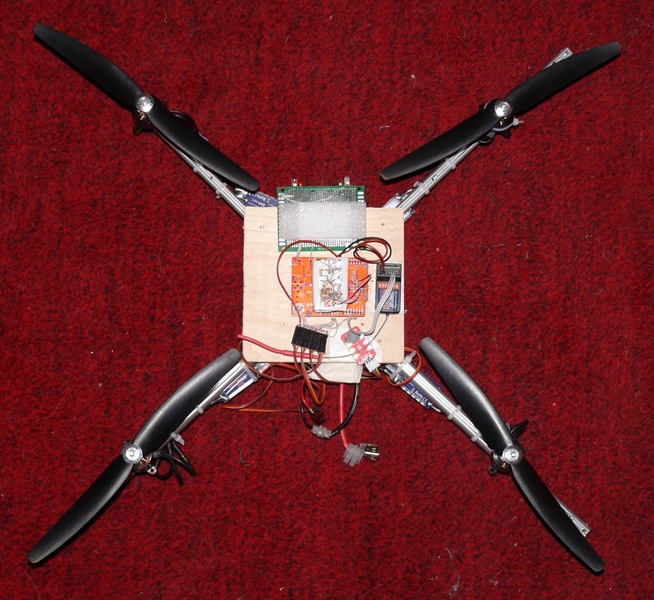
We make a frame for what, the main thing is that the distance from the center to the ends of the rays is the same, the propellers during rotation do not touch each other and the central part (plywood), since it will have brains, sensors and possibly a camera. Sensors are best installed on thick tape, silicone or rubber to reduce vibration. At the ends or in the middle of the beams, rubber balls, polystyrene foam or dense paralon can be inserted as a chassis for a soft landing.
I got something like this (the battery is attached on the other hand, in the photo there is an old version of the copter’s brains with MultiWii firmware , which I was not lucky with): it’s
not very beautiful, but it flies
And now the attention is the jambs, which you can stumble out of ignorance and the necessary information:
Continuation of
PS: I hope people in the RC theme will forgive me for inaccuracies and correct where necessary.
As promised, as soon as I fly, I will write a full-fledged post about the assembly of my flying unit. Surely many people have long looked at how a “regular” office worker collects this in 2 hours , I’ll immediately note that I am not a “regular” office worker, so the pilot from me is not very good, but it is important that the quadrocopter flies and responds adequately to control. The first and most important thing - if you decide to collect, do not save and do not think that you are smarter than those who are already flying, just keep in mind that the theory is somewhat at odds with practice.There are a large number of firmware, ready-made controllers, sensor options, motors, etc. etc. - there is something to choose from, but in the article I will focus only on one option based on Arduino Mega, MegaPirate firmware and relatively cheap sensors.
Result
In order not to torment you,% username%, like this it flies without special settings, calibrations and balancing in inept hands:
And now what do we need for this ...
Details and prices
The most important and minimum that is required to build from scratch (the first in the list is what I used, then what many others use):
| Quadrocopter itself | ||
|---|---|---|
| Motors: 4 pieces are better to take 1 more, useful | hacker Style Brushless Outrunner 20-22L 924kv | $ 12.88 |
| hexTronik DT700 Brushless Outrunner 700kv | $ 10.95 | |
| 2213N 800Kv Brushless Motor | $ 7.36 | |
| Propellers: at least 2 standard and 2 reverse rotations at the beginning of attempts and tests, this will be the main consumables, so take a lot at once, at the same time some of them will be defective and not suitable for use | 10X6 Propellers ( 5pcs ) 10X6R Propellers (5pcs) | $ 2.40 $ 3.04 |
| APC 10x4.7 counter rotating propellers set | $ 8.50 | |
| Speed controllers: 4 pieces must be bought, like motors with a margin, maybe a defect or accidentally burns out and then wait a month for a new one | HobbyKing 30A BlueSeries Brushless Speed Controller aka Mystery 30A BlueSeries | $ 10.47 $ 13.96 |
| TURNIGY Plush 25amp Speed Controller | $ 11.81 | |
| The power source with increasing capacity grows and weight, which means the motors will consume more, so there is little point in taking a super capacious battery, it is better to take 2-3 small ones and change them | Turnigy 2200mAh 3S 30C Lipo | $ 13.79 |
| ZIPPY Flightmax 2800mAh 3S1P 30C | $ 17.76 | |
| We try to make the frame as light and durable as possible. | 4 aluminum tubes or 10x10 profile and a piece of plywood | disassemble aluminum tripod |
| HobbyKing Quadcopter Frame V1 | $ 14.99 | |
| Brains and Sensors | ||
| Programmable microcontroller | Seeeduino mega | $ 43.00 |
| Arduino mega | $ 64.90 | |
| Sensors I recommend immediately taking AllInOne or FFIMU scarf, as the remaining sensors will be very useful later | gyroscope ITG3205 accelerometer BMA020 | WMP $ 7.98 BMA020 230RUR |
| All In One (ITG3200 gyroscope, BMA180 accelerometer, BMP085 barometer, HMC5883L magnetometer) | $ 99.80 | |
| FreeFlight IMU 1.22L | € 84.00 | |
| Control Equipment and Charger | ||
| Control equipment at least 4 channels | Hobby King 2.4Ghz 4Ch Tx & Rx V2 (Mode 2) | $ 22.99 |
| Turnigy 9X 9Ch (Mode 2) | $ 53.79 | |
| Battery for equipment | Mystery 11.1V 2200mAh | $ 12.72 |
| AA 600mAH Ni-MH Battery Set (8pc) | $ 1.99 | |
| Charger | iMAX B6 2.5 "LCD RC Lipo Battery Balance Charger | $ 36.50 |
| Turnigy Accucel-6 50W 6A Balancer / Charger | $ 22.99 | |
| Other | ||
| it will also require wires, bolts, screws, ties, a drill, a soldering iron with soldering accessories and more or less straight arms | ||
| TOTAL from about $ 220 | ||
Assembly and adjustment of iron
Suppose that you already have everything above and that you can start drilling, soldering and twisting.
We make a frame for what, the main thing is that the distance from the center to the ends of the rays is the same, the propellers during rotation do not touch each other and the central part (plywood), since it will have brains, sensors and possibly a camera. Sensors are best installed on thick tape, silicone or rubber to reduce vibration. At the ends or in the middle of the beams, rubber balls, polystyrene foam or dense paralon can be inserted as a chassis for a soft landing.
I got something like this (the battery is attached on the other hand, in the photo there is an old version of the copter’s brains with MultiWii firmware , which I was not lucky with): it’s
not very beautiful, but it flies
And now the attention is the jambs, which you can stumble out of ignorance and the necessary information:
- The receiver must be paired with the transmitter - it is written in the instructions
- Speed controllers (ESC) need to be calibrated! To do this, we connect all 4 ESCs together: ground (black) and the signal wire (white or yellow) and leave ONE power wire (red), then insert it into the third channel of the receiver, as well as connect the power wires and connect the motors to the regulators. After that, on the turned-on transmitter, put the throttle stick (third channel) to the maximum position (up) and connect the power source to the speed controllers, cheerfully squeak the motors, then lower the throttle stick down and the motors squeak again - hooray, we calibrated the control
- Often speed regulators also need to be programmed, read the instructions for your regulators about this, the main point is to increase the reaction speed by increasing the frequency and setting the instant reaction mode, rather than a gradual set of revolutions. This can be done both by listening to endless beeps, and using special programming cards .
- In order for the motors to rotate in the opposite direction, you need to swap any two wires
- Put the propellers last - they cut your hands very well
- Motors, like propellers often require balancing, to reduce vibration, for this, take the usual cable ties and fasten 1-2 to the motor, rotate and turn it on until you feel minimal vibration. In more detail, as well as with the video it is better to read on a specialized forum
Continuation of
PS: I hope people in the RC theme will forgive me for inaccuracies and correct where necessary.