FPV
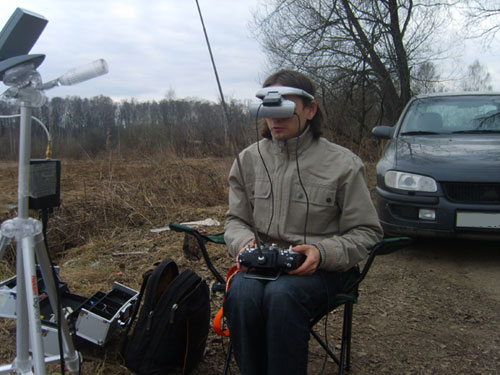
This article is for those who since childhood dream of flying like a bird. Immediately make a reservation, in real life you will not fly, but the feelings will be very close. So, we are talking about FPV (first person view) flights. FPV is a new movement in aircraft modeling, its essence is to control the model of an airplane through a camera installed on board. You get a picture from the plane in real time and see through the glasses of “virtual reality”. Also, a head rotation sensor is installed on the glasses and the camera on the plane rotates after the turns of your head. You have a genuine sense of real presence. And you control the plane on the radio channel. From the side it looks something like this:
But here's how it looks from the inside:
The topic of FPV has already been raised on the hub ; I will try to open it and deepen it. My article turned out to be more overview with a do-it-yourself bias. The FPV topic itself is very voluminous and in the following articles I plan to describe everything in detail.
Let's start with the worst - with the price. In modern modelism, the phrase “made by myself” means bought parts, assembled and configured. Although, there are lovers who like to pick up a jigsaw and a soldering iron, but this is aerobatics, first we assemble from a ready-made one.
The table lists what we need and how much it costs.
* Required components.
All the proposed component options can be replaced by analogues, I only offered what I personally bought, or would buy. The links to the stores were not taken from the ceiling; all of these stores were personally checked by me.
If you weren’t afraid of prices, then we went on.
I suggest using the EasyStar . This aircraft has become the standard for FPV, it has a bunch of different gadgets and a huge number of articles and discussions . The aircraft itself is sold as an assembly kit. To assemble the aircraft you only need super glue with an activator . There is no sense in describing the collection process itself, there is an instruction in the kit, and to spoil something there is simply unrealistic, a German-made aircraft, so everything is clear and beautiful there. Above all, do not forget to glue the motor and servos. 3 hours of work - and your plane will be ready to fly, well, 10 minutes to wash your hands from glue :-).
Radio equipment consists of a transmitter and a receiver. Servo drives already connected by you are connected to the receiver. Servo drives drive the aircraft.
In the price table, I indicated a link to Futaba 10CG 2.4GHz equipment . I’ll immediately warn you that this is expensive equipment, but there are several pitfalls here. If you want to use a head rotation sensor, then, in fact, there are no more options except for a footaba - you won’t be able to connect a head rotation sensor without crutches to all other equipment sets, and it’s not a fact that it will work as it should. You can choose futaba easier, but, it seems to me, this is the last century. It’s not worth going down below Futaba 9, not the fact that our head rotation sensor will work, but Futaba 9 is an outdated model.
Video equipment we will use analog. I agree, this is the last century, but, unfortunately, I have not yet found a digital radio link with a reasonable price. In the table I indicated links to equipment with a frequency of 900 MHz, and this is no accident. The fact is that our RC equipment operates at a frequency of 2.4 GHz and, in order not to interfere with it, we select an AV radio link with a frequency farther away. 900 MHz suits us well. The video transmitter will have a capacity of 800mW, this is enough for us to fly off the base by about 2-3km, for a start, I think, above the roof.
Especially for our aircraft they sell a camera turning device . All video equipment can be hung on it, as a result we get a kind of candy bar.
We glue it according to the following video instructions:
In the video equipment kit, all contacts are of the tulip type, we tear them off and solder them tightly, we are making an airplane, not a tank - we save every gram. We glue the camera and video transmitter on double-sided tape. As a result, you should get something in the form of this.
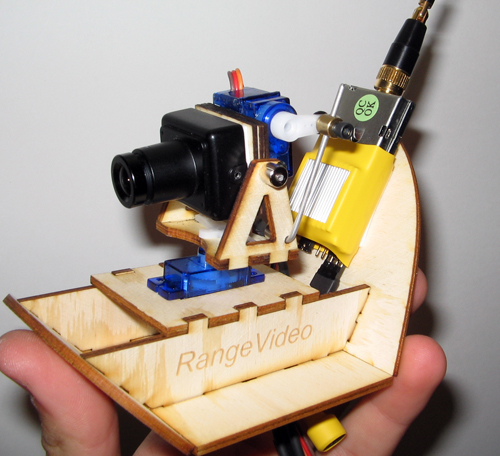
All this should clearly fit into the groove for the aircraft lantern.
For a video receiver, I recommend purchasing a path antenna . With it, the quality of the received video signal will increase at times, but there will be one BUT. The Path antenna has a directivity pattern and therefore it is better to fly in a sector in which the antenna efficiency is best, or so that no matter who helps you and directs the antenna to the plane.
All ground equipment is connected very simply, all connectors and wires are included. Connect the antenna to the receiver, then the glasses, and apply all this power and you see the picture from the plane in the glasses.
To complete the sensations, the aircraft can be equipped with telemetry. Telemetry displays information about your speed, altitude, distance from the base, horizon, etc. on top of the image. Many telemetry kits are equipped with an autopilot, which can, in the event of a loss of radio signal, return the aircraft to base. I will not advise which telemetry to take, everyone is good. There is even a purely Russian development from smalltim . For example, I soldered mine, maybe somehow I will write an article about this.
The plane is ready, the video equipment is working, everything seems to be ready to fly, but you have no piloting experience, and you are reluctant to smash such a lot of money into chips in the first flight. Fans of flight simulators can argue with me, but I agree the principle of flight is very similar and it will be much easier for you, but in addition to first-person control, you will need to learn how to control the aircraft from the side. To save money, our brother came up with a simulator of aircraft models. I recommend PhoenixRC .

Included is a disk with the program and the wiring for connecting the transmitter to the computer. Of course, I understand that piracy is a bad thing, but I will say in secret that postings can be bought cheaper, or even soldered yourself, and the program is generally free to download from torrents, only shhhh.
I advise you to fly a couple of weeks on the simulator and then try in real life. It’s better for the first time to fly surrounded by knowledgeable people. On the forum of modelers, you can find the site closest to you.
I wish you a successful flight!
Links:
Branch on the Russian-language forum dedicated to FPV
Branch on the English-language forum dedicated to FPV
But here's how it looks from the inside:
The topic of FPV has already been raised on the hub ; I will try to open it and deepen it. My article turned out to be more overview with a do-it-yourself bias. The FPV topic itself is very voluminous and in the following articles I plan to describe everything in detail.
Let's start with the worst - with the price. In modern modelism, the phrase “made by myself” means bought parts, assembled and configured. Although, there are lovers who like to pick up a jigsaw and a soldering iron, but this is aerobatics, first we assemble from a ready-made one.
The table lists what we need and how much it costs.
| Airplane * | R 2628 |
| Engine * | $ 9.69 |
| Controller for brushless motor * | 1350r |
| Servos * | 2x 570 rub |
| Battery * | 1800 rub |
| Radio equipment * | $ 579 |
| Charger * | $ 24.99 |
| Video Transmitter * | $ 65 |
| Video receiver * | $ 65 |
| Camera * | $ 95 |
| Points * | $ 275 |
| Path antenna * | $ 55 |
| Camera rotation device | $ 35 |
| Head rotation sensor | $ 55 |
| Telemetry | $ 335 |
* Required components.
All the proposed component options can be replaced by analogues, I only offered what I personally bought, or would buy. The links to the stores were not taken from the ceiling; all of these stores were personally checked by me.
If you weren’t afraid of prices, then we went on.
Airplane
I suggest using the EasyStar . This aircraft has become the standard for FPV, it has a bunch of different gadgets and a huge number of articles and discussions . The aircraft itself is sold as an assembly kit. To assemble the aircraft you only need super glue with an activator . There is no sense in describing the collection process itself, there is an instruction in the kit, and to spoil something there is simply unrealistic, a German-made aircraft, so everything is clear and beautiful there. Above all, do not forget to glue the motor and servos. 3 hours of work - and your plane will be ready to fly, well, 10 minutes to wash your hands from glue :-).
Radio equipment
Radio equipment consists of a transmitter and a receiver. Servo drives already connected by you are connected to the receiver. Servo drives drive the aircraft.
In the price table, I indicated a link to Futaba 10CG 2.4GHz equipment . I’ll immediately warn you that this is expensive equipment, but there are several pitfalls here. If you want to use a head rotation sensor, then, in fact, there are no more options except for a footaba - you won’t be able to connect a head rotation sensor without crutches to all other equipment sets, and it’s not a fact that it will work as it should. You can choose futaba easier, but, it seems to me, this is the last century. It’s not worth going down below Futaba 9, not the fact that our head rotation sensor will work, but Futaba 9 is an outdated model.
Video equipment
Video equipment we will use analog. I agree, this is the last century, but, unfortunately, I have not yet found a digital radio link with a reasonable price. In the table I indicated links to equipment with a frequency of 900 MHz, and this is no accident. The fact is that our RC equipment operates at a frequency of 2.4 GHz and, in order not to interfere with it, we select an AV radio link with a frequency farther away. 900 MHz suits us well. The video transmitter will have a capacity of 800mW, this is enough for us to fly off the base by about 2-3km, for a start, I think, above the roof.
Especially for our aircraft they sell a camera turning device . All video equipment can be hung on it, as a result we get a kind of candy bar.
We glue it according to the following video instructions:
In the video equipment kit, all contacts are of the tulip type, we tear them off and solder them tightly, we are making an airplane, not a tank - we save every gram. We glue the camera and video transmitter on double-sided tape. As a result, you should get something in the form of this.
All this should clearly fit into the groove for the aircraft lantern.
For a video receiver, I recommend purchasing a path antenna . With it, the quality of the received video signal will increase at times, but there will be one BUT. The Path antenna has a directivity pattern and therefore it is better to fly in a sector in which the antenna efficiency is best, or so that no matter who helps you and directs the antenna to the plane.
All ground equipment is connected very simply, all connectors and wires are included. Connect the antenna to the receiver, then the glasses, and apply all this power and you see the picture from the plane in the glasses.
Telemetry
To complete the sensations, the aircraft can be equipped with telemetry. Telemetry displays information about your speed, altitude, distance from the base, horizon, etc. on top of the image. Many telemetry kits are equipped with an autopilot, which can, in the event of a loss of radio signal, return the aircraft to base. I will not advise which telemetry to take, everyone is good. There is even a purely Russian development from smalltim . For example, I soldered mine, maybe somehow I will write an article about this.
Flight preparation
The plane is ready, the video equipment is working, everything seems to be ready to fly, but you have no piloting experience, and you are reluctant to smash such a lot of money into chips in the first flight. Fans of flight simulators can argue with me, but I agree the principle of flight is very similar and it will be much easier for you, but in addition to first-person control, you will need to learn how to control the aircraft from the side. To save money, our brother came up with a simulator of aircraft models. I recommend PhoenixRC .
Included is a disk with the program and the wiring for connecting the transmitter to the computer. Of course, I understand that piracy is a bad thing, but I will say in secret that postings can be bought cheaper, or even soldered yourself, and the program is generally free to download from torrents, only shhhh.
I advise you to fly a couple of weeks on the simulator and then try in real life. It’s better for the first time to fly surrounded by knowledgeable people. On the forum of modelers, you can find the site closest to you.
I wish you a successful flight!
Links:
Branch on the Russian-language forum dedicated to FPV
Branch on the English-language forum dedicated to FPV