Slaughter kit
For all my reviews, I assign the tag " review ". Today this tag has been replenished with another entry - the Wacom Intuos4 tablet became the hero of the review - this is again not a hot new season, but such devices do not get worse with time.
For several years I was the proud owner of the Wacom Intuos3 A5 tablet , which I bought as a student at the institute’s elementary courses ... I received a birthday present - guests came in the evening, but I couldn’t tear myself away from the new toy)
It was a long time ago, but as I remember now, I took a tablet for ten and a half thousand - since then prices have risen "by format" ... actually, like the size of my monitor. If you had to be content with a “tag” with an aspect ratio of 4: 3, now it’s a widescreen 24-inch display, on which it became simply impossible to work with a 4: 3 tablet - you draw a circle, but you get an oval. In principle, in the tablet’s settings for drawing, you can use only part of the tablet, but in my understanding, all this is crutches.
In general, I sold the assistant faithfully to the girl designer at the lepro flea market, which she is still very happy with;) But I myself remained at the trough - there was nothing left to do but lick at the HD version of the tablet and save money on new "intuos".

Thanks to Santa Claus - since the new year I have become fully armed, thanks to the “slaughter kit” - I became the proud owner of Wacom Intuos4 A5 (16:10), in the box with which came the licensed Adobe Photoshop Lightroom 3 . The kit (by and large it’s just an action) is really called the “ Slaughter Kit ” - I would never buy a lightroom separately, but when it is put into the box as a bonus, then it’s a sin to refuse. All the same, not every day they report good software into the box, which helps in processing photos. Although here I lied a little - the Adobe Camera RAW integrated in Photoshop helps me more, but I repeat - licensed disochka in our time does not hurt. To celebrate, I decided to share my impressions of the device, although you can’t name it new. Why joy? Because this is a really awesome device! :) So, the key points.
Tablets :
Input Devices :

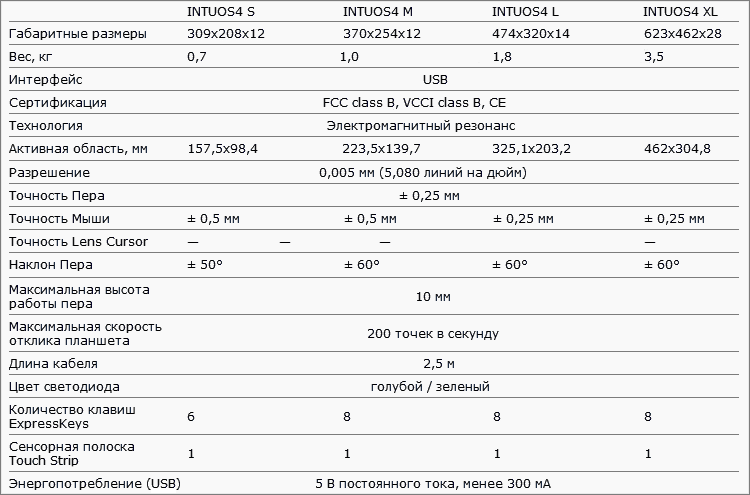
For comparison, the technical specifications of Intuos3 tablets and input devices for them.
Price : Wacom Intuos4 S - from 8500 rubles, M - from 14000, L - from 19500, XL - from 29000.
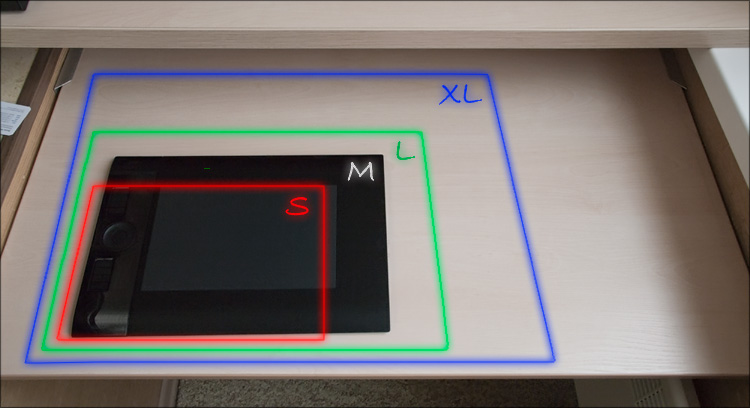
The smallest size, a kind of Barbie size, is S (the work area is almost like an A6 format sheet). Following it, as mine is M (analogue of A5). There are two more king-sizes - L (A4) and XL (A3), but they are simply huge and cost accordingly. However, a choice is provided - look here according to your needs. Practice has shown that the A5 format was quite enough for me - I don't draw as much as retouch the photos, that is, most of the movements are concentrated in about one place and rarely have a large amplitude.
The box is large enough even at the "emka", since the space inside is not used very rationally - a lot of space is allocated for the "protection" of the tablet around the perimeter. Content:

- Wacom Intuos4 M tablet
- Intuos4 Grip Pen and accessories for it:
- Inkstand
- Replaceable rubber pen
- 10 interchangeable tips
- 3 interchangeable decorative rings
- Wire for USB-miniUSB connection
- Disk with Adobe Lightroom
- Paper box

Good a set ... moreover, the bundle itself is rich not so much in it as in the ability to "add on to itself" the main working tool, the Wacom digital pen.
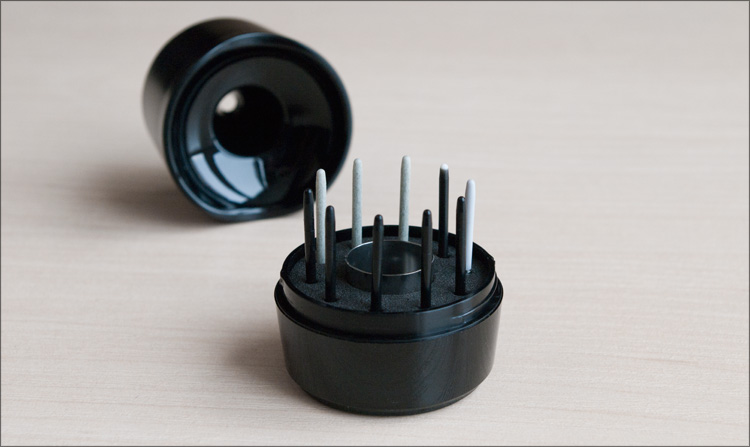
I wrote that 10 replaceable tips come with the tablet, but I was surprised when I did not find them in the set. As it turned out later, this is a fairly common “problem” - everything is there, you just have to open the instructions) In general, these comrades will no longer have to randomly wallow in the drawer - now there is a specially designated place for all the feathers, which will always be at hand. Simply put, the tips are hidden in the “inkwell” (in the opening stand for the pen) - all the decorative rings from the kit fit in the same place later (I previously installed red on the pen).
Who, ask, need these rings? Imagine some kind of “design office” where 5 people are sitting at the tablets ... each pen is individual and has its own settings - can you imagine how sinister it would be to joke if all the feathers were the same? And here it’s immediately clear that a black feather with a red ring is mine) In general, Wacom well thought over even such trifles - offset!
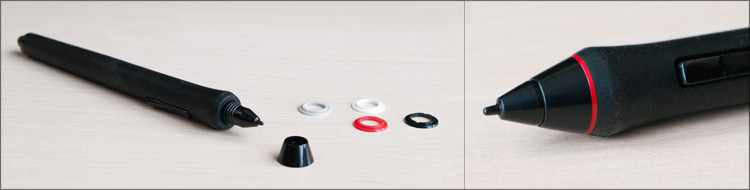
There are different tips - black, white, red ... just kidding, there are no red ones, but there is even a spring (for hatching) and an imitation brush (for aesthetes). This is something like interchangeable optics in the “DSLRs” - different lenses serve different tasks, although in many cases a whale lens is also suitable for undemanding users. I left that core, which was originally, although nothing prevents you from more carefully adjusting the tool for yourself, experimenting with the nature of the interaction of the pens and the working surface of the tablet.
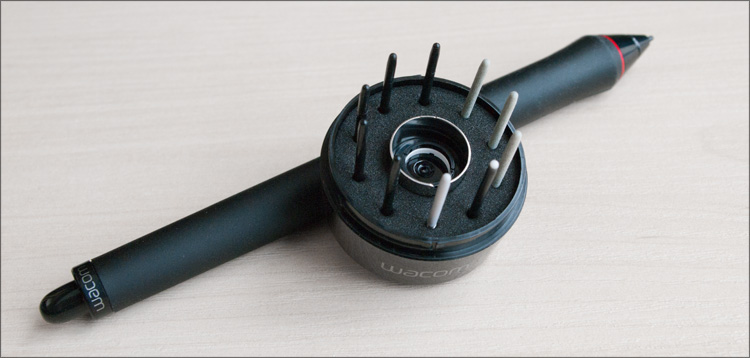
The pen can be put in the “inkwell” or put on it - for this case a small relief recess is provided.

Finally, you can change the rubber grip of the pen, replacing it with a “bottle-shaped” pen - I didn’t do it either, because I got used to the shape that the pen from the kit had for a long time - it’s almost the same as in Intuos3, only black.
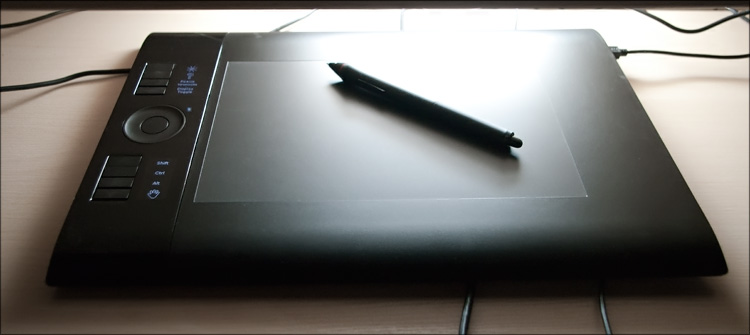
Dimensions (in particular, height) and shape remained unchanged. Most of the space is occupied by smooth matte plastic, the sensory part of which has a clear border - in fact, in this area you will have to crawl back and forth with the pen.

The area of the working area is much smaller than the area of the entire tablet - the reason is the empty space around the entire perimeter; This is done so that the tablet can be equally conveniently used for both right-handed and left-handed people - there is always a place in the palm of your hand where she can lie down to rest, without constantly changing the tablet level to the table level.
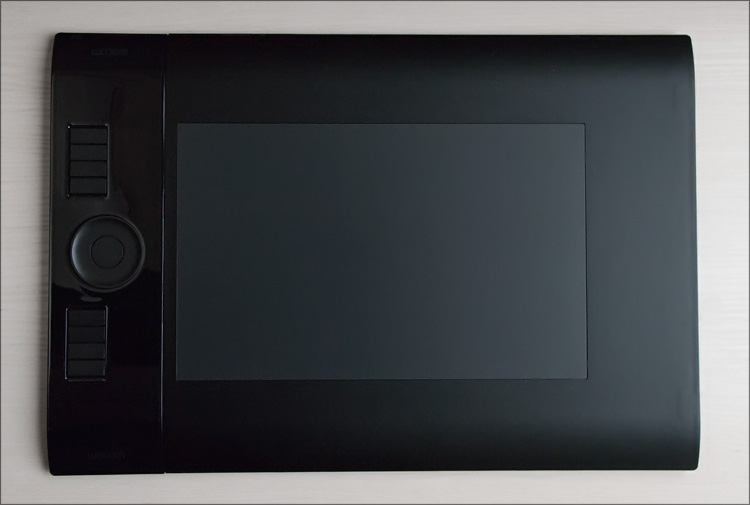
The first change in the tablet that catches your eye is that now all the functional elements are located on one side of the workspace, and not on the two, as before. And it’s very convenient - now you don’t need to drag one of the hands to the control buttons to switch functions - one hand will already be on them all the time, while the other hand will be occupied only with a pen. Accordingly, there will be no situations with a cross arrangement of hands, you will never need to reach anywhere, which means you will not have to break away from drawing.

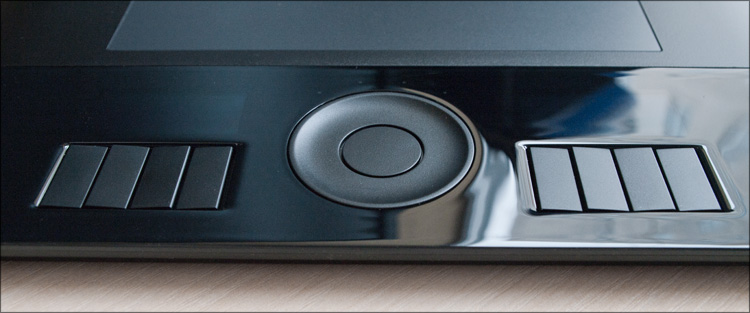
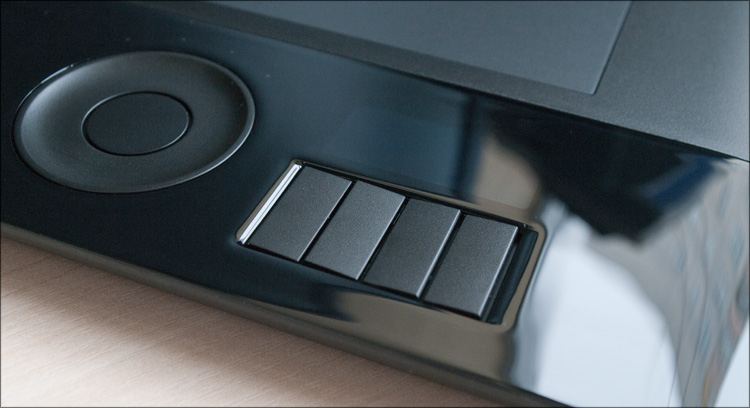
As I said, the left side of the tablet (well, or the right one - depending on how to position it), where all the controls are located, took the brunt of the blow. Among them - a touch ring with a button in the center, as well as two columns of buttons, 4 in each - above and below the ring.
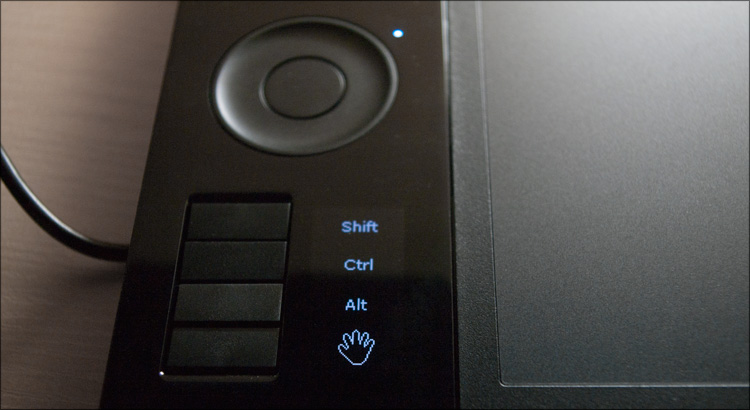
Near these buttons are OLED displays (with adjustable backlight brightness), on which nothing is displayed before installing the drivers. But then ... then there you can output anything you want. And to be more precise, the values of the functions assigned to the buttons are displayed there.
The circle is slightly depressed so that it can always be found by touch. Next to it there are four LEDs that light up cyclically from pressing the central button - it switches the various modes of operation of this circle in the currently open application.
Other buttons are also embossed and located at a slight angle to each other. Pressing moderately elastic - perhaps, what is needed for continuous use. But I didn’t like the gloss around - not by the quality of execution, but by its presence. I hoped that at least he wouldn’t be here ... I was
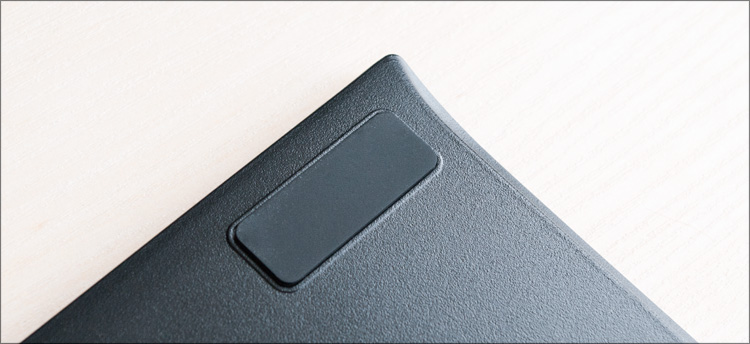
pleasantly surprised by the only moving part of the tablet - a small die on the side, behind which there is a miniUSB-connector for connecting wires. More precisely, there are two connectors behind it, and by moving this plate, you can decide which port will be open - all these subtleties come in handy for different device orientations. It’s only a pity that, by and large, there is nowhere to remove the wire - as I did not try to hide it, he kept bulging all the time ...

On the back there are 4 rubber legs that fix the tablet quite well on the table.
At the moment, the latest driver for Windows is version 6.1.6-7 (14 Mb) dated 6.12.2010. Installation takes 1 minute and passes without problems - that everything worked (in fact, the pen worked before, but not at full strength), you will learn from the illuminated indicators on the tablet.
The appearance of the shell for setting up the tablet remained the same, but something has changed. Once upon a time I wrote an article about the “fine-tuning" of the tablet to work in Adobe Photoshop, and, apparently, everything can be repeated for the new version; well, or just speculate with users on this topic.
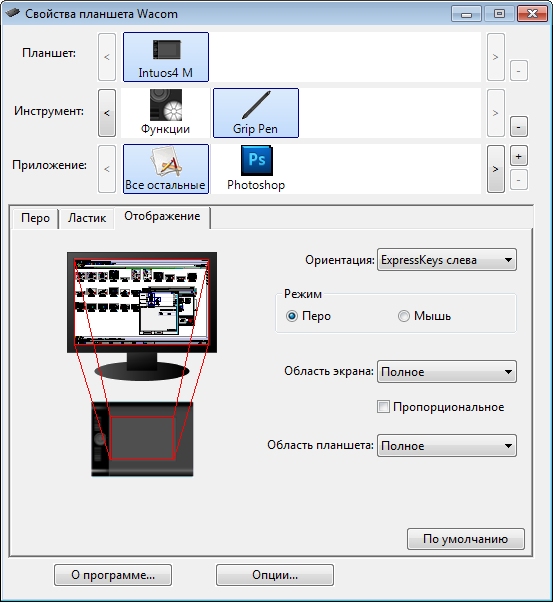
So, the program window. At the very top there is a section in which the current tablet is displayed (there can be several devices), the tools connected to it (pen, mouse, airbrush, etc.) and applications (Photoshop, Lightroom and all others) - I only had a tablet one, so I had to configure only the last two points.
The pen and all the buttons on the tablet lend themselves to customization tools. The pen is configured with three elements - two buttons (which are made by one “rocker” and have the official name DuoSwitch ) and the reverse side, which by default acts as an eraser. Buttons are the most “programmable” - you can hang anything on them.
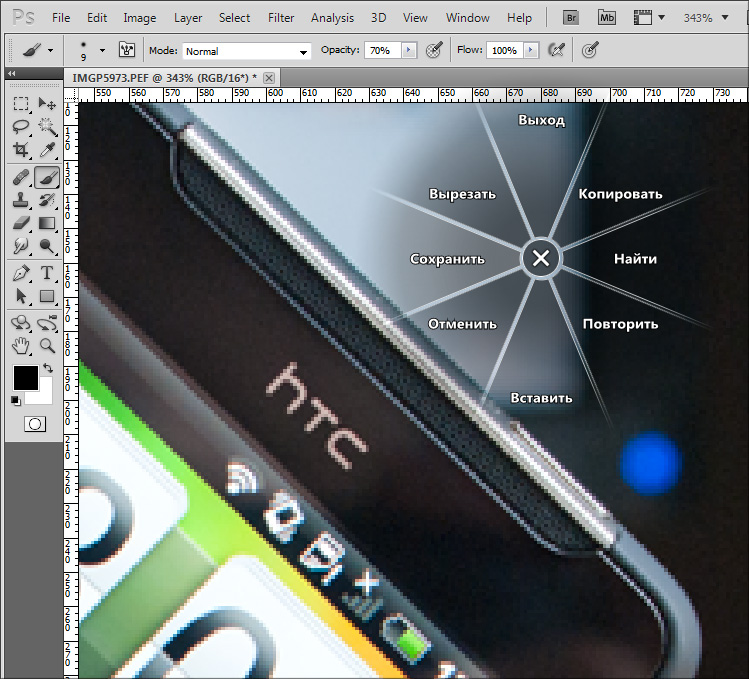
One of the most interesting items is the “Circular menu”, which I’ll talk about below, but for now I’ll just apply the screen:
As before, there is the ability to change the sensitivity of the pen to pressure, click and tilt. Only this time there were twice as many degrees of pressure - 2048 versus 1024 for Intuos3; in the settings window there is an indicator that clearly demonstrates the efforts made. On the practical side, the 1024 and 2048 pressure levels do not differ much, well, or I just didn’t notice this difference. Although ... a certain abstract effect in the smoother lines may be, but, I repeat, it is not obvious and equally comfortable you can work on both versions of the tablet.
The eraser on the back is also customizable, but not so flexible - really, why, if turning the pen back and forth takes time and is not very convenient in practice. Although, if you hang up the “right-click” function on the eraser in most applications, you will learn the basics of “pen spinning” pretty soon, since the shape and weight of the pen contribute to this) The
settings of the tablet’s elements seem much more interesting to me - perhaps this is what is the main "coolness" of the new version of intuos.
To begin with, the available 8 buttons are also programmed as you like - some of them I recommend to leave as modifier keys (Alt-Ctrl-Shift), another part - at your discretion (for the most popular functions), and any of those closest to the circle buttons to configure as a "circular menu". As a result, you will get the most flexible system in which the range of hand movements will be minimal ... and moreover, this approach will allow you to move the keyboard to the far box, which was not achieved on Intuos3 even with the “ Popup Menu ” setting . One of the buttons can be set to "Help" so that when you click on the screen, the values of all the buttons on the tablet are displayed.

I will explain what the chip is. Circular menu- an interface element, which is a circle of 8 sectors - it will appear after pressing the specified button. Each sector can be assigned any function, for which it is enough to enter the desired key combination and display name ... but one of the most interesting functions, again, is the ability to "hang up" a call to a sector of a circular menu, only already nested.

The software allows you to customize the menu to three levels of nesting, that is, for each program, we have the ability to set as many and as few as 512 actions! This is 100% enough for any program, not only for a novice user, but also for a professional; I’ll say more - it’s unlikely that you memorize at least 256 hotkey combinations in the same photoshop, which means that for most actions you will climb the program menu, choosing the right one — on the monitor with a large diagonal (24-30 '') you will do many unnecessary action, wasting time. And here, given that the center of this circular menu will always be at the point of the current position of the pen, the choice of the desired sector requires minimal movement of the hand - so that in addition to saving time and effort, the keyboard can indeed be pushed to the side (it will be needed, except for text input). But,
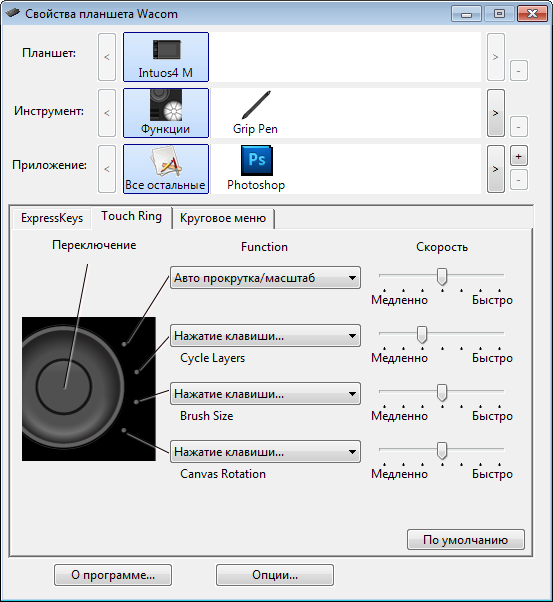
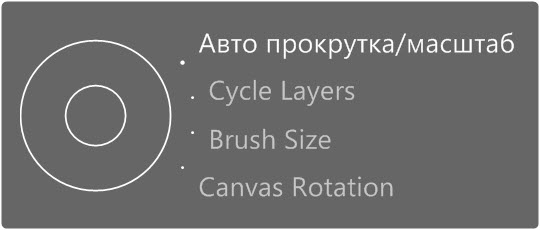
In general, the circular menu alone is worth what ... but Intuos4 also has a Touch Ring with a button, which I wrote about above. This control made the usability of the tablet full and irrevocable) By pressing the button in the center of the circle, we switch 4 different actions, the values of which are also displayed on the screen. For the same photoshop, it’s “Scrolling / Zoom”, “Cycle Layers”, “Brush size” and “Canvas Rotation”; hotkeys were not initially set for some values, so assign them to make it work :)
Accordingly, when you select "scroll and zoom", moving your finger in a circle will scroll through the document or scale it. Click in the center again and with a short movement select the layer we need. We press the button again and we already have the brush size adjusted for the upcoming action. Another click and we can rotate the canvas to draw more conveniently - all this is done without the keyboard! Interesting for the sake of it, I decided to compare the difference in time spent on such a sequence of actions - for this I had to do the same combination of actions on the tablet, on the keyboard and mouse on the screen.
 Mouse. Select the “Zoom” tool, zoom in the document. Select the desired layer on the layer panel, switch to the Brush tool and select the desired brush size in the drop-down menu. Next, select the “Rotate View Tool” there, rotate the canvas, switch to the brush and start drawing. Total - 10 seconds.
Keyboard . Click "Z" (or "Ctrl +"), scale. Using the combination "Alt + [" select the desired layer. “B” (brush), “]” or “[” to resize the brush. Then press “Shift + H” to select the canvas rotation tool (this combination must be assigned in the Photoshop settings, since initially only a hand is assigned to “H”, as well as to the “space”) and rotate the canvas.
Tablet . On the first attempt, I completed it in 3 seconds, although I was still not very well accustomed and not used to new opportunities - I think that with the habit and in the presence of a smart system, it will be possible to do all the actions even faster. Moreover, I want to note that the savings here are not only in time (after all, for scale, layer selection and rotation it is not necessary to switch from the “brush” at all), but also in the number of movements - you simply either press the button with one finger or you drive it in a circle. Like it or not, it’s very convenient!
The tablet has another interesting feature - " Accuracy mode". Initially, this mode is on one of the buttons - by pressing it, the cursor movements “slow down” twice as compared to the real movement. This cursor behavior makes it possible to more accurately and thoughtfully work out any details of the image, and this is not at all the same as drawing with a pen twice as slow.
 Rich equipment
High-quality plastic, good assembly
Pen settings - tips, rings, gum
Works on Windows and Mac; an abundance of tablet settings
A separate item - TouchRing and ExpressKey with screens
Sophisticated ergonomics - suitable for left-handed and right-handed people, in any orientation
Detailed instruction
 Subjective: glossy inserts in the housing
No groove for wire (it is only in the XL version)
High price
On the manufacturer’s website, I I also found information that there is a Wireless version (Bluetooth) of Wacom tablets, which has its advantages. But I have not seen such a device on sale.
* UPD *: I learned that the Wireless versionThe tablet is sold only in Europe, in size it is like a cross between A6 and A5. Whether it will be sold in Russia is still an open question.
I pay attention to the following features :
Intuos4 S has only 6 ExpressKey keys, and without screens
Intuos4 S has only one USB connector and it
has an integrated wire without an Intuos4 XL cover , that is, it is not removable.
The tablet can work both in pen mode, so and in mouse mode
On tablets of size L and XL there is a special layout, thanks to which the work surface can be divided into 2 parts (QuickPoint) - for drawing and for quick navigation on the screen.
Each pen has a unique identifier, which means that even two outwardly the same pen will have different settings. To add a new tool, just touch the surface of the tablet.
The feathers from Intuos3 and Intuos4 are incompatible. I
’m adding this article, and my head is spinning a line from one song:
“ ... Find a tablet with a clothespin in A5 format, again everywhere only A4 - I’m sick of looking! ... ”
© Casta, “Billion years old ". I wonder what clothespin are we talking about? ;)
Wacom Intuos4 is hardly revolutionary, therefore, to some extent, a miracle did not happen. But on the other hand, the evolution of the series went the right way. Since Intuos3 existed, manufacturers have accumulated negative reviews and suggestions for improving functionality and ergonomics - as a result of which in Intuos 4 we received not only a higher level of comfort from work, but also a really thought-out tool for professionals. I’m almost used to the new tablet, although I can’t find the time to properly configure the drivers for the most commonly used applications.
I summarize. If you have an entry-level tablet, such as Bamboo or Graphire ... and you feel that it is not enough for you - it makes sense to switch to Intuos4. If you have Intuos3, then the meaning of the transition is not so obvious - yes, the new version of the tablet has a lot of goodies, but do not forget that all these updates are poured into a round coin. Although I can’t say that I regret the transition - on the contrary, it’s hard for me to hide the joy that I’m fully armed again) I can safely advise this device to those who have the need to at least sometimes "jumble".
It was a long time ago, but as I remember now, I took a tablet for ten and a half thousand - since then prices have risen "by format" ... actually, like the size of my monitor. If you had to be content with a “tag” with an aspect ratio of 4: 3, now it’s a widescreen 24-inch display, on which it became simply impossible to work with a 4: 3 tablet - you draw a circle, but you get an oval. In principle, in the tablet’s settings for drawing, you can use only part of the tablet, but in my understanding, all this is crutches.
In general, I sold the assistant faithfully to the girl designer at the lepro flea market, which she is still very happy with;) But I myself remained at the trough - there was nothing left to do but lick at the HD version of the tablet and save money on new "intuos".
Thanks to Santa Claus - since the new year I have become fully armed, thanks to the “slaughter kit” - I became the proud owner of Wacom Intuos4 A5 (16:10), in the box with which came the licensed Adobe Photoshop Lightroom 3 . The kit (by and large it’s just an action) is really called the “ Slaughter Kit ” - I would never buy a lightroom separately, but when it is put into the box as a bonus, then it’s a sin to refuse. All the same, not every day they report good software into the box, which helps in processing photos. Although here I lied a little - the Adobe Camera RAW integrated in Photoshop helps me more, but I repeat - licensed disochka in our time does not hurt. To celebrate, I decided to share my impressions of the device, although you can’t name it new. Why joy? Because this is a really awesome device! :) So, the key points.
Specifications
Tablets :
Input Devices :
For comparison, the technical specifications of Intuos3 tablets and input devices for them.
Price : Wacom Intuos4 S - from 8500 rubles, M - from 14000, L - from 19500, XL - from 29000.
Equipment
The smallest size, a kind of Barbie size, is S (the work area is almost like an A6 format sheet). Following it, as mine is M (analogue of A5). There are two more king-sizes - L (A4) and XL (A3), but they are simply huge and cost accordingly. However, a choice is provided - look here according to your needs. Practice has shown that the A5 format was quite enough for me - I don't draw as much as retouch the photos, that is, most of the movements are concentrated in about one place and rarely have a large amplitude.
The box is large enough even at the "emka", since the space inside is not used very rationally - a lot of space is allocated for the "protection" of the tablet around the perimeter. Content:
- Wacom Intuos4 M tablet
- Intuos4 Grip Pen and accessories for it:
- Inkstand
- Replaceable rubber pen
- 10 interchangeable tips
- 3 interchangeable decorative rings
- Wire for USB-miniUSB connection
- Disk with Adobe Lightroom
- Paper box
Good a set ... moreover, the bundle itself is rich not so much in it as in the ability to "add on to itself" the main working tool, the Wacom digital pen.
Customization
I wrote that 10 replaceable tips come with the tablet, but I was surprised when I did not find them in the set. As it turned out later, this is a fairly common “problem” - everything is there, you just have to open the instructions) In general, these comrades will no longer have to randomly wallow in the drawer - now there is a specially designated place for all the feathers, which will always be at hand. Simply put, the tips are hidden in the “inkwell” (in the opening stand for the pen) - all the decorative rings from the kit fit in the same place later (I previously installed red on the pen).
Who, ask, need these rings? Imagine some kind of “design office” where 5 people are sitting at the tablets ... each pen is individual and has its own settings - can you imagine how sinister it would be to joke if all the feathers were the same? And here it’s immediately clear that a black feather with a red ring is mine) In general, Wacom well thought over even such trifles - offset!
There are different tips - black, white, red ... just kidding, there are no red ones, but there is even a spring (for hatching) and an imitation brush (for aesthetes). This is something like interchangeable optics in the “DSLRs” - different lenses serve different tasks, although in many cases a whale lens is also suitable for undemanding users. I left that core, which was originally, although nothing prevents you from more carefully adjusting the tool for yourself, experimenting with the nature of the interaction of the pens and the working surface of the tablet.
The pen can be put in the “inkwell” or put on it - for this case a small relief recess is provided.
Finally, you can change the rubber grip of the pen, replacing it with a “bottle-shaped” pen - I didn’t do it either, because I got used to the shape that the pen from the kit had for a long time - it’s almost the same as in Intuos3, only black.
Appearance
Dimensions (in particular, height) and shape remained unchanged. Most of the space is occupied by smooth matte plastic, the sensory part of which has a clear border - in fact, in this area you will have to crawl back and forth with the pen.
The area of the working area is much smaller than the area of the entire tablet - the reason is the empty space around the entire perimeter; This is done so that the tablet can be equally conveniently used for both right-handed and left-handed people - there is always a place in the palm of your hand where she can lie down to rest, without constantly changing the tablet level to the table level.
The first change in the tablet that catches your eye is that now all the functional elements are located on one side of the workspace, and not on the two, as before. And it’s very convenient - now you don’t need to drag one of the hands to the control buttons to switch functions - one hand will already be on them all the time, while the other hand will be occupied only with a pen. Accordingly, there will be no situations with a cross arrangement of hands, you will never need to reach anywhere, which means you will not have to break away from drawing.
As I said, the left side of the tablet (well, or the right one - depending on how to position it), where all the controls are located, took the brunt of the blow. Among them - a touch ring with a button in the center, as well as two columns of buttons, 4 in each - above and below the ring.
Near these buttons are OLED displays (with adjustable backlight brightness), on which nothing is displayed before installing the drivers. But then ... then there you can output anything you want. And to be more precise, the values of the functions assigned to the buttons are displayed there.
The circle is slightly depressed so that it can always be found by touch. Next to it there are four LEDs that light up cyclically from pressing the central button - it switches the various modes of operation of this circle in the currently open application.
Other buttons are also embossed and located at a slight angle to each other. Pressing moderately elastic - perhaps, what is needed for continuous use. But I didn’t like the gloss around - not by the quality of execution, but by its presence. I hoped that at least he wouldn’t be here ... I was
pleasantly surprised by the only moving part of the tablet - a small die on the side, behind which there is a miniUSB-connector for connecting wires. More precisely, there are two connectors behind it, and by moving this plate, you can decide which port will be open - all these subtleties come in handy for different device orientations. It’s only a pity that, by and large, there is nowhere to remove the wire - as I did not try to hide it, he kept bulging all the time ...
On the back there are 4 rubber legs that fix the tablet quite well on the table.
Software
At the moment, the latest driver for Windows is version 6.1.6-7 (14 Mb) dated 6.12.2010. Installation takes 1 minute and passes without problems - that everything worked (in fact, the pen worked before, but not at full strength), you will learn from the illuminated indicators on the tablet.
The appearance of the shell for setting up the tablet remained the same, but something has changed. Once upon a time I wrote an article about the “fine-tuning" of the tablet to work in Adobe Photoshop, and, apparently, everything can be repeated for the new version; well, or just speculate with users on this topic.
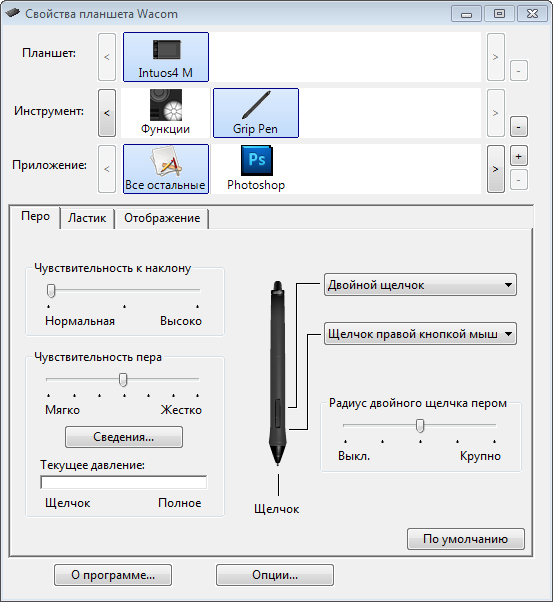
So, the program window. At the very top there is a section in which the current tablet is displayed (there can be several devices), the tools connected to it (pen, mouse, airbrush, etc.) and applications (Photoshop, Lightroom and all others) - I only had a tablet one, so I had to configure only the last two points.
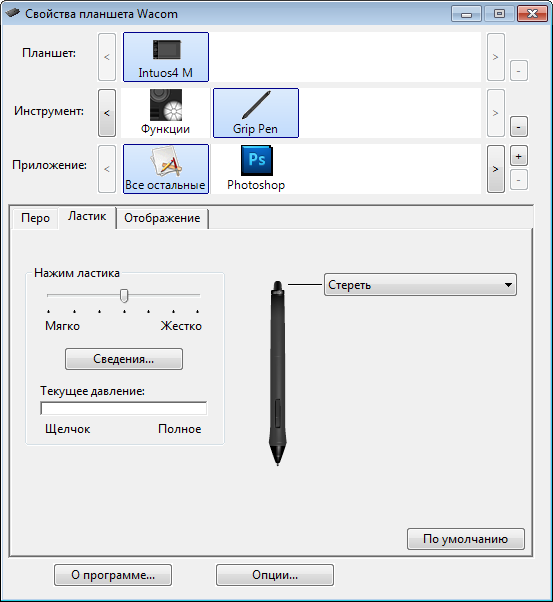
The pen and all the buttons on the tablet lend themselves to customization tools. The pen is configured with three elements - two buttons (which are made by one “rocker” and have the official name DuoSwitch ) and the reverse side, which by default acts as an eraser. Buttons are the most “programmable” - you can hang anything on them.
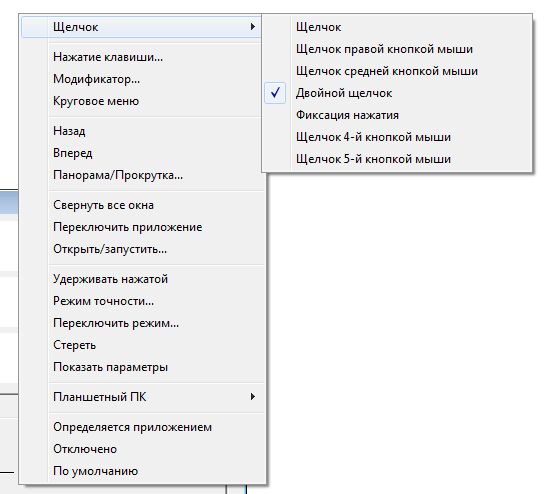
One of the most interesting items is the “Circular menu”, which I’ll talk about below, but for now I’ll just apply the screen:
As before, there is the ability to change the sensitivity of the pen to pressure, click and tilt. Only this time there were twice as many degrees of pressure - 2048 versus 1024 for Intuos3; in the settings window there is an indicator that clearly demonstrates the efforts made. On the practical side, the 1024 and 2048 pressure levels do not differ much, well, or I just didn’t notice this difference. Although ... a certain abstract effect in the smoother lines may be, but, I repeat, it is not obvious and equally comfortable you can work on both versions of the tablet.
The eraser on the back is also customizable, but not so flexible - really, why, if turning the pen back and forth takes time and is not very convenient in practice. Although, if you hang up the “right-click” function on the eraser in most applications, you will learn the basics of “pen spinning” pretty soon, since the shape and weight of the pen contribute to this) The
settings of the tablet’s elements seem much more interesting to me - perhaps this is what is the main "coolness" of the new version of intuos.
To begin with, the available 8 buttons are also programmed as you like - some of them I recommend to leave as modifier keys (Alt-Ctrl-Shift), another part - at your discretion (for the most popular functions), and any of those closest to the circle buttons to configure as a "circular menu". As a result, you will get the most flexible system in which the range of hand movements will be minimal ... and moreover, this approach will allow you to move the keyboard to the far box, which was not achieved on Intuos3 even with the “ Popup Menu ” setting . One of the buttons can be set to "Help" so that when you click on the screen, the values of all the buttons on the tablet are displayed.
I will explain what the chip is. Circular menu- an interface element, which is a circle of 8 sectors - it will appear after pressing the specified button. Each sector can be assigned any function, for which it is enough to enter the desired key combination and display name ... but one of the most interesting functions, again, is the ability to "hang up" a call to a sector of a circular menu, only already nested.
The software allows you to customize the menu to three levels of nesting, that is, for each program, we have the ability to set as many and as few as 512 actions! This is 100% enough for any program, not only for a novice user, but also for a professional; I’ll say more - it’s unlikely that you memorize at least 256 hotkey combinations in the same photoshop, which means that for most actions you will climb the program menu, choosing the right one — on the monitor with a large diagonal (24-30 '') you will do many unnecessary action, wasting time. And here, given that the center of this circular menu will always be at the point of the current position of the pen, the choice of the desired sector requires minimal movement of the hand - so that in addition to saving time and effort, the keyboard can indeed be pushed to the side (it will be needed, except for text input). But,
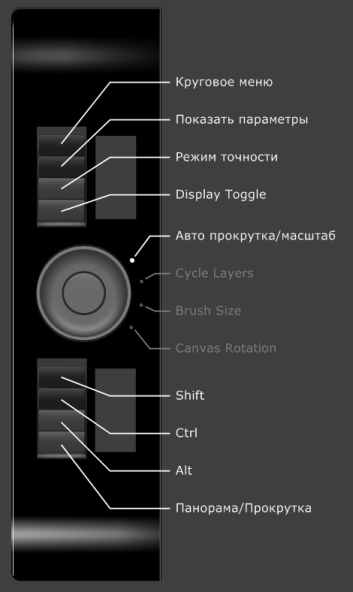
In general, the circular menu alone is worth what ... but Intuos4 also has a Touch Ring with a button, which I wrote about above. This control made the usability of the tablet full and irrevocable) By pressing the button in the center of the circle, we switch 4 different actions, the values of which are also displayed on the screen. For the same photoshop, it’s “Scrolling / Zoom”, “Cycle Layers”, “Brush size” and “Canvas Rotation”; hotkeys were not initially set for some values, so assign them to make it work :)
Accordingly, when you select "scroll and zoom", moving your finger in a circle will scroll through the document or scale it. Click in the center again and with a short movement select the layer we need. We press the button again and we already have the brush size adjusted for the upcoming action. Another click and we can rotate the canvas to draw more conveniently - all this is done without the keyboard! Interesting for the sake of it, I decided to compare the difference in time spent on such a sequence of actions - for this I had to do the same combination of actions on the tablet, on the keyboard and mouse on the screen.
Mouse. Select the “Zoom” tool, zoom in the document. Select the desired layer on the layer panel, switch to the Brush tool and select the desired brush size in the drop-down menu. Next, select the “Rotate View Tool” there, rotate the canvas, switch to the brush and start drawing. Total - 10 seconds. Keyboard . Click "Z" (or "Ctrl +"), scale. Using the combination "Alt + [" select the desired layer. “B” (brush), “]” or “[” to resize the brush. Then press “Shift + H” to select the canvas rotation tool (this combination must be assigned in the Photoshop settings, since initially only a hand is assigned to “H”, as well as to the “space”) and rotate the canvas.Z → CTRL + → ALT + [→ B → [→ Shift + H- It took 6 seconds to do everything.
Tablet . On the first attempt, I completed it in 3 seconds, although I was still not very well accustomed and not used to new opportunities - I think that with the habit and in the presence of a smart system, it will be possible to do all the actions even faster. Moreover, I want to note that the savings here are not only in time (after all, for scale, layer selection and rotation it is not necessary to switch from the “brush” at all), but also in the number of movements - you simply either press the button with one finger or you drive it in a circle. Like it or not, it’s very convenient! The tablet has another interesting feature - " Accuracy mode". Initially, this mode is on one of the buttons - by pressing it, the cursor movements “slow down” twice as compared to the real movement. This cursor behavior makes it possible to more accurately and thoughtfully work out any details of the image, and this is not at all the same as drawing with a pen twice as slow.
 Pros and cons
Rich equipment High-quality plastic, good assembly Pen settings - tips, rings, gum Works on Windows and Mac; an abundance of tablet settings A separate item - TouchRing and ExpressKey with screens Sophisticated ergonomics - suitable for left-handed and right-handed people, in any orientation Detailed instruction Subjective: glossy inserts in the housing No groove for wire (it is only in the XL version) High price On the manufacturer’s website, I I also found information that there is a Wireless version (Bluetooth) of Wacom tablets, which has its advantages. But I have not seen such a device on sale.
* UPD *: I learned that the Wireless versionThe tablet is sold only in Europe, in size it is like a cross between A6 and A5. Whether it will be sold in Russia is still an open question.
I pay attention to the following features :
Intuos4 S has only 6 ExpressKey keys, and without screens Intuos4 S has only one USB connector and it has an integrated wire without an Intuos4 XL cover , that is, it is not removable. The tablet can work both in pen mode, so and in mouse mode On tablets of size L and XL there is a special layout, thanks to which the work surface can be divided into 2 parts (QuickPoint) - for drawing and for quick navigation on the screen.Each pen has a unique identifier, which means that even two outwardly the same pen will have different settings. To add a new tool, just touch the surface of the tablet. The feathers from Intuos3 and Intuos4 are incompatible. I ’m adding this article, and my head is spinning a line from one song:
“ ... Find a tablet with a clothespin in A5 format, again everywhere only A4 - I’m sick of looking! ... ”
© Casta, “Billion years old ". I wonder what clothespin are we talking about? ;)
Conclusion
Wacom Intuos4 is hardly revolutionary, therefore, to some extent, a miracle did not happen. But on the other hand, the evolution of the series went the right way. Since Intuos3 existed, manufacturers have accumulated negative reviews and suggestions for improving functionality and ergonomics - as a result of which in Intuos 4 we received not only a higher level of comfort from work, but also a really thought-out tool for professionals. I’m almost used to the new tablet, although I can’t find the time to properly configure the drivers for the most commonly used applications.
I summarize. If you have an entry-level tablet, such as Bamboo or Graphire ... and you feel that it is not enough for you - it makes sense to switch to Intuos4. If you have Intuos3, then the meaning of the transition is not so obvious - yes, the new version of the tablet has a lot of goodies, but do not forget that all these updates are poured into a round coin. Although I can’t say that I regret the transition - on the contrary, it’s hard for me to hide the joy that I’m fully armed again) I can safely advise this device to those who have the need to at least sometimes "jumble".