February 5, 2011 at 22:57
Activate disabled VT-x
A friend wrote once to me with a Samsung r60 laptop. The processor in this laptop supports hardware virtualization, but by default it is disabled, and there is no enable point in the BIOS. BIOS - Phoenix. We will not patch the BIOS, we will patch the NVRAM!
We need:
• Samsung's FW Modules Extractor
• Phoenix BIOS Editor
• SYMCMOS - reader / writer cmos
• NDISASM - disassembler x86 code
• Bootable USB flash drive / floppy disk with DOS
Well, let's get started!
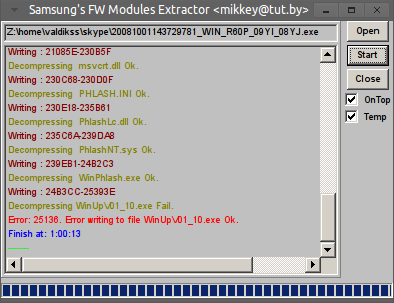
Download firmware from the Samsung website. The firmware comes with one .exe file along with the flasher, you need to get the firmware file itself. We’ll use Samsung’s FW Modules Extractor for this. Not all files have been unpacked, but it doesn’t matter.
Open the firmware in the Phoenix BIOS Editor, collapse it and extract the BIOSCOD * .ROM files from the TEMP Phoenix BIOS Editor folder. He unpacked our firmware. Copy the files to another folder, close the Phoenix BIOS Editor.
The fun begins. Disassemble the files from the firmware, in my case there were 7 (0-6):
Googling it turned out that you need to look for the command mov ecx, 0x3a: Great, the command was found in the BIOSCOD04.dasm file! It can be seen from the code that the value at address 0x66f is written to the ax register, comparisons are made between al and bl, and if both values coincide, we jump to address 0xbee9 - the virtualization disable address. The time has come for SYMCMOS. Create a bootable USB flash drive / floppy disk, write the program to the media, boot and execute
Now we have the nvram.txt file with approximate contents: It can be seen that the value of the parameter responsible for virtualization is set to 0. Change it directly in this file: Again, boot into DOS and execute: Reboot. Ta Dam! Hardware virtualization activated! Interesting links: http://tjworld.net/wiki/Sony/Vaio/FE41Z/HackingBiosNvram - a program for activating VT-x without CMOS firmware for linux http://forum.notebookreview.com/acer/465936-acer-laptop- phoenix-bios-enable-virtualization-test-machine-acer-aspire-9420-a.html - How it all began
We need:
• Samsung's FW Modules Extractor
• Phoenix BIOS Editor
• SYMCMOS - reader / writer cmos
• NDISASM - disassembler x86 code
• Bootable USB flash drive / floppy disk with DOS
Well, let's get started!
Download firmware from the Samsung website. The firmware comes with one .exe file along with the flasher, you need to get the firmware file itself. We’ll use Samsung’s FW Modules Extractor for this. Not all files have been unpacked, but it doesn’t matter.
Open the firmware in the Phoenix BIOS Editor, collapse it and extract the BIOSCOD * .ROM files from the TEMP Phoenix BIOS Editor folder. He unpacked our firmware. Copy the files to another folder, close the Phoenix BIOS Editor.
The fun begins. Disassemble the files from the firmware, in my case there were 7 (0-6):
$ for i in {0..6}; do ndisasm -a -p intel -b 16 BIOSCOD0$i.ROM > BIOSCOD0$i.dasm; doneGoogling it turned out that you need to look for the command mov ecx, 0x3a: Great, the command was found in the BIOSCOD04.dasm file! It can be seen from the code that the value at address 0x66f is written to the ax register, comparisons are made between al and bl, and if both values coincide, we jump to address 0xbee9 - the virtualization disable address. The time has come for SYMCMOS. Create a bootable USB flash drive / floppy disk, write the program to the media, boot and execute
 $ grep 'mov ecx,0x3a' *.dasm

BIOSCOD04.dasm:0000BE99 66B93A000000 mov ecx,0x3a
0000BE99 66B93A000000 mov ecx,0x3a
0000BE9F 0F32 rdmsr
0000BEA1 668BD8 mov ebx,eax
0000BEA4 83E305 and bx,byte +0x5
0000BEA7 B86F06 mov ax,0x66f
0000BEAA 9A355400F0 call word 0xf000:0x5435
0000BEAF C1E002 shl ax,0x2
0000BEB2 40 inc ax
0000BEB3 38D8 cmp al,bl
0000BEB5 7432 jz 0xbee9symcmos -v2 -lNVRAM.TXTNow we have the nvram.txt file with approximate contents: It can be seen that the value of the parameter responsible for virtualization is set to 0. Change it directly in this file: Again, boot into DOS and execute: Reboot. Ta Dam! Hardware virtualization activated! Interesting links: http://tjworld.net/wiki/Sony/Vaio/FE41Z/HackingBiosNvram - a program for activating VT-x without CMOS firmware for linux http://forum.notebookreview.com/acer/465936-acer-laptop- phoenix-bios-enable-virtualization-test-machine-acer-aspire-9420-a.html - How it all began
( SYMBOLIC CMOS EDITOR - Version 643710-035 )


CRC = 350F

(0015) [0000]

(0018) [0001]

(001B) [0001]

(0021) [0000]

(0024) [0001]

(0027) [0001]

(002A) [0000]

(002D) [0001]

(0030) [0000]

(0036) [0000]

(0039) [0000]

(003F) [0001]

(0042) [0000]

...
(066F) [0000]

(0672) [0000]

(0675) [0000]

(0678) [0002]

(067B) [0000]

(067E) [0000]

(0681) [0002]
(066F) [0001]symcmos -v2 -uNVRAM.TXT