Reverse engineering android applications
In this article I will try to talk about reverse engineering applications for android. This process is somewhat different from that for win-applications: there is no debugger and no assembler, instead of them are LogCat and byte code. As you may have guessed, we will investigate the application with the goal of breaking it, or, more simply, “quacking”.
BRIEFING
As an experimental rabbit, I chose the program “Multi Mount SD-Card”. Its essence is to mount the flash drive of the device with simultaneous access to it by the system and the user. The fact is that, by default, android does not have access to the drive currently mounted. For Eclair users, this is not so critical, but Froyo + users who
To begin with, we need a distribution package to break something. But where to get it? After all, for this you need to buy it. Well, or to beg from a person who has already bought. Such a man was the creageFrom the forum w3bsit3-dns.com , which kindly shared the purchased apk.
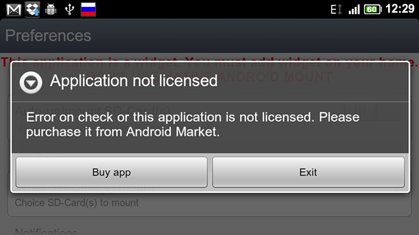
So, we have a distribution kit , we have already installed the program, run ... And then bam! We see a window with an offer to buy a license. It follows that the check goes through the Internet, we try to disconnect - it does not help. The application’s buyer is not given any keys and logins, which tells us about binding to something like a hardware_id or google account. Therefore, we have several hacking options: either hard-code the program with knowingly correct verified information, or cut out from the code all the sections that verify the license’s validity. I chose the second option, because I like it more.
Tools
For work, we need tools. I wanted to talk about them along the way, but still changed my mind and decided to write about everything in advance. Actually, today we need the following list of tools:
Introduction
Before starting, I will explain a little structure of android applications. Each application has a file with the apk extension, packaged by zip. It contains application resources, AndroidManifest.xml and classes.dex. What is the latter? This is the program byte code compiled specifically for the dalvik virtual machine. It is impossible to get clean source code from it in java, but you can get dalvik opcodes - a set of commands for a virtual machine, roughly speaking, this is a local assembler. And you can turn a dex file into a jar, and then decompile it and get more or less readable code in java. What we will do now.
Decompilation
We will carry out all manipulations with apk using the Apk Manger utility. This is a kind of unified front-end for a set of libraries working with apk. Let me remind you that the drivers for the device must be installed and USB-debugging mode is turned on . Let's get started.
- Copy multimount.apk to the apk_manager \ place-apk-here-for-modding folder and run Script.bat. If all is well, a console with green text will appear .
- Need to decompile apk. We select item of the same name 9. We do not close the console after that.
- Open multimount.apk with the archiver and copy the classes.dex file to the dex2jar folder, and then drag it to dex2jar.bat. In Total Commander, drag and drop does not work.
- The classes.dex.dex2jar.jar that appears are opened using jd-gui. The window is not yet closed, it will be needed later.
Start of analysis
For initial information about the application, look at its manifest. From it you can understand that the main activity is settings. So the code offering to buy the application is somewhere there. You can also notice a strange line at the very bottom:
android:name="com.android.vending.CHECK_LICENSE" />
What is this? As Google suggests, this line hints that the application uses LVL , that is, the android license manager. Well, that’s even good, because we have documentation. Having read that, it’s worth understanding that this LVL not only manages licenses, but also exposes the obfuscation code, which will significantly complicate our work.
Well, okay, let's proceed directly to the analysis of the code. We switch to jd-gui, expand the tree, and see three namespaces: the first is something related to advertising, the second is a set of LVL classes, and the third is what we need.
We go into it and see the consequences of obfuscation. Open MultiMountSDCardConfigure, quickly look through the code. A long line with some hash immediately catches your eye. This is a base64 public key. And around it are other lines that check the license. We need to cut them out.
- com.android.vending.licensing.h localh = new com.android.vending.licensing.h(arrayOfByte, str4, str3);
- v localv = new v(this, localh);
- m localm1 = new m(this, localv, "MIIBIjANBgkqhkiG9w0BAQEFAAOCAQ8AMIIBCgKCAQEAg1...");
- f = localm1;
- m localm2 = f;
- j localj = e;
- localm2.a(localj);
Open apk_manager \ projects \ multimount.apk \ smali \ com \ rafoid \ multimountsdcard \ widget \ MultiMountSDCardConfigure.smali and see the bytecode. Before reading further, I advise you first to review the list of commands. We need to find those lines and comment them out. Here they are:
- ...
- #iput-object v1, p0, Lcom/rafoid/multimountsdcard/widget/MultiMountSDCardConfigure;->e:Lcom/android/vending/licensing/j;
-
- #new-instance v1, Lcom/android/vending/licensing/m;
-
- #new-instance v2, Lcom/android/vending/licensing/v;
-
- #new-instance v3, Lcom/android/vending/licensing/h;
-
- #sget-object v4, Lcom/rafoid/multimountsdcard/widget/MultiMountSDCardConfigure;->d:[B
-
- #invoke-virtual {p0}, Lcom/rafoid/multimountsdcard/widget/MultiMountSDCardConfigure;->getPackageName()Ljava/lang/String;
-
- #move-result-object v5
-
- #invoke-direct {v3, v4, v5, v0}, Lcom/android/vending/licensing/h;->
([BLjava/lang/String;Ljava/lang/String;)V -
- #invoke-direct {v2, p0, v3}, Lcom/android/vending/licensing/v;->
(Landroid/content/Context;Lcom/android/vending/licensing/n;)V -
- #const-string v0, "MIIBIjANBgkqhkiG9w0BAQEFAAOCAQ8AMIIBCg..."
-
- #invoke-direct {v1, p0, v2, v0}, Lcom/android/vending/licensing/m;->
(Landroid/content/Context;Lcom/android/vending/licensing/k;Ljava/lang/String;)V -
- #iput-object v1, p0, Lcom/rafoid/multimountsdcard/widget/MultiMountSDCardConfigure;->f:Lcom/android/vending/licensing/m;
-
- #iget-object v0, p0, Lcom/rafoid/multimountsdcard/widget/MultiMountSDCardConfigure;->f:Lcom/android/vending/licensing/m;
-
- #iget-object v1, p0, Lcom/rafoid/multimountsdcard/widget/MultiMountSDCardConfigure;->e:Lcom/android/vending/licensing/j;
-
- #invoke-virtual {v0, v1}, Lcom/android/vending/licensing/m;->a(Lcom/android/vending/licensing/j;)V
- ...
We shorten, save. It seems like everything can be used. It remains only to compile and install.
Compilation and installation
To do this, we will use the already familiar Apk Manager.
- If you have not yet closed the console window, switch to it and select item 14. The script itself will compile, sign and install apk on the device.
- We launch the application and see that now we are not offered to buy anything, but the window with the verification process hangs and does not close.
Analysis again
Now we need to detect and remove the code showing the dialog we do not need. Switch to jd-gui and find the following lines a little higher:
- rogressDialog localProgressDialog = ProgressDialog.show(this, str1, str2, 1, 0);
- b = localProgressDialog;
Now you need to find them in MultiMountSDCardConfigure.smali. Here they are:
- ...
- #invoke-static {p0, v0, v1, v6, v7}, Landroid/app/ProgressDialog;->show(Landroid/content/Context;Ljava/lang/CharSequence;Ljava/lang/CharSequence;ZZ)Landroid/app/ProgressDialog;
-
- #move-result-object v0
-
- #iput-object v0, p0, Lcom/rafoid/multimountsdcard/widget/MultiMountSDCardConfigure;->b:Landroid/app/ProgressDialog;
- ...
We commit, save, compile, install, run. Hurrah! Everything works. But after a short test, we understand that not everything works, namely the auto-mount function. Switch to jd-gui, open MultiMountSDCardWidget $ UpdateService and see the following curved code:
-
- if (MultiMountSDCardWidget.b.booleanValue());
- int j;
- for (int i = 0; ; j = 1)
- {
- Boolean localBoolean = Boolean.valueOf(i);
- RemoteViews localRemoteViews = MultiMountSDCardWidget.a(this, localBoolean);
- Class localClass = MultiMountSDCardWidget.a;
- ComponentName localComponentName = new ComponentName(this, localClass);
- AppWidgetManager.getInstance(this).updateAppWidget(localComponentName, localRemoteViews);
- return;
- }
-
It is this service that is responsible for auto-mounting. At the very beginning we see some kind of check, as a result of which this mount is performed. The code checks the variable b from the main activity, the same variable whose declaration we commented out, deleting the dialog. We will do the same with this test - we will comment it to hell.
This time, open MultiMountSDCardWidget $ UpdateService.smali and close the following lines:
- ...
- .method public onStart(Landroid/content/Intent;I)V
- .locals 3
-
- #sget-object v0, Lcom/rafoid/multimountsdcard/widget/MultiMountSDCardWidget;->b:Ljava/lang/Boolean;
-
- #invoke-virtual {v0}, Ljava/lang/Boolean;->booleanValue()Z
-
- #move-result v0
-
- #if-eqz v0, :cond_0
-
- const/4 v0, 0x0
-
- :goto_0
- invoke-static {v0}, Ljava/lang/Boolean;->valueOf(Z)Ljava/lang/Boolean;
-
- move-result-object v0
-
- invoke-static {p0, v0}, Lcom/rafoid/multimountsdcard/widget/MultiMountSDCardWidget;->a(Landroid/content/Context;Ljava/lang/Boolean;)Landroid/widget/RemoteViews;
-
- move-result-object v0
-
- new-instance v1, Landroid/content/ComponentName;
-
- sget-object v2, Lcom/rafoid/multimountsdcard/widget/MultiMountSDCardWidget;->a:Ljava/lang/Class;
-
- invoke-direct {v1, p0, v2}, Landroid/content/ComponentName;->
(Landroid/content/Context;Ljava/lang/Class;)V -
- invoke-static {p0}, Landroid/appwidget/AppWidgetManager;->getInstance(Landroid/content/Context;)Landroid/appwidget/AppWidgetManager;
-
- move-result-object v2
-
- invoke-virtual {v2, v1, v0}, Landroid/appwidget/AppWidgetManager;->updateAppWidget(Landroid/content/ComponentName;Landroid/widget/RemoteViews;)V
-
- return-void
-
- #:cond_0
-
- const/4 v0, 0x1
-
- goto :goto_0
- .end method
- ...
We launch and rejoice that we saved as much as 30 rubles on the purchase of this useful program.
Notes
The process is described entirely for Windows, but can easily be repeated on Linux, since all the necessary libraries are cross-platform.
After writing this article, I came across this hacking method, but, as I understand it, it is relevant for early versions of LVL.
All information is provided for informational purposes only. And also for developers, in order to improve software protection.